Note
Access to this page requires authorization. You can try signing in or changing directories.
Access to this page requires authorization. You can try changing directories.
Overview
In this tutorial, you add push notifications to the Android quick start project so that a push notification is sent to the device every time a record is inserted.
If you do not use the downloaded quick start server project, you need the push notification extension package. For more information, see Work with the .NET backend server SDK for Azure Mobile Apps.
Prerequisites
You need the following:
An IDE, depending on your project's back end:
- Android Studio if this app has a Node.js back end.
- Visual Studio Community 2013 or later if this app has a Microsoft .NET back end.
Android 2.3 or later, Google Repository revision 27 or later, and Google Play Services 9.0.2 or later for Firebase Cloud Messaging.
Complete the Android quick start.
Create a project that supports Firebase Cloud Messaging
Sign in to the Firebase console. Create a new Firebase project if you don't already have one.
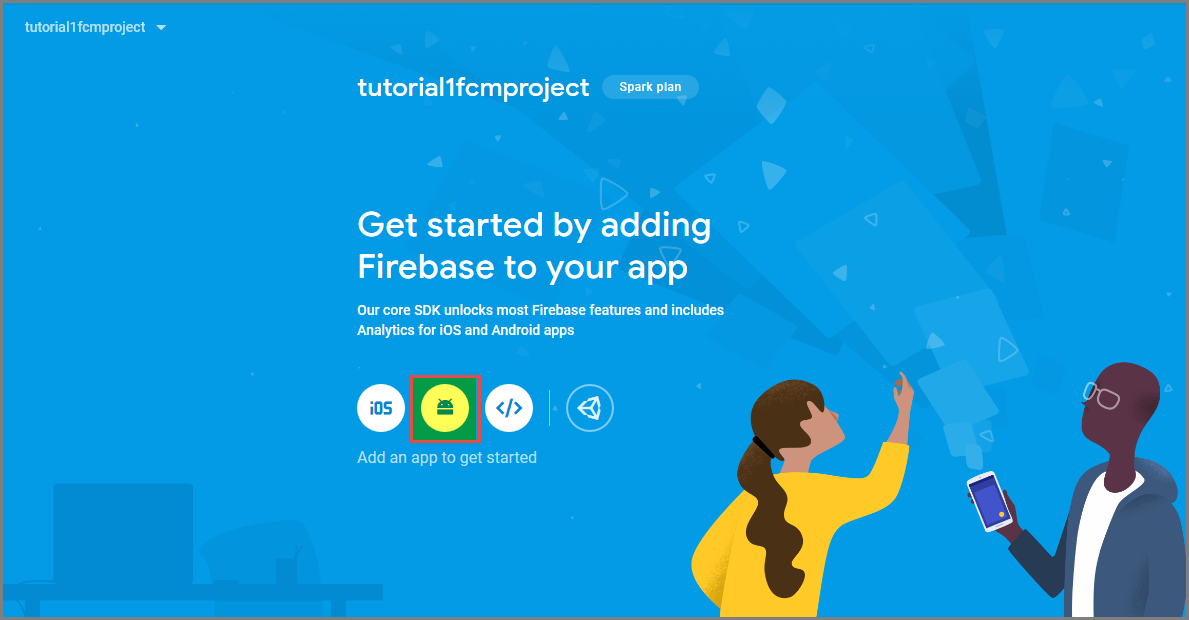
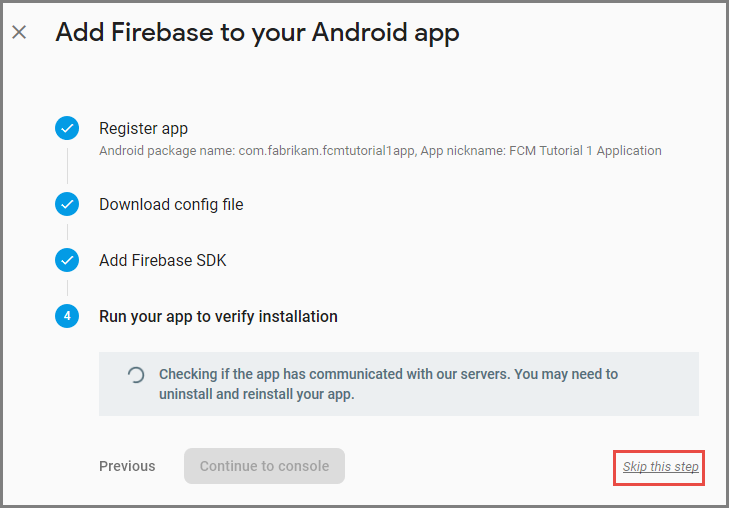
After you create your project, select Add Firebase to your Android app.
On the Add Firebase to your Android app page, take the following steps:
For Android package name, copy the value of your applicationId in your application's build.gradle file. In this example, it's
com.fabrikam.fcmtutorial1app.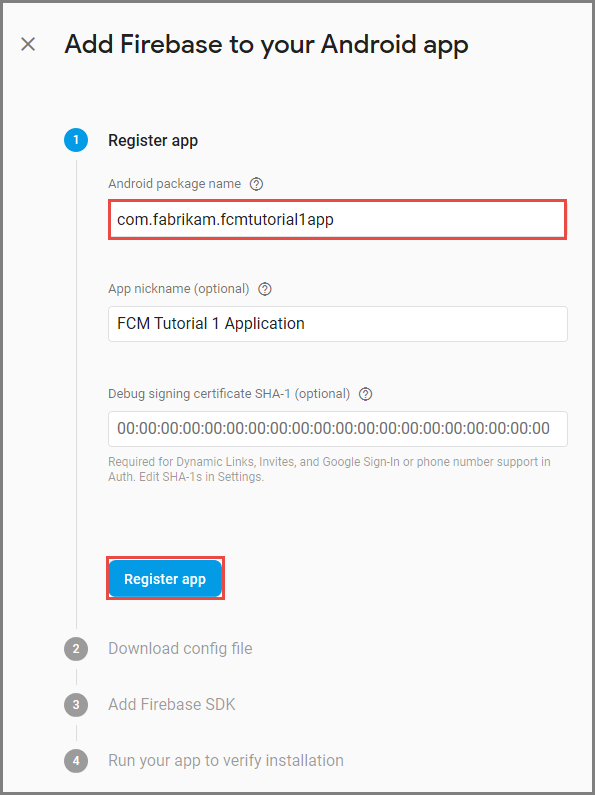
Select Register app.
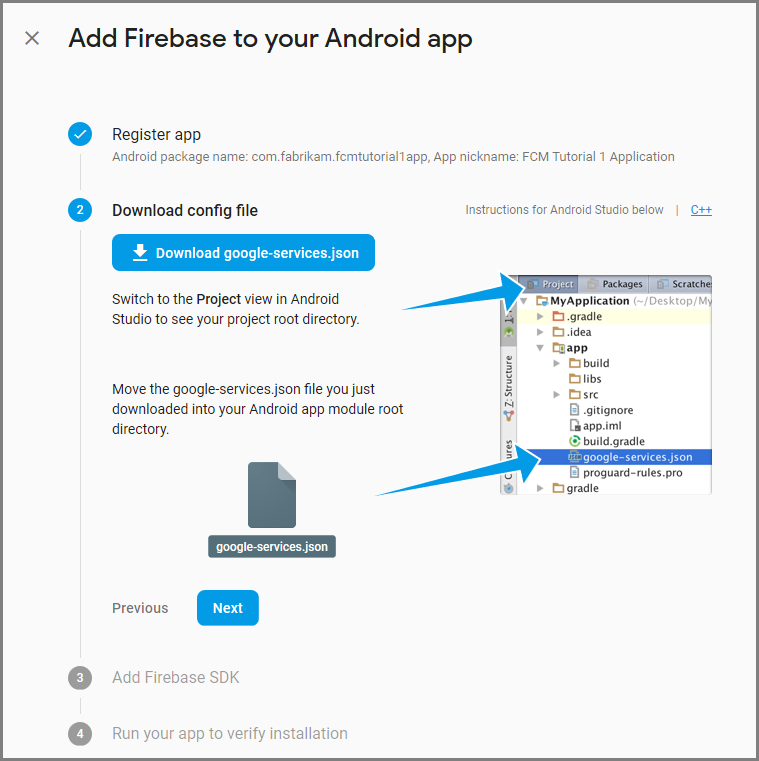
Select Download google-services.json, save the file into the app folder of your project, and then select Next.
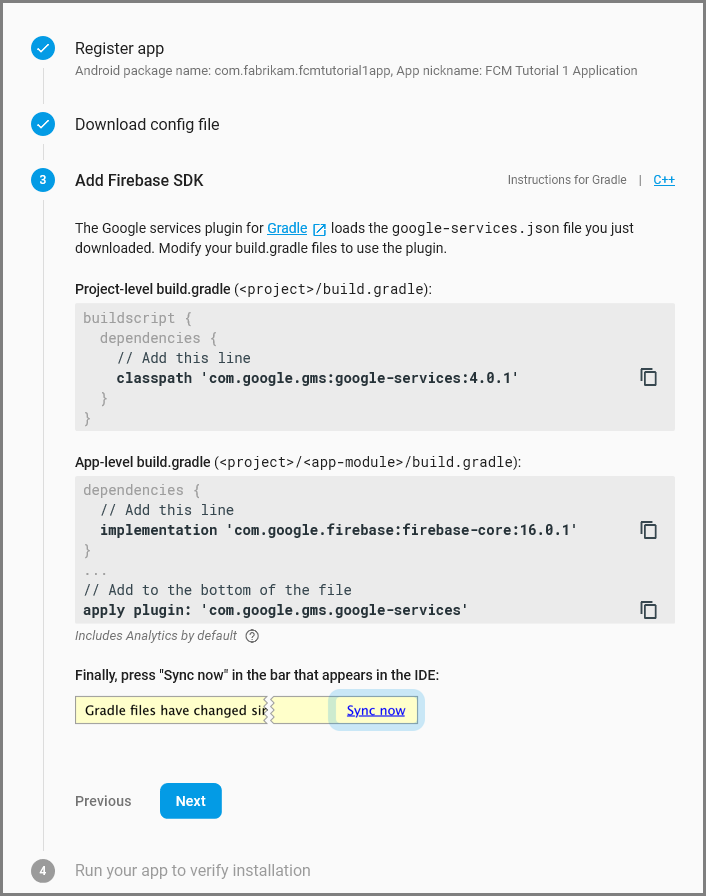
Make the following configuration changes to your project in Android Studio.
In your project-level build.gradle file (<project>/build.gradle), add the following statement to the dependencies section.
classpath 'com.google.gms:google-services:4.0.1'In your app-level build.gradle file (<project>/<app-module>/build.gradle), add the following statements to the dependencies section.
implementation 'com.google.firebase:firebase-core:16.0.8'
implementation 'com.google.firebase:firebase-messaging:17.3.4'
Add the following line to the end of the app-level build.gradle file after the dependencies section.
apply plugin: 'com.google.gms.google-services'Select Sync now on the toolbar.
Select Next.
Select Skip this step.
In the Firebase console, select the cog for your project. Then select Project Settings.
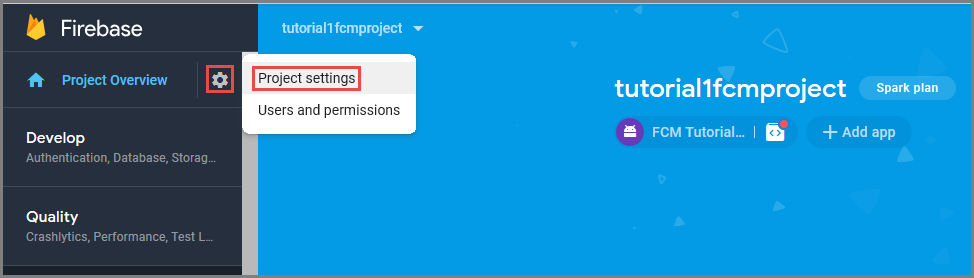
If you haven't downloaded the google-services.json file into the app folder of your Android Studio project, you can do so on this page.
Switch to the Cloud Messaging tab at the top.
Copy and save the Server key for later use. You use this value to configure your hub.
Configure a notification hub
The Mobile Apps feature of Azure App Service uses Azure Notification Hubs to send pushes, so you will be configuring a notification hub for your mobile app.
In the Azure portal, go to App Services, and then select your app back end. Under Settings, select Push.
To add a notification hub resource to the app, select Connect. You can either create a hub or connect to an existing one.
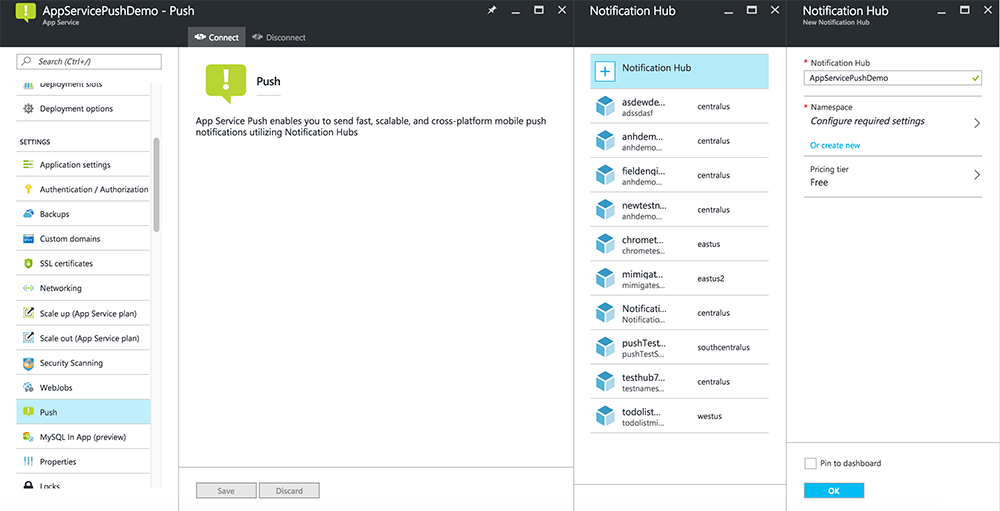
Now you have connected a notification hub to your Mobile Apps back-end project. Later you configure this notification hub to connect to a platform notification system (PNS) to push to devices.
Configure Azure to send push notifications
In the Azure portal, click Browse All > App Services, and then click your Mobile Apps back end. Under Settings, click App Service Push, and then click your notification hub name.
Go to Google (GCM), enter the Server Key value that you obtained from Firebase in the previous procedure, and then click Save.
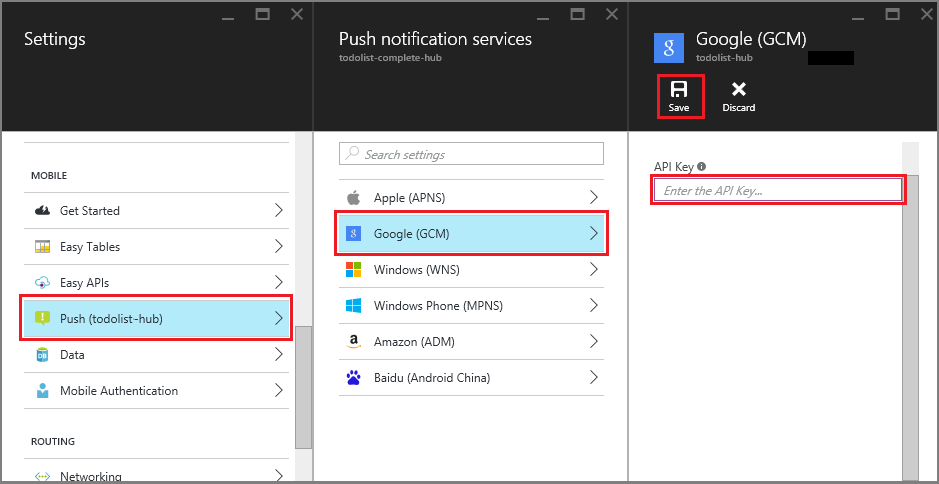
The Mobile Apps back end is now configured to use Firebase Cloud Messaging. This enables you to send push notifications to your app running on an Android device, by using the notification hub.
Enable push notifications for the server project
Use the procedure that matches your back-end project type—either .NET back end or Node.js back end.
.NET back-end project
In Visual Studio, right-click the server project, and click Manage NuGet Packages. Search for
Microsoft.Azure.NotificationHubs, and then click Install. This installs the Notification Hubs client library.In the Controllers folder, open TodoItemController.cs and add the following
usingstatements:using Microsoft.Azure.Mobile.Server.Config; using Microsoft.Azure.NotificationHubs;Replace the
PostTodoItemmethod with the following code:public async Task<IHttpActionResult> PostTodoItem(TodoItem item) { TodoItem current = await InsertAsync(item); // Get the settings for the server project. HttpConfiguration config = this.Configuration; MobileAppSettingsDictionary settings = this.Configuration.GetMobileAppSettingsProvider().GetMobileAppSettings(); // Get the Notification Hubs credentials for the Mobile App. string notificationHubName = settings.NotificationHubName; string notificationHubConnection = settings .Connections[MobileAppSettingsKeys.NotificationHubConnectionString].ConnectionString; // Create a new Notification Hub client. NotificationHubClient hub = NotificationHubClient .CreateClientFromConnectionString(notificationHubConnection, notificationHubName); // Android payload var androidNotificationPayload = "{ \"data\" : {\"message\":\"" + item.Text + "\"}}"; try { // Send the push notification and log the results. var result = await hub.SendGcmNativeNotificationAsync(androidNotificationPayload); // Write the success result to the logs. config.Services.GetTraceWriter().Info(result.State.ToString()); } catch (System.Exception ex) { // Write the failure result to the logs. config.Services.GetTraceWriter() .Error(ex.Message, null, "Push.SendAsync Error"); } return CreatedAtRoute("Tables", new { id = current.Id }, current); }Republish the server project.
Node.js back-end project
Set up your backend project.
Replace the existing code in the todoitem.js file with the following:
var azureMobileApps = require('azure-mobile-apps'),
promises = require('azure-mobile-apps/src/utilities/promises'),
logger = require('azure-mobile-apps/src/logger');

var table = azureMobileApps.table();

table.insert(function (context) {
// For more information about the Notification Hubs JavaScript SDK,
// see https://aka.ms/nodejshubs
logger.info('Running TodoItem.insert');

// Define the GCM payload.
var payload = {
    "data": {
        "message": context.item.text
    }
};

// Execute the insert.  The insert returns the results as a Promise,
// Do the push as a post-execute action within the promise flow.
return context.execute()
    .then(function (results) {
        // Only do the push if configured
        if (context.push) {
            // Send a GCM native notification.
            context.push.gcm.send(null, payload, function (error) {
                if (error) {
                    logger.error('Error while sending push notification: ', error);
                } else {
                    logger.info('Push notification sent successfully!');
                }
            });
        }
        // Don't forget to return the results from the context.execute()
        return results;
    })
    .catch(function (error) {
        logger.error('Error while running context.execute: ', error);
    });
});

module.exports = table;
This sends a GCM notification that contains the item.text when a new todo item is inserted.
When editing the file in your local computer, republish the server project.
Add push notifications to your app
In this section, you update your client Android app to handle push notifications.
Verify Android SDK version
Because of ongoing development, the Android SDK version installed in Android Studio might not match the version in the code. The Android SDK referenced in this tutorial is version 26, the latest at the time of writing. The version number may increase as new releases of the SDK appear, and we recommend using the latest version available.
Two symptoms of version mismatch are:
- When you build or rebuild the project, you may get Gradle error messages like
Gradle sync failed: Failed to find target with hash string 'android-XX'. - Standard Android objects in code that should resolve based on
importstatements may be generating error messages.
If either of these appears, the version of the Android SDK installed in Android Studio might not match the SDK target of the downloaded project. To verify the version, make the following changes:
In Android Studio, click Tools > Android > SDK Manager. If you have not installed the latest version of the SDK Platform, then click to install it. Make a note of the version number.
On the Project Explorer tab, under Gradle Scripts, open the file build.gradle (Module: app). Ensure that the compileSdkVersion and targetSdkVersion are set to the latest SDK version installed. The
build.gradlemight look like this:android { compileSdkVersion 26 defaultConfig { targetSdkVersion 26 } }
Your next step is to install Google Play services. Firebase Cloud Messaging has some minimum API level requirements for development and testing, which the minSdkVersion property in the manifest must conform to.
If you are testing with an older device, consult Add Firebase to Your Android Project to determine how low you can set this value, and set it appropriately.
Add Firebase Cloud Messaging to the project
In Android Studio, choose File > Project Structure. Select Notifications, select Firebase Cloud Messaging, and then click OK.
Add code
In your app project, open the file
AndroidManifest.xml. Add the following code after theapplicationopening tag:<service android:name=".ToDoMessagingService"> <intent-filter> <action android:name="com.google.firebase.MESSAGING_EVENT"/> </intent-filter> </service> <service android:name=".ToDoInstanceIdService"> <intent-filter> <action android:name="com.google.firebase.INSTANCE_ID_EVENT"/> </intent-filter> </service>Open the file
ToDoActivity.java, and make following changes:Add the import statement:
import com.google.firebase.iid.FirebaseInstanceId;Change the definition of
MobileServiceClientfrom private to private static, so it now looks like this:private static MobileServiceClient mClient;Add
registerPushmethod:public static void registerPush() { final String token = FirebaseInstanceId.getInstance().getToken(); if (token != null) { new AsyncTask<Void, Void, Void>() { protected Void doInBackground(Void... params) { mClient.getPush().register(token); return null; } }.execute(); } }Update the onCreate method of the
ToDoActivityclass. Make sure to add this code after theMobileServiceClientis instantiated.registerPush();
Add a new class to handle notifications. In Project Explorer, open the app > java > your-project-namespace nodes, and right-click the package name node. Click New, and then click Java Class. In Name, type
ToDoMessagingService, and then click OK. Then, replace the class declaration with:import android.app.Notification; import android.app.NotificationManager; import android.app.PendingIntent; import android.content.Context; import android.content.Intent; import com.google.firebase.messaging.FirebaseMessagingService; import com.google.firebase.messaging.RemoteMessage; public class ToDoMessagingService extends FirebaseMessagingService { private static final int NOTIFICATION_ID = 1; @Override public void onMessageReceived(RemoteMessage remoteMessage) { String message = remoteMessage.getData().get("message"); if (message != null) { sendNotification("Notification Hub Demo", message); } } private void sendNotification(String title, String messageBody) { PendingIntent contentIntent = PendingIntent.getActivity(this, 0, new Intent(this, ToDoActivity.class), 0); Notification.Builder notificationBuilder = new Notification.Builder(this) .setSmallIcon(R.drawable.ic_launcher) .setContentTitle(title) .setContentText(messageBody) .setContentIntent(contentIntent); NotificationManager notificationManager = (NotificationManager) getSystemService(Context.NOTIFICATION_SERVICE); if (notificationManager != null) { notificationManager.notify(NOTIFICATION_ID, notificationBuilder.build()); } } }Add another class to handle token updates. Create
ToDoInstanceIdServicejava class and replace the class declaration with:import com.google.firebase.iid.FirebaseInstanceIdService; public class ToDoInstanceIdService extends FirebaseInstanceIdService { @Override public void onTokenRefresh() { ToDoActivity.registerPush(); } }
Your app is now updated to support push notifications.
Test the app against the published mobile service
You can test the app by directly attaching an Android phone with a USB cable, or by using a virtual device in the emulator.
Next steps
Now that you completed this tutorial, consider continuing on to one of the following tutorials:
- Add authentication to your Android app. Learn how to add authentication to the todolist quickstart project on Android using a supported identity provider.
- Enable offline sync for your Android app. Learn how to add offline support to your app by using a Mobile Apps back end. With offline sync, users can interact with a mobile app—viewing, adding, or modifying data—even when there is no network connection.