Note
Access to this page requires authorization. You can try signing in or changing directories.
Access to this page requires authorization. You can try changing directories.
This article provides detailed information and examples that show how to work with a Node.js back end in the Mobile Apps feature of Azure App Service.
Introduction
Mobile Apps provides the capability to add a mobile-optimized data access Web API to a web application. The Mobile Apps SDK is provided for ASP.NET and Node.js web applications. The SDK provides the following operations:
- Table operations (read, insert, update, delete) for data access
- Custom API operations
Both operations provide for authentication across all identity providers that Azure App Service allows. These providers include social identity providers such as Facebook, Twitter, Google, and Microsoft, as well as Azure Active Directory for enterprise identity.
You can find samples for each use case in the samples directory on GitHub.
Supported platforms
The Mobile Apps Node.js SDK supports the current LTS release of Node and later. Currently, the latest LTS version is Node v4.5.0. Other versions of Node might work but are not supported.
The Mobile Apps Node.js SDK supports two database drivers:
- The node-mssql driver supports Azure SQL Database and local SQL Server instances.
- The sqlite3 driver supports SQLite databases on a single instance only.
Create a basic Node.js back end by using the command line
Every Mobile Apps Node.js back end starts as an ExpressJS application. ExpressJS is the most popular web service framework available for Node.js. You can create a basic Express application as follows:
In a command or PowerShell window, create a directory for your project:
mkdir basicappRun
npm initto initialize the package structure:cd basicapp npm initThe
npm initcommand asks a set of questions to initialize the project. See the example output: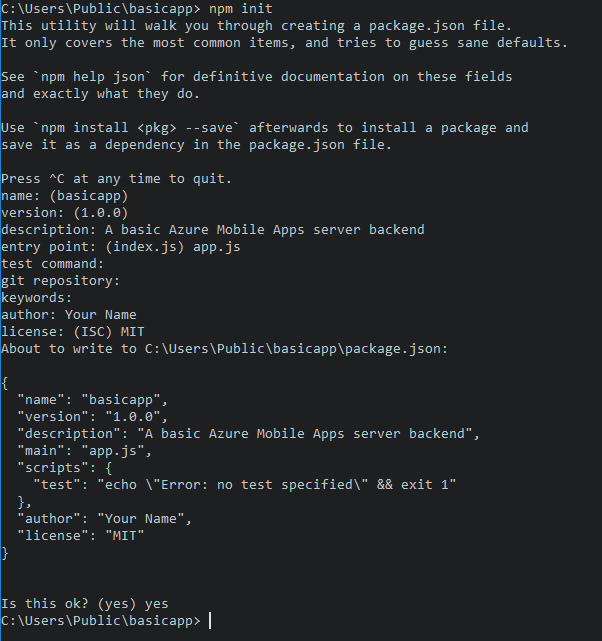
Install the
expressandazure-mobile-appslibraries from the npm repository:npm install --save express azure-mobile-appsCreate an app.js file to implement the basic mobile server:
var express = require('express'),
    azureMobileApps = require('azure-mobile-apps');

var app = express(),
    mobile = azureMobileApps();

// Define a TodoItem table.
mobile.tables.add('TodoItem');

// Add the Mobile API so it is accessible as a Web API.
app.use(mobile);

// Start listening on HTTP.
app.listen(process.env.PORT || 3000);
This application creates a mobile-optimized Web API with a single endpoint (/tables/TodoItem) that provides
unauthenticated access to an underlying SQL data store by using a dynamic schema. It is suitable for following the
client library quickstarts:
- Android client quickstart
- Apache Cordova client quickstart
- iOS Client quickstart
- Windows Store client quickstart
- Xamarin.iOS client quickstart
- Xamarin.Android client quickstart
- Xamarin.Forms client quickstart
You can find the code for this basic application in the basicapp sample on GitHub.
Create a Node.js back end by using Visual Studio 2015
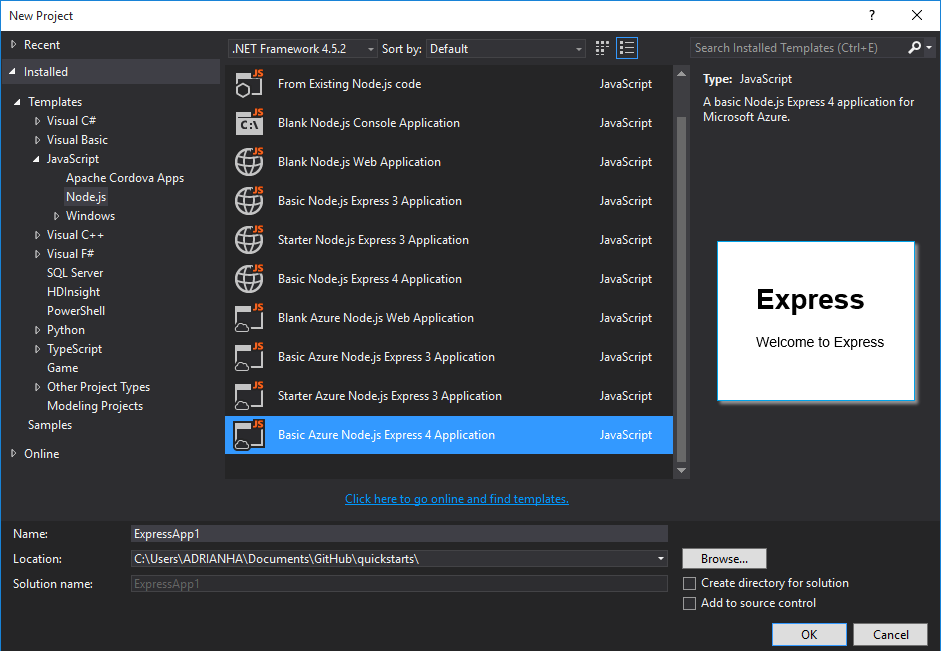
Visual Studio 2015 requires an extension to develop Node.js applications within the IDE. To start, install the Node.js Tools 1.1 for Visual Studio. When you finish the installation, create an Express 4.x application:
Open the New Project dialog box (from File > New > Project).
Expand Templates > JavaScript > Node.js.
Select Basic Azure Node.js Express 4 Application.
Fill in the project name. Select OK.
Right-click the npm node and select Install New npm packages.
You might need to refresh the npm catalog after you create your first Node.js application. Select Refresh if necessary.
Enter azure-mobile-apps in the search box. Select the azure-mobile-apps 2.0.0 package, and then select Install Package.
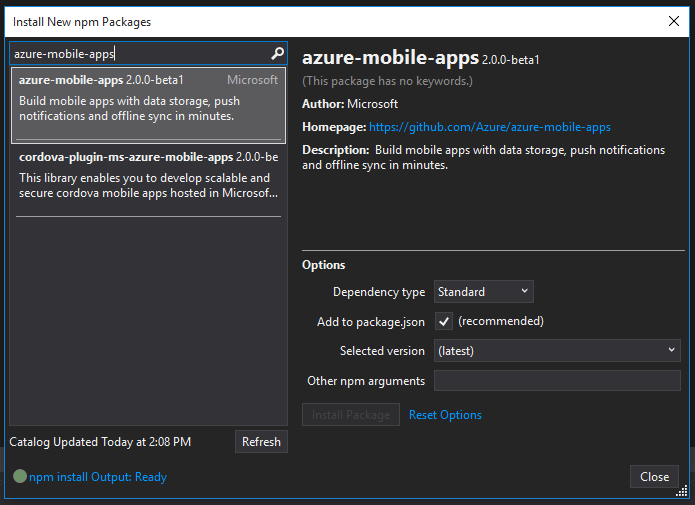
Select Close.
Open the app.js file to add support for the Mobile Apps SDK. At line 6 at the bottom of the library
requirestatements, add the following code:var bodyParser = require('body-parser'); var azureMobileApps = require('azure-mobile-apps');At approximately line 27 after the other
app.usestatements, add the following code:app.use('/users', users); // Mobile Apps initialization var mobile = azureMobileApps(); mobile.tables.add('TodoItem'); app.use(mobile);Save the file.
Either run the application locally (the API is served on
https://localhost:3000) or publish to Azure.
Create a Node.js back end by using the Azure portal
You can create a Mobile Apps back end right in the Azure portal. You can either complete the following steps or create a client and server together by following the Create a mobile app tutorial. The tutorial contains a simplified version of these instructions and is best for proof-of-concept projects.
Sign in at the Azure portal.
Select +NEW > Web + Mobile > Mobile App, and then provide a name for your Mobile Apps back end.
For Resource Group, select an existing resource group, or create a new one (by using the same name as your app).
For App Service plan, the default plan (in the Standard tier) is selected. You can also select a different plan, or create a new one.
The App Service plan's settings determine the location, features, cost, and compute resources associated with your app. For more about App Service plans and how to create a new plan in a different pricing tier and in your desired location, see Azure App Service plans in-depth overview.
Select Create. This step creates the Mobile Apps back end.
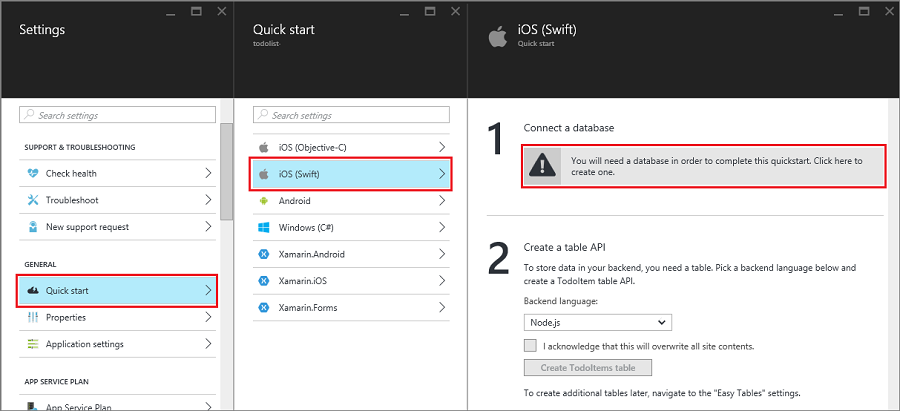
In the Settings pane for the new Mobile Apps back end, select Quick start > your client app platform > Connect a database.
In the Add data connection pane, select SQL Database > Create a new database. Enter the database name, choose a pricing tier, and then select Server. You can reuse this new database. If you already have a database in the same location, you can instead choose Use an existing database. We don't recommend the use of a database in a different location, due to bandwidth costs and higher latency.

In the New server pane, enter a unique server name in the Server name box, provide a login and password, select Allow Azure services to access server, and select OK. This step creates the new database.
Back in the Add data connection pane, select Connection string, enter the login and password values for your database, and select OK.
Wait a few minutes for the database to be deployed successfully before you proceed.
Back in the Get started pane, under Create a table API, choose Node.js as your back-end language. Select the box for I acknowledge that this will overwrite all site contents, and then select Create TodoItem table.
Download the Node.js back-end quickstart code project by using Git
When you create a Node.js Mobile Apps back end by using the portal's Quick start pane, a Node.js project is created for you and deployed to your site. In the portal, you can add tables and APIs, and edit code files for the Node.js back end. You can also use various deployment tools to download the back-end project so that you can add or modify tables and APIs, and then republish the project. For more information, see the Azure App Service deployment guide.
The following procedure uses a Git repository to download the quickstart project code:
Install Git, if you haven't already done so. The steps required to install Git vary between operating systems. For operating system-specific distributions and installation guidance, see Installing Git.
See Prepare your repository to enable the Git repository for your back-end site. Make a note of the deployment username and password.
In the pane for your Mobile Apps back end, make a note of the Git clone URL setting.
Execute the
git clonecommand by using the Git clone URL. Enter your password when required, as in the following example:$ git clone https://username@todolist.scm.azurewebsites.net:443/todolist.gitBrowse to the local directory (
/todolistin the preceding example), and notice that project files have been downloaded. Locate the todoitem.json file in the/tablesdirectory. This file defines permissions on the table. Also find the todoitem.js file in the same directory. It defines the CRUD operation scripts for the table.After you make changes to project files, run the following commands to add, commit, and then upload the changes to the site:
 $ git commit -m "updated the table script"
 $ git push origin master
When you add new files to the project, you first need to run the
git add .command.
The site is republished every time a new set of commits is pushed to the site.
Publish your Node.js back end to Azure
Microsoft Azure provides many mechanisms for publishing your Mobile Apps Node.js back end to the Azure service. These mechanisms include deployment tools integrated into Visual Studio, command-line tools, and continuous deployment options based on source control. For more information, see the Azure App Service deployment guide.
Azure App Service has specific advice for Node.js applications that you should review before you publish the back end:
- How to specify the Node version
- How to use Node modules
Enable a home page for your application
Many applications are a combination of web and mobile apps. You can use the ExpressJS framework to combine the two facets. Sometimes, however, you might want to only implement a mobile interface. It's useful to provide a home page to ensure that the app service is up and running. You can either provide your own home page or enable a temporary home page. To enable a temporary home page, use the following code to instantiate Mobile Apps:
var mobile = azureMobileApps({ homePage: true });
If you only want this option available when developing locally, you can add this setting to your azureMobile.js file.
Table operations
The azure-mobile-apps Node.js Server SDK provides mechanisms to expose data tables stored in Azure SQL Database as a Web API. It provides five operations:
| Operation | Description |
|---|---|
| GET /tables/tablename | Get all records in the table. |
| GET /tables/tablename/:id | Get a specific record in the table. |
| POST /tables/tablename | Create a record in the table. |
| PATCH /tables/tablename/:id | Update a record in the table. |
| DELETE /tables/tablename/:id | Delete a record in the table. |
This Web API supports OData and extends the table schema to support offline data sync.
Define tables by using a dynamic schema
Before you can use a table, you must define it. You can define tables by using a static schema (where you define the columns in the schema) or dynamically (where the SDK controls the schema based on incoming requests). In addition, you can control specific aspects of the Web API by adding JavaScript code to the definition.
As a best practice, you should define each table in a JavaScript file in the tables directory, and then use the
tables.import() method to import the tables. Extending the basic-app sample, you would adjust the app.js file:
var express = require('express'),
    azureMobileApps = require('azure-mobile-apps');

var app = express(),
    mobile = azureMobileApps();

// Define the database schema that is exposed.
mobile.tables.import('./tables');

// Provide initialization of any tables that are statically defined.
mobile.tables.initialize().then(function () {
    // Add the Mobile API so it is accessible as a Web API.
    app.use(mobile);

    // Start listening on HTTP.
    app.listen(process.env.PORT || 3000);
});
Define the table in ./tables/TodoItem.js:
var azureMobileApps = require('azure-mobile-apps');

var table = azureMobileApps.table();

// Additional configuration for the table goes here.

module.exports = table;
Tables use a dynamic schema by default. To turn off the dynamic schema globally, set the MS_DynamicSchema app setting to false in the Azure portal.
You can find a complete example in the todo sample on GitHub.
Define tables by using a static schema
You can explicitly define the columns to expose via the Web API. The azure-mobile-apps Node.js SDK automatically
adds any extra columns required for offline data sync to the list that you provide. For example, the
quickstart client applications require a table with two columns: text (a string) and complete (a Boolean).
The table can be defined in the table definition JavaScript file (located in the tables directory) as follows:
var azureMobileApps = require('azure-mobile-apps');

var table = azureMobileApps.table();

// Define the columns within the table.
table.columns = {
    "text": "string",
    "complete": "boolean"
};

// Turn off the dynamic schema.
table.dynamicSchema = false;

module.exports = table;
If you define tables statically, you must also call the tables.initialize() method to create the database
schema on startup. The tables.initialize() method returns a promise so that the web service does not serve
requests before the database is initialized.
Use SQL Server Express as a development data store on your local machine
The Mobile Apps Node.js SDK provides three options for serving data out of the box:
- Use the memory driver to provide a non-persistent example store.
- Use the mssql driver to provide a SQL Server Express data store for development.
- Use the mssql driver to provide an Azure SQL Database data store for production.
The Mobile Apps Node.js SDK uses the mssql Node.js package to establish and use a connection to both SQL Server Express and SQL Database. This package requires that you enable TCP connections on your SQL Server Express instance.
Tip
The memory driver does not provide a complete set of facilities for testing. If you want to test your back end locally, we recommend the use of a SQL Server Express data store and the mssql driver.
Download and install Microsoft SQL Server 2014 Express. Ensure that you install the SQL Server 2014 Express with Tools edition. Unless you explicitly require 64-bit support, the 32-bit version consumes less memory when running.
Run SQL Server 2014 Configuration Manager:
a. Expand the SQL Server Network Configuration node in the tree menu.
b. Select Protocols for SQLEXPRESS.
c. Right-click TCP/IP and select Enable. Select OK in the pop-up dialog box.
d. Right-click TCP/IP and select Properties.
e. Select the IP Addresses tab.
f. Find the IPAll node. In the TCP Port field, enter 1433.
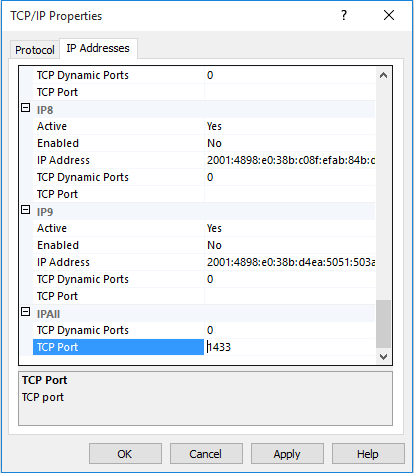
g. Select OK. Select OK in the pop-up dialog box.
h. Select SQL Server Services in the tree menu.
i. Right-click SQL Server (SQLEXPRESS) and select Restart.
j. Close SQL Server 2014 Configuration Manager.
Run SQL Server 2014 Management Studio and connect to your local SQL Server Express instance:
Right-click your instance in Object Explorer and select Properties.
Select the Security page.
Ensure that SQL Server and Windows Authentication mode is selected.
Select OK.

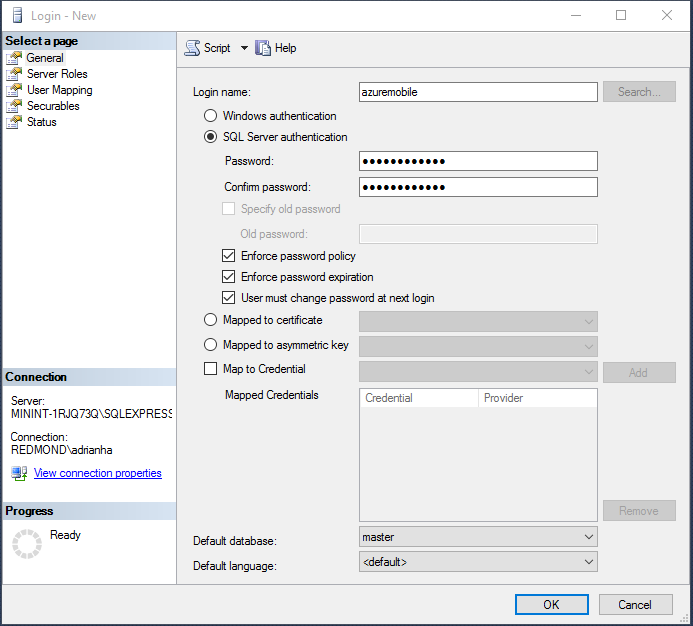
Expand Security > Logins in Object Explorer.
Right-click Logins and select New Login.
Enter a login name. Select SQL Server authentication. Enter a password, and then enter the same password in Confirm password. The password must meet Windows complexity requirements.
Select OK.
Right-click your new login and select Properties.
Select the Server Roles page.
Select the check box for the dbcreator server role.
Select OK.
Close SQL Server 2015 Management Studio.
Be sure to record the username and password that you selected. You might need to assign additional server roles or permissions, depending on your database requirements.
The Node.js application reads the SQLCONNSTR_MS_TableConnectionString environment variable for
the connection string for this database. You can set this variable in your environment. For example,
you can use PowerShell to set this environment variable:
$env:SQLCONNSTR_MS_TableConnectionString = "Server=127.0.0.1; Database=mytestdatabase; User Id=azuremobile; Password=T3stPa55word;"
Access the database through a TCP/IP connection. Provide a username and password for the connection.
Configure your project for local development
Mobile Apps reads a JavaScript file called azureMobile.js from the local file system. Do not use this file to configure the Mobile Apps SDK in production. Instead, use App settings in the Azure portal.
The azureMobile.js file should export a configuration object. The most common settings are:
- Database settings
- Diagnostic logging settings
- Alternate CORS settings
This example azureMobile.js file implements the preceding database settings:
module.exports = {
    cors: {
        origins: [ 'localhost' ]
    },
    data: {
        provider: 'mssql',
        server: '127.0.0.1',
        database: 'mytestdatabase',
        user: 'azuremobile',
        password: 'T3stPa55word'
    },
    logging: {
        level: 'verbose'
    }
};
We recommend that you add azureMobile.js to your .gitignore file (or other source code control ignore file) to prevent passwords from being stored in the cloud. Always configure production settings in App settings within the Azure portal.
Configure app settings for your mobile app
Most settings in the azureMobile.js file have an equivalent app setting in the Azure portal. Use the following list to configure your app in App settings:
| App setting | azureMobile.js setting | Description | Valid values |
|---|---|---|---|
| MS_MobileAppName | name | Name of the app | string |
| MS_MobileLoggingLevel | logging.level | Minimum log level of messages to log | error, warning, info, verbose, debug, silly |
| MS_DebugMode | debug | Enables or disables debug mode | true, false |
| MS_TableSchema | data.schema | Default schema name for SQL tables | string (default: dbo) |
| MS_DynamicSchema | data.dynamicSchema | Enables or disables debug mode | true, false |
| MS_DisableVersionHeader | version (set to undefined) | Disables the X-ZUMO-Server-Version header | true, false |
| MS_SkipVersionCheck | skipversioncheck | Disables the client API version check | true, false |
To set an app setting:
- Sign in to the Azure portal.
- Select All resources or App Services, and then select the name of your mobile app.
- The Settings pane opens by default. If it doesn't, select Settings.
- On the GENERAL menu, select Application settings.
- Scroll to the App settings section.
- If your app setting already exists, select the value of the app setting to edit the value. If your app setting does not exist, enter the app setting in the Key box and the value in the Value box.
- Select Save.
Changing most app settings requires a service restart.
Use SQL Database as your production data store
Using Azure SQL Database as a data store is identical across all Azure App Service application types. If you have not done so already, follow these steps to create a Mobile Apps back end:
Sign in to the Azure portal.
In the upper left of the window, select the +NEW button > Web + Mobile > Mobile App, and then provide a name for your Mobile Apps back end.
In the Resource Group box, enter the same name as your app.
The default App Service plan is selected. If you want to change your App Service plan:
a. Select App Service Plan > +Create New.
b. Provide a name of the new App Service plan and select an appropriate location.
c. Select an appropriate pricing tier for the service. Select View all to view more pricing options, such as Free and Shared.
d. Click the Select button.
e. Back in the App Service plan pane, select OK.
Select Create.
Provisioning a Mobile Apps back end can take a couple of minutes. After the Mobile Apps back end is provisioned, the portal opens the Settings pane for the Mobile Apps back end.
You can choose to either connect an existing SQL database to your Mobile Apps back end or create a new SQL database. In this section, we create a SQL database.
Note
If you already have a database in the same location as the Mobile Apps back end, you can instead select Use an existing database and then select that database. We don't recommend the use of a database in a different location because of higher latencies.
In the new Mobile Apps back end, select Settings > Mobile App > Data > +Add.
In the Add data connection pane, select SQL Database - Configure required settings > Create a new database. Enter the name of the new database in the Name box.
Select Server. In the New server pane, enter a unique server name in the Server name box, and provide a suitable server admin login and password. Ensure that Allow azure services to access server is selected. Select OK.
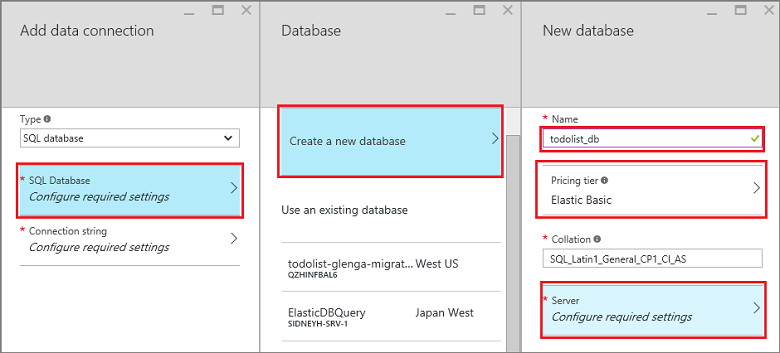
In the New database pane, select OK.
Back in the Add data connection pane, select Connection string, and enter the login and password that you provided when you created the database. If you use an existing database, provide the login credentials for that database. Select OK.
Back in the Add data connection pane again, select OK to create the database.
Creation of the database can take a few minutes. Use the Notifications area to monitor the progress of the deployment. Do not progress until the database is deployed successfully. After the database is deployed, a connection string is created for the SQL Database instance in your Mobile Apps back-end app settings. You can see this app setting in Settings > Application settings > Connection strings.
Require authentication for access to tables
If you want to use App Service Authentication with the tables endpoint, you must configure App Service
Authentication in the Azure portal first. For more information, see the configuration guide for the identity provider that you intend to use:
- Configure Azure Active Directory authentication
- Configure Facebook authentication
- Configure Google authentication
- Configure Microsoft authentication
- Configure Twitter authentication
Each table has an access property that you can use to control access to the table. The following sample shows a statically defined table with authentication required.
var azureMobileApps = require('azure-mobile-apps');

var table = azureMobileApps.table();

// Define the columns within the table.
table.columns = {
    "text": "string",
    "complete": "boolean"
};

// Turn off the dynamic schema.
table.dynamicSchema = false;

// Require authentication to access the table.
table.access = 'authenticated';

module.exports = table;
The access property can take one of three values:
- anonymous indicates that the client application is allowed to read data without authentication.
- authenticated indicates that the client application must send a valid authentication token with the request.
- disabled indicates that this table is currently disabled.
If the access property is undefined, unauthenticated access is allowed.
Use authentication claims with your tables
You can set up various claims that are requested when authentication is set up. These claims are not normally
available through the context.user object. However, you can retrieve them by using the context.user.getIdentity()
method. The getIdentity() method returns a promise that resolves to an object. The object is keyed by the
authentication method (facebook, google, twitter, microsoftaccount, or aad).
For example, if you set up Microsoft account authentication and request the email addresses claim, you can add the email address to the record with the following table controller:
var azureMobileApps = require('azure-mobile-apps');

// Create a new table definition.
var table = azureMobileApps.table();

table.columns = {
    "emailAddress": "string",
    "text": "string",
    "complete": "boolean"
};
table.dynamicSchema = false;
table.access = 'authenticated';

/**
* Limit the context query to those records with the authenticated user email address
* @param {Context} context the operation context
* @returns {Promise} context execution Promise
*/
function queryContextForEmail(context) {
    return context.user.getIdentity().then((data) => {
        context.query.where({ emailAddress: data.microsoftaccount.claims.emailaddress });
        return context.execute();
    });
}

/**
* Adds the email address from the claims to the context item - used for
* insert operations
* @param {Context} context the operation context
* @returns {Promise} context execution Promise
*/
function addEmailToContext(context) {
    return context.user.getIdentity().then((data) => {
        context.item.emailAddress = data.microsoftaccount.claims.emailaddress;
        return context.execute();
    });
}

// Configure specific code when the client does a request.
// READ: only return records that belong to the authenticated user.
table.read(queryContextForEmail);

// CREATE: add or overwrite the userId based on the authenticated user.
table.insert(addEmailToContext);

// UPDATE: only allow updating of records that belong to the authenticated user.
table.update(queryContextForEmail);

// DELETE: only allow deletion of records that belong to the authenticated user.
table.delete(queryContextForEmail);

module.exports = table;
To see what claims are available, use a web browser to view the /.auth/me endpoint of your site.
Disable access to specific table operations
In addition to appearing on the table, the access property can be used to control individual operations. There are four operations:
readis the RESTful GET operation on the table.insertis the RESTful POST operation on the table.updateis the RESTful PATCH operation on the table.deleteis the RESTful DELETE operation on the table.
For example, you might want to provide a read-only unauthenticated table:
var azureMobileApps = require('azure-mobile-apps');

var table = azureMobileApps.table();

// Read-only table. Only allow READ operations.
table.read.access = 'anonymous';
table.insert.access = 'disabled';
table.update.access = 'disabled';
table.delete.access = 'disabled';

module.exports = table;
Adjust the query that is used with table operations
A common requirement for table operations is to provide a restricted view of the data. For example, you can provide a table that is tagged with the authenticated user ID such that you can only read or update your own records. The following table definition provides this functionality:
var azureMobileApps = require('azure-mobile-apps');

var table = azureMobileApps.table();

// Define a static schema for the table.
table.columns = {
    "userId": "string",
    "text": "string",
    "complete": "boolean"
};
table.dynamicSchema = false;

// Require authentication for this table.
table.access = 'authenticated';

// Ensure that only records for the authenticated user are retrieved.
table.read(function (context) {
    context.query.where({ userId: context.user.id });
    return context.execute();
});

// When adding records, add or overwrite the userId with the authenticated user.
table.insert(function (context) {
    context.item.userId = context.user.id;
    return context.execute();
});

module.exports = table;
Operations that normally run a query have a query property that you can adjust by using a where clause. The query
property is a QueryJS object that is used to convert an OData query to something that the data back end can
process. For simple equality cases (like the preceding one), you can use a map. You can also add specific SQL
clauses:
context.query.where('myfield eq ?', 'value');
Configure a soft delete on a table
A soft delete does not actually delete records. Instead it marks them as deleted within the database by setting
the deleted column to true. The Mobile Apps SDK automatically removes soft-deleted records from results
unless the Mobile Client SDK uses IncludeDeleted(). To configure a table for a soft delete, set the softDelete
property in the table definition file:
var azureMobileApps = require('azure-mobile-apps');

var table = azureMobileApps.table();

// Define the columns within the table.
table.columns = {
    "text": "string",
    "complete": "boolean"
};

// Turn off the dynamic schema.
table.dynamicSchema = false;

// Turn on soft delete.
table.softDelete = true;

// Require authentication to access the table.
table.access = 'authenticated';

module.exports = table;
You should establish a mechanism for deleting records: a client application, a WebJob, an Azure function, or a custom API.
Seed your database with data
When you're creating a new application, you might want to seed a table with data. You can do this within the table definition JavaScript file as follows:
var azureMobileApps = require('azure-mobile-apps');

var table = azureMobileApps.table();

// Define the columns within the table.
table.columns = {
    "text": "string",
    "complete": "boolean"
};
table.seed = [
    { text: 'Example 1', complete: false },
    { text: 'Example 2', complete: true }
];

// Turn off the dynamic schema.
table.dynamicSchema = false;

// Require authentication to access the table.
table.access = 'authenticated';

module.exports = table;
Seeding of data happens only when you've used the Mobile Apps SDK to create the table. If the table already exists in the database, no data is injected into the table. If the dynamic schema is turned on, the schema is inferred from the seeded data.
We recommend that you explicitly call the tables.initialize() method to create the table when the service starts
running.
Enable Swagger support
Mobile Apps comes with built-in Swagger support. To enable Swagger support, first install swagger-ui as a dependency:
npm install --save swagger-ui
You can then enable Swagger support in the Mobile Apps constructor:
var mobile = azureMobileApps({ swagger: true });
You probably only want to enable Swagger support in development editions. You can do this by using the
NODE_ENV app setting:
var mobile = azureMobileApps({ swagger: process.env.NODE_ENV !== 'production' });
The swagger endpoint is located at http://yoursite.azurewebsites.net/swagger. You can access the Swagger
UI via the /swagger/ui endpoint. If you choose to require authentication across your entire application,
Swagger produces an error. For best results, choose to allow unauthenticated requests in the Azure
App Service Authentication/Authorization settings, and then control authentication by using the table.access
property.
You can also add the Swagger option to your azureMobile.js file if you only want Swagger support for developing locally.
Push notifications
Mobile Apps integrates with Azure Notification Hubs so you can send targeted push notifications to millions of devices across all major platforms. By using Notification Hubs, you can send push notifications to iOS, Android, and Windows devices. To learn more about all that you can do with Notification Hubs, see the Notification Hubs overview.
Send push notifications
The following code shows how to use the push object to send a broadcast push notification to registered iOS
devices:
// Create an APNS payload.
var payload = '{"aps": {"alert": "This is an APNS payload."}}';

// Only do the push if configured.
if (context.push) {
    // Send a push notification by using APNS.
    context.push.apns.send(null, payload, function (error) {
        if (error) {
            // Do something or log the error.
        }
    });
}
By creating a template push registration from the client, you can instead send a template push message to devices on all supported platforms. The following code shows how to send a template notification:
// Define the template payload.
var payload = '{"messageParam": "This is a template payload."}';

// Only do the push if configured.
if (context.push) {
    // Send a template notification.
    context.push.send(null, payload, function (error) {
        if (error) {
            // Do something or log the error.
        }
    });
}
Send push notifications to an authenticated user by using tags
When an authenticated user registers for push notifications, a user ID tag is automatically added to the registration. By using this tag, you can send push notifications to all devices registered by a specific user. The following code gets the SID of user who's making the request and sends a template push notification to every device registration for that user:
// Only do the push if configured.
if (context.push) {
    // Send a notification to the current user.
    context.push.send(context.user.id, payload, function (error) {
        if (error) {
            // Do something or log the error.
        }
    });
}
When you're registering for push notifications from an authenticated client, make sure that authentication is complete before you attempt registration.
Custom APIs
Define a custom API
In addition to the Data Access API via the /tables endpoint, Mobile Apps can provide custom API coverage. Custom
APIs are defined in a similar way to the table definitions and can access all the same facilities, including authentication.
If you want to use App Service Authentication with a custom API, you must configure App Service Authentication in the Azure portal first. For more information, see the configuration guide for the identity provider that you intend to use:
- Configure Azure Active Directory authentication
- Configure Facebook authentication
- Configure Google authentication
- Configure Microsoft authentication
- Configure Twitter authentication
Custom APIs are defined in much the same way as the Tables API:
- Create an
apidirectory. - Create an API definition JavaScript file in the
apidirectory. - Use the import method to import the
apidirectory.
Here is the prototype API definition based on the basic-app sample that we used earlier:
var express = require('express'),
    azureMobileApps = require('azure-mobile-apps');

var app = express(),
    mobile = azureMobileApps();

// Import the custom API.
mobile.api.import('./api');

// Add the Mobile API so it is accessible as a Web API.
app.use(mobile);

// Start listening on HTTP
app.listen(process.env.PORT || 3000);
Let's take an example API that returns the server date by using the Date.now() method. Here is the api/date.js
file:
var api = {
    get: function (req, res, next) {
        var date = { currentTime: Date.now() };
        res.status(200).type('application/json').send(date);
    });
};

module.exports = api;
Each parameter is one of the standard RESTful verbs: GET, POST, PATCH, or DELETE. The method is a standard ExpressJS middleware function that sends the required output.
Require authentication for access to a custom API
The Mobile Apps SDK implements authentication in the same way for both the tables endpoint and custom APIs. To
add authentication to the API developed in the previous section, add an access property:
var api = {
    get: function (req, res, next) {
        var date = { currentTime: Date.now() };
        res.status(200).type('application/json').send(date);
    });
};
// All methods must be authenticated.
api.access = 'authenticated';

module.exports = api;
You can also specify authentication on specific operations:
var api = {
    get: function (req, res, next) {
        var date = { currentTime: Date.now() };
        res.status(200).type('application/json').send(date);
    }
};
// The GET methods must be authenticated.
api.get.access = 'authenticated';

module.exports = api;
The same token that is used for the tables endpoint must be used for custom APIs that require authentication.
Handle large file uploads
The Mobile Apps SDK uses the body-parser middleware to accept and decode body content in your submission. You can preconfigure body-parser to accept larger file uploads:
var express = require('express'),
    bodyParser = require('body-parser'),
    azureMobileApps = require('azure-mobile-apps');

var app = express(),
    mobile = azureMobileApps();

// Set up large body content handling.
app.use(bodyParser.json({ limit: '50mb' }));
app.use(bodyParser.urlencoded({ limit: '50mb', extended: true }));

// Import the custom API.
mobile.api.import('./api');

// Add the Mobile API so it is accessible as a Web API.
app.use(mobile);

// Start listening on HTTP.
app.listen(process.env.PORT || 3000);
The file is base-64 encoded before transmission. This encoding increases the size of the actual upload (and the size that you must account for).
Execute custom SQL statements
The Mobile Apps SDK allows access to the entire context through the request object. You can easily execute parameterized SQL statements to the defined data provider:
var api = {
    get: function (request, response, next) {
        // Check for parameters. If not there, pass on to a later API call.
        if (typeof request.params.completed === 'undefined')
            return next();

        // Define the query. Anything that the mssql
        // driver can handle is allowed.
        var query = {
            sql: 'UPDATE TodoItem SET complete=@completed',
            parameters: [{
                completed: request.params.completed
            }]
        };

        // Execute the query. The context for Mobile Apps is available through
        // request.azureMobile. The data object contains the configured data provider.
        request.azureMobile.data.execute(query)
        .then(function (results) {
            response.json(results);
        });
    }
};

api.get.access = 'authenticated';
module.exports = api;
Debugging
Debug, diagnose, and troubleshoot Mobile Apps
Azure App Service provides several debugging and troubleshooting techniques for Node.js applications. To get started in troubleshooting your Node.js Mobile Apps back end, see the following articles:
- Monitoring Azure App Service
- Enable diagnostic logging in Azure App Service
- Troubleshoot Azure App Service in Visual Studio
Node.js applications have access to a wide range of diagnostic log tools. Internally, the Mobile Apps
Node.js SDK uses Winston for diagnostic logging. Logging is automatically enabled when you enable debug mode or set the MS_DebugMode app setting to true in the Azure portal. Generated logs appear in the diagnostic
logs in the Azure portal.