Tutorial: Analyze live video using OpenVINO™ Model Server – AI Extension from Intel
![]()
Alternatively, check out topics under Create video applications in the service.
Note
Azure Video Analyzer has been retired and is no longer available.
Azure Video Analyzer for Media is not affected by this retirement. It is now rebranded to Azure Video Indexer. Click here to read more.
This tutorial shows you how to use the OpenVINO™ Model Server – AI Extension from Intel to analyze a live video feed from a (simulated) IP camera. You'll see how this inference server gives you access to models for detecting objects (a person, a vehicle, or a bike), and a model for classifying vehicles. A subset of the frames in the live video feed is sent to this inference server, and the results are sent to IoT Edge Hub.
This tutorial uses an Azure VM as an IoT Edge device, and it uses a simulated live video stream. It's based on sample code written in C#.
Note
This tutorial requires the use of an x86-64 machine as your Edge device.
Prerequisites
An Azure account that includes an active subscription. Create an account for free if you don't already have one.
Note
You will need an Azure subscription where you have access to both Contributor role, and User Access Administrator role. If you do not have the right permissions, please reach out to your account administrator to grant you those permissions.
Visual Studio Code, with the following extensions:
Tip
When you're installing the Azure IoT Tools extension, you might be prompted to install Docker. Feel free to ignore the prompt.
Set up Azure resources
The deployment process will take about 20 minutes. Upon completion, you will have certain Azure resources deployed in the Azure subscription, including:
- Video Analyzer account - This cloud service is used to register the Video Analyzer edge module, and for playing back recorded video and video analytics.
- Storage account - For storing recorded video and video analytics.
- Managed Identity - This is the user assigned managed identity used to manage access to the above storage account.
- Virtual machine - This is a virtual machine that will serve as your simulated edge device.
- IoT Hub - This acts as a central message hub for bi-directional communication between your IoT application, IoT Edge modules and the devices it manages.
In addition to the resources mentioned above, following items are also created in the 'deployment-output' file share in your storage account, for use in quickstarts and tutorials:
- appsettings.json - This file contains the device connection string and other properties needed to run the sample application in Visual Studio Code.
- env.txt - This file contains the environment variables that you will need to generate deployment manifests using Visual Studio Code.
- deployment.json - This is the deployment manifest used by the template to deploy edge modules to the simulated edge device.
Tip
If you run into issues creating all of the required Azure resources, please use the manual steps in this quickstart.
About OpenVINO™ Model Server – AI Extension from Intel
The Intel® Distribution of OpenVINO™ toolkit (open visual inference and neural network optimization) is a free software kit that helps developers and data scientists speed up computer vision workloads, streamline deep learning inference and deployments, and enable easy, heterogeneous execution across Intel® platforms from edge to cloud. It includes the Intel® Deep Learning Deployment Toolkit with model optimizer and inference engine, and the Open Model Zoo repository that includes more than 40 optimized pre-trained models.
In order to build complex, high-performance video analytics solutions, the Video Analyzer module should be paired with a powerful inference engine that can leverage the scale at the edge. In this tutorial, inference requests are sent to the OpenVINO™ Model Server – AI Extension from Intel, an Edge module that has been designed to work with Video Analyzer. This inference server module contains the OpenVINO™ Model Server (OVMS), an inference server powered by the OpenVINO™ toolkit, that is highly optimized for computer vision workloads and developed for Intel® architectures. An extension has been added to OVMS for easy exchange of video frames and inference results between the inference server and the Video Analyzer module, which empowers you to run any OpenVINO™ toolkit supported model (you can customize the inference server module by modifying the code). You can further select from the wide variety of acceleration mechanisms provided by Intel® hardware. These include CPUs (Atom, Core, Xeon), FPGAs, VPUs.
In the initial release of this inference server, you have access to the following models:
- Vehicle Detection (inference URL: http://{module-name}:4000/vehicleDetection)
- Person/Vehicle/Bike Detection (inference URL: http://{module-name}:4000/personVehicleBikeDetection)
- Vehicle Classification (inference URL: http://{module-name}:4000/vehicleClassification)
- Face Detection (inference URL: http://{module-name}:4000/faceDetection)
Note
By downloading and using the Edge module: OpenVINO™ Model Server – AI Extension from Intel, and the included software, you agree to the terms and conditions under the License Agreement. Intel is committed to respecting human rights and avoiding complicity in human rights abuses. See Intel’s Global Human Rights Principles. Intel’s products and software are intended only to be used in applications that do not cause or contribute to a violation of an internationally recognized human right.
Overview
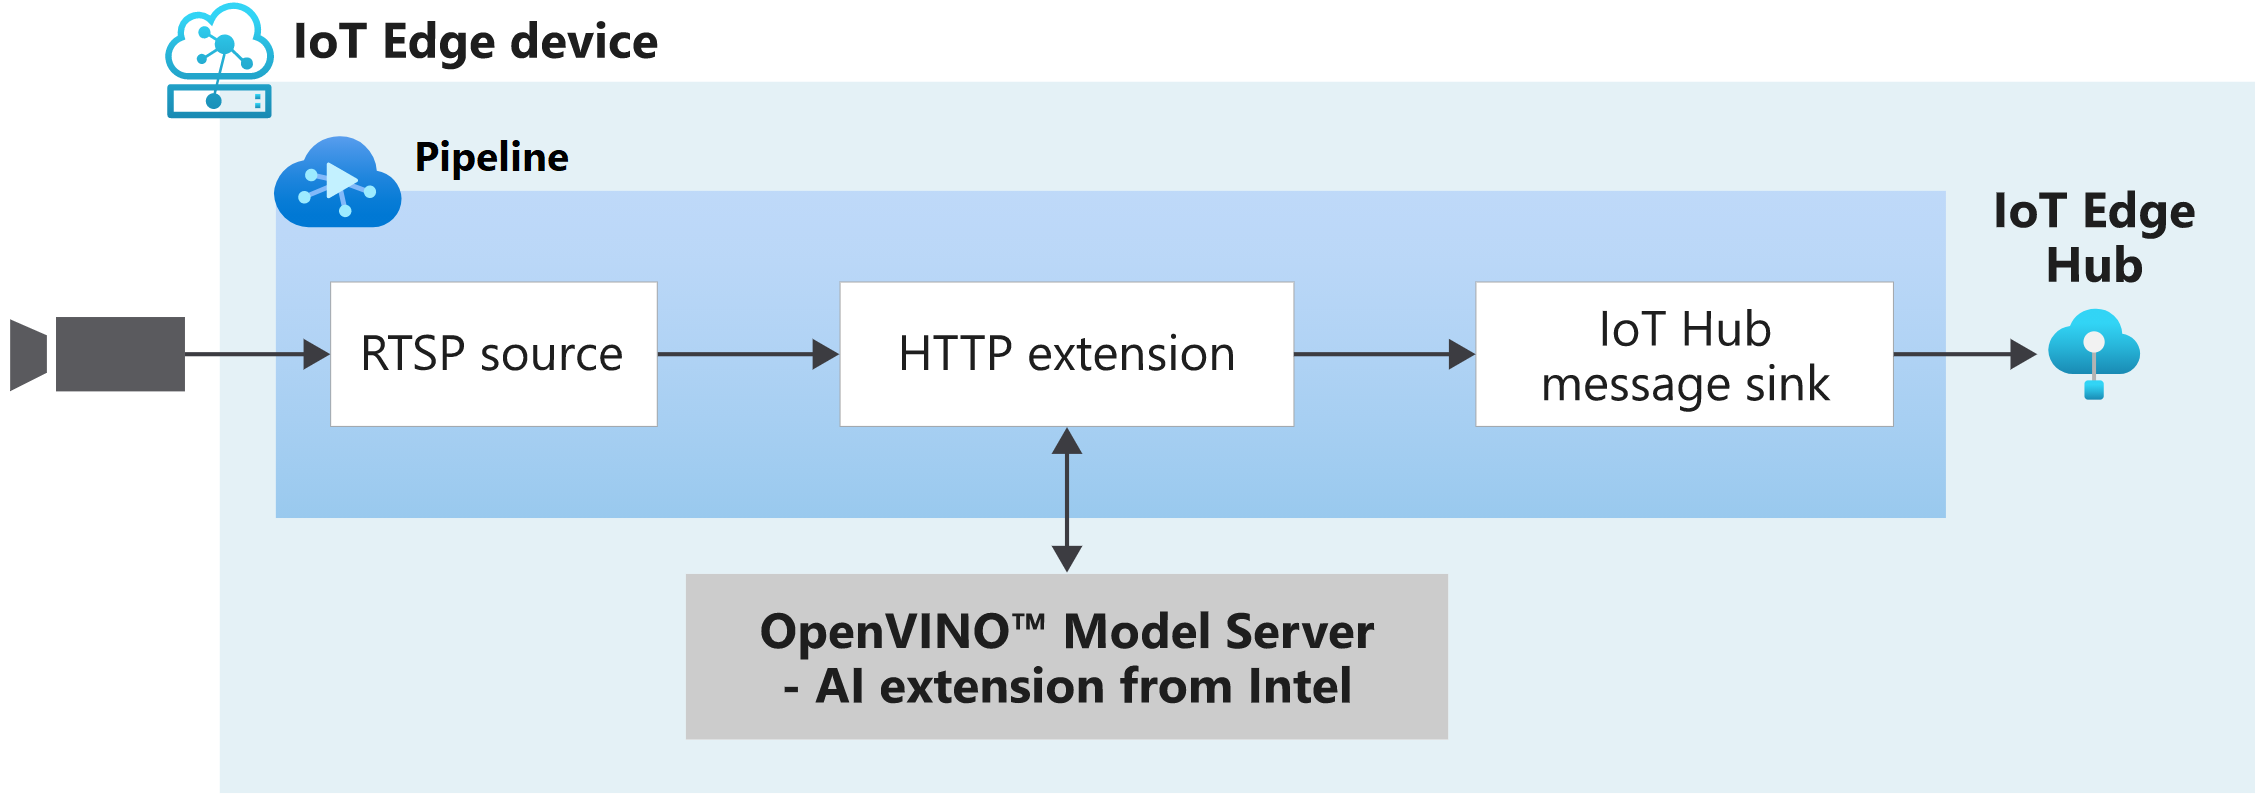
This diagram shows how the signals flow in this quickstart. An edge module simulates an IP camera hosting a Real-Time Streaming Protocol (RTSP) server. An RTSP source node pulls the video feed from this server and sends video frames to the HTTP extension processor node.
The HTTP extension processor node plays the role of a proxy. It selects a subset of the incoming video frames and converts those frames to images. Then it relays the image over REST to another edge module that runs AI models behind an HTTP endpoint. In this example, that edge module is the OpenVINO™ Model Server – AI Extension from Intel. The HTTP extension processor node gathers the detection results and publishes events to the IoT Hub message sink node. The latter node then sends those events to IoT Edge Hub.
In this tutorial, you will:
- Setup your development environment.
- Deploy the required edge modules.
- Create and deploy the live pipeline.
- Interpret the results.
- Clean up resources.
Set up your development environment
Get the sample code
Clone the AVA C# samples repository.
Start Visual Studio Code, and open the folder where the repo has been downloaded.
In Visual Studio Code, browse to the src/cloud-to-device-console-app folder and create a file named appsettings.json. This file contains the settings needed to run the program.
Browse to the file share in the storage account created in the setup step above, and locate the appsettings.json file under the "deployment-output" file share. Click on the file, and then hit the "Download" button. The contents should open in a new browser tab, which should look like:
{
    "IoThubConnectionString" : "HostName=xxx.azure-devices.net;SharedAccessKeyName=iothubowner;SharedAccessKey=XXX",
    "deviceId" : "avasample-iot-edge-device",
    "moduleId" : "avaedge"
}
The IoT Hub connection string lets you use Visual Studio Code to send commands to the edge modules via Azure IoT Hub. Copy the above JSON into the src/cloud-to-device-console-app/appsettings.json file.
Next, browse to the src/edge folder and create a file named .env. This file contains properties that Visual Studio Code uses to deploy modules to an edge device.
Browse to the file share in the storage account created in the setup step above, and locate the env.txt file under the "deployment-output" file share. Click on the file, and then hit the "Download" button. The contents should open in a new browser tab, which should look like:
     SUBSCRIPTION_ID="<Subscription ID>"
     RESOURCE_GROUP="<Resource Group>"
     AVA_PROVISIONING_TOKEN="<Provisioning token>"
     VIDEO_INPUT_FOLDER_ON_DEVICE="/home/localedgeuser/samples/input"
     VIDEO_OUTPUT_FOLDER_ON_DEVICE="/var/media"
     APPDATA_FOLDER_ON_DEVICE="/var/lib/videoanalyzer"
     CONTAINER_REGISTRY_USERNAME_myacr="<your container registry username>"
     CONTAINER_REGISTRY_PASSWORD_myacr="<your container registry password>"
Copy the JSON from your env.txt into the src/edge/.env file.
Connect to the IoT Hub
In Visual Studio Code, set the IoT Hub connection string by selecting the More actions icon next to the AZURE IOT HUB pane in the lower-left corner. Copy the string from the src/cloud-to-device-console-app/appsettings.json file.
Note
You might be asked to provide Built-in endpoint information for the IoT Hub. To get that information, in Azure portal, navigate to your IoT Hub and look for Built-in endpoints option in the left navigation pane. Click there and look for the Event Hub-compatible endpoint under Event Hub compatible endpoint section. Copy and use the text in the box. The endpoint will look something like this:
Endpoint=sb://iothub-ns-xxx.servicebus.windows.net/;SharedAccessKeyName=iothubowner;SharedAccessKey=XXX;EntityPath=<IoT Hub name>In about 30 seconds, refresh Azure IoT Hub in the lower-left section. You should see the edge device
avasample-iot-edge-device, which should have the following modules deployed:- Edge Hub (module name edgeHub)
- Edge Agent (module name edgeAgent)
- Video Analyzer (module name avaedge)
- RTSP simulator (module name rtspsim)
Prepare to monitor the modules
When you use run this quickstart or tutorial, events will be sent to the IoT Hub. To see these events, follow these steps:
Open the Explorer pane in Visual Studio Code, and look for Azure IoT Hub in the lower-left corner.
Expand the Devices node.
Right-click on
avasample-iot-edge-device, and select Start Monitoring Built-in Event Endpoint.Note
You might be asked to provide Built-in endpoint information for the IoT Hub. To get that information, in Azure portal, navigate to your IoT Hub and look for Built-in endpoints option in the left navigation pane. Click there and look for the Event Hub-compatible endpoint under Event Hub compatible endpoint section. Copy and use the text in the box. The endpoint will look something like this:
Endpoint=sb://iothub-ns-xxx.servicebus.windows.net/;SharedAccessKeyName=iothubowner;SharedAccessKey=XXX;EntityPath=<IoT Hub name>
Review the sample video
When you set up the Azure resources, a short video of a parking lot is copied to the Linux VM in Azure that you're using as the IoT Edge device. This quickstart uses the video file to simulate a live stream.
Deploy the required modules
As part of the prerequisites, you downloaded the sample code to a folder. Follow these steps to deploy the required modules.
- In Visual Studio Code, right-click the src/edge/deployment.openvino.template.json file and then select Generate IoT Edge Deployment Manifest.
- The deployment.openvino.amd64.json manifest file is created in the src/edge/config folder.
- Right-click src/edge/config/deployment.openvino.amd64.json and select Create Deployment for Single Device.
- When you're prompted to select an IoT Hub device, select avasample-iot-edge-device.
- After about 30 seconds, in the lower-left corner of the window, refresh Azure IoT Hub. The edge device now shows the following deployed modules:
- The Video Analyzer edge module, named avaedge.
- The rtspsim module, which simulates an RTSP server and acts as the source of a live video feed.
- The openvino module, which is the OpenVINO™ Model Server – AI Extension module from Intel.
Create and activate the live pipeline
Edit the sample code
- In Visual Studio code, browse to src/cloud-to-device-console-app and edit the operations.json file:
Change the link to the live pipeline topology:
"pipelineTopologyUrl" : "https://raw.githubusercontent.com/Azure/video-analyzer/main/pipelines/live/topologies/httpExtensionOpenVINO/topology.json"Under
livePipelineSet, edit the name of the live pipeline topology to match the value in the preceding link:"topologyName" : "InferencingWithOpenVINO"Under
pipelineTopologyDelete, edit the name:"name": "InferencingWithOpenVINO"
Run the sample program to detect vehicles
If you open the pipeline topology (pipelineTopologyUrl) for this tutorial in a browser, you will see that the value of inferencingUrl has been set to http://openvino:4000/vehicleDetection, which means the inference server will attempt to detect vehicles in the live video.
To start a debugging session, select the F5 key. You see messages printed in the TERMINAL window.
The operations.json code starts off with calls to the direct methods
pipelineTopologyListandlivePipelineList. If you cleaned up resources after you completed previous quickstarts, then this process will return empty lists. The TERMINAL window shows the next set of direct method calls:A call to
pipelineTopologySetthat uses the precedingpipelineTopologyUrlA call to
livePipelineSetthat uses the following body:{ "@apiVersion": "1.1", "name": "Sample-Pipeline-1", "properties": { "topologyName": "InferencingWithOpenVINO", "description": "Sample pipeline description", "parameters": [ { "name": "rtspUrl", "value": "rtsp://rtspsim:554/media/camera-300s.mkv" }, { "name": "rtspUserName", "value": "testuser" }, { "name": "rtspPassword", "value": "testpassword" } ] } }A call to
livePipelineActivatethat starts the pipeline and the flow of video
The output in the TERMINAL window pauses at a
Press Enter to continueprompt. Don't select Enter yet. Scroll up to see the JSON response payloads for the direct methods you invoked.Switch to the OUTPUT window in Visual Studio Code. You see messages that the Video Analyzer module is sending to the IoT hub. The following section of this quickstart discusses these messages.
The live pipeline continues to run and print results. The RTSP simulator keeps looping the source video. To stop the live pipeline, return to the TERMINAL window and select Enter.
The next series of calls cleans up resources:
- A call to
livePipelineDeactivatedeactivates the pipeline. - A call to
livePipelineDeletedeletes the pipeline. - A call to
pipelineTopologyDeletedeletes the topology. - A final call to
pipelineTopologyListshows that the list is empty.
- A call to
Interpret results
When you run the live pipeline the results from the HTTP extension processor node pass through the IoT Hub message sink node to the IoT hub. The messages you see in the OUTPUT window contain a body section. For more information, see Create and read IoT Hub messages.
In the following messages, the Video Analyzer module defines the application properties and the content of the body.
MediaSessionEstablished event
When a live pipeline is activated, the RTSP source node attempts to connect to the RTSP server that runs on the rtspsim-live555 container. If the connection succeeds you will see an event in the OUTPUT window with the following.
[IoTHubMonitor] [9:42:18 AM] Message received from [ava-sample-device/avaadge]:
{
  "body": {
    "sdp": "SDP:\nv=0\r\no=- 1586450538111534 1 IN IP4 XXX.XX.XX.XX\r\ns=Matroska video+audio+(optional)subtitles, streamed by the LIVE555 Media Server\r\ni=media/lots_015.mkv\r\nt=0 0\r\na=tool:LIVE555 Streaming Media v2020.03.06\r\na=type:broadcast\r\na=control:*\r\na=range:npt=0-300.000\r\na=x-qt-text-nam:Matroska video+audio+(optional)subtitles, streamed by the LIVE555 Media Server\r\na=x-qt-text-inf:media/lots_015.mkv\r\nm=video 0 RTP/AVP 96\r\nc=IN IP4 0.0.0.0\r\nb=AS:500\r\na=rtpmap:96 H264/90000\r\na=fmtp:96 packetization-mode=1;profile-level-id=4D0029;sprop-parameter-sets=XXXXXXXXXXXXXXXXXXXXXX\r\na=control:track1\r\n"
  },
  "applicationProperties": {
    "dataVersion": "1.0",
    "topic": "/subscriptions/{subscriptionID}/resourceGroups/{name}/providers/microsoft.media/videoanalyzers/{ava-account-name}",
    "subject": "/edgeModules/avaedge/livePipelines/Sample-Pipeline-1/sources/rtspSource",
    "eventType": "Microsoft.VideoAnalyzers.Diagnostics.MediaSessionEstablished",
    "eventTime": "2021-04-09T09:42:18.1280000Z"
  }
}
In the preceding output:
- The message is a diagnostics event, MediaSessionEstablished. It indicates that the RTSP source node (the subject) connected with the RTSP simulator and has begun to receive a (simulated) live feed.
- The
sdpsection contains data about the diagnostics event. In this case, the data comprises the Session Description Protocol (SDP) details.
Inference event
The HTTP extension processor node receives inference results from the OpenVINO™ Model Server – AI Extension module. It then emits the results through the IoT Hub message sink node as inference events.
In these events, the type is set to entity to indicate it's an entity, such as a car or truck. In the following example of the body of such an event, a vehicle was detected, with a confidence values above 0.9.
{
  "timestamp": 145819820073974,
  "inferences": [
    {
      "type": "entity",
      "subtype": "vehicleDetection",
      "entity": {
        "tag": {
          "value": "vehicle",
          "confidence": 0.9147264
        },
        "box": {
          "l": 0.6853116,
          "t": 0.5035262,
          "w": 0.04322505,
          "h": 0.03426218
        }
      }
    }
In the messages, notice the following details:
- The
bodysection contains data about the analytics event. In this case, the event is an inference event, so the body containsinferencesdata. - The
inferencessection indicates that thetypeisentity. This section includes additional data about the entity.
Run the sample program to detect persons, vehicles or bikes
To use a different model, you will need to modify the pipeline topology, and as well as operations.json file.
Copy the pipeline topology (URL used in pipelineTopologyUrl) to a local file, say C:\TEMP\topology.json. Open that copy, and edit the value of inferencingUrl to http://openvino:4000/personVehicleBikeDetection.
Next, in Visual Studio Code, go to the src/cloud-to-device-console-app folder and open operations.json file. Edit the line with pipelineTopologyUrl to:
"pipelineTopologyFile" : "C:\\TEMP\\topology.json"
You can now repeat the steps above to run the sample program again, with the new topology. The inference results will be similar (in schema) to that of the vehicle detection model, with just the subtype set to personVehicleBikeDetection.
Run the sample program to classify vehicles
In Visual Studio Code, open the local copy of topology.json from the previous step, and edit the value of inferencingUrl to http://openvino:4000/vehicleClassification. If you have run the previous example to detect persons or vehicles or bikes, you do not need to modify the operations.json file again.
You can now repeat the steps above to run the sample program again, with the new topology. A sample classification result is as follows.
{
  "timestamp": 145819896480527,
  "inferences": [
    {
      "type": "classification",
      "subtype": "color",
      "classification": {
        "tag": {
          "value": "gray",
          "confidence": 0.683415
        }
      }
    },
    {
      "type": "classification",
      "subtype": "type",
      "classification": {
        "tag": {
          "value": "truck",
          "confidence": 0.9978394
        }
      }
    }
  ]
}
Run the sample program to detect faces
In Visual Studio Code, open the local copy of topology.json from the previous step, and edit the value of inferencingUrl to http://openvino:4000/faceDetection. If you have run the previous example to detect persons or vehicles or bikes, you do not need to modify the operations.json file again.
You can now repeat the steps above to run the sample program again, with the new topology. A sample detection result is as follows (note: the parking lot video used above does not contain any detectable faces - you should another video in order to try this model).
{
  "body": {
    "inferences": [
      {
        "type": "entity",
        "subtype": "faceDetection",
        "entity": {
          "tag": {
            "value": "face",
            "confidence": 0.9997053742408752
          },
          "box": {
            "l": 0.2559490501880646,
            "t": 0.03403960168361664,
            "w": 0.17685115337371826,
            "h": 0.45835764706134796
          }
        }
      }
    ]
  }
Clean up resources
If you intend to try other quickstarts or tutorials, keep the resources you created. Otherwise, go to the Azure portal, go to your resource groups, select the resource group where you ran this tutorial, and delete all the resources.
Next steps
Review additional challenges for advanced users:
- Use an IP camera that has support for RTSP instead of using the RTSP simulator. You can search for IP cameras that support RTSP on the ONVIF conformant products page. Look for devices that conform with profiles G, S, or T.
- Use a local x64 Linux device instead of an Azure Linux VM. This device must be in the same network as the IP camera. You can follow the instructions in Install Azure IoT Edge runtime on Linux. Then register the device with Azure IoT Hub by following instructions in Deploy your first IoT Edge module to a virtual Linux device.