Connect to Azure by using an Azure Resource Manager service connection
TFS 2018
Note
Microsoft Visual Studio Team Foundation Server 2018 and earlier versions have the following differences in naming:
- Pipelines for build and release are called definitions
- Runs are called builds
- Service connections are called service endpoints
- Stages are called environments
- Jobs are called phases
You can use an Azure Resource Manager service connection to connect to Azure resources through service principal authentication or through an Azure managed service identity. If you use a Resource Manager service connection, you can use a pipeline to deploy to an Azure resource like an Azure App Service app without authenticating each time.
You have multiple options for connecting to Azure by using Azure Resource Manager service connections:
- Service principal with secret
- Agent-assigned managed identity
To learn about other types of connections and for general information about creating and using connections, see Service connections for builds and releases.
Create an Azure Resource Manager service connection that uses an existing service principal
If you want to use a predefined set of access permissions and you don't already have a service principal defined for this purpose, follow one of these tutorials to create a new service principal:
In the Azure DevOps project, go to Project settings > Service connections.
In Team Foundation Server, select the Settings icon in the top menu bar to go to the Services page.
For more information, see Open project settings.
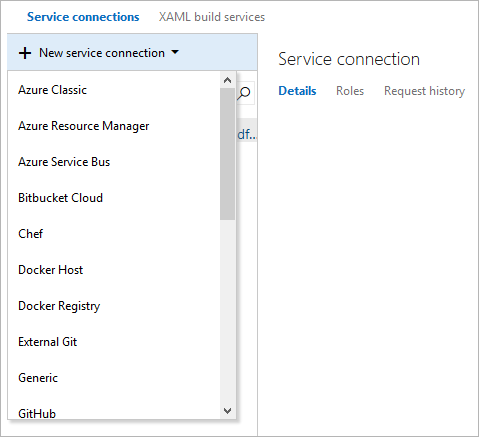
Select New service connection, and then select Azure Resource Manager.
Select the Service Principal (manual) option, and then enter the service principal details.
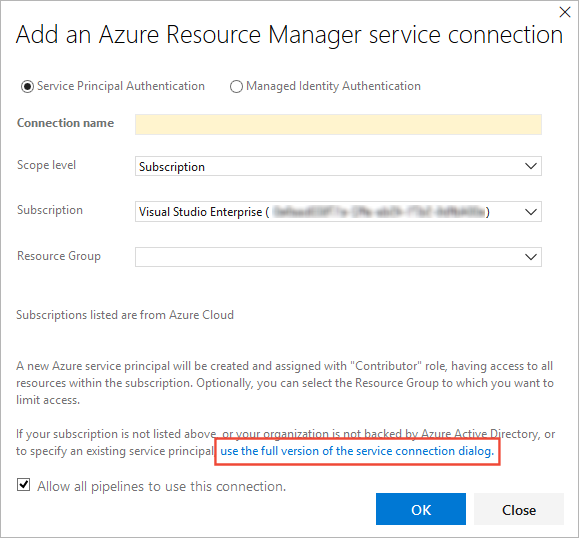
For Connection name, enter a display name to use to refer to this service connection.
For Environment, select the environment name (Azure Cloud, Azure Stack, or Azure Government Cloud).
If you don't select Azure Cloud, enter the environment URL. For Azure Stack, the environment URL is something like
https://management.local.azurestack.external.For Scope level, select the scope for the connection:
- If you select Subscription, select an existing Azure subscription. If no Azure subscriptions or instances appear, see Troubleshoot Azure Resource Manager service connections.
- If you select Management Group, select an existing Azure management group. For more information, see Create management groups.
In the Azure subscription dialog, enter the following information about your service principal:
- Subscription ID
- Subscription name
- Service principal ID
- Either the service principal client key or, if you selected Certificate, enter the contents of both the certificate and the private key sections of the *.pem file.
- Tenant ID
You can get this information by downloading and running an Azure PowerShell script. When you're prompted, enter your subscription name, password, role (optional), and the type of cloud, such as Azure Cloud (the default), Azure Stack, or an Azure Government Cloud.
Select Verify connection to validate the settings you entered.
After the new service connection is created:
- If you use the service connection in the UI, select the connection name that you assigned in the Azure subscription setting of your pipeline.
- If you use the service connection in a YAML file, copy the connection name and paste it into your code as the value for
azureSubscription.
If necessary, modify the service principal to expose the appropriate permissions.
For more information about authenticating by using a service principal, see Use role-based access control to manage access to your Azure subscription resources or the blog post Automate an Azure resource group deployment by using a service principal in Visual Studio.
For more information, see Troubleshoot Azure Resource Manager service connections.
Create an Azure Resource Manager service connection to a VM that uses a managed service identity
Note
To use a managed service identity to authenticate, you must use a self-hosted agent on an Azure virtual machine (VM).
You can configure Azure VM-based agents to use an Azure Managed Service Identity in Microsoft Entra ID. In this scenario, you use the system-assigned identity (service principal) to grant the Azure VM-based agents access to any Azure resource that supports Microsoft Entra ID, such as an instance of Azure Key Vault, instead of persisting credentials in Azure DevOps for the connection.
In the Azure DevOps project, go to Project settings > Service connections.
In Team Foundation Server, select the Settings icon in the top menu bar to go to the Services page.
For more information, see Open project settings.
Select New service connection, and then select Azure Resource Manager.
Select the Managed Identity Authentication option.
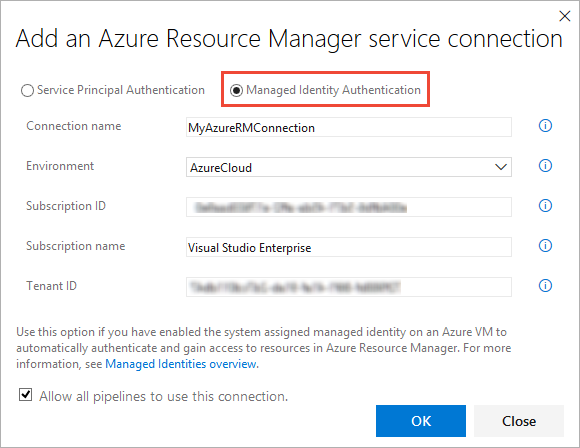
For Connection name, enter a display name to use when you refer to this service connection.
For Environment, select the environment name (Azure Cloud, Azure Stack, or Azure Government Cloud).
In the connections dialog, enter the following values from your subscription:
- Subscription ID
- Subscription name
- Tenant ID
After the new service connection is created:
- If you use the service connection in the UI, select the connection name that you assigned in the Azure subscription setting of your pipeline.
- If you use the service connection in a YAML file, copy the connection name into your code as the value for
azureSubscription.
Ensure that the VM (agent) has the appropriate permissions.
For example, if your code needs to call Azure Resource Manager, assign the VM the appropriate role by using role-based access control (RBAC) in Microsoft Entra ID.
For more information, see How can I use managed identities for Azure resources? and Use role-based access control to manage access to your Azure subscription resources.
For more information about the process, see Troubleshoot Azure Resource Manager service connections.
Connect to an Azure Government Cloud
For information about connecting to an Azure Government Cloud, see Connect from Azure Pipelines (Azure Government Cloud).
Connect to Azure Stack
For information about connecting to Azure Stack, see these articles:
- Connect to Azure Stack
- Connect Azure Stack to Azure by using a VPN
- Connect Azure Stack to Azure by using Azure ExpressRoute
Help and support
- Explore troubleshooting tips.
- Get advice on Stack Overflow.
- Post your questions, search for answers, or suggest a feature in the Azure DevOps Developer Community.
- Get support for Azure DevOps.