Set Git repository settings and policies
TFS 2018
There are several ways to customize your Azure Repos Git repositories by using branch and repository settings and policies. This article discusses repository-level settings and policies.
Repository settings and policies configure global options for all Git repositories for a project or organization, or for individual repositories.
This article discusses server-side repository settings and policies. To learn about client-side Git preferences, see Git preferences and settings in Visual Studio.
Branch policies cover branch-specific controls.
Branch policies include options like requiring a pull request, a successful build, or a code review before changes can merge into a branch. For more information, see Branch policies and settings.
Repository and branch security permissions control user assignments.
These permissions control who can read, write, contribute to pull requests, and take other specific actions. For more information, see Set permissions for a repository.
Note
The feature documented in this article requires TFS 2018 Update 2 or later version.
Summary of all repository and branch settings and policies
You can configure settings and policies for all repositories in a project, for individual repositories, and for branches of repositories. In the browser, you configure all these settings and policies through Project settings > Repositories.
The following tables summarize the settings and policies you can enable and configure for Git repositories and branches.
All Repositories Settings
The following table summarizes the settings you can enable and configure for all new Git repositories in a project or in an organization.
Setting
Default
Description
Off
Initialize new repositories with the default branch name you specify. You can change the default branch for a particular repository anytime. If you don't enable this feature, repositories initialize with a default branch named main.
Repository settings
The following table summarizes the settings you can enable or configure for each individual Git repository.
Setting
Default
Description
On
Enables or disables the use of Gravatar images for users outside of your enterprise. This setting applies to all repositories in the project.
On
Allow users to create forks from the repository.
On
Automatically create links for work items mentioned in a commit comment.
On
Remember user preferences for completing work items with pull requests.
Branch policies
The following table summarizes the policies you can define to customize a branch. For more information on configuring these settings, see Improve code quality with branch policies. When you set any policy on a branch, the following policies are automatically enforced:
- Pull requests are required to update the branch.
- The branch can't be deleted.
Note
Branch policies are applied to Pull Requests based on the target branch of the Pull Request. Branch policies should not be set on temporary branches that will be deleted after a pull request. Adding branch policies to temporary branches will cause automatic branch deletion to fail.
Policy
Default
Description
Off
Require approval from a specified number of reviewers on pull requests.
Off
Encourage traceability by checking for linked work items on pull requests.
Off
Check to see that all comments have been resolved on pull requests.
Off
Control branch history by limiting the available types of merge when pull requests are completed.
Prerequisites
- To configure policies, you must be a member of the Project Administrators security group, or have repository-level Edit policies permissions. To learn more, see Set Git repository permissions.
View and edit settings and policies
You can configure settings for all repositories across an organization or project, or for individual repositories. You can configure policies for all repositories, for individual repositories, or for specified branches across repositories. For information about setting branch policies, see Branch policies.
Note
It's best to configure repository settings either at the project level or for individual repositories, but not both. If you configure settings at more than one level, the system honors the most restrictive setting. Configuring settings at only one level reduces confusion and Git performance issues.
From your web browser, open the project and choose the gear icon, Version Control, and select your repository.
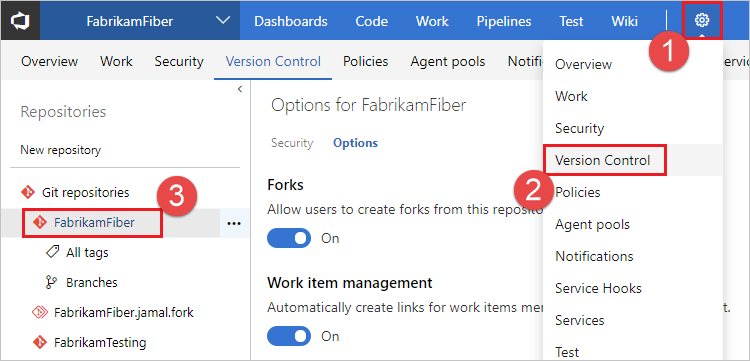
Select Options to view and configure your repository settings.
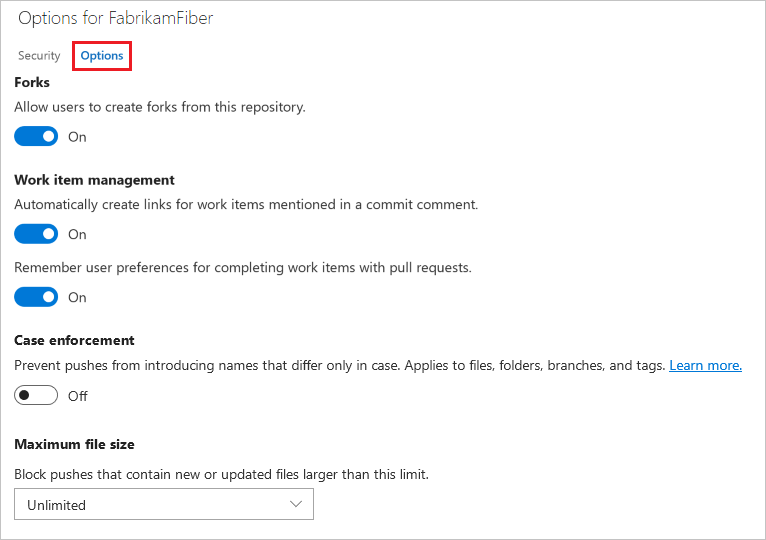
Gravatar images
This setting enables or disables the use of Gravatar images for users outside your enterprise.
Gravatar images is an individual repository setting.
Work item linking settings
These repository settings manage work item linking.
- Select Project Settings > Repositories, and then select a repository.
- On the Settings tab of the <Repository name> page, turn the settings On or Off.
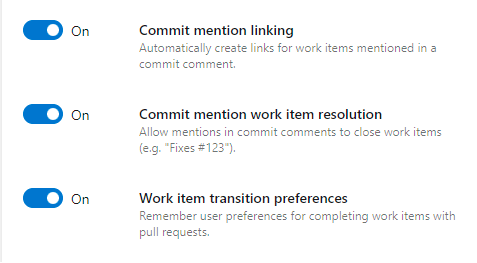
Commit mention linking
When enabled, commit messages containing # followed by a valid work item ID automatically link the commit to that work item. Disable this setting if the repository previously used a different account or service. Those repositories might have commit messages with # mentions that don't match the work item IDs in the current account.
Commit mention work item resolution
Enable this setting to automatically complete those work items when you successfully complete the PR. To learn more, see Auto-complete work items with pull requests.
Work item transition preferences
By default, the option to complete linked work items during pull request completion remembers each user's last choice. Teams that want to discourage users from completing work items with their pull requests can disable this setting. Users must then opt in to completing work items each time they complete a pull request.
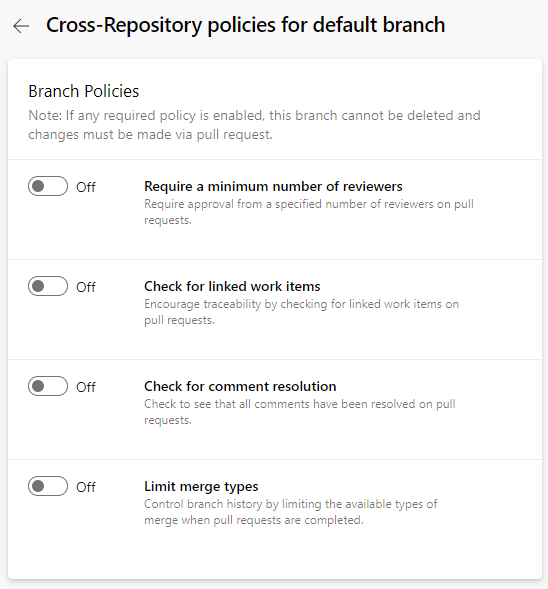
Cross-repo branch policies
You can set policies on a specific branch name, or on the default branch, across all repositories in a project. For example, you could require two minimum reviewers for all pull requests in every main branch for all project repositories.
To set policies to protect specific or default branch names across a project:
From Project Settings, select Repositories in the left navigation.
On the All Repositories page, select the Policies tab.
Select the plus sign + in Branch Policies at the bottom of the page.
On the Add branch protection screen, select Protect the default branch of each repository, or Protect current and future branches matching a specified pattern.
If you select the second option, enter the branch name to protect. An informational message lets you know how many current branches are affected. The branch doesn't have to exist yet to protect the branch name.
Select Create.
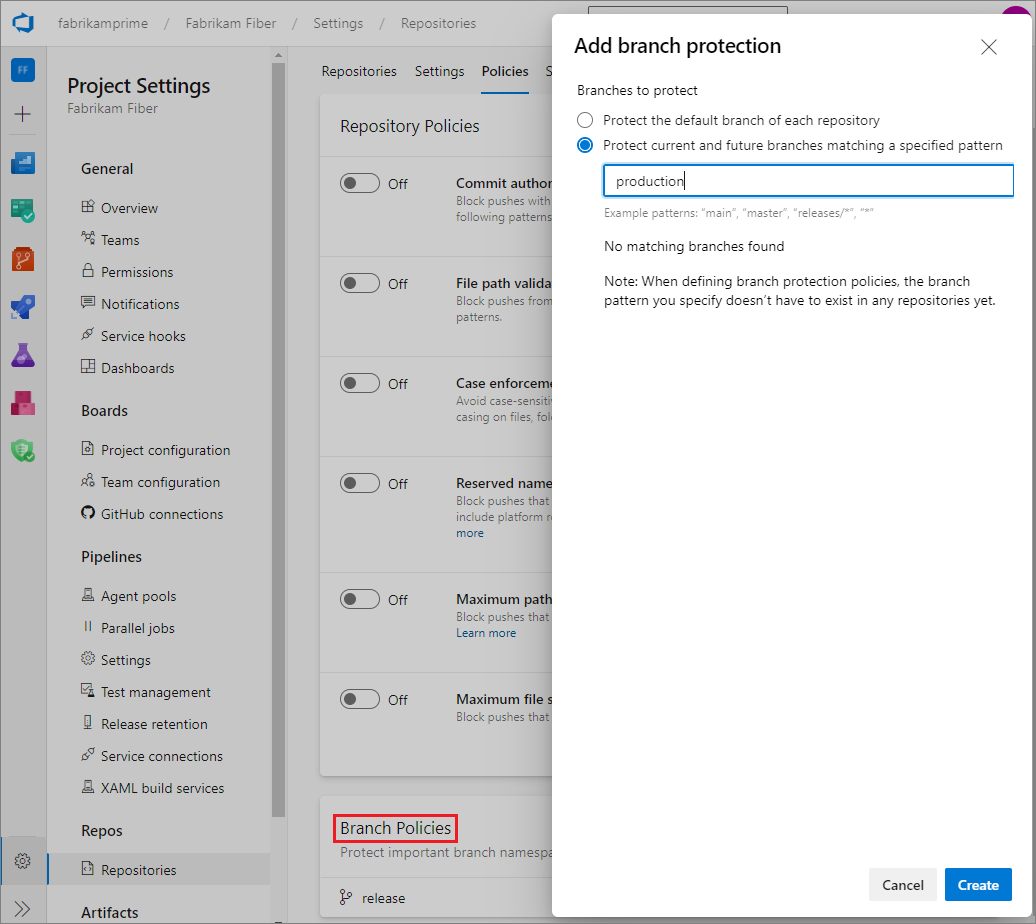
On the Cross-Repository policies for <branch name> page, set the policies you want for the protected branches. For more information about branch policies, see Branch policies.
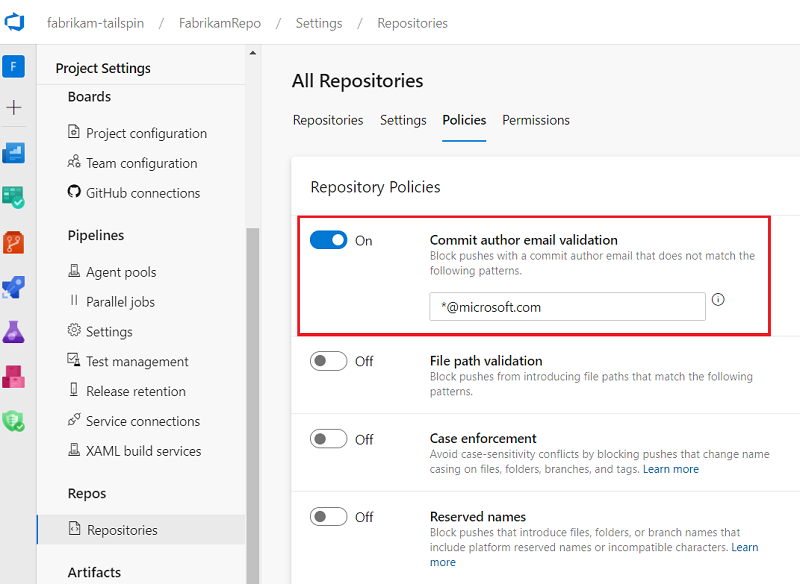
Commit author email validation policy
This policy blocks commits to a repository by commit authors whose email addresses don't match a pattern.
Select Project Settings > Repositories, and select a repository if you want to configure only that repository.
On the Policies tab of the All Repositories or <Repository name> page, under Repository Policies, set Commit author email validation to On or Off.
If you turn on the policy, specify the email address or addresses to match.
You can specify exact email addresses or use wildcards. Use
;as a separator for multiple email patterns. Email patterns prefixed with!are excluded. Order is important.
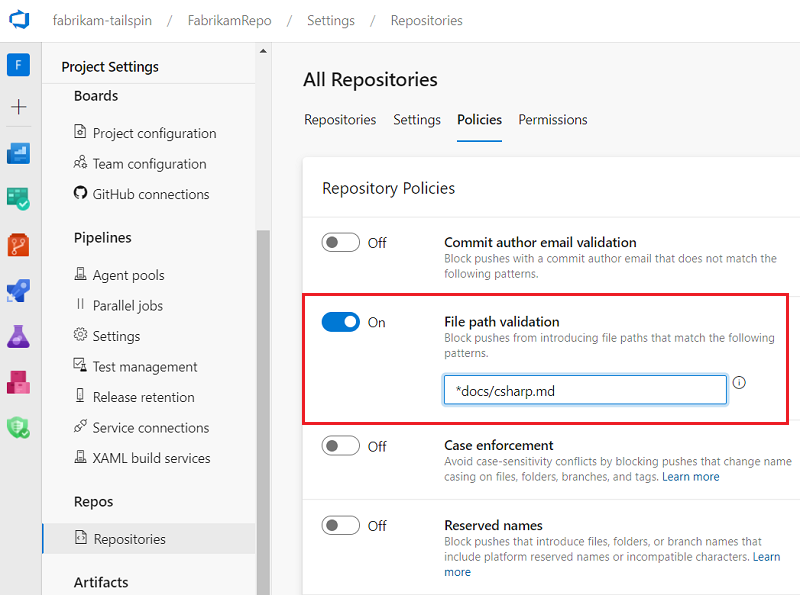
File path validation policy
You can set a policy that prevents commits to a repository from file paths that match a pattern.
Select Project Settings > Repositories, and select a repository if you want to configure only that repository.
On the Policies tab of the All Repositories or <Repository name> page, under Repository Policies, set File path validation to On or Off.
If you turn on the policy, specify the path or paths to block.
You can specify exact paths and wildcards. Exact paths begin with
/. You can also specify multiple paths by using;as a separator. Paths prefixed with!are excluded. Order is important.
Case enforcement policy
Git is case-sensitive, meaning that a file called Foo.txt is different from a file called foo.txt. However, Windows and macOS default to case-insensitive file systems, meaning that Foo.txt and foo.txt are the same name. This discrepancy can cause problems if someone on a case-insensitive system pushes files, folders, branches, or tags that differ only by letter case. For more information, see Git Cross-Platform Compatibility.
If most of your contributors are on Windows or macOS, it's best to enable the Case enforcement policy. Case enforcement switches the server from its default case-sensitive mode, where File.txt and file.txt are distinct, to a Windows and macOS-friendly mode where File.txt and file.txt are considered the same file. This setting affects files, folders, branches, and tags.
This setting prevents contributors from introducing case-only differences. The setting avoids case-sensitivity conflicts by blocking pushes that change name casing on files, folders, branches, and tags. The user has to rewrite their unpushed history to fix the problem, then try the push again.
This setting won't fix a repository that already contains objects that differ only by case. It's best to fix such issues before turning on the policy. Rename files and folders or re-create branches and tags to use non-conflicting names.
To set case enforcement policy:
- Select Project Settings > Repositories, and select a repository if you want to configure only that repository.
- On the Policies tab of the All Repositories or <Repository name> page, under Repository Policies, set Case enforcement to On or Off.

Note
The Case enforcement policy requires TFS 2018.2 or later version.
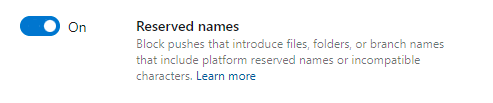
Reserved names policy
Not all filenames are allowed on the three major OS file systems: Windows, macOS, and Linux. Commits to a shared repository might contain file or folder names that are invalid on one or more platforms. If invalid files or folders are fetched and checked out on these platforms, working directories can become corrupted. For more information, see Git Cross-Platform Compatibility.
You can enable or disable policies to place restrictions on file and folder names. The Reserved names setting blocks pushes to a repository that contain file or folder names that are invalid on all platforms. To see what names are invalid, see Git Cross-Platform Compatibility.
To set the reserved names policy:
- Select Project Settings > Repositories, and select a repository if you want to configure only that repository.
- On the Policies tab of the All Repositories or <Repository name> page, under Repository Policies, set Reserved names to On or Off.
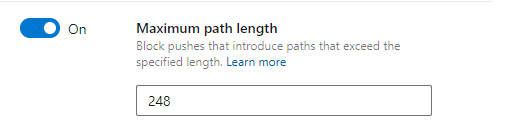
Maximum path length policy
Not all path lengths are allowed on the three major OS file systems: Windows, macOS, and Linux. Commits to a shared repository might contain files or directories with path lengths that are invalid on one or more platforms. If these files or directories are fetched and checked out on a platform where they're invalid, working directories can become corrupted. For more information, see Git Cross-Platform Compatibility.
The Maximum path length setting blocks pushes that contain files or directories with path lengths that are invalid on any platform. To see what path lengths are invalid, see Git Cross-Platform Compatibility. When you enable this setting, the default maximum value is 248, because that maximum length is 100% supported across all three major platforms.
You can modify the maximum path value. For example, if you only have macOS or Linux developers in your organization, you might choose to set the maximum length to the value that's supported on both platforms, 1016. You might also choose to set a lower maximum path value to enforce your organization's directory-naming conventions.
To set the maximum path length policy:
- Select Project Settings > Repositories, and select a repository if you want to configure only that repository.
- On the Policies tab of the All Repositories or <Repository name> page, under Repository Policies, set Maximum path length to On or Off.
- If you turned on the setting, enter a maximum path length.
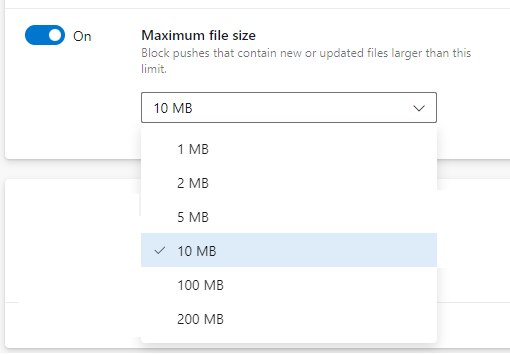
Maximum file size policy
Large files checked into Git remain in the repository indefinitely, increasing clone times and disk usage. For guidance on managing large files, see Manage and store large files in Git.
The Maximum file size policy setting blocks files over a certain size from entering the repository. If a push contains a new or updated file larger than the limit configured in this setting, the push is blocked. The user must rewrite their unpushed history to remove the large file and try the push again.
To configure Maximum file size policy:
- Select Project Settings > Repositories, and select a repository if you want to configure only that repository.
- On the Policies tab of the All Repositories or <Repository name> page, under Repository Policies, set Maximum file size to On or Off.
- If you turned on the setting, select a maximum file size.
Note
The Maximum file size policy requires TFS 2018.2 or later.