Note
Access to this page requires authorization. You can try signing in or changing directories.
Access to this page requires authorization. You can try changing directories.
Applies to: ![]() IoT Edge 1.1
IoT Edge 1.1
Important
IoT Edge 1.1 end of support date was December 13, 2022. Check the Microsoft Product Lifecycle for information about how this product, service, technology, or API is supported. For more information about updating to the latest version of IoT Edge, see Update IoT Edge.
This article provides end-to-end instructions for registering and provisioning a Linux IoT Edge device, including installing IoT Edge.
Every device that connects to an IoT hub has a device ID that's used to track cloud-to-device or device-to-cloud communications. You configure a device with its connection information, which includes the IoT hub hostname, the device ID, and the information the device uses to authenticate to IoT Hub.
The steps in this article walk through a process called manual provisioning, where you connect a single device to its IoT hub. For manual provisioning, you have two options for authenticating IoT Edge devices:
Symmetric keys: When you create a new device identity in IoT Hub, the service creates two keys. You place one of the keys on the device, and it presents the key to IoT Hub when authenticating.
This authentication method is faster to get started, but not as secure.
X.509 self-signed: You create two X.509 identity certificates and place them on the device. When you create a new device identity in IoT Hub, you provide thumbprints from both certificates. When the device authenticates to IoT Hub, it presents one certificate and IoT Hub verifies that the certificate matches its thumbprint.
This authentication method is more secure and recommended for production scenarios.
This article covers using symmetric keys as your authentication method. If you want to use X.509 certificates, see Create and provision an IoT Edge device on Linux using X.509 certificates.
Note
If you have many devices to set up and don't want to manually provision each one, use one of the following articles to learn how IoT Edge works with the IoT Hub device provisioning service:
Prerequisites
This article covers registering your IoT Edge device and installing IoT Edge on it. These tasks have different prerequisites and utilities used to accomplish them. Make sure you have all the prerequisites covered before proceeding.
Device management tools
You can use the Azure portal, Visual Studio Code, or Azure CLI for the steps to register your device. Each utility has its own prerequisites:
A free or standard IoT hub in your Azure subscription.
Device requirements
An X64, ARM32, or ARM64 Linux device.
Microsoft publishes installation packages for a variety of operating systems.
For the latest information about which operating systems are currently supported for production scenarios, see Azure IoT Edge supported systems.
Register your device
You can use the Azure portal, Visual Studio Code, or Azure CLI to register your device, depending on your preference.
In your IoT hub in the Azure portal, IoT Edge devices are created and managed separately from IoT devices that are not edge enabled.
Sign in to the Azure portal and navigate to your IoT hub.
In the left pane, select Devices from the menu, then select Add Device.
On the Create a device page, provide the following information:
- Create a descriptive device ID. Make a note of this device ID, as you'll use it later.
- Check the IoT Edge Device checkbox.
- Select Symmetric key as the authentication type.
- Use the default settings to auto-generate authentication keys and connect the new device to your hub.
Select Save.
Now that you have a device registered in IoT Hub, retrieve the information that you use to complete installation and provisioning of the IoT Edge runtime.
View registered devices and retrieve provisioning information
Devices that use symmetric key authentication need their connection strings to complete installation and provisioning of the IoT Edge runtime.
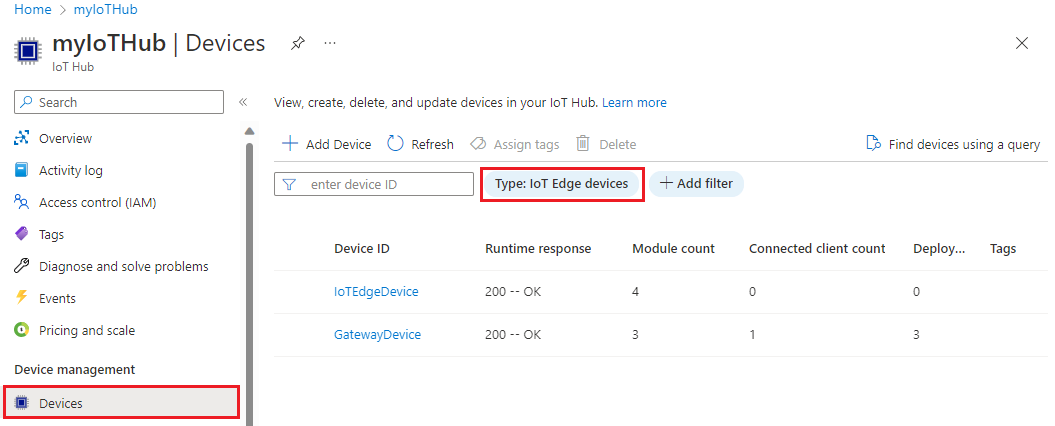
The edge-enabled devices that connect to your IoT hub are listed on the Devices page. You can filter the list by type Iot Edge Device.
When you're ready to set up your device, you need the connection string that links your physical device with its identity in the IoT hub.
Devices that authenticate with symmetric keys have their connection strings available to copy in the portal.
- From the Devices page in the portal, select the IoT Edge device ID from the list.
- Copy the value of either Primary Connection String or Secondary Connection String.
Install IoT Edge
In this section, you prepare your Linux VM or physical device for IoT Edge. Then, you install IoT Edge.
Run the following commands to add the package repository and then add the Microsoft package signing key to your list of trusted keys.
Important
On June 30, 2022 Raspberry Pi OS Stretch was retired from the Tier 1 OS support list. To avoid potential security vulnerabilities update your host OS to Bullseye.
Installing can be done with a few commands. Open a terminal and run the following commands:
20.04:
wget https://packages.microsoft.com/config/ubuntu/20.04/packages-microsoft-prod.deb -O packages-microsoft-prod.deb sudo dpkg -i packages-microsoft-prod.deb rm packages-microsoft-prod.deb18.04:
wget https://packages.microsoft.com/config/ubuntu/18.04/multiarch/packages-microsoft-prod.deb -O packages-microsoft-prod.deb
sudo dpkg -i packages-microsoft-prod.deb
rm packages-microsoft-prod.deb
Note
Azure IoT Edge software packages are subject to the license terms located in each package (usr/share/doc/{package-name} or the LICENSE directory). Read the license terms prior to using a package. Your installation and use of a package constitutes your acceptance of these terms. If you don't agree with the license terms, don't use that package.
Install a container engine
Azure IoT Edge relies on an OCI-compatible container runtime. For production scenarios, we recommend that you use the Moby engine. The Moby engine is the only container engine officially supported with IoT Edge. Docker CE/EE container images are compatible with the Moby runtime.
Install the Moby engine.
sudo apt-get update; \
  sudo apt-get install moby-engine
Once the Moby engine is successfully installed, configure it to use local logging driver as the logging mechanism. To learn more about logging configuration, see Production Deployment Checklist.
Create or open the Docker daemon's config file at
/etc/docker/daemon.json.Set the default logging driver to the
locallogging driver as shown in the example below.{ "log-driver": "local" }Restart the container engine for the changes to take effect.
sudo systemctl restart dockerTip
If you get errors when you install the Moby container engine, verify your Linux kernel for Moby compatibility. Some embedded device manufacturers ship device images that contain custom Linux kernels without the features required for container engine compatibility. Run the following command, which uses the check-config script provided by Moby, to check your kernel configuration:
curl -ssl https://raw.githubusercontent.com/moby/moby/master/contrib/check-config.sh -o check-config.sh
chmod +x check-config.sh
./check-config.sh
In the output of the script, check that all items under
Generally NecessaryandNetwork Driversare enabled. If you're missing features, enable them by rebuilding your kernel from source and selecting the associated modules for inclusion in the appropriate kernel .config. Similarly, if you're using a kernel configuration generator likedefconfigormenuconfig, find and enable the respective features and rebuild your kernel accordingly. After you've deployed your newly modified kernel, run the check-config script again to verify that all the required features were successfully enabled.
Install the IoT Edge runtime
The IoT Edge security daemon provides and maintains security standards on the IoT Edge device. The daemon starts on every boot and bootstraps the device by starting the rest of the IoT Edge runtime.
The steps in this section represent the typical process to install the latest version on a device that has internet connection. If you need to install a specific version, like a pre-release version, or need to install while offline, follow the Offline or specific version installation steps later in this article.
Install IoT Edge version 1.1.* along with the libiothsm-std package:
sudo apt-get update; \
  sudo apt-get install iotedge
Note
IoT Edge version 1.1 is the long-term support branch of IoT Edge. If you are running an older version, we recommend installing or updating to the latest patch as older versions are no longer supported.
Provision the device with its cloud identity
Now that the container engine and the IoT Edge runtime are installed on your device, you're ready for the next step, which is to set up the device with its cloud identity and authentication information.
On the IoT Edge device, open the configuration file.
sudo nano /etc/iotedge/config.yaml
Find the provisioning configurations of the file and uncomment the Manual provisioning configuration using a connection string section, if it isn't already uncommented.
# Manual provisioning configuration using a connection string
provisioning:
source: "manual"
device_connection_string: "ADD_DEVICE_CONNECTION_STRING_HERE"
Update the value of device_connection_string with the connection string from your IoT Edge device. Make sure that any other provisioning sections are commented out. Make sure the provisioning: line has no preceding whitespace and that nested items are indented by two spaces.
To paste clipboard contents into Nano Shift+Right Click or press Shift+Insert.
Save and close the file.
CTRL + X, Y, Enter
After entering the provisioning information in the configuration file, restart the daemon:
sudo systemctl restart iotedge
Verify successful configuration
Verify that the runtime was successfully installed and configured on your IoT Edge device.
Tip
You need elevated privileges to run iotedge commands. Once you sign out of your machine and sign back in the first time after installing the IoT Edge runtime, your permissions are automatically updated. Until then, use sudo in front of the commands.
Check to see that the IoT Edge system service is running.
sudo systemctl status iotedge
If you need to troubleshoot the service, retrieve the service logs.
journalctl -u iotedge
Use the check tool to verify configuration and connection status of the device.
sudo iotedge check
Tip
Always use sudo to run the check tool, even after your permissions are updated. The tool needs elevated privileges to access the config file to verify configuration status.
Note
On a newly provisioned device, you may see an error related to IoT Edge Hub:
× production readiness: Edge Hub's storage directory is persisted on the host filesystem - Error
Could not check current state of edgeHub container
This error is expected on a newly provisioned device because the IoT Edge Hub module isn't running. To resolve the error, in IoT Hub, set the modules for the device and create a deployment. Creating a deployment for the device starts the modules on the device including the IoT Edge Hub module.
View all the modules running on your IoT Edge device. When the service starts for the first time, you should only see the edgeAgent module running. The edgeAgent module runs by default and helps to install and start any additional modules that you deploy to your device.
sudo iotedge list
When you create a new IoT Edge device, it will display the status code 417 -- The device's deployment configuration is not set in the Azure portal. This status is normal, and means that the device is ready to receive a module deployment.
Offline or specific version installation (optional)
The steps in this section are for scenarios not covered by the standard installation steps. This may include:
- Install IoT Edge while offline
- Install a release candidate version
Use the steps in this section if you want to install a specific version of the Azure IoT Edge runtime that isn't available through your package manager. The Microsoft package list only contains a limited set of recent versions and their sub-versions, so these steps are for anyone who wants to install an older version or a release candidate version.
Using curl commands, you can target the component files directly from the IoT Edge GitHub repository.
Navigate to the Azure IoT Edge releases, and find the release version that you want to target.
Expand the Assets section for that version.
Every release should have new files for the IoT Edge security daemon and the hsmlib. If you're going to install IoT Edge on an offline device, download these files ahead of time. Otherwise, use the following commands to update those components.
Find the libiothsm-std file that matches your IoT Edge device's architecture. Right-click on the file link and copy the link address.
Use the copied link in the following command to install that version of the hsmlib:
curl -L <libiothsm-std_link> -o libiothsm-std.deb && sudo apt-get install ./libiothsm-std.debFind the iotedge file that matches your IoT Edge device's architecture. Right-click on the file link and copy the link address.
Use the copied link in the following command to install that version of the IoT Edge security daemon.
curl -L iotedge_link_here -o iotedge.deb && sudo apt-get install ./iotedge.deb
Now that the container engine and the IoT Edge runtime are installed on your device, you're ready for the next step, which is to Provision the device with its cloud identity.
Uninstall IoT Edge
If you want to remove the IoT Edge installation from your device, use the following commands.
Remove the IoT Edge runtime.
sudo apt-get autoremove iotedge
When the IoT Edge runtime is removed, any containers that it created are stopped but still exist on your device. View all containers to see which ones remain.
sudo docker ps -a
Delete the containers from your device, including the two runtime containers.
sudo docker rm -f <container name>
Finally, remove the container runtime from your device.
sudo apt-get autoremove --purge moby-engine