Note
Access to this page requires authorization. You can try signing in or changing directories.
Access to this page requires authorization. You can try changing directories.
Important
Classic VMs will be retired on March 1, 2023.
If you use IaaS resources from ASM, please complete your migration by March 1, 2023. We encourage you to make the switch sooner to take advantage of the many feature enhancements in Azure Resource Manager.
For more information, see Migrate your IaaS resources to Azure Resource Manager by March 1, 2023.
Set up a Microsoft HPC Pack cluster in Azure that contains a head node running Windows Server and several compute nodes running a supported Linux distribution. Explore options to move data among the Linux nodes and the Windows head node of the cluster. Learn how to submit Linux HPC jobs to the cluster.
Note
Azure has two different deployment models for creating and working with resources: Resource Manager and classic. This article covers using both models, but Microsoft recommends that most new deployments use the Resource Manager model.
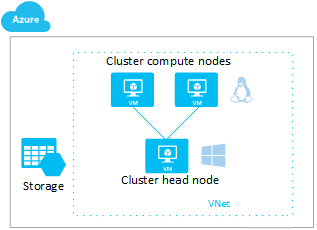
At a high level, the following diagram shows the HPC Pack cluster you create and work with.
For other options to run Linux HPC workloads in Azure, see Technical resources for batch and high-performance computing.
Deploy an HPC Pack cluster with Linux compute nodes
This article shows you two options to deploy an HPC Pack cluster in Azure with Linux compute nodes. Both methods use a Marketplace image of Windows Server with HPC Pack to create the head node.
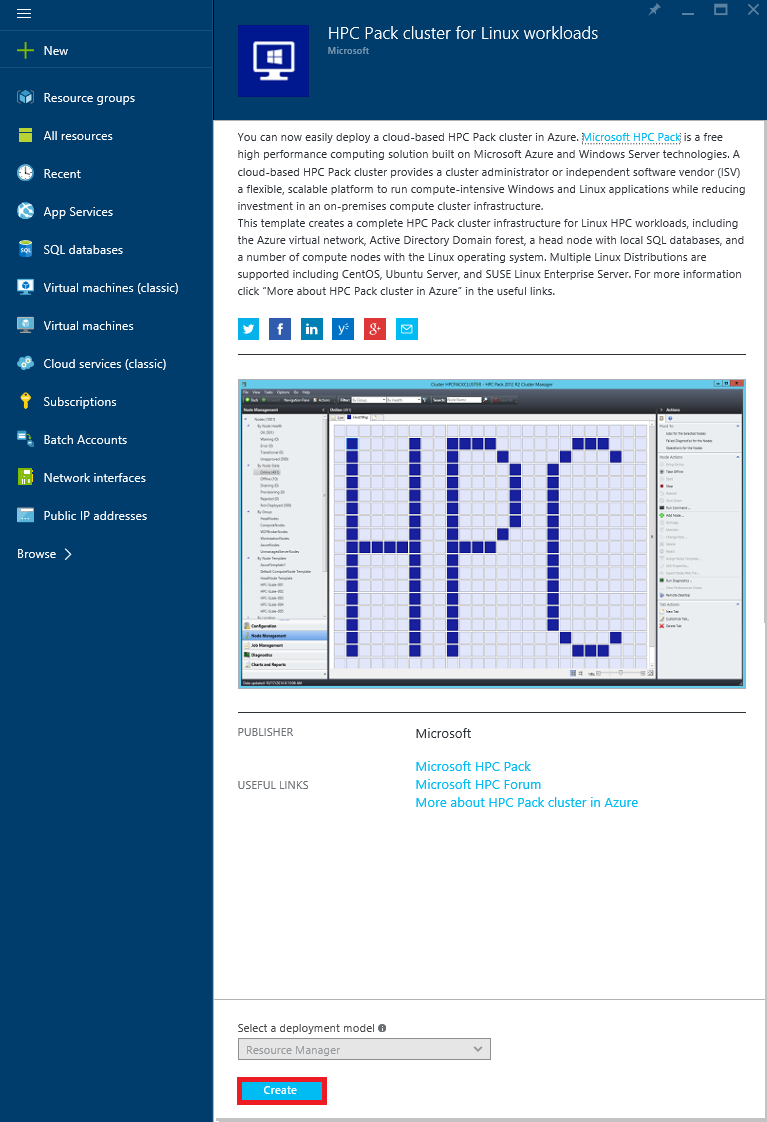
- Azure Resource Manager template - Use a template from the Azure Marketplace, or a quickstart template from the community, to automate creation of the cluster in the Resource Manager deployment model. For example, the HPC Pack cluster for Linux workloads template in the Azure Marketplace creates a complete HPC Pack cluster infrastructure for Linux HPC workloads.
- PowerShell script - Use the Microsoft HPC Pack IaaS deployment script (New-HpcIaaSCluster.ps1) to automate a complete cluster deployment in the classic deployment model. This Azure PowerShell script uses an HPC Pack VM image in the Azure Marketplace for fast deployment and provides a comprehensive set of configuration parameters to deploy Linux compute nodes.
For more information about HPC Pack cluster deployment options in Azure, see Options to create and manage a high-performance computing (HPC) cluster in Azure with Microsoft HPC Pack.
Prerequisites
Azure subscription - You can use a subscription in either the Azure Global or Azure China service. If you don't have an account, you can create a free account in just a couple of minutes.
Cores quota - You might need to increase the quota of cores, especially if you choose to deploy several cluster nodes with multicore VM sizes. To increase a quota, open an online customer support request at no charge.
Linux distributions - Currently HPC Pack supports the following Linux distributions for compute nodes. You can use Marketplace versions of these distributions where available, or supply your own.
CentOS-based: 6.5, 6.6, 6.7, 7.0, 7.1, 7.2, 6.5 HPC, 7.1 HPC
Red Hat Enterprise Linux: 6.7, 6.8, 7.2
SUSE Linux Enterprise Server: SLES 12, SLES 12 (Premium), SLES 12 SP1, SLES 12 SP1 (Premium), SLES 12 for HPC, SLES 12 for HPC (Premium)
Ubuntu Server: 14.04 LTS, 16.04 LTS
Tip
To use the Azure RDMA network with one of the RDMA-capable VM sizes, specify a SUSE Linux Enterprise Server 12 HPC or CentOS-based HPC image from the Azure Marketplace. For more information, see High performance compute VM sizes.
Additional prerequisites to deploy the cluster by using the HPC Pack IaaS deployment script:
- Client computer - You need a Windows-based client computer to run the cluster deployment script.
- Azure PowerShell - Install and configure Azure PowerShell (version 0.8.10 or later) on your client computer.
- HPC Pack IaaS deployment script - Download and unpack the latest version of the script from the Microsoft Download Center. You can check the version of the script by running
.\New-HPCIaaSCluster.ps1 –Version. This article is based on version 4.4.1 or later of the script.
Deployment option 1. Use a Resource Manager template
Go to the HPC Pack cluster for Linux workloads template in the Azure Marketplace, and click Deploy.
In the Azure portal, review the information and then click Create.
On the Basics blade, enter a name for the cluster, which also names the head node VM. You can choose an existing resource group or create a group for the deployment in a location that's available to you. The location affects the availability of certain VM sizes and other Azure services (see Products available by region).
On the Head node settings blade, for a first deployment, you can generally accept the default settings.
Note
The Post-configuration script URL is an optional setting to specify a publicly available Windows PowerShell script that you want to run on the head node VM after it is running.
On the Compute node settings blade, select a naming pattern for the nodes, the number and size of the nodes, and the Linux distribution to deploy.
On the Infrastructure settings blade, enter names for the virtual network and Active Directory domain, domain and VM administrator credentials, and a naming pattern for the storage accounts.
Note
HPC Pack uses the Active Directory domain to authenticate cluster users.
After the validation tests run and you review the terms of use, click Purchase.
Deployment option 2. Use the IaaS deployment script
Following are additional prerequisites to deploy the cluster by using the HPC Pack IaaS deployment script:
- Client computer - You need a Windows-based client computer to run the cluster deployment script.
- Azure PowerShell - Install and configure Azure PowerShell (version 0.8.10 or later) on your client computer.
- HPC Pack IaaS deployment script - Download and unpack the latest version of the script from the Microsoft Download Center. You can check the version of the script by running
.\New-HPCIaaSCluster.ps1 –Version. This article is based on version 4.4.1 or later of the script.
XML configuration file
The HPC Pack IaaS deployment script uses an XML configuration file as input to describe the HPC cluster. The following sample configuration file specifies a small cluster consisting of an HPC Pack head node and two size A7 CentOS 7.0 Linux compute nodes.
Modify the file as needed for your environment and desired cluster configuration, and save it with a name such as HPCDemoConfig.xml. For example, you need to supply your subscription name and a unique storage account name and cloud service name. Additionally, you might want to choose a different supported Linux image for the compute nodes. For more information about the elements in the configuration file, see the Manual.rtf file in the script folder and Create an HPC cluster with the HPC Pack IaaS deployment script.
<?xml version="1.0" encoding="utf-8" ?>
<IaaSClusterConfig>
  <Subscription>
    <SubscriptionName>Subscription-1</SubscriptionName>
    <StorageAccount>allvhdsje</StorageAccount>
  </Subscription>
  <Location>Japan East</Location>
  <VNet>
    <VNetName>centos7rdmavnetje</VNetName>
    <SubnetName>CentOS7RDMACluster</SubnetName>
  </VNet>
  <Domain>
    <DCOption>HeadNodeAsDC</DCOption>
    <DomainFQDN>hpc.local</DomainFQDN>
  </Domain>
  <Database>
    <DBOption>LocalDB</DBOption>
  </Database>
  <HeadNode>
    <VMName>CentOS7RDMA-HN</VMName>
    <ServiceName>centos7rdma-je</ServiceName>
  <VMSize>ExtraLarge</VMSize>
  <EnableRESTAPI />
  <EnableWebPortal />
  </HeadNode>
  <LinuxComputeNodes>
    <VMNamePattern>CentOS7RDMA-LN%1%</VMNamePattern>
    <ServiceName>centos7rdma-je</ServiceName>
    <VMSize>A7</VMSize>
    <NodeCount>2</NodeCount>
    <ImageName>5112500ae3b842c8b9c604889f8753c3__OpenLogic-CentOS-70-20150325</ImageName>
  </LinuxComputeNodes>
</IaaSClusterConfig>
To run the HPC Pack IaaS deployment script
Open Windows PowerShell on the client computer as an administrator.
Change directory to the folder where the script is installed (E:\IaaSClusterScript in this example).
cd E:\IaaSClusterScriptRun the following command to deploy the HPC Pack cluster. This example assumes that the configuration file is located in E:\HPCDemoConfig.xml
.\New-HpcIaaSCluster.ps1 –ConfigFile E:\HPCDemoConfig.xml –AdminUserName MyAdminNamea. Because the AdminPassword is not specified in the preceding command, you are prompted to enter the password for user MyAdminName.
b. The script then starts to validate the configuration file. It can take up to several minutes depending on the network connection.

c. After validations pass, the script lists the cluster resources to create. Enter Y to continue.

d. The script starts to deploy the HPC Pack cluster and completes the configuration without further manual steps. The script can run for several minutes.

Note
In this example, the script generates a log file automatically since the -LogFile parameter isn't specified. The logs aren't written in real time, but are collected at the end of the validation and the deployment. If the PowerShell process is stopped while the script is running, some logs are lost.
Connect to the head node
After you deploy the HPC Pack cluster in Azure, connect by Remote Desktop to the head node VM using the domain credentials you provided when you deployed the cluster (for example, hpc\clusteradmin). You manage the cluster from the head node.
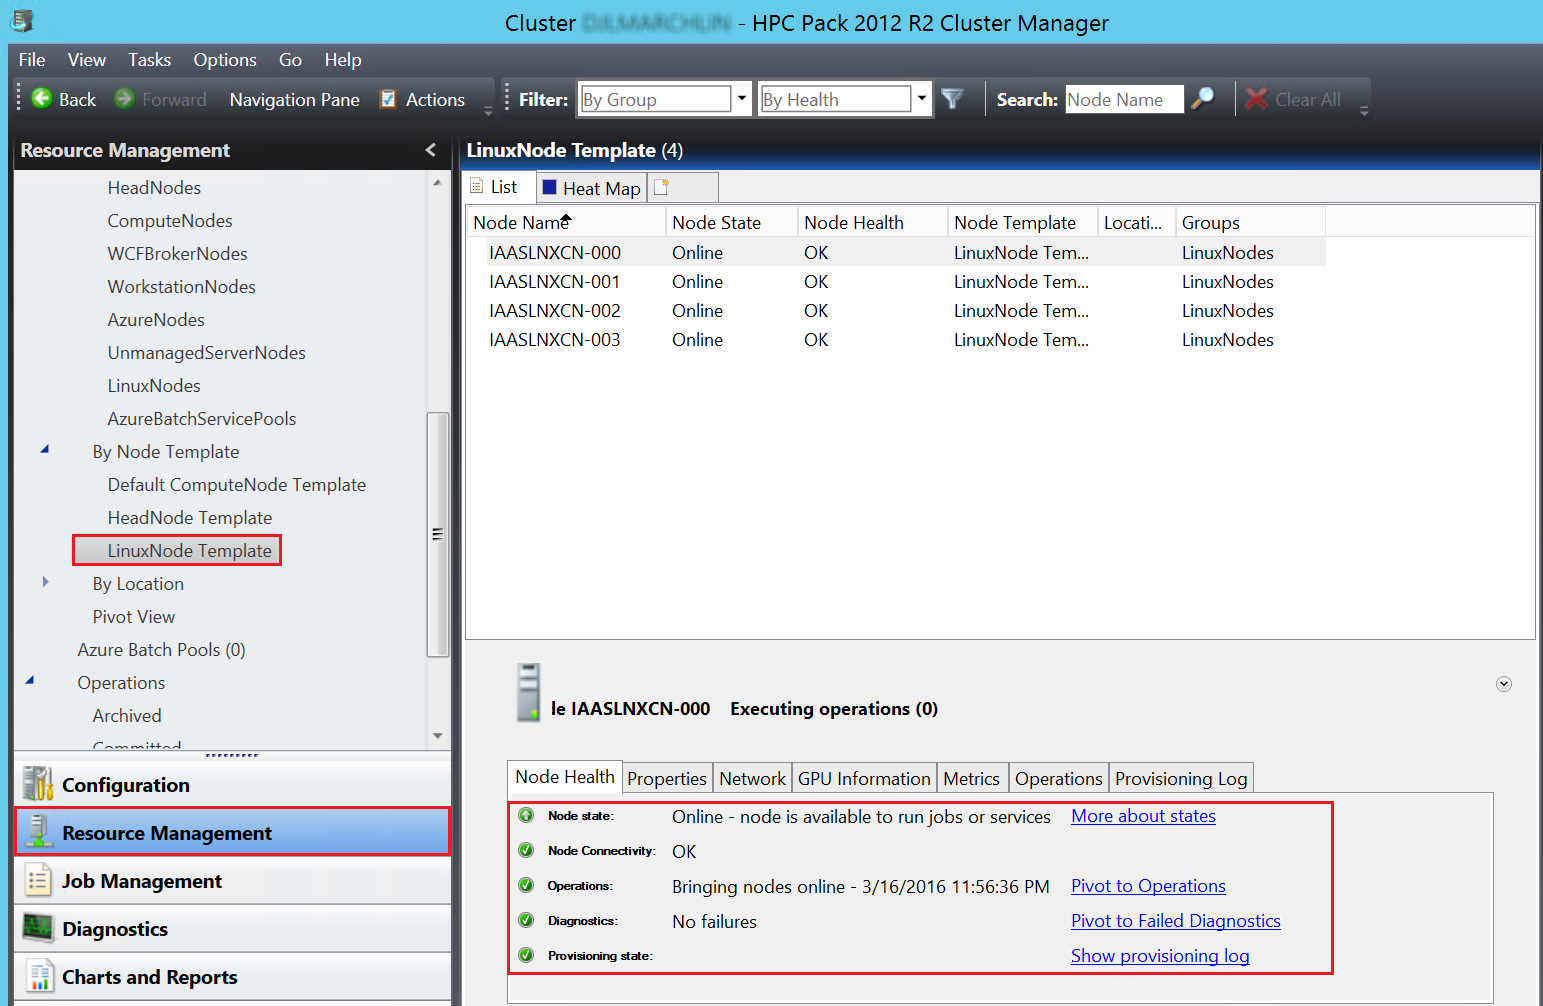
On the head node, start HPC Cluster Manager to check the status of the HPC Pack cluster. You can manage and monitor Linux compute nodes the same way you work with Windows compute nodes. For example, you see the Linux nodes listed in Resource Management (these nodes are deployed with the LinuxNode template).
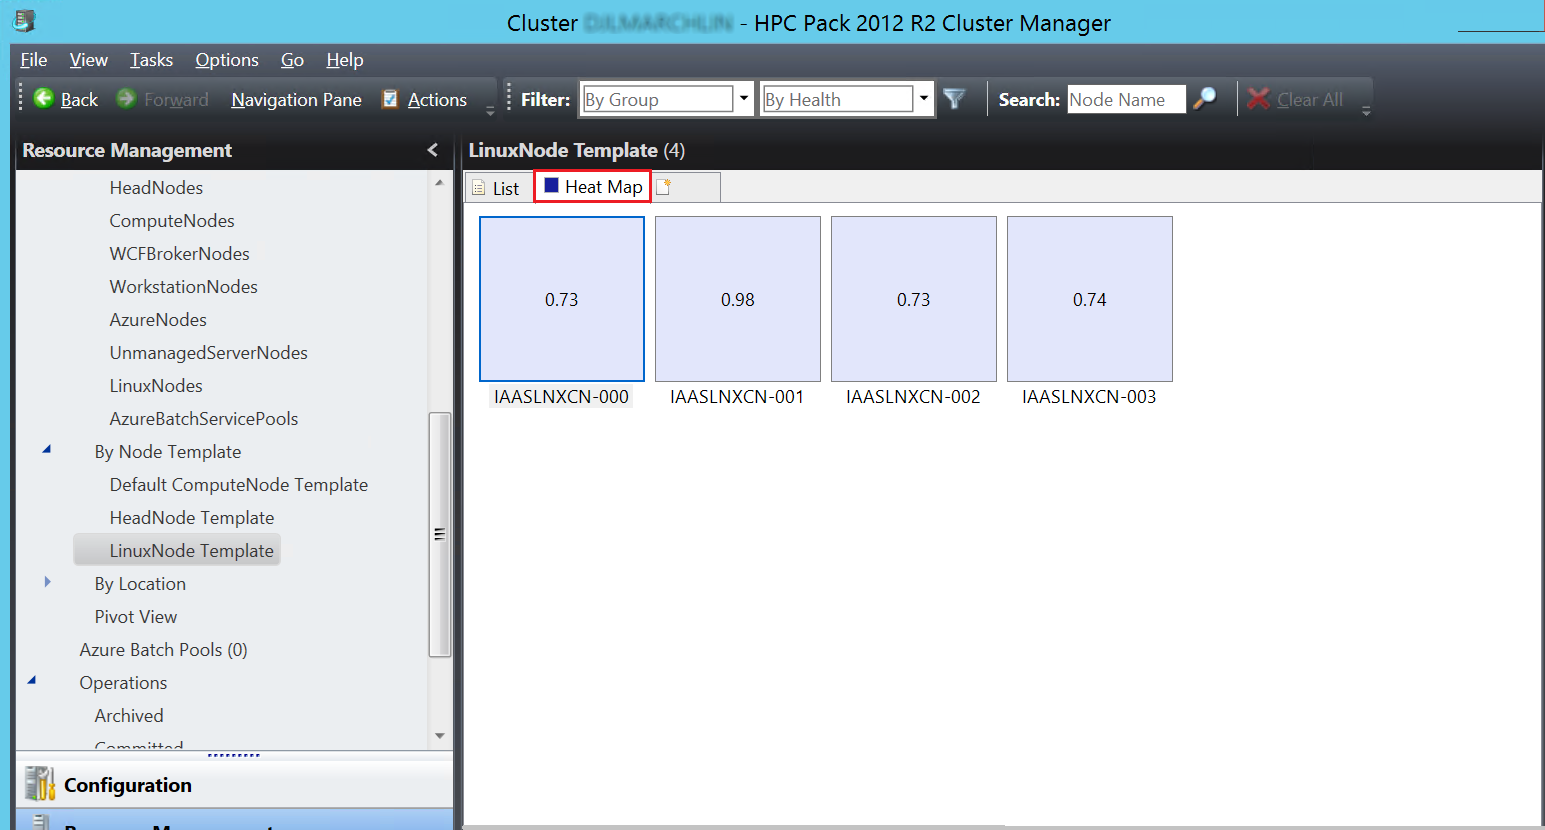
You also see the Linux nodes in the Heat Map view.
How to move data in a cluster with Linux nodes
You have several choices to move data among Linux nodes and the Windows head node of the cluster. Here are three common methods, described in more detail in the following sections:
- Azure File - Exposes a managed SMB file share to store data files in Azure storage. Windows nodes and Linux nodes can mount an Azure File share as a drive or folder at the same time, even if they're deployed in different virtual networks.
- Head node SMB share - Mounts a standard Windows shared folder of the head node on Linux nodes.
- Head node NFS server - Provides a file-sharing solution for a mixed Windows and Linux environment.
Azure File storage
The Azure File service exposes file shares using the standard SMB 2.1 protocol. Azure VMs and cloud services can share file data across application components via mounted shares, and on-premises applications can access file data in a share through the File storage API.
For detailed steps to create an Azure File share and mount it on the head node, see Get started with Azure File storage on Windows. To mount the Azure File share on the Linux nodes, see How to use Azure File storage with Linux. To set up persisting connections, see Persisting connections to Microsoft Azure Files.
In the following example, create an Azure File share on a storage account. To mount the share on the head node, open a Command Prompt and enter the following commands:
cmdkey /add:allvhdsje.file.core.windows.net /user:allvhdsje /pass:<storageaccountkey>

net use Z: \\allvhdje.file.core.windows.net\rdma /persistent:yes
In this example, allvhdsje is your storage account name, storageaccountkey is your storage account key, and rdma is the Azure File share name. The Azure File share is mounted as Z: on the head node.
To mount the Azure File share on Linux nodes, run a clusrun command on the head node. Clusrun is a useful HPC Pack tool to carry out administrative tasks on multiple nodes. (See also Clusrun for Linux nodes in this article.)
Open a Windows PowerShell window and enter the following commands:
clusrun /nodegroup:LinuxNodes mkdir -p /rdma

clusrun /nodegroup:LinuxNodes mount -t cifs //allvhdsje.file.core.windows.net/rdma /rdma -o vers=2.1`,username=allvhdsje`,password=<storageaccountkey>'`,dir_mode=0777`,file_mode=0777
The first command creates a folder named /rdma on all nodes in the LinuxNodes group. The second command mounts the Azure File share allvhdsjw.file.core.windows.net/rdma onto the /rdma folder with dir and file mode bits set to 777. In the second command, allvhdsje is your storage account name and storageaccountkey is your storage account key.
Note
The “`” symbol in the second command is an escape symbol for PowerShell. “`,” means that the “,” (comma character) is a part of the command.
Head node share
Alternatively, mount a shared folder of the head node on Linux nodes. A share provides the simplest way to share files, but the head node and all Linux nodes must be deployed in the same virtual network. Here are the steps.
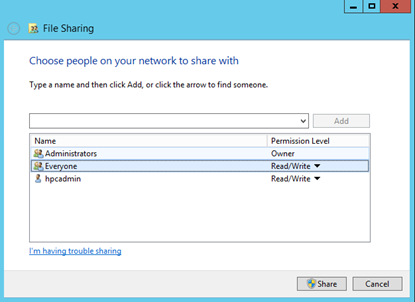
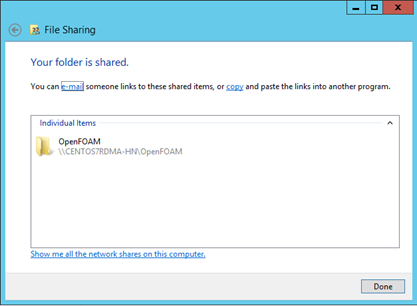
Create a folder on the head node and share it to Everyone with Read/Write permissions. For example, share D:\OpenFOAM on the head node as \CentOS7RDMA-HN\OpenFOAM. Here CentOS7RDMA-HN is the hostname of the head node.
Open a Windows PowerShell window and run the following commands:
clusrun /nodegroup:LinuxNodes mkdir -p /openfoam

clusrun /nodegroup:LinuxNodes mount -t cifs //CentOS7RDMA-HN/OpenFOAM /openfoam -o vers=2.1`,username=<username>`,password='<password>'`,dir_mode=0777`,file_mode=0777
The first command creates a folder named /openfoam on all nodes in the LinuxNodes group. The second command mounts the shared folder //CentOS7RDMA-HN/OpenFOAM onto the folder with dir and file mode bits set to 777. The username and password in the command should be the username and password of a cluster user on the head node. (See Add or remove cluster users.)
Note
The “`” symbol in the second command is an escape symbol for PowerShell. “`,” means that the “,” (comma character) is a part of the command.
NFS server
The NFS service enables you to share and migrate files between computers running the Windows Server 2012 operating system using the SMB protocol and Linux-based computers using the NFS protocol. The NFS server and all other nodes have to be deployed in the same virtual network. It provides better compatibility with Linux nodes compared with an SMB share. For example, it supports file links.
To install and set up an NFS server, follow the steps in Server for Network File System First Share End-to-End.
For example, create an NFS share named nfs with the following properties:
Open a Windows PowerShell window and run the following commands:
clusrun /nodegroup:LinuxNodes mkdir -p /nfsshare

clusrun /nodegroup:LinuxNodes mount CentOS7RDMA-HN:/nfs /nfsshared
The first command creates a folder named /nfsshared on all nodes in the LinuxNodes group. The second command mounts the NFS share CentOS7RDMA-HN:/nfs onto the folder. Here CentOS7RDMA-HN:/nfs is the remote path of your NFS share.
How to submit jobs
There are several ways to submit jobs to the HPC Pack cluster:
- HPC Cluster Manager or HPC Job Manager GUI
- HPC web portal
- REST API
Job submission to the cluster in Azure via HPC Pack GUI tools and the HPC web portal are the same as for Windows compute nodes. See HPC Pack Job Manager and How to submit jobs from an on-premises client computer.
To submit jobs via the REST API, refer to Creating and Submitting Jobs by Using the REST API in Microsoft HPC Pack. To submit jobs from a Linux client, also refer to the Python sample in the HPC Pack SDK.
Clusrun for Linux nodes
The HPC Pack clusrun tool can be used to execute commands on Linux nodes either through a Command Prompt or HPC Cluster Manager. Following are some basic examples.
Show current user names on all nodes in the cluster.
clusrun whoamiInstall the gdb debugger tool with yum on all nodes in the linuxnodes group and then restart the nodes after 10 minutes.
clusrun /nodegroup:linuxnodes yum install gdb –y; shutdown –r 10Create a shell script displaying each number 1 through 10 for one second on each Linux node in the cluster, run it, and show output from the nodes immediately.
clusrun /interleaved /nodegroup:linuxnodes echo \"for i in {1..10}; do echo \\\"\$i\\\"; sleep 1; done\" ^> script.sh; chmod +x script.sh; ./script.sh
Note
You might need to use certain escape characters in clusrun commands. As shown in this example, use ^ in a Command Prompt to escape the ">" symbol.
Next steps
- Try scaling up the cluster to a larger number of nodes, or try running a Linux workload on the cluster. For an example, see Run NAMD with Microsoft HPC Pack on Linux compute nodes in Azure.
- Try a cluster with RDMA-capable, compute-intensive VMs to run MPI workloads. For an example, see Run OpenFOAM with Microsoft HPC Pack on a Linux RDMA cluster in Azure.
- If you are interested in working with Linux nodes in an on-premises HPC Pack cluster, see the TechNet guidance.