Note
Access to this page requires authorization. You can try signing in or changing directories.
Access to this page requires authorization. You can try changing directories.
Important
Classic VMs will be retired on March 1, 2023.
If you use IaaS resources from ASM, please complete your migration by March 1, 2023. We encourage you to make the switch sooner to take advantage of the many feature enhancements in Azure Resource Manager.
For more information, see Migrate your IaaS resources to Azure Resource Manager by March 1, 2023.
This article shows you one way to run OpenFoam in Azure virtual machines. Here, you deploy a Microsoft HPC Pack cluster with Linux compute nodes on Azure and run an OpenFoam job with Intel MPI. You can use RDMA-capable Azure VMs for the compute nodes, so that the compute nodes communicate over the Azure RDMA network. Other options to run OpenFoam in Azure include fully configured commercial images available in the Marketplace, such as UberCloud's OpenFoam 2.3 on CentOS 6, and by running on Azure Batch.
Note
Azure has two different deployment models for creating and working with resources: Resource Manager and classic. This article covers using both models, but Microsoft recommends that most new deployments use the Resource Manager model.
OpenFOAM (for Open Field Operation and Manipulation) is an open-source computational fluid dynamics (CFD) software package that is used widely in engineering and science, in both commercial and academic organizations. It includes tools for meshing, notably snappyHexMesh, a parallelized mesher for complex CAD geometries, and for pre- and post-processing. Almost all processes run in parallel, enabling users to take full advantage of computer hardware at their disposal.
Microsoft HPC Pack provides features to run large-scale HPC and parallel applications, including MPI applications, on clusters of Microsoft Azure virtual machines. HPC Pack also supports running Linux HPC applications on Linux compute node VMs deployed in an HPC Pack cluster. See Get started with Linux compute nodes in an HPC Pack cluster in Azure for an introduction to using Linux compute nodes with HPC Pack.
Note
This article illustrates how to run a Linux MPI workload with HPC Pack. It assumes you have some familiarity with Linux system administration and with running MPI workloads on Linux clusters. If you use versions of MPI and OpenFOAM different from the ones shown in this article, you might have to modify some installation and configuration steps.
Prerequisites
HPC Pack cluster with RDMA-capable Linux compute nodes - Deploy an HPC Pack cluster with size A8, A9, H16r, or H16rm Linux compute nodes using either an Azure Resource Manager template or an Azure PowerShell script. See Get started with Linux compute nodes in an HPC Pack cluster in Azure for the prerequisites and steps for either option. If you choose the PowerShell script deployment option, see the sample configuration file in the sample files at the end of this article. Use this configuration to deploy an Azure-based HPC Pack cluster consisting of a size A8 Windows Server 2012 R2 head node and 2 size A8 SUSE Linux Enterprise Server 12 compute nodes. Substitute appropriate values for your subscription and service names.
Additional things to know
- For Linux RDMA networking prerequisites in Azure, see High performance compute VM sizes.
- If you use the Powershell script deployment option, deploy all the Linux compute nodes within one cloud service to use the RDMA network connection.
- After deploying the Linux nodes, connect by SSH to perform any additional administrative tasks. Find the SSH connection details for each Linux VM in the Azure portal.
Intel MPI - To run OpenFOAM on SLES 12 HPC compute nodes in Azure, you need to install the Intel MPI Library 5 runtime from the Intel.com site. (Intel MPI 5 is preinstalled on CentOS-based HPC images.) In a later step, if necessary, install Intel MPI on your Linux compute nodes. To prepare for this step, after you register with Intel, follow the link in the confirmation email to the related web page. Then, copy the download link for the .tgz file for the appropriate version of Intel MPI. This article is based on Intel MPI version 5.0.3.048.
OpenFOAM Source Pack - Download the OpenFOAM Source Pack software for Linux from the OpenFOAM Foundation site. This article is based on Source Pack version 2.3.1, available for download as OpenFOAM-2.3.1.tgz. Follow the instructions later in this article to unpack and compile OpenFOAM on the Linux compute nodes.
EnSight (optional) - To see the results of your OpenFOAM simulation, download and install the EnSight visualization and analysis program. Licensing and download information are at the EnSight site.
Set up mutual trust between compute nodes
Running a cross-node job on multiple Linux nodes requires the nodes to trust each other (by rsh or ssh). When you create the HPC Pack cluster with the Microsoft HPC Pack IaaS deployment script, the script automatically sets up permanent mutual trust for the administrator account you specify. For non-administrator users you create in the cluster's domain, you have to set up temporary mutual trust among the nodes when a job is allocated to them, and destroy the relationship after the job is complete. To establish trust for each user, provide an RSA key pair to the cluster that HPC Pack uses for the trust relationship.
Generate an RSA key pair
It's easy to generate an RSA key pair, which contains a public key and a private key, by running the Linux ssh-keygen command.
Log on to a Linux computer.
Run the following command:
ssh-keygen -t rsaNote
Press Enter to use the default settings until the command is completed. Do not enter a passphrase here; when prompted for a password, just press Enter.
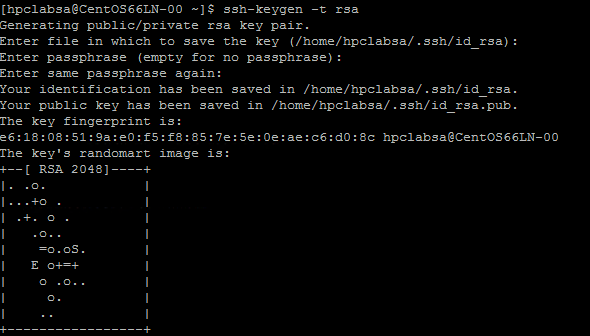
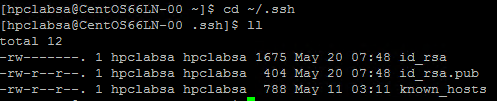
Change directory to the ~/.ssh directory. The private key is stored in id_rsa and the public key in id_rsa.pub.
Add the key pair to the HPC Pack cluster
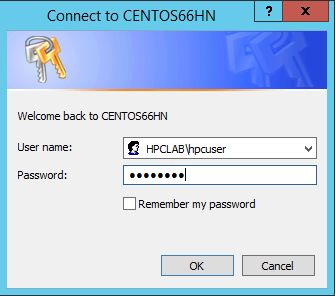
Make a Remote Desktop connection to your head node with your HPC Pack administrator account (the administrator account you set up when you ran the deployment script).
Use standard Windows Server procedures to create a domain user account in the cluster's Active Directory domain. For example, use the Active Directory User and Computers tool on the head node. The examples in this article assume you create a domain user named hpclab\hpcuser.
Create a file named C:\cred.xml and copy the RSA key data into it. A sample cred.xml file is at the end of this article.
<ExtendedData>
  <PrivateKey>Copy the contents of private key here</PrivateKey>
  <PublicKey>Copy the contents of public key here</PublicKey>
</ExtendedData>
Open a Command Prompt and enter the following command to set the credentials data for the hpclab\hpcuser account. You use the extendeddata parameter to pass the name of C:\cred.xml file you created for the key data.
hpccred setcreds /extendeddata:c:\cred.xml /user:hpclab\hpcuser /password:<UserPassword>This command completes successfully without output. After setting the credentials for the user accounts you need to run jobs, store the cred.xml file in a secure location, or delete it.
If you generated the RSA key pair on one of your Linux nodes, remember to delete the keys after you finish using them. If HPC Pack finds an existing id_rsa file or id_rsa.pub file, it does not set up mutual trust.
Important
We don’t recommend running a Linux job as a cluster administrator on a shared cluster, because a job submitted by an administrator runs under the root account on the Linux nodes. However, a job submitted by a non-administrator user runs under a local Linux user account with the same name as the job user. In this case, HPC Pack sets up mutual trust for this Linux user across the nodes allocated to the job. You can set up the Linux user manually on the Linux nodes before running the job, or HPC Pack creates the user automatically when the job is submitted. If HPC Pack creates the user, HPC Pack deletes it after the job completes. To reduce security threats, HPC Pack removes the keys after job completion.
Set up a file share for Linux nodes
Now set up a standard SMB share on a folder on the head node. To allow the Linux nodes to access application files with a common path, mount the shared folder on the Linux nodes. If you want, you can use another file sharing option, such as an Azure Files share - recommended for many scenarios - or an NFS share. See the file sharing information and detailed steps in Get started with Linux compute nodes in an HPC Pack Cluster in Azure.
Create a folder on the head node, and share it to Everyone by setting Read/Write privileges. For example, share C:\OpenFOAM on the head node as \\SUSE12RDMA-HN\OpenFOAM. Here, SUSE12RDMA-HN is the host name of the head node.
Open a Windows PowerShell window and run the following commands:
clusrun /nodegroup:LinuxNodes mkdir -p /openfoam

clusrun /nodegroup:LinuxNodes mount -t cifs //SUSE12RDMA-HN/OpenFOAM /openfoam -o vers=2.1`,username=<username>`,password='<password>'`,dir_mode=0777`,file_mode=0777
The first command creates a folder named /openfoam on all nodes in the LinuxNodes group. The second command mounts the shared folder //SUSE12RDMA-HN/OpenFOAM on the Linux nodes with dir_mode and file_mode bits set to 777. The username and password in the command should be the credentials of a user on the head node.
Note
The “`” symbol in the second command is an escape symbol for PowerShell. “`,” means the “,” (comma character) is a part of the command.
Install MPI and OpenFOAM
To run OpenFOAM as an MPI job on the RDMA network, you need to compile OpenFOAM with the Intel MPI libraries.
First, run several clusrun commands to install Intel MPI libraries (if not already installed) and OpenFOAM on your Linux nodes. Use the head node share configured previously to share the installation files among the Linux nodes.
Important
These installation and compiling steps are examples. You need some knowledge of Linux system administration to ensure that dependent compilers and libraries are installed correctly. You might need to modify certain environment variables or other settings for your versions of Intel MPI and OpenFOAM. For details, see Intel MPI Library for Linux Installation Guide and OpenFOAM Source Pack Installation for your environment.
Install Intel MPI
Save the downloaded installation package for Intel MPI (l_mpi_p_5.0.3.048.tgz in this example) in C:\OpenFoam on the head node so that the Linux nodes can access this file from /openfoam. Then run clusrun to install Intel MPI library on all the Linux nodes.
The following commands copy the installation package and extract it to /opt/intel on each node.
clusrun /nodegroup:LinuxNodes mkdir -p /opt/intel

clusrun /nodegroup:LinuxNodes cp /openfoam/l_mpi_p_5.0.3.048.tgz /opt/intel/

clusrun /nodegroup:LinuxNodes tar -xzf /opt/intel/l_mpi_p_5.0.3.048.tgz -C /opt/intel/
To install Intel MPI Library silently, use a silent.cfg file. You can find an example in the sample files at the end of this article. Place this file in the shared folder /openfoam. For details about the silent.cfg file, see Intel MPI Library for Linux Installation Guide - Silent Installation.
Tip
Make sure that you save your silent.cfg file as a text file with Linux line endings (LF only, not CR LF). This step ensures that it runs properly on the Linux nodes.
Install Intel MPI Library in silent mode.
clusrun /nodegroup:LinuxNodes bash /opt/intel/l_mpi_p_5.0.3.048/install.sh --silent /openfoam/silent.cfg
Configure MPI
For testing, you should add the following lines to the /etc/security/limits.conf on each of the Linux nodes:
clusrun /nodegroup:LinuxNodes echo "*               hard    memlock         unlimited" `>`> /etc/security/limits.conf
clusrun /nodegroup:LinuxNodes echo "*               soft    memlock         unlimited" `>`> /etc/security/limits.conf
Restart the Linux nodes after you update the limits.conf file. For example, use the following clusrun command:
clusrun /nodegroup:LinuxNodes systemctl reboot
After restarting, ensure that the shared folder is mounted as /openfoam.
Compile and install OpenFOAM
Save the downloaded installation package for the OpenFOAM Source Pack (OpenFOAM-2.3.1.tgz in this example) to C:\OpenFoam on the head node so that the Linux nodes can access this file from /openfoam. Then run clusrun commands to compile OpenFOAM on all the Linux nodes.
Create a folder /opt/OpenFOAM on each Linux node, copy the source package to this folder, and extract it there.
clusrun /nodegroup:LinuxNodes mkdir -p /opt/OpenFOAM

clusrun /nodegroup:LinuxNodes cp /openfoam/OpenFOAM-2.3.1.tgz /opt/OpenFOAM/

clusrun /nodegroup:LinuxNodes tar -xzf /opt/OpenFOAM/OpenFOAM-2.3.1.tgz -C /opt/OpenFOAM/
To compile OpenFOAM with the Intel MPI Library, first set up some environment variables for both Intel MPI and OpenFOAM. Use a bash script called settings.sh to set the variables. You can find an example in the sample files at the end of this article. Place this file (saved with Linux line endings) in the shared folder /openfoam. This file also contains settings for the MPI and OpenFOAM runtimes that you use later to run an OpenFOAM job.
Install dependent packages needed to compile OpenFOAM. Depending on your Linux distribution, you might first need to add a repository. Run clusrun commands similar to the following:
clusrun /nodegroup:LinuxNodes zypper ar http://download.opensuse.org/distribution/13.2/repo/oss/suse/ opensuse

clusrun /nodegroup:LinuxNodes zypper -n --gpg-auto-import-keys install --repo opensuse --force-resolution -t pattern devel_C_C++
If necessary, SSH to each Linux node to run the commands to confirm that they run properly.
Run the following command to compile OpenFOAM. The compilation process takes some time to complete and generates a large amount of log information to standard output, so use the /interleaved option to display the output interleaved.
clusrun /nodegroup:LinuxNodes /interleaved source /openfoam/settings.sh `&`& /opt/OpenFOAM/OpenFOAM-2.3.1/AllwmakeNote
The “`” symbol in the command is an escape symbol for PowerShell. “`&” means the “&” is a part of the command.
Prepare to run an OpenFOAM job
Now get ready to run an MPI job called sloshingTank3D, which is one of the OpenFoam samples, on two Linux nodes.
Set up the runtime environment
To set up the runtime environments for MPI and OpenFOAM on the Linux nodes, run the following command in a Windows PowerShell window on the head node. (This command is valid for SUSE Linux only.)
clusrun /nodegroup:LinuxNodes cp /openfoam/settings.sh /etc/profile.d/
Prepare sample data
Use the head node share you configured previously to share files among the Linux nodes (mounted as /openfoam).
SSH to one of your Linux compute nodes.
Run the following command to set up the OpenFOAM runtime environment, if you haven’t already done this.
$ source /openfoam/settings.shCopy the sloshingTank3D sample to the shared folder and navigate to it.
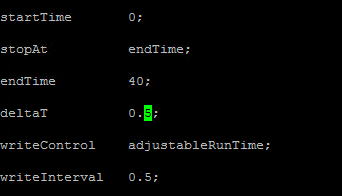
$ cp -r $FOAM_TUTORIALS/multiphase/interDyMFoam/ras/sloshingTank3D /openfoam/

$ cd /openfoam/sloshingTank3D
When you use the default parameters of this sample, it can take tens of minutes to run, so you might want to modify some parameters to make it run faster. One simple choice is to modify the time step variables deltaT and writeInterval in the system/controlDict file. This file stores all input data relating to the control of time and reading and writing solution data. For example, you could change the value of deltaT from 0.05 to 0.5 and the value of writeInterval from 0.05 to 0.5.
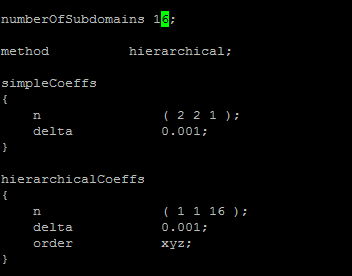
Specify desired values for the variables in the system/decomposeParDict file. This example uses two Linux nodes each with 8 cores, so set numberOfSubdomains to 16 and n of hierarchicalCoeffs to (1 1 16), which means run OpenFOAM in parallel with 16 processes. For more information, see OpenFOAM User Guide: 3.4 Running applications in parallel.
Run the following commands from the sloshingTank3D directory to prepare the sample data.
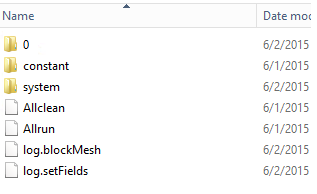
$ . $WM_PROJECT_DIR/bin/tools/RunFunctions

$ m4 constant/polyMesh/blockMeshDict.m4 > constant/polyMesh/blockMeshDict

$ runApplication blockMesh

$ cp 0/alpha.water.org 0/alpha.water

$ runApplication setFields
On the head node, you should see the sample data files are copied into C:\OpenFoam\sloshingTank3D. (C:\OpenFoam is the shared folder on the head node.)
Host file for mpirun
In this step, you create a host file (a list of compute nodes) which the mpirun command uses.
On one of the Linux nodes, create a file named hostfile under /openfoam, so this file can be reached at /openfoam/hostfile on all Linux nodes.
Write your Linux node names into this file. In this example, the file contains the following names:
SUSE12RDMA-LN1
SUSE12RDMA-LN2
Tip
You can also create this file at C:\OpenFoam\hostfile on the head node. If you choose this option, save it as a text file with Linux line endings (LF only, not CR LF). This ensures that it runs properly on the Linux nodes.
Bash script wrapper
If you have many Linux nodes and you want your job to run on only some of them, it’s not a good idea to use a fixed host file, because you don’t know which nodes will be allocated to your job. In this case, write a bash script wrapper for mpirun to create the host file automatically. You can find an example bash script wrapper called hpcimpirun.sh at the end of this article, and save it as /openfoam/hpcimpirun.sh. This example script does the following:
Sets up the environment variables for mpirun, and some addition command parameters to run the MPI job through the RDMA network. In this case, it sets the following variables:
- I_MPI_FABRICS=shm:dapl
- I_MPI_DAPL_PROVIDER=ofa-v2-ib0
- I_MPI_DYNAMIC_CONNECTION=0
Creates a host file according to the environment variable $CCP_NODES_CORES, which is set by the HPC head node when the job is activated.
The format of $CCP_NODES_CORES follows this pattern:
<Number of nodes> <Name of node1> <Cores of node1> <Name of node2> <Cores of node2>...`where
<Number of nodes>- the number of nodes allocated to this job.<Name of node_n_...>- the name of each node allocated to this job.<Cores of node_n_...>- the number of cores on the node allocated to this job.
For example, if the job needs two nodes to run, $CCP_NODES_CORES is similar to
2 SUSE12RDMA-LN1 8 SUSE12RDMA-LN2 8Calls the mpirun command and appends two parameters to the command line.
--hostfile <hostfilepath>: <hostfilepath>- the path of the host file the script creates-np ${CCP_NUMCPUS}: ${CCP_NUMCPUS}- an environment variable set by the HPC Pack head node, which stores the number of total cores allocated to this job. In this case, it specifies the number of processes for mpirun.
Submit an OpenFOAM job
Now you can submit a job in HPC Cluster Manager. You need to pass the script hpcimpirun.sh in the command lines for some of the job tasks.
Connect to your cluster head node and start HPC Cluster Manager.
In Resource Management, ensure that the Linux compute nodes are in the Online state. If they are not, select them and click Bring Online.
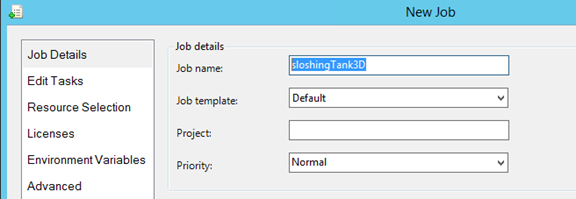
In Job Management, click New Job.
Enter a name for job such as sloshingTank3D.
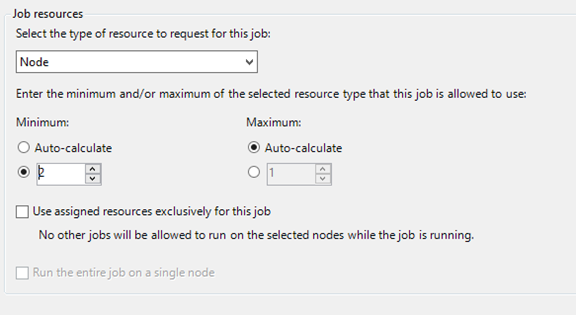
In Job resources, choose the type of resource as “Node” and set the Minimum to 2. This configuration runs the job on two Linux nodes, each of which has eight cores in this example.
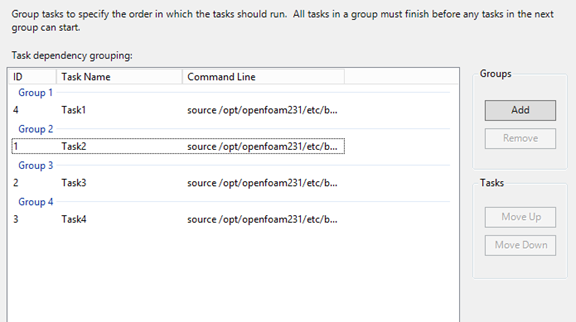
Click Edit Tasks in the left navigation, and then click Add to add a task to the job. Add four tasks to the job with the following command lines and settings.
Note
Running
source /openfoam/settings.shsets up the OpenFOAM and MPI runtime environments, so each of the following tasks calls it before the OpenFOAM command.Task 1. Run decomposePar to generate data files for running interDyMFoam in parallel.
- Assign one node to the task
- Command line -
source /openfoam/settings.sh && decomposePar -force > /openfoam/decomposePar${CCP_JOBID}.log - Working directory - /openfoam/sloshingTank3D
See the following figure. You configure the remaining tasks similarly.

Task 2. Run interDyMFoam in parallel to compute the sample.
- Assign two nodes to the task
- Command line -
source /openfoam/settings.sh && /openfoam/hpcimpirun.sh interDyMFoam -parallel > /openfoam/interDyMFoam${CCP_JOBID}.log - Working directory - /openfoam/sloshingTank3D
Task 3. Run reconstructPar to merge the sets of time directories from each processor_N_ directory into a single set.
- Assign one node to the task
- Command line -
source /openfoam/settings.sh && reconstructPar > /openfoam/reconstructPar${CCP_JOBID}.log - Working directory - /openfoam/sloshingTank3D
Task 4. Run foamToEnsight in parallel to convert the OpenFOAM result files into EnSight format and place the EnSight files in a directory named Ensight in the case directory.
- Assign two nodes to the task
- Command line -
source /openfoam/settings.sh && /openfoam/hpcimpirun.sh foamToEnsight -parallel > /openfoam/foamToEnsight${CCP_JOBID}.log - Working directory - /openfoam/sloshingTank3D
Add dependencies to these tasks in ascending task order.
Click Submit to run this job.
By default, HPC Pack submits the job as your current logged-on user account. After you click Submit, you might see a dialog box prompting you to enter the user name and password.
Under some conditions, HPC Pack remembers the user information you input before and doesn’t show this dialog box. To make HPC Pack show it again, enter the following command at a Command prompt and then submit the job.
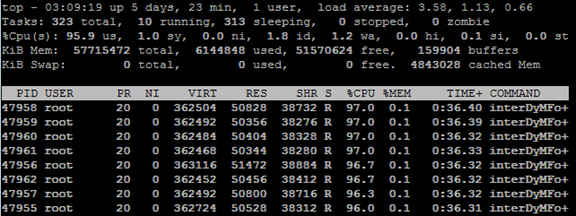
hpccred delcredsThe job takes from tens of minutes to several hours according to the parameters you have set for the sample. In the heat map, you see the job running on the Linux nodes.
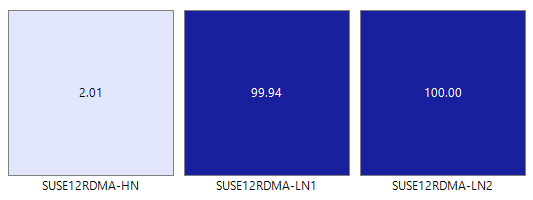
On each node, eight processes are started.
When the job finishes, find the job results in folders under C:\OpenFoam\sloshingTank3D, and the log files at C:\OpenFoam.
View results in EnSight
Optionally use EnSight to visualize and analyze the results of the OpenFOAM job.
After you install EnSight on the head node, start it.
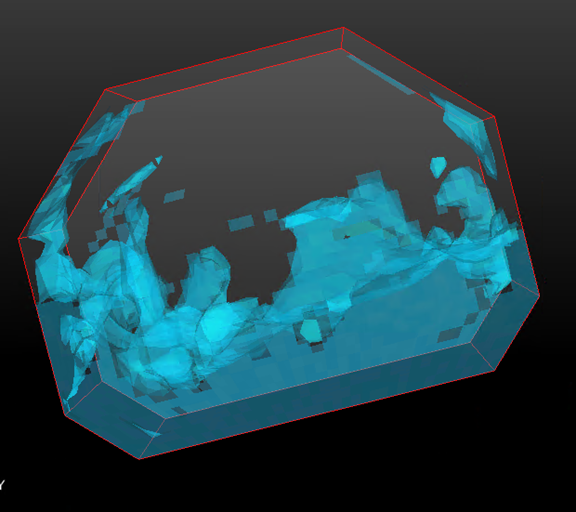
Open C:\OpenFoam\sloshingTank3D\EnSight\sloshingTank3D.case.
You see a tank in the viewer.
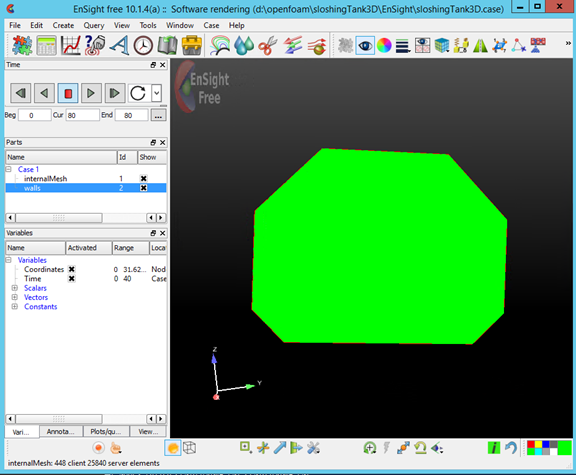
Create an Isosurface from internalMesh, and then choose the variable alpha_water.

Set the color for Isosurface_part created in the previous step. For example, set it to water blue.
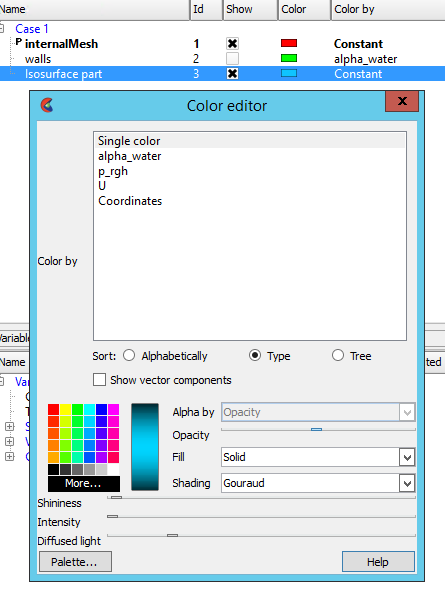
Create an Iso-volume from walls by selecting walls in the Parts panel and click the Isosurfaces button in the toolbar.
In the dialog box, select Type as Isovolume and set the Min of Isovolume range to 0.5. To create the isovolume, click Create with selected parts.
Set the color for Iso_volume_part created in the previous step. For example, set it to deep water blue.
Set the color for walls. For example, set it to transparent white.
Now click Play to see the results of the simulation.
Sample files
Sample XML configuration file for cluster deployment by PowerShell script
<?xml version="1.0" encoding="utf-8" ?>
<IaaSClusterConfig>
 <Subscription>
   <SubscriptionName>Subscription-1</SubscriptionName>
   <StorageAccount>allvhdsje</StorageAccount>
 </Subscription>
 <Location>Japan East</Location>
 <VNet>
   <VNetName>suse12rdmavnet</VNetName>
   <SubnetName>SUSE12RDMACluster</SubnetName>
 </VNet>
 <Domain>
   <DCOption>HeadNodeAsDC</DCOption>
   <DomainFQDN>hpclab.local</DomainFQDN>
 </Domain>
 <Database>
   <DBOption>LocalDB</DBOption>
 </Database>
 <HeadNode>
   <VMName>SUSE12RDMA-HN</VMName>
   <ServiceName>suse12rdma-je</ServiceName>
   <VMSize>A8</VMSize>
   <EnableRESTAPI />
   <EnableWebPortal />
 </HeadNode>
 <LinuxComputeNodes>
   <VMNamePattern>SUSE12RDMA-LN%1%</VMNamePattern>
   <ServiceName>suse12rdma-je</ServiceName>
   <VMSize>A8</VMSize>
   <NodeCount>2</NodeCount>
     <ImageName>b4590d9e3ed742e4a1d46e5424aa335e__suse-sles-12-hpc-v20150708</ImageName>
 </LinuxComputeNodes>
</IaaSClusterConfig>
Sample cred.xml file
<ExtendedData>
  <PrivateKey>-----BEGIN RSA PRIVATE KEY-----
MIIEpQIBAAKCAQEAxJKBABhnOsE9eneGHvsjdoXKooHUxpTHI1JVunAJkVmFy8JC
qFt1pV98QCtKEHTC6kQ7tj1UT2N6nx1EY9BBHpZacnXmknpKdX4Nu0cNlSphLpru
lscKPR3XVzkTwEF00OMiNJVknq8qXJF1T3lYx3rW5EnItn6C3nQm3gQPXP0ckYCF
Jdtu/6SSgzV9kaapctLGPNp1Vjf9KeDQMrJXsQNHxnQcfiICp21NiUCiXosDqJrR
AfzePdl0XwsNngouy8t0fPlNSngZvsx+kPGh/AKakKIYS0cO9W3FmdYNW8Xehzkc
VzrtJhU8x21hXGfSC7V0ZeD7dMeTL3tQCVxCmwIDAQABAoIBAQCve8Jh3Wc6koxZ
qh43xicwhdwSGyliZisoozYZDC/ebDb/Ydq0BYIPMiDwADVMX5AqJuPPmwyLGtm6
9hu5p46aycrQ5+QA299g6DlF+PZtNbowKuvX+rRvPxagrTmupkCswjglDUEYUHPW
05wQaNoSqtzwS9Y85M/b24FfLeyxK0n8zjKFErJaHdhVxI6cxw7RdVlSmM9UHmah
wTkW8HkblbOArilAHi6SlRTNZG4gTGeDzPb7fYZo3hzJyLbcaNfJscUuqnAJ+6pT
iY6NNp1E8PQgjvHe21yv3DRoVRM4egqQvNZgUbYAMUgr30T1UoxnUXwk2vqJMfg2
Nzw0ESGRAoGBAPkfXjjGfc4HryqPkdx0kjXs0bXC3js2g4IXItK9YUFeZzf+476y
OTMQg/8DUbqd5rLv7PITIAqpGs39pkfnyohPjOe2zZzeoyaXurYIPV98hhH880uH
ZUhOxJYnlqHGxGT7p2PmmnAlmY4TSJrp12VnuiQVVVsXWOGPqHx4S4f9AoGBAMn/
vuea7hsCgwIE25MJJ55FYCJodLkioQy6aGP4NgB89Azzg527WsQ6H5xhgVMKHWyu
Q1snp+q8LyzD0i1veEvWb8EYifsMyTIPXOUTwZgzaTTCeJNHdc4gw1U22vd7OBYy
nZCU7Tn8Pe6eIMNztnVduiv+2QHuiNPgN7M73/x3AoGBAOL0IcmFgy0EsR8MBq0Z
ge4gnniBXCYDptEINNBaeVStJUnNKzwab6PGwwm6w2VI3thbXbi3lbRAlMve7fKK
B2ghWNPsJOtppKbPCek2Hnt0HUwb7qX7Zlj2cX/99uvRAjChVsDbYA0VJAxcIwQG
TxXx5pFi4g0HexCa6LrkeKMdAoGAcvRIACX7OwPC6nM5QgQDt95jRzGKu5EpdcTf
g4TNtplliblLPYhRrzokoyoaHteyxxak3ktDFCLj9eW6xoCZRQ9Tqd/9JhGwrfxw
MS19DtCzHoNNewM/135tqyD8m7pTwM4tPQqDtmwGErWKj7BaNZARUlhFxwOoemsv
R6DbZyECgYEAhjL2N3Pc+WW+8x2bbIBN3rJcMjBBIivB62AwgYZnA2D5wk5o0DKD
eesGSKS5l22ZMXJNShgzPKmv3HpH22CSVpO0sNZ6R+iG8a3oq4QkU61MT1CfGoMI
a8lxTKnZCsRXU1HexqZs+DSc+30tz50bNqLdido/l5B4EJnQP03ciO0=
-----END RSA PRIVATE KEY-----</PrivateKey>
  <PublicKey>ssh-rsa AAAAB3NzaC1yc2EAAAADAQABAAABAQDEkoEAGGc6wT16d4Ye+yN2hcqigdTGlMcjUlW6cAmRWYXLwkKoW3WlX3xAK0oQdMLqRDu2PVRPY3qfHURj0EEellpydeaSekp1fg27Rw2VKmEumu6Wxwo9HddXORPAQXTQ4yI0lWSerypckXVPeVjHetbkSci2foLedCbeBA9c/RyRgIUl227/pJKDNX2Rpqly0sY82nVWN/0p4NAyslexA0fGdBx+IgKnbU2JQKJeiwOomtEB/N492XRfCw2eCi7Ly3R8+U1KeBm+zH6Q8aH8ApqQohhLRw71bcWZ1g1bxd6HORxXOu0mFTzHbWFcZ9ILtXRl4Pt0x5Mve1AJXEKb username@servername;</PublicKey>
</ExtendedData>
Sample silent.cfg file to install MPI
# Patterns used to check silent configuration file
#
# anythingpat - any string
# filepat     - the file location pattern (/file/location/to/license.lic)
# lspat       - the license server address pattern (0123@hostname)
# snpat       - the serial number pattern (ABCD-01234567)

# accept EULA, valid values are: {accept, decline}
ACCEPT_EULA=accept

# optional error behavior, valid values are: {yes, no}
CONTINUE_WITH_OPTIONAL_ERROR=yes

# install location, valid values are: {/opt/intel, filepat}
PSET_INSTALL_DIR=/opt/intel

# continue with overwrite of existing installation directory, valid values are: {yes, no}
CONTINUE_WITH_INSTALLDIR_OVERWRITE=yes

# list of components to install, valid values are: {ALL, DEFAULTS, anythingpat}
COMPONENTS=DEFAULTS

# installation mode, valid values are: {install, modify, repair, uninstall}
PSET_MODE=install

# directory for non-RPM database, valid values are: {filepat}
#NONRPM_DB_DIR=filepat

# Serial number, valid values are: {snpat}
#ACTIVATION_SERIAL_NUMBER=snpat

# License file or license server, valid values are: {lspat, filepat}
#ACTIVATION_LICENSE_FILE=

# Activation type, valid values are: {exist_lic, license_server, license_file, trial_lic, serial_number}
ACTIVATION_TYPE=trial_lic

# Path to the cluster description file, valid values are: {filepat}
#CLUSTER_INSTALL_MACHINES_FILE=filepat

# Intel(R) Software Improvement Program opt-in, valid values are: {yes, no}
PHONEHOME_SEND_USAGE_DATA=no

# Perform validation of digital signatures of RPM files, valid values are: {yes, no}
SIGNING_ENABLED=yes

# Select yes to enable mpi-selector integration, valid values are: {yes, no}
ENVIRONMENT_REG_MPI_ENV=no

# Select yes to update ld.so.conf, valid values are: {yes, no}
ENVIRONMENT_LD_SO_CONF=no
Sample settings.sh script
#!/bin/bash

# impi
source /opt/intel/impi/5.0.3.048/bin64/mpivars.sh
export MPI_ROOT=$I_MPI_ROOT
export I_MPI_FABRICS=shm:dapl
export I_MPI_DAPL_PROVIDER=ofa-v2-ib0
export I_MPI_DYNAMIC_CONNECTION=0

# openfoam
export FOAM_INST_DIR=/opt/OpenFOAM
source /opt/OpenFOAM/OpenFOAM-2.3.1/etc/bashrc
export WM_MPLIB=INTELMPI
Sample hpcimpirun.sh script
#!/bin/bash

# The path of this script
SCRIPT_PATH="$( dirname "${BASH_SOURCE[0]}" )"

# Set mpirun runtime evironment
source /opt/intel/impi/5.0.3.048/bin64/mpivars.sh
export MPI_ROOT=$I_MPI_ROOT
export I_MPI_FABRICS=shm:dapl
export I_MPI_DAPL_PROVIDER=ofa-v2-ib0
export I_MPI_DYNAMIC_CONNECTION=0

# mpirun command
MPIRUN=mpirun
# Argument of "--hostfile"
NODELIST_OPT="--hostfile"
# Argument of "-np"
NUMPROCESS_OPT="-np"

# Get node information from ENVs
NODESCORES=(${CCP_NODES_CORES})
COUNT=${#NODESCORES[@]}

if [ ${COUNT} -eq 0 ]
then
    # CCP_NODES_CORES is not found or is empty, just run the mpirun without hostfile arg.
    ${MPIRUN} $*
else
    # Create the hostfile file
    NODELIST_PATH=${SCRIPT_PATH}/hostfile_$$

    # Get every node name and write into the hostfile file
    I=1
    while [ ${I} -lt ${COUNT} ]
    do
        echo "${NODESCORES[${I}]}" >> ${NODELIST_PATH}
        let "I=${I}+2"
    done

    # Run the mpirun with hostfile arg
    ${MPIRUN} ${NUMPROCESS_OPT} ${CCP_NUMCPUS} ${NODELIST_OPT} ${NODELIST_PATH} $*

    RTNSTS=$?
    rm -f ${NODELIST_PATH}
fi

exit ${RTNSTS}