Windows Workflow Tutorial: Rules-Driven .NET Applications
Matt Milner
Pluralsight
Published: December, 2008
Articles in this series
- Building a Sequential Workflow
- Building a State Machine Workflow
- Flow Control: Basics
- Flow Control: Replicator
- Fault Handling
- Communication: Calling Methods within the Host Process
- Communication: Handling an Event From the Host in a Workflow
- Rules-Driven .NET Applications
- Rules-Driven WCF Services
Download the code for this article
Windows Workflow Foundation ships with a robust business rule engine that can be incorporated into workflows to assist in managing business processes. What some developers do not realize is that the rule engine can be used outside of workflows in any .NET application to provide robust rule processing against any .NET object. This hands-on article will walk through how developers can take advantage of using the rule engine in .NET applications through examples using WPF and ASP.NET.
Using rules in ASP.NET applications
In this example rules will be used to control the user interface for a user to ensure that all required information is selected. The user interface consists of simple wizard using the MultiView control to collect loan application information (the sample is greatly simplified). Certain steps in the wizard are only required for applications in particular states and should not be shown to other applicants. Rules will be used to skip certain steps as the user progresses through the interface.
The MultiView control was chosen over the Wizard control because it has better support for removing steps.
The image below show the main wizard steps in order as shown in Visual Studio.

Figure 1: LoanWizard in Visual Studio
The starter user interface is included in the before directory of the downloadable code sample.
Creating the rules
Once the user interface is created with all of the steps defined, the next step is to create the business rules. WF allows you to build your own UI for creating and editing rules, and allows for rehosting the rules editor dialog that comes as part of WF 3.0. For this example, rather than creating our own UI for creating and editing rules, we will use the External RuleSet Toolkit sample (https://msdn.microsoft.com/en-us/library/bb472424.aspx). This sample demonstrates how to create a ruleset outside of Visual Studio and save the resulting XML to a file or a database; for our purposes, it provides an easy UI that we don’t have to code in this article. You can download the sample from MSDN using the link. Once you have downloaded the samples, run the installer to expand them and you will find the External Ruleset Toolkit in the following directory: \WCF\Extensibility\Rules\ExternalRuleSetToolkit.
To setup the database used by the External RuleSet Toolkit, double-click the setup.cmd command file found with the sample. Note: The command file assumes that your instance of SQL Server Express is named .\sqlexpress. If you have named your instance something different or you are using another version of SQL Server, you will need to modify the file before executing it. In addition, you will need to update the configuration files in the toolkit projects to point to the correct instance of SQL Server.
Once the command file has completed and the database has been configured, open the ExternalRuleSetToolkit.sln solution in Visual Studio. Make any necessary changes to the configuration file for your database to point at the database you just created, and set the start up project by right-clicking on the ExternalRuleSetTool project and selecting Set as startup project from the context menu. Press F5 to run the application and you should see a dialog as shown in Figure 2.

Figure 2: External RuleSet Tool
Click the “New” button to create a new ruleset with an initial version of 1.0, and change the name of the ruleset to “LoanWizardRules”. Typically Rules are articulated using the properties of a Fact – For e.g. in the following rule, Applicant and Loan are Facts and Age and IsApproved are properties of these facts.
If Applicant.Age < 21 Then Loan.IsApproved = false
A Fact can be thought of as an object instantiation of a type. In the above example Applicant is an object of type LoanApplicant and Loan is an object of type LoanApplication. In Windows Workflow Foundation rather than authoring rules against many different fact types, a single type called the root type is used. Thus all rulesets are defined in relation to a single specific .NET type. For this example, the rules are defined against the System.Web.UI.WebControls.MultiView type. Defining rules against ASP.NET page types can be difficult as the type at runtime is generated from the ASPX being compiled so a specific control type was chosen for this sample. To select the type the rules will be authored against, click the “Browse” button. In the resulting dialog, shown in Figure 3, the specific type must be found. Click the “Browse” button and select the System.Web.dll assembly in the c:\windows\microsoft.net\framework\v2.0.50727\ directory. Browse through the list of types and select the System.Web.UI.WebControls.MultiView type as shown in Figure 3.

Figure 3: Choosing the target type for the ruleset
Click OK to close the type selection dialog; you are now ready to edit the actual rules in the ruleset can Click the “Edit Rules” button which will open the Rule Set Editor dialog.
The Rule Set Editor dialog is not part of the External RuleSet Toolkit, it is installed as part of the .NET Framework 3.0 runtime installation and resides in the System.Workflow.Activities assembly. The toolkit provides one example of how the dialog can be re-hosted in an application to allow rule display and/or editing.
For this example, the rules should remove the NY and CA legal views if the user did not select one of those states on the first page. To add the rule for New York, click the Add Rule button, then edit the Name field to set the value as “NY”. Next, enter the following code for the Condition field; this is the Boolean expression as you would use in an IF statement in code.
((System.Web.UI.WebControls.DropDownList)this.FindControl("State")).SelectedValue != "NY"
This condition checks that the State dropdown list on the first page of the wizard is not set to “NY”. In the Then Action enter the following code to remove the page from the wizard that includes NY specific content.
this.Views.RemoveAt(1)
Now add a new rule for California by clicking the Add Rule button and then entering “CA” for the Name field. For the Condition, enter a similar test of the State dropdown control, this time making sure the value is not “CA”.
((System.Web.UI.WebControls.DropDownList)this.FindControl("State")).SelectedValue != "CA"
In the Then Actions, enter the following code to remove the California specific content from the wizard.
this.Views.RemoveAt(2)
Finally change the value in the Priority field to “2”, giving this rule a higher priority than the other.
The result of adding these two rules should look similar to the dialog in Figure 4.

Figure 4: Rules for removing wizard steps
Each rule has a priority indicating that the California rule will run first as it has the higher priority. This ensures that views are removed based on the index from highest to lowest to so the correct views are removed. Click OK to exit the rule editor dialog and return to the main window of the toolkit application.
Once the rules are defined, they must be saved in the External RuleSet Tool window. Press CTRL + S or choose the File | Save menu option). The tool will save the data in the SQL Server database created with the setup command earlier.
Defining a wrapper class
Within an application, the code to execute the rules involves retrieving the ruleset from the database, file or other location and then executing them using the rule engine. Rather than code all of this into each page or window of an application, a static class can be used to simplify the code in each page and centralize the code used to retrieve and execute the rules.
Right-click the RulesInASP website project and choose Add Reference from the context menu. Select the System.Workflow.Activities and System.Workflow.ComponentModel assemblies. These assemblies contain the rule related classes and the classes used to serialize rulesets. Next, right-click the App_Code directory in the RulesInASP website and choose Add New Item from the context menu. In the new item dialog, select the Class template and name the file “RulesMediator.cs”. Change the class definition to make the class public and static. Also add a dictionary for caching the rules and a static constructor which initializes the dictionary to an empty collection. The resulting class should look like Figure 5.
public static class RulesMediator
{
    static Dictionary<string, RuleSet> ruleCache;
    static RulesMediator()
    {
        ruleCache = new Dictionary<string, RuleSet>();
    }
}
Figure 5: RulesMediator class construction
Next the class needs the ability to get the ruleset from the database which is a combination of getting the XML representation of the rules from the database and deserializing that into a RuleSet object. Simple ADO.NET data access can be used to get the XML as a string and the WorkflowMarkupSerializer class is used to deserialize the XML into a RuleSet. Add a static method to the RulesMediator class called GetRuleSet which selects the most recent version of a ruleset by name from the database created by the ExternalRuleSetToolkit. After retrieving the XML for the ruleset, use the WorkflowMarkupSerializer class’ deserialize method to get the XML converted to a RuleSet object as shown in Figure 6.
private static RuleSet GetRuleSet(string ruleSetName)
{
using (SqlConnection cnn = new SqlConnection(
ConfigurationManager.ConnectionStrings[
"Rules"].ConnectionString))
{
using (SqlCommand cmd = new SqlCommand(
"SELECT TOP 1 [RuleSet] FROM RuleSet WHERE
Name=@name ORDER BY MajorVersion DESC , MinorVersion DESC",
cnn))
{
                     cmd.Parameters.Add("@name",
                           System.Data.SqlDbType.NVarChar, 128);
                     cmd.Parameters["@name"].Value = ruleSetName;
                     cnn.Open();
                     string rules = cmd.ExecuteScalar().ToString();
                     WorkflowMarkupSerializer serializer =
                            new WorkflowMarkupSerializer();
                     RuleSet ruleset =
                           (RuleSet)serializer.Deserialize(
                                  XmlReader.Create(
                                         new StringReader(rules)));
                     return ruleset;
              }
       }
}
Figure 6: Retrieving and deserializing a ruleset
Rather than having to retrieve the rules for each execution they can be cached in the local dictionary. This is accomplished by creating a GetRules method which gets the rules from the cache or loads them from the database and then puts them in the cache. Add the method, shown in Figure 7, to the RulesMediator class. Notice that the GetRules method is public, while the previous GetRuleSet method is a private method.
public static RuleSet GetRules(string ruleSetName)
{
       if (ruleCache.ContainsKey(ruleSetName))
              return ruleCache[ruleSetName];
       else
       {
              RuleSet rules = GetRuleSet(ruleSetName);
              ruleCache[ruleSetName] = rules;
              return rules;
       }
}
Figure 7: Caching rules in memory for performance
The other method to add to the RulesMediator is the RunRules method which provides the actual execution of a set of rules on a given instance of an object. Because rules are authored against a particular type, the execution of those rules must be against an instance of that type. The RunRules method is defined as a generic method where the type defines the type of the instance. In addition, the name of the RuleSet to run is passed as a parameter. Create the RunRules method in the RulesMediator class based on the sample in Figure 8.
public static void RunRules<T>(T target, string rulesName)
{
       RuleSet rules = GetRules(rulesName);
       RuleEngine engine = new RuleEngine(rules, typeof(T));
       engine.Execute(target);
}
Figure 8: Executing a ruleset
In order to execute rules, the RuleSet must be created or retrieved as shown. Next, an instance of the RuleEngine must be created passing in the RuleSet and the type of the object on which the rules will execute. Finally, the execute method of the RuleEngine class is called which runs the rules. After this method has executed the object passed to the RuleEngine may have been updated by rules and can be inspected for changes. Essentially, the object passed to the RuleEngine as the input is also the output.
Executing the rules
To execute the rules in a given page of the .NET application is quite simple as it involves a single call to the static RunRules method of the RulesMediator class. Update the WizardNext_Click event handler with the code in Figure 9. This code will execute when the user clicks the next button and will ensure that the correct panels in the wizard are shown or hidden accordingly.
protected void WizardNext_Click(object sender, EventArgs e)
{
       RulesMediator.RunRules<MultiView>(
              LoanWizard, "LoanWizardRules");
}
Figure 9: Executing rules in the web page
Now the page has very simple code that runs the rules and updates the user interface based on those rules. To test the application, choose Debug | Start Debugging from the Visual Studio menus, or press F5. On the default page, select a state and then click the Next button. If you chose NY or CA, you should be presented with a legal page specific to that state. If not, you should skip directly to the view where you can input loan amount and term.
What have we done so far
In this first example, the rules regarding data collection in a user interface were extracted from the code and encapsulated in an externally editable business rule definition. For this simple example it may not seem like an incredible achievement, but simply consider how much more complex the ASP.NET code would become with a real loan application and all the associated rules. The code in the web pages is extremely concise and simple, while the business rules can become much more complex.
Using rules in a WPF application
The same concepts used in the previous example can also be used in other .NET applications. In this example the Windows Workflow Foundation business rules engine is used in conjunction with the data validation features found in Windows Presentation Foundation. Instead of writing rules based on a user interface class, the rules in this application are written against a business object.
The LoanApplication class
The business object used in this example is a simple LoanApplication class that implements the IDataErrorInfo interface. As of .NET Framework 3.5 WPF data binding supports the IDataErrorInfo interface for data validation. If a particular property on the class is in error, this interface exposes the error information returned using the Indexer property. To get started, open the HandsOn.WFRulesInNetApps.sln file from the before directory if you don’t already have it open from the previous example. Open the LoanApplication.cs file in the RulesInWPF project. The class provides a simple business object with properties for a name and loan terms. Add a declaration of a dictionary to hold any errors that are created by the business rules and two properties defined on the IErrorInfo interface as shown in Figure 10.
private Dictionary<string, string> errors = new
Dictionary<string, string>();
string IDataErrorInfo.Error
{
get { return string.Empty; }
}
string IDataErrorInfo.this[string columnName]
{
get
{
RulesMediator.RunRules<LoanApplication>(
                     this, "WPFLoanRules");
if (errors.ContainsKey(columnName))
return errors[columnName];
else
return String.Empty;
}
}
Figure 10: Errors dictionary
Make sure you have your class declared to implement the IErrorInfo interface as shown here:
public class LoanApplication : IDataErrorInfo
Notice that as the first step in checking for errors in the indexer, the business rules policy is called by using the same RulesMediator class created in the ASP.NET example. This “validate” method runs all of the business rules for the loan application when requested by the user interface. In your own applications you may choose to put the validation triggers in different places based on your requirements and when it is most appropriate to validate your business objects.
Writing the rules
Using the External RuleSet Toolkit the rules are built against the LoanApplication type. The first rule checks the LoanAmount property and if it exceeds 350,000 uses the SetError method to set an error message indicating this amount is too high. The second rule checks the combination of the LoanAmount and LoanTerm properties and if the LoanAmount is less than 30,000 and the LoanTerm is more than 5, sets an error on the LoanTerm property. To begin, open the ExternalRuleSetToolkit.sln solution from the SDK samples directory as you did in the earlier sample. Click the New button and enter “WPFLoanRules” for the RuleSet Name field.
Click the Browse button on the main dialog, and then again on the Type Selection dialog. Browse to the RulesInWPF.exe assembly and select the LoanApplication type as shown in Figure 11.
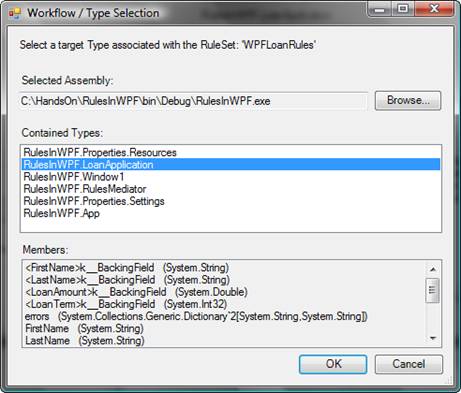
Figure 11: Selecting the LoanApplication type
Now that a type has been selected, click the Edit Rules button to invoke the Rule Set Editor. Click the Add Rule button and name the new rule “LoanAmount”. Set the Condition to the following code to test the LoanAmount:
this.LoanAmount > 350000
In the Then Actions, use the following code to set the error on the LoanApplication:
this.errors["LoanAmount"] = "Amount must be less than $350,000"
Next, use the following code in the Else Actions pane to remove any existing errors for the LoanAmount property.
this.errors.Remove("LoanAmount")
There are two interesting things to note about these statements. First, the Else Action is optional and in this case it makes sense to remove any existing errors for a particular field, but it may not in cases with more rules and multiple validation requirements for a given field. Also, the errors field is an internal field, but we are able to manipulate it directly in the rules rather than having to expose a public method allowing for setting error messages.
Add another rule by clicking the Add Rule button and setting the Name to “InvalidTermAndAmount”. Also set the Priority of this rule to “2”, ensuring that it runs before the other rule. This is important as the mechanism for showing errors, discussed below, will only show a single error. For the Condition enter the following code to check both the LoanAmount and LoanTerm properties.
this.LoanAmount < 30000 && this.LoanTerm > 5
Set the Then Actions to set errors on both the LoanAmount and LoanTerm properties if the conditions are met.
this.errors["LoanAmount"] = "The loan term is too long for the loan amount" this.errors["LoanTerm"] = "The loan term is too long for the loan amount"
Set the Else Actions to clear errors on both fields if the conditions are not met.
this.errors.Remove("LoanAmount") this.errors.Remove("LoanTerm")
Figure 12 shows the completed rules in the editor.
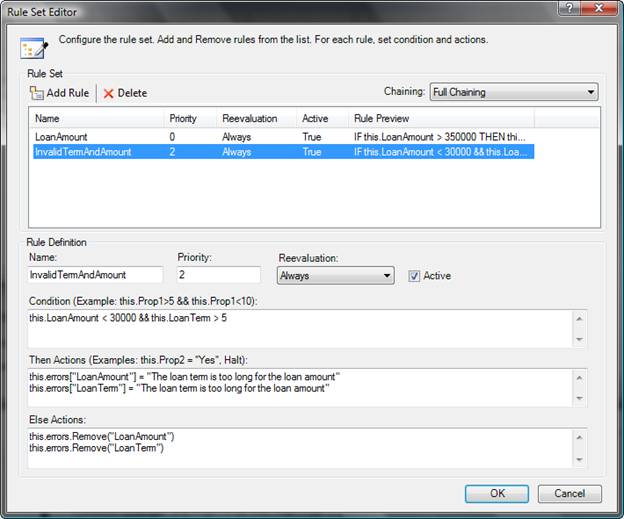
Figure 12: WPFLoanRules defined
Click the OK button to close the editor dialog and then choose File | Save from the window menu. Close the ExternalRuleSetTool application and return to the Visual Studio solution for this example.
Provide user feedback
WPF supports the IDataErrorInfo interface and will highlight an input field when the data source reports an error. However, in order to provide the user the error message, the developer needs to apply a bit more code. One way this can be accomplished is using a style with a trigger. The example style below is included as a resource in the XAML file for the input window and causes the tooltip for the control to show the actual error message.
<Style TargetType="TextBox">
  <Style.Triggers>
    <Trigger Property="Validation.HasError" Value="true">
      <Setter Property="ToolTip"
          Value="{Binding RelativeSource={RelativeSource Self},
          Path=(Validation.Errors)[0].ErrorContent}"/>
    </Trigger>
  </Style.Triggers>
</Style>
Now when a user enters text in the dialog, the WPF databinding technology kicks in and when the IDataErrorInfo indexer is called the rules are executed. The images below show the validation in action on a simple entry form where the TextBox controls are bound to an instance of the LoanApplication class. Run the RulesInWPF application to test for yourself.


Figure 13: Rules in action
Conclusion
In this example the validation of a business object in a WPF application is managed by an external ruleset. The rules about what makes the loan and it’s various properties valid are defined and managed in the rules and can be updated without having to re-deploy the application. In addition, the rules are integrated into the standard WPF data validation framework to provide immediate feedback to the user.
About the Author
Matt Milner is a member of the technical staff at Pluralsight, where he focuses on connected systems technologies and is the author of the Windows Workflow and BizTalk Server courses. Matt is also an independent consultant specializing in Microsoft .NET technologies and speaks regularly at regional and national conferences such as Tech Ed. As a writer Matt has contributed to several journals and magazines such as .NET Developers Journal and MSDN Magazine where he currently authors the workflow content for the Foundations column.
Related Links
- External RuleSet Toolkit
- Guidance on Choosing the Right Root Workflow Type
- Creating Your First State Machine Workflow
- Running Workflows in your .NET Applications
- WF: "Hello World"
- Windows Communication Foundation (WCF), Windows Workflow Foundation (WF) and Windows CardSpace Samples
- Visual Studio Guided Tour