Note
Access to this page requires authorization. You can try signing in or changing directories.
Access to this page requires authorization. You can try changing directories.
Important
This article is for the legacy Workplace Analytics app and does not reflect functionality available on the updated Viva Insights platform. Access current documentation for Viva Insights advanced insights here: advanced insights documentation.
Using Microsoft Graph Data Connect, you can load and copy data from your Office 365 organization (Microsoft Graph) into your Azure storage account, then extract attributes, ultimately enriched attributes, and knowledge. Microsoft Graph Data Connect usually provides Office 365 data to your Azure storage in JSON lines. However, this walkthrough flattens the data into entity tables, which are represented as CSVs. In addition to flat CSVs, the solution exports data with the Common Data Model (CDM) structure. Follow Microsoft documentation here to learn more about the CDM.
In this walkthrough you’ll:
Provision required resources in your Azure environment to store and process your Office 365 data.
Use an Azure Data Factory or Synapse to move your Office 365 data through Microsoft Graph Data Connect into Azure Data Lake Storage Gen2 (ADLSg2) in your environment in JSON lines.
Use Azure Synapse Spark pool or Databricks to run a PySpark script, which converts your Office 365 data from JSON lines into flat CSV or CDM entities.
Prerequisites
Before following the steps in this walkthrough, make sure you have:
Microsoft Graph Data Connect enabled in your Office 365 organization
An Azure subscription under the same Azure Active Directory tenant as your Office 365 subscription
Need to enable and configure Microsoft Graph Data Connect in your environment alongside an Azure subscription? Follow the steps in Set up your Microsoft 365 tenant and enable Microsoft Graph Data Connect of our Microsoft Graph Data Connect training module.
Provision and configure required resources
To complete the conversion, you’ll need to create or provision a few resources in your Azure environment:
App registration: The app registration enables Microsoft Graph Data Connect to extract your Office 365 data into your Azure storage. Follow the steps in Set up your Azure Active Directory app registration of our training module to provision the resource.
Note down the application ID, tenant ID, and application key; they’ll be used later in the walkthrough.
Ensure the app registration has Storage Blob Data Contributor access to the ADLSg2 account (detailed on the next bullet).
ADLSg2 account: This account stores the JSON lines outputted from Microsoft Graph Data Connect. This storage account can be any new or existing account, or if you're using Synapse pipelines, the default storage linked to Synapse.
Follow the steps in Set up your Azure Storage resource to set up proper permissions for your storage account.
File systems:
A file system to store the Office 365 data outputted by Microsoft Graph Data Connect in JSON format (called json in this walkthrough and is the default value in the script and pipeline parameters)
A file system to store the outputted CDM entities after the conversion is complete (called cdm in this walkthrough and is the default value in the script and pipeline parameters)
A file system to store the outputted CSV entities after the conversion is complete (called csv in this walkthrough and is the default value in the script and pipeline parameters)
A preferred:
Orchestration tool: Synapse/Azure Data Factory
Processing engine: Databricks or Synapse Spark pool
The PySpark script: This script converts the Microsoft Graph Data Connect JSON lines into CDM and CSV format and stores the resulting files.
If using Databricks as your compute engine: upload the Databricks notebook—located in the src directory of this repository—into the Databricks instance.
If using Synapse Spark pool as your compute engine: Import the Synapse notebook from the src directory of this repository into your Synapse workspace (Develop > Notebooks > import).
CDM library:
Synapse has the CDM library installed by default.
If you’re using Databricks, install the CDM library via Maven:
Under Install library, select Maven as the source, then select Search Packages.
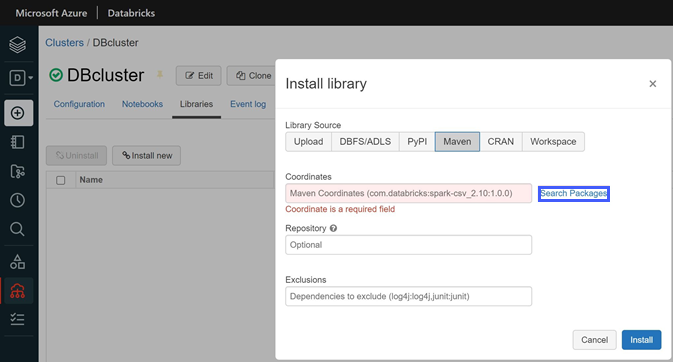
Search for and select
spark-cdm-connector.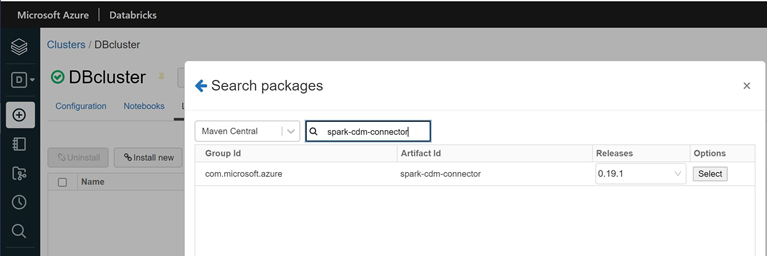
Follow these steps to create a pipeline to export your Office 365 data into a storage account, and then transform this data into CDM and CSV formats.
Create linked services within the orchestration tool
You'll need to create a few linked service entities within the orchestration tool (Azure Data Factory or Synapse) using the Azure resources provisioned earlier.
In ADF/Synapse > Manage > Linked Services:
Create an ADLSg2 linked service to allow access the ADLSg2 account:
Select Azure Data Lake Storage Gen2 and create a new linked service.
In the resulting blade, make sure you‘ve set the Authentication method to Service Principal and Account selection method to From Azure subscription.
Select the Azure subscription and account created earlier, then input the application ID and application key noted in Provision and configure required resources that has access to the account.
Select Create.
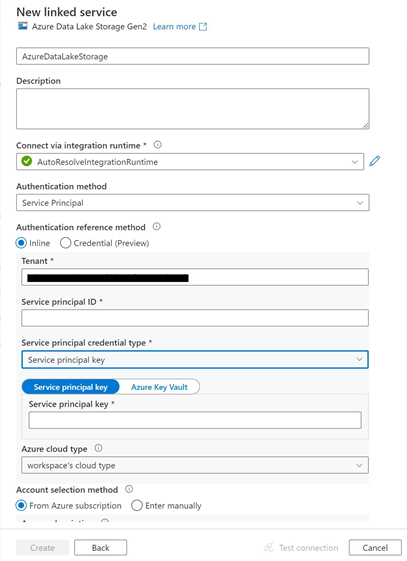
Screenshot that shows a New linked service blade. AzureDataLakeStorage is entered in the first field, the field underneath the Description section is not filled in, AutoResolveIntegrationRuntime is selected in the field underneath the Connect via integration runtime section, and Service Principal is selected in the field underneath the Authentication method section. Underneath the Authentication reference method section, the Inline radio button is selected. The field underneath the Tenant section is simplified with a black bar. The field underneath Service principal ID section is not filled in, and Service Principal credential is selected underneath the Service principal credential type section. Underneath the Service principal credential type section, the Service principal key button is selected. workspace's cloud type is selected underneath the Azure cloud type section. The From Azure subscription radio button is selected underneath the Account selection method section.
Create an Office 365 data linked service to allow Microsoft Graph Data Connect to move data into your Azure storage account:
Select Office 365 and create a new linked service.
In the resulting blade, provide the application ID and application key noted in Provision and configure required resources.
Select Create. This linked service will automatically be used for all of the Office 365 tables.
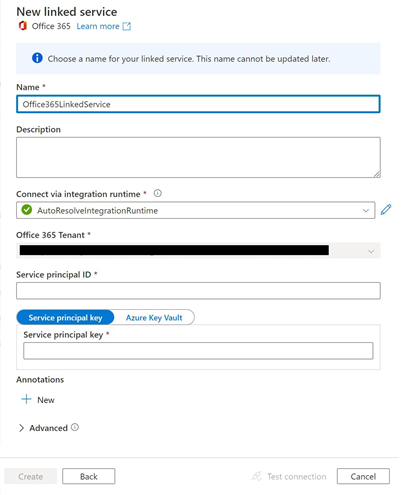
Screenshot that shows a New linked service blade. Office365LinkedService is entered in the field underneath the Name section. The field underneath the Description section is not filled in, and AutoResolveIntegrationRuntime is selected in the field underneath the Connect via integration runtime section. The field underneath the Office 365 Tenant section is simplified with a black bar, and the section underneath Service principal ID is not filled in. The Service principal key button is selected above the Service principal key section. The field underneath the Service principal key field is not filled in.
Depending on your compute engine, create either a Databricks linked service or a new Synapse Spark pool.
If using Databricks, create a Databricks linked service connected to your existing Databricks instance:
Select Databricks under Compute and create a new linked service.
In the resulting blade, make sure the appropriate Databricks workspace and cluster is selected. Generate the Access Token from the Azure Databricks workplace. (You can find the steps to do that here.)
If using Synapse with Synapse Spark pool, create a new pool in Synapse > Manage > Analytics Pools > Apache Spark Pool.
Create a new pipeline
Within the orchestration tool (either Azure Data Factory or Synapse), create a new pipeline.
Create the following parameters for the pipeline:
OfficeDataFileSystem- The file system in the ADLSg2 account to place the Office 365 data in JSON lines (for this walkthrough, we usejson)DateStartTime- The start time for the Office 365 data you want to process. The format is 2019-10-22T00:00:00Z.DateEndTime- The end time for the Office 365 data you want to process. The format is 2019-10-28T00:00:00Z.StorageAccountName- The name of the ADLSg2 accountAppID- The application ID for the app registration provisioned earlierAppKey- The application key for the app registration provisioned earlierTenantId- The tenant ID for the app registration provisioned earlierCdmDataFileSystem- The file system in the ADLSg2 account that will contain the CDM entities (cdmfor this walkthrough)CdmModelName- Sub-directory in theCdmDataFileSystemfor the CDM entities (O365-datafor this walkthrough)MessageDatasetFolder- Sub-directory in theOfficeDataFileSystemfor the messages in JSON (messagefor this walkthrough)EventDatasetFolder- Sub-directory in theOfficeDataFileSystemfor events in JSON (eventfor this walkthrough)UserDatasetFolder- Sub-directory in theOfficeDataFileSystemfor user data in JSON (userfor this walkthrough)ManagerDatasetFolder- Sub-directory in theOfficeDataFileSystemfor manager user data in JSON (managerfor this walkthrough)CsvDataFileSystem- The file system in the ADLSg2 account that will contain the CSV entities (csvfor this walkthrough)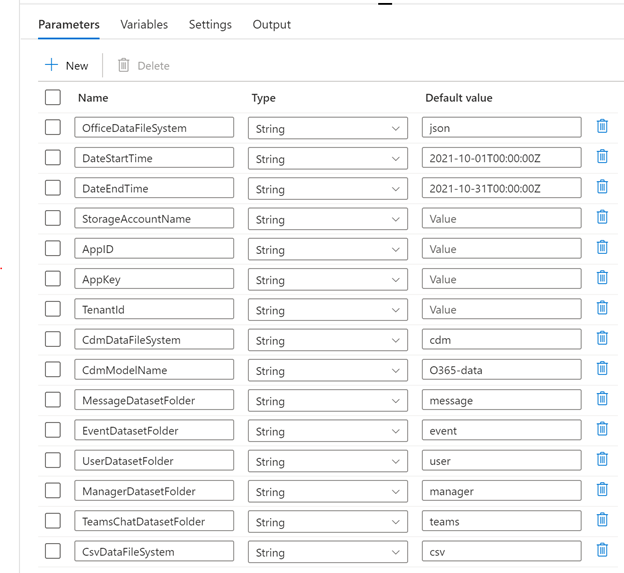
Screenshot that shows the pipeline Parameters window, which contains a table with Name, Type, and Default value columns. Values for the Name and Default value columns correspond to the values provided in step 2. For Default value, StorageAccountName, AppID, AppKey, and TenantId have placeholder text that reads, Value. Type is String for all rows.
Create Copy Data activities and a new Sink dataset
Follow the steps here to create four Copy Data activities to load the following four Office 365 tables. For each table, include the respective Source parameters from the list below.
Note
The versions provided for each table are current as of time of writing.
Event Table (BasicDataSet_v0.Event_v1)
Date filter: input pipeline
DateStartTimeandDateEndTimeparameters via Add Dynamic Content.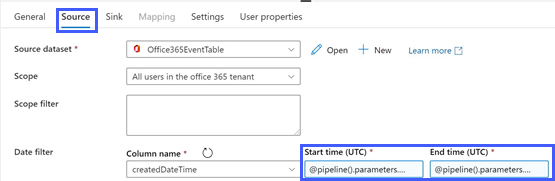
Screenshot that shows the Copy data activity parameter window for Event Table. The Source tab is selected and highlighted. Office365EventTable is selected in the Source dataset section and All users in the office 365 tenant is selected in the Scope section. In the Date filter section, createdDateTime is selected under Column name, and Start time and End time fields are highlighted and each contain content beginning with @pipeline....
Message Table (BasicDataSet_v0.Message_v1)
Date filter: input pipeline
DateStartTimeandDateEndTimeparameters via Add Dynamic Content.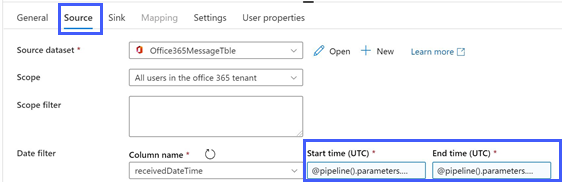
Screenshot that shows the Copy data activity parameter window for Message Table. The Source tab is selected and highlighted. Office365MessageTble is selected in the Source dataset section, and All users in the office 365 tenant is selected in the Scope section. In the Date filter section, received DateTime is selected under Column name, and Start time and End time fields are highlighted and each contain content beginning with @pipeline....
Manager Table (BasicDataSet_v0.Manager_v0)
- No Date filter is required.
User Table (BasicDataSet_v0.User_v1)
- No Date filter is required.
Create a new Sink dataset to be used for all four data tables.
Select the storage account provisioned in this walkthrough, then add
OfficeDataFileSystem,DatasetPath, andPipelineIDas the Sink dataset parameters, and add@concat(dataset().OfficeDataFileSystem,'/',dataset().PipelineID,'/',dataset().DatasetPath)as the File path in the Directory field.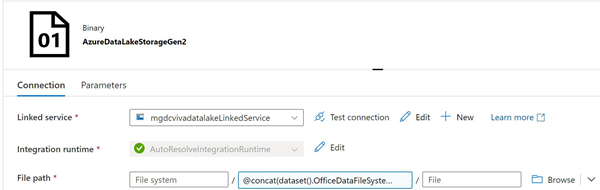
Screenshot that shows the Sink dataset window with the Connection tab selected. mgdcvivadatalakeLinkedService is selected in the Link service section, AutoResolveIntegrationRuntime is selected in the Integration runtime section, and the @concat... data path, described in step 1, is entered in the middle field of the File path section.
In the Copy Data activities, set the Sink parameters as follows:
OfficeDataFileSystem:@pipeline().parameters.OfficeDataFileSystemDatasetPath, unique to each activity:Event Table:
@pipeline().parameters.EventDatasetFolderMessage Table:
@pipeline().parameters.MessageDatasetFolderManager Table:
@pipeline().parameters.ManagerDatasetFolderUser Table:
@pipeline().parameters.UserDatasetFolder
PipelineID:@pipeline().RunId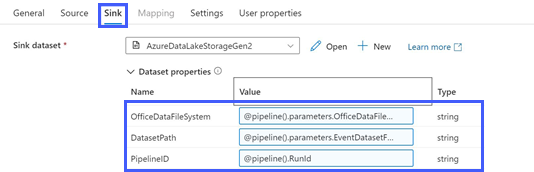
Screenshot that shows the Copy Data activity parameter window with the Sink tab selected and highlighted. AzureDataLakeStorageGen2 is selected in the Sink dataset section, and the Dataset properties section is highlighted and expanded to show Name, Value, and Type. Name and Value correspond to steps 2a-c; Type is string for all three rows.
Add a notebook to the pipeline
Based on your orchestration tool and preferred processing platform, add a Synapse notebook or Databricks notebook to the pipeline. In the settings:
Link to the notebook downloaded and imported to the tool earlier in this walkthrough.
Select the Spark pool or the Databricks linked service.
Set the Base parameters as follows:
OfficeDataFileSystem-@pipeline().parameters.OfficeDataFileSystemStorageAccountName-@pipeline().parameters.StorageAccountNameAppId-@pipeline().parameters.AppIdAppKey-@pipeline().parameters.AppKeyTenantId-@pipeline().parameters.TenantIdCdmDataFileSystem-@@pipeline().parameters.CdmDataFileSystemCdmModelName-@pipeline().parameters.CdmModelNamePipelineId-@pipeline().parameters.PipelineIdEventDatasetFolder-@pipeline().parameters.EventDatasetFolderManagerDatasetFolder-@pipeline().parameters.ManagerDatasetFolderMessageDatasetFolder-@pipeline().parameters.MessageDatasetFolderUserDatasetFolder-@pipeline().parameters.UserDatasetFolderCsvDataFileSystem-@pipeline().parameters.CsvDataFileSystem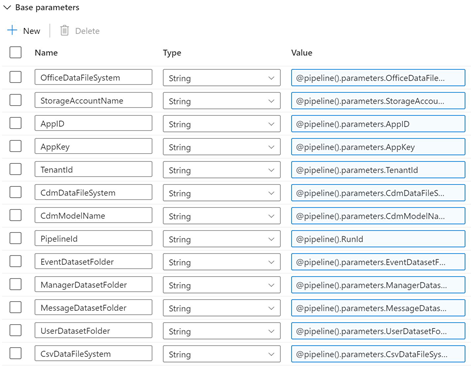
Screenshot that shows the Sink dataset Parameters window with columns for Name, Type, and Value. Name and Value entries correspond to the parameter names and values in step 3; Type is String for all rows.
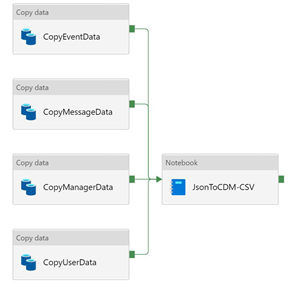
At this point, the pipeline should resemble the following image:
Publish the pipeline and add triggers
Publish the pipeline.
After the first trigger, follow steps here to monitor and approve data consent requests at in the Microsoft 365 Admin Center or via PowerShell.
Note
Each approved data consent request is valid for six months unless there is a change in the pipeline (for example, a Copy Data activity name change or a pipeline name change).