Note
Access to this page requires authorization. You can try signing in or changing directories.
Access to this page requires authorization. You can try changing directories.
Microsoft Security Exposure Management keeps your business-critical assets secure and available. Critical assets help the SOC team prioritize efforts to improve the organization's security posture. Focusing on critical assets ensures that the most important assets are protected against the risk of data breaches and operational disruptions. This article describes how to work with critical assets.
Asset criticality
Asset criticality is a measure of the importance of an asset to your organization's operations and security posture. It reflects a combination of its cyber-role, production context, and system or subsystem.

Assets are categorized into four levels of criticality:
- Very High - Very high criticality assets are essential to the survival and continuity of your business. Their compromise could result in catastrophic consequences.
- High - High criticality assets are crucial to your organization's core operations. Their compromise could lead to significant disruptions.
- Medium - Medium criticality assets have a moderate impact and might affect certain functions or processes.
- Low - Low criticality assets have minimal impact on your business operations and security if compromised.
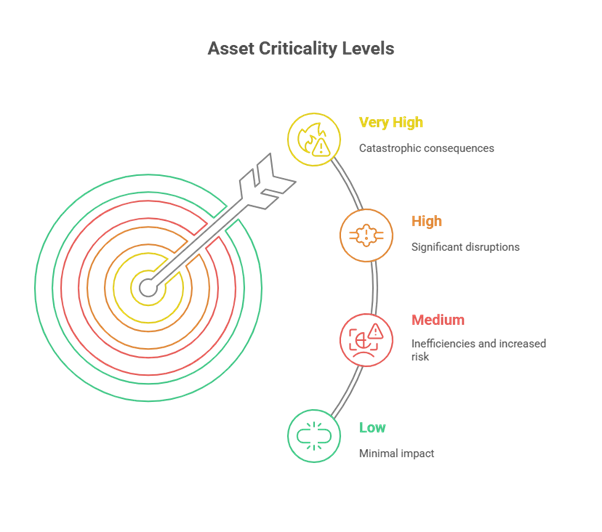
Understanding and categorizing assets based on their criticality helps prioritize security efforts and ensures that the most important assets receive the highest level of protection.
Impact analysis and crown jewels analysis are essential methodologies for identifying and prioritizing critical assets. The National Institute of Standards and Technology (NIST) provides guidelines for criticality analysis, which can be found in NIST IR 8179.
The NIST Cybersecurity Framework (CSF) 800-53 also emphasizes guidance for asset management and criticality analysis, as outlined in ID.AM-05, which can be found at: https://csf.tools/reference/nist-cybersecurity-framework/v2-0/id/id-am/id-am-05/.
Note
When multiple classification rules apply to an asset, the rule with the highest criticality level takes precedence. This classification remains in effect until the asset no longer meets the criteria for that rule, at which point it will automatically revert to the next applicable classification level.
Prerequisites
Before you begin, ensure you meet the following requirements for working with critical assets in Microsoft Security Exposure Management.
- Before you start, learn about critical asset management in Exposure Management.
- Review required permissions for working with critical assets.
- For security telemetry to support MSEM use cases, endpoints must be running version 10.3740.XXXX or later of the Microsoft Defender for Endpoint agent. We recommend using the latest agent version, as listed on the Defender for Endpoint What's New page.
You can check which agent version a device is running as follows:
On a specific device, browse to the MsSense.exe file in C:\Program Files\Windows Defender Advanced Threat Protection. Right-click the file and select Properties. On the Details tab, check the file version.
For multiple devices, it's easier to run an advanced hunting Kusto query to check device sensor versions, as follows:
DeviceInfo | project DeviceName, ClientVersion
Review critical assets
Review critical assets as follows.
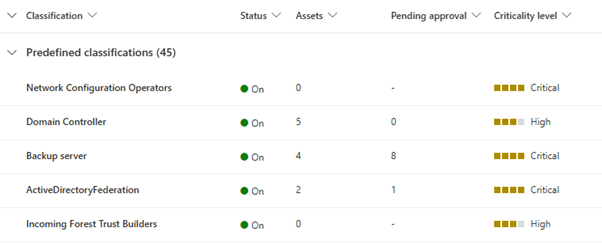
In the Microsoft Defender portal, select Settings > Microsoft XDR > Rules > Critical asset management.
On the Critical asset management page, review predefined and custom critical asset classifications, including the number of assets in the classification, whether assets are on or off, and criticality levels.

Note
You can also see critical assets in Assets > Devices > Classify critical asset. In addition, you can view the Critical Asset Protection initiative in Exposure insights -> Initiatives.
Request a new predefined classification
Suggesting a new classification to our research and development teams helps expand our out-of-the-box detections to include classifications and roles that can be applied across the ecosystem. This greatly enhances the product, and Microsoft does all the work.
Request a new predefined classification as follows:
- On the Critical asset management page, select Suggest new classification.
- Fill in what classification you'd like to see and then select Submit request.
Create a custom classification
Custom classifications allow you to fine-tune the role assignment logic and criticality level to align with your organization's criticality policy. For example, classify assets in a specific network or types of assets that should have a different criticality level than the default.
Create a custom classification as follows:
On the Critical asset management page, select Create a new classification.
On the Create a critical asset classification page, complete the following information to set your classification criteria:
- Name - A new classification name.
- Description - A new classification description.
- Query builder
- Use the query builder to define a new classification, for instance, "mark all devices with a certain naming convention as critical."
- Add one or more Boolean filters that are defined per device, identity, or cloud resource.
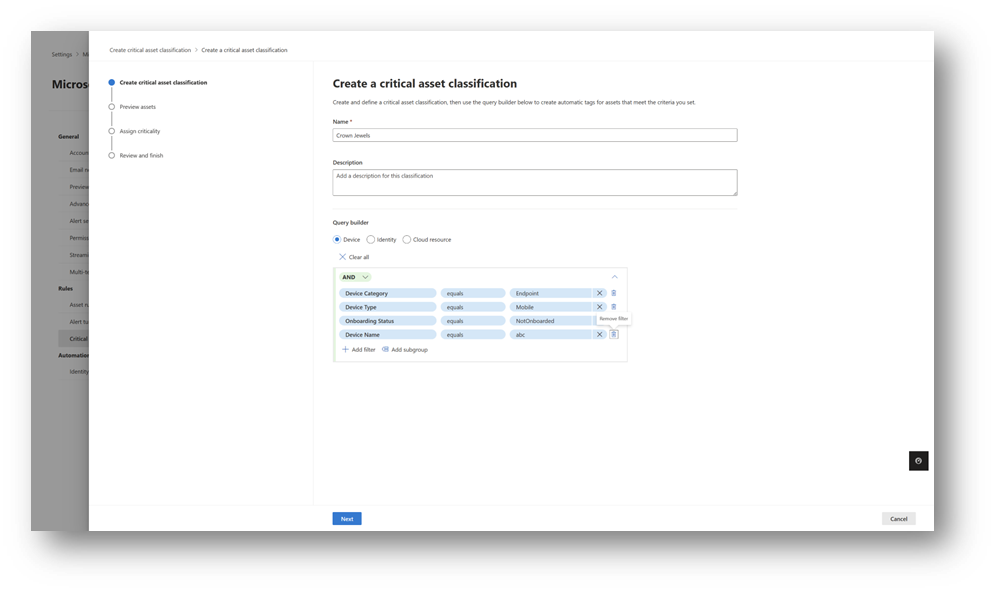
After setting the criteria, select Next.
On the following pages, preview the affected assets, and assign the criticality level.
Note
In the Microsoft Defender portal, when creating a new custom Critical Asset classification, the query builder only supports Active Directory (AD) groups for identity-based rules. Currently, Microsoft Entra ID groups are not supported.
Set critical asset levels
Set levels as follows.
On the Critical asset management page, select a critical asset classification.
In the Overview tab, select the desired criticality level.
Select Save.
Note
You can set critical levels manually in the device inventory. We recommend creating criticality rules that allow broad application of critical levels across assets.
Edit custom classifications
Edit custom classifications as follows.
- On the Critical asset management page, browse to the classification you want to modify. Only custom classifications can be edited or deleted.
- Select Edit, Delete, or Turn off.
Add assets to predefined classifications
On the Critical asset management page, select the relevant asset classification. The Pending Approval column helps find classifications with assets that didn't meet the automatic classification threshold and require user approval.
To see all assets in the classification that are currently considered critical, select the Assets tab.
To approve assets that fit the classification but are out of threshold, browse to Pending Approval.
Review the listed assets. Select the plus button next to the assets you want to add.
Note
Pending Approval only displays when there are assets to review.
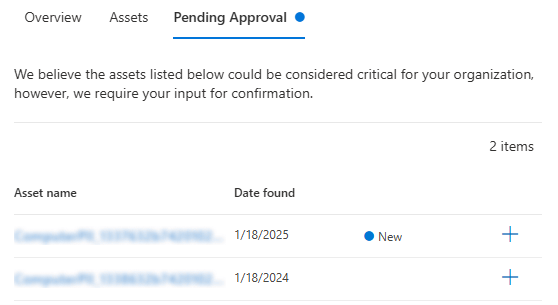
You can change the criticality levels and turn off the classification for all assets. You can also edit and delete custom critical assets.
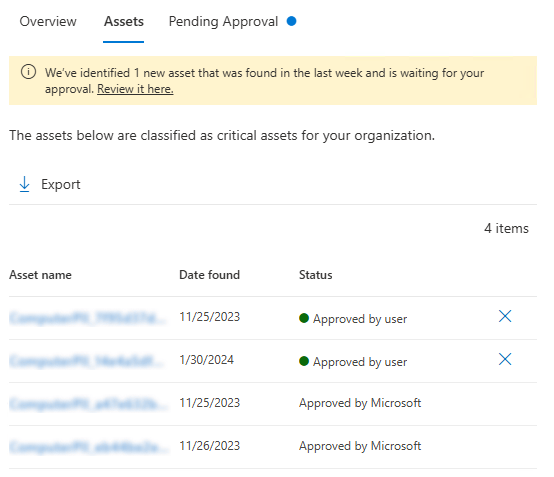
Remove approved assets from predefined classifications
On the Critical asset management page, select the relevant asset classification.
To see all assets in the classification that are currently considered critical, select the Assets tab.
Select the X next to the assets you want to remove.
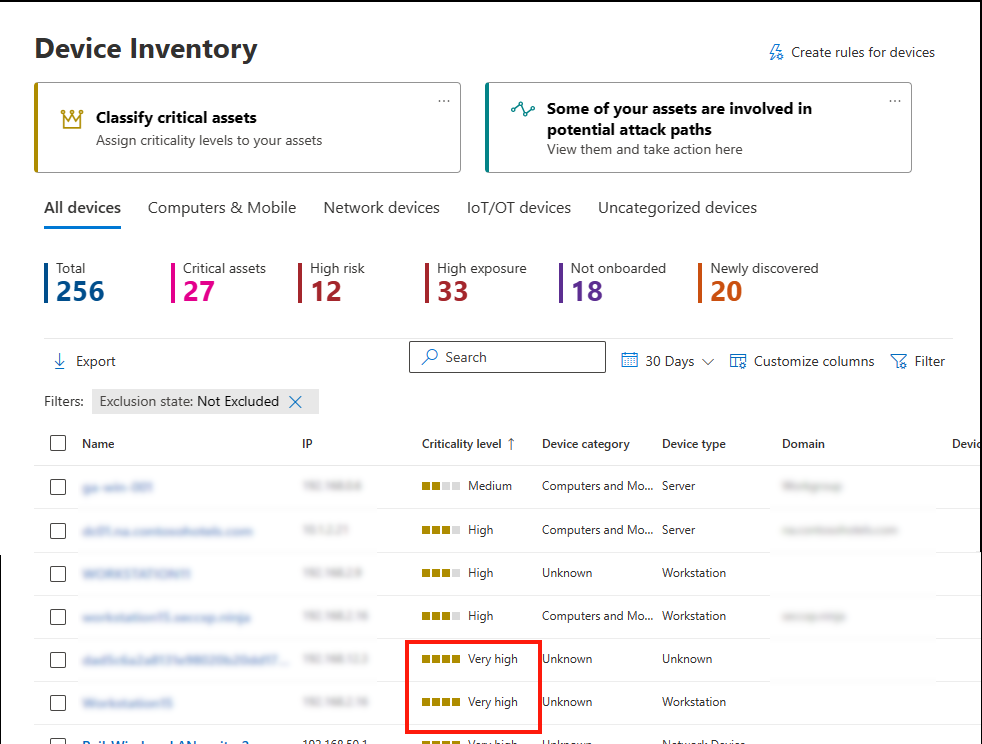
Sort by criticality
Select Devices in the Device Inventory.
Sort by Criticality level to view business critical assets with a "very high" level of criticality.
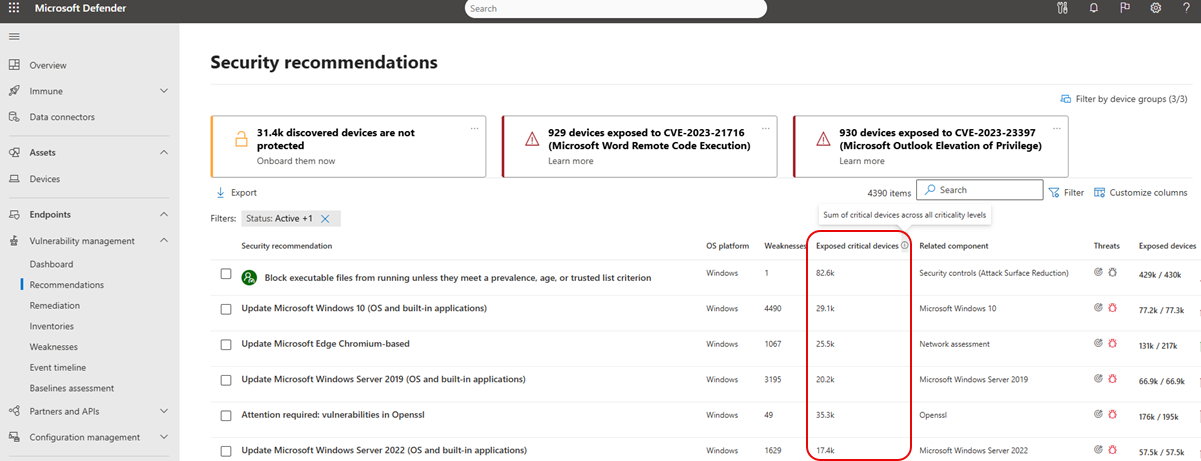
Prioritize recommendations for critical assets
To help prioritize security recommendations, and remediation steps to focus on critical assets, the sum of exposed critical assets for a recommendation can be viewed from the Security recommendations page in the Microsoft Defender portal.
To see the sum of exposed critical assets go to the Security recommendations page:
Next steps
Learn about simulating attack paths.