Note
Access to this page requires authorization. You can try signing in or changing directories.
Access to this page requires authorization. You can try changing directories.
Important
Some information in this article relates to a prereleased product which may be substantially modified before it's commercially released. Microsoft makes no warranties, expressed or implied, with respect to the information provided here. Project Perception is currently in Limited Public Preview. Limited Public Preview Program means Perception is available to a small, invitation-only set of customers for a defined preview window before broader public availability.
The Recon Agent in Project Perception gives security teams and red team operators an attacker-perspective view of an Azure environment. It correlates assets, identities, permissions, and network exposure to identify realistic attack paths, configuration issues, and exposure risks without changing resources.
Use this article to understand the Recon Agent's capabilities, review its prerequisites and permissions, set it up, start a session, and interpret its report.
Key capabilities
The Recon Agent runs multi-step, AI-orchestrated reconnaissance in your Azure environment.
- Read-only assessment: Provides an evidence-backed risk assessment without changing resources.
- Input for other agents: Provides findings to other agents, including investigation agents.
- Environment-grounded analysis: Analyzes only data from your Azure environment.
Note
The Recon Agent creates a read-only assessment. It doesn't exploit vulnerabilities, execute payloads, modify resources, deploy detections, persist attack graphs, or operate outside your organization. The agent analyzes your environment through read-only API calls. Results are a point-in-time snapshot and don't replace continuous monitoring systems.
Why use the Recon Agent?
Microsoft Security Exposure Management continuously identifies attack paths that originate from internet-exposed assets, critical resources, and sensitive identities. It monitors these marked assets and identities, but doesn't generate attack paths from arbitrary starting points that don't meet these criteria.
The Recon Agent complements Exposure Management with assumed-breach analysis. Analysts can start with any asset or identity in an Azure subscription. Assets don't need to be designated as critical or internet exposed, and identities don't need to be marked as sensitive. The analysis answers the question, "If an attacker already controlled this asset or identity, where could they go next?"
For example, a phishing attack might compromise a user who isn't marked as a sensitive identity in Defender. Exposure Management typically doesn't generate an attack path from that user unless the path includes another marked asset. The Recon Agent can use the user as the starting point to reveal potential attacker pivots. Teams can then identify effective choke points before those paths lead to incidents involving critical resources or sensitive identities.
This broader starting-point coverage helps teams identify attack paths across their Azure environment and prioritize critical paths in time to reduce security operations center (SOC) incident volume.
| Use case | Recon Agent |
|---|---|
| Attack paths from unmarked assets and identities | Generates assumed-breach attack paths from any asset or identity in an Azure subscription, including assets that aren't designated as critical or internet exposed and identities that aren't marked as sensitive. |
| Posture and exposure visibility | Interprets those signals in context and explains which combinations of identity, permission, asset, and network exposure create realistic attack paths. |
| Alert investigation | Explains whether an alert or finding is part of a broader attacker route and what downstream assets could be reached. |
| Attack path analysis | Runs targeted, session-based reconnaissance scoped to a subscription, resource group, or critical asset and can reason over missing data, failed steps, and inferred paths. |
| Detection coverage | Maps attack-path steps to existing Defender alerts and hunting coverage, then highlights where the SOC may lack visibility. |
| Prioritization | Prioritizes the paths and fixes most likely to reduce exploitability, blast radius, and business impact for the selected environment. |
| Remediation planning | Identifies the smallest set of high-impact changes that would break the largest number of attack paths and shows which paths each fix eliminates. |
| Analyst usability | Produces plain-language explanations, evidence-backed reasoning, and attack-path diagrams that are easier for analysts, red teams, and stakeholders to review. |
In short: Microsoft Defender products help detect, protect, and manage exposure. The Recon Agent explains how an attacker could use that exposure in a specific Azure environment and which actions would most effectively reduce risk.
Before you begin
Review the following product and permission requirements before you set up the Recon Agent.
Prerequisites
To use the Recon Agent, you need:
- Microsoft Entra ID P2
- Microsoft Defender XDR
- Microsoft Defender for Cloud with the Defender CSPM plan
- An Azure subscription
Required permissions
| Permission level | What you can do |
|---|---|
| Security Admin | Install and configure agents: set up agent identities and permissions, and remove agents. At least one user in your organization must have this role. |
| Security Reader | Use agents: view and interact with agent sessions, start sessions, and view session details. |
Tip
To delegate agent setup to others, assign the Security Admin role. Contact your Microsoft Entra administrator if you need role assignments.
Additional permissions required
The Recon Agent requires two more permission sets to perform reconnaissance. The user who grants each permission set needs the corresponding role in the following table.
| Role required to grant permissions | Permissions to grant to the Recon Agent |
|---|---|
| Privileged Role Administrator (Microsoft Entra role) | Microsoft Graph API permissions: - User.Read.All- Organization.Read.All- GroupMember.Read.All- Application.Read.All- DelegatedPermissionGrant.Read.All- Policy.Read.All- RoleManagement.Read.Directory- AuditLog.Read.All |
| Role Based Access Control Administrator on the subscription that is the target environment for the Recon Agent | Azure role-based access control (RBAC) roles (assign at subscription scope): - Reader - Key Vault Reader - Log Analytics Reader - Security Reader |
Set up the Recon Agent
To set up this agent, follow the steps in Set up an agent.
Note
The Recon Agent uses an agent identity rather than an agent user identity. Because of current technical limitations, agent user identities don't support the Recon Agent's read-only operations.
After you create the Recon Agent's Agent ID, use the following scripts to assign the permissions listed in Additional permissions required. Both scripts require the Agent ID as input.
Grant Microsoft Graph API permissions:
Run this script to grant the Microsoft Graph application permissions that the Recon Agent needs:
<#
.SYNOPSIS
    Assigns the set of Graph API roles required for the Recon Agent Blueprint.

.DESCRIPTION
    Assigns the following Graph API Roles:
      - User.Read.All
      - Organization.Read.All
      - GroupMember.Read.All
      - Application.Read.All
      - DelegatedPermissionGrant.Read.All
      - Policy.Read.All
      - RoleManagement.Read.Directory
      - AuditLog.Read.All

.PARAMETER TenantId
    The Tenant Id.

.PARAMETER AgentObjectId
    The Entra ID Object ID (principal ID) of the Agent Identity to assign roles to. To get this value,
    1. Go to the Microsoft Defender portal at https://security.microsoft.com/ -> Perception -> Agents
    2. Search for the Recon Agent and click on it to open the agent details page
    3. Copy the value under the "Identity" > "Recon Agent Agent ID" and click Copy ID
#>

[CmdletBinding()]
param(
    [Parameter(Mandatory = $true)]
    [ValidatePattern('^[0-9a-fA-F]{8}-([0-9a-fA-F]{4}-){3}[0-9a-fA-F]{12}$')]
    [string]$TenantId,

    [Parameter(Mandatory = $true)]
    [ValidatePattern('^[0-9a-fA-F]{8}-([0-9a-fA-F]{4}-){3}[0-9a-fA-F]{12}$')]
    [string]$AgentObjectId
)

# Use one Az PowerShell authentication context for all directory and Graph calls.
foreach ($moduleName in @("Az.Accounts", "Az.Resources")) {
    if (-not (Get-Module -ListAvailable -Name $moduleName)) {
        throw "Required PowerShell module '$moduleName' is not installed. Run: Install-Module $moduleName -Scope CurrentUser"
    }
}

Import-Module Az.Accounts -ErrorAction Stop
Import-Module Az.Resources -ErrorAction Stop

Connect-AzAccount -Tenant $TenantId -ErrorAction Stop | Out-Null

$context = Get-AzContext
if ($null -eq $context) {
    throw "Connect-AzAccount completed without creating an Azure context."
}
if ($context.Tenant.Id -ne $TenantId) {
    throw "Connected tenant '$($context.Tenant.Id)' does not match expected tenant '$TenantId'."
}

function Get-PlainTextToken {
    param(
        [Parameter(Mandatory)]
        [object]$Token
    )

    if ($Token -isnot [System.Security.SecureString]) {
        return [string]$Token
    }

    $pointer = [Runtime.InteropServices.Marshal]::SecureStringToBSTR($Token)
    try {
        return [Runtime.InteropServices.Marshal]::PtrToStringBSTR($pointer)
    }
    finally {
        [Runtime.InteropServices.Marshal]::ZeroFreeBSTR($pointer)
    }
}

function Invoke-GraphRequest {
    param(
        [Parameter(Mandatory)]
        [ValidateSet("GET", "POST")]
        [string]$Method,

        [Parameter(Mandatory)]
        [string]$Uri,

        [object]$Body
    )

    $accessToken = Get-AzAccessToken `
        -ResourceUrl "https://graph.microsoft.com/" `
        -ErrorAction Stop

    $token = Get-PlainTextToken -Token $accessToken.Token
    $parameters = @{
        Method      = $Method
        Uri         = $Uri
        Headers     = @{
            Authorization = "Bearer $token"
            Accept        = "application/json"
        }
        ErrorAction = "Stop"
    }

    if ($null -ne $Body) {
        $parameters.ContentType = "application/json"
        $parameters.Body = $Body | ConvertTo-Json -Depth 10 -Compress
    }

    Invoke-RestMethod @parameters
}

# Graph API roles (AppRoleId -> Role Name)
$roleIds = @{
    "df021288-bdef-4463-88db-98f22de89214" = "User.Read.All"
    "498476ce-e0fe-48b0-b801-37ba7e2685c6" = "Organization.Read.All"
    "98830695-27a2-44f7-8c18-0c3ebc9698f6" = "GroupMember.Read.All"
    "9a5d68dd-52b0-4cc2-bd40-abcf44ac3a30" = "Application.Read.All"
    "81b4724a-58aa-41c1-8a55-84ef97466587" = "DelegatedPermissionGrant.Read.All"
    "246dd0d5-5bd0-4def-940b-0421030a5b68" = "Policy.Read.All"
    "483bed4a-2ad3-4361-a73b-c83ccdbdc53c" = "RoleManagement.Read.Directory"
    "b0afded3-3588-46d8-8b3d-9842eff778da" = "AuditLog.Read.All"
}

# Validate the target identity and resolve Microsoft Graph by its well-known app ID.
$agentSp = Get-AzADServicePrincipal -ObjectId $AgentObjectId -ErrorAction Stop
if ($null -eq $agentSp) {
    throw "Agent service principal '$AgentObjectId' was not found."
}

$graphSp = Get-AzADServicePrincipal `
    -ApplicationId "00000003-0000-0000-c000-000000000000" `
    -ErrorAction Stop

if ($null -eq $graphSp) {
    throw "The Microsoft Graph service principal was not found in tenant '$TenantId'."
}

$GraphObjectId = if ($graphSp.Id) { $graphSp.Id } else { $graphSp.ObjectId }
if ([string]::IsNullOrWhiteSpace($GraphObjectId)) {
    throw "The Microsoft Graph service principal was resolved without an object ID."
}

# Read existing assignments so rerunning the script is safe.
$existingAssignments = Invoke-GraphRequest `
    -Method GET `
    -Uri "https://graph.microsoft.com/v1.0/servicePrincipals/$AgentObjectId/appRoleAssignments"

$existingAppRoleIds = @(
    $existingAssignments.value |
        Where-Object { $_.resourceId -eq $GraphObjectId } |
        ForEach-Object { $_.appRoleId }
)

# Assign Graph API roles to the agent identity
$results = @()
foreach ($rid in $roleIds.Keys) {
    $roleName = $roleIds[$rid]

    if ($existingAppRoleIds -contains $rid) {
        $results += [pscustomobject]@{
            Role             = $roleName
            Status           = "Already Assigned"
            "Error / Detail" = ""
        }
        continue
    }

    $body = @{
        principalId = $AgentObjectId
        resourceId  = $GraphObjectId
        appRoleId   = $rid
    }

    try {
        $null = Invoke-GraphRequest `
            -Method POST `
            -Uri "https://graph.microsoft.com/v1.0/servicePrincipals/$AgentObjectId/appRoleAssignments" `
            -Body $body

        $results += [pscustomobject]@{
            Role             = $roleName
            Status           = "Assigned"
            "Error / Detail" = ""
        }
    }
    catch {
        $detail = $_.ErrorDetails.Message
        if ([string]::IsNullOrWhiteSpace($detail)) {
            $detail = $_.Exception.Message
        }

        $results += [pscustomobject]@{
            Role             = $roleName
            Status           = "Failed"
            "Error / Detail" = $detail
        }
    }
}

Write-Host "`n=== Summary ===" -ForegroundColor Cyan
$results | Format-Table -AutoSize
Grant Azure role-based access control permissions:
Select the Azure subscriptions that the Recon Agent can analyze. This selection limits all users of the agent to the preconfigured subscriptions. Run this script for each subscription:
<#
.SYNOPSIS
    Assigns the set of Azure RBAC roles required for the Recon Agent Identity.

.DESCRIPTION
    Assigns the following built-in roles at subscription scope to the specified Agent Identity:
      - Reader
      - Key Vault Reader
      - Log Analytics Reader
      - Security Reader

.PARAMETER TenantId
    The Tenant Id.

.PARAMETER SubscriptionId
    The Azure subscription ID to scope the role assignments to.

.PARAMETER AgentObjectId
    The Entra ID Object ID (principal ID) of the Agent Identity to assign roles to. To get this value,
    1. Go to the Microsoft Defender portal at https://security.microsoft.com/ -> Perception -> Agents
    2. Search for the Recon Agent and click on it to open the agent details page
    3. Copy the value under the "Identity" > "Recon Agent Agent ID" and click Copy ID
#>

[CmdletBinding()]
param(
    [Parameter(Mandatory = $true)]
    [ValidatePattern('^[0-9a-fA-F]{8}-([0-9a-fA-F]{4}-){3}[0-9a-fA-F]{12}$')]
    [string]$TenantId,

    [Parameter(Mandatory = $true)]
    [ValidatePattern('^[0-9a-fA-F]{8}-([0-9a-fA-F]{4}-){3}[0-9a-fA-F]{12}$')]
    [string]$SubscriptionId,

    [Parameter(Mandatory = $true)]
    [ValidatePattern('^[0-9a-fA-F]{8}-([0-9a-fA-F]{4}-){3}[0-9a-fA-F]{12}$')]
    [string]$AgentObjectId

)

# Ensure Az.Resources module is available
if (-not (Get-Module -ListAvailable -Name Az.Resources)) {
    Write-Error "The Az.Resources module is required. Install with: Install-Module Az -Scope CurrentUser"
    exit 1
}
Import-Module Az.Resources -ErrorAction Stop

# Ensure signed in
Connect-AzAccount -Tenant $TenantId | Out-Null

# Set subscription context
Write-Host "Setting subscription context to $SubscriptionId." -ForegroundColor Cyan
Set-AzContext -SubscriptionId $SubscriptionId | Out-Null

$scope = "/subscriptions/$SubscriptionId"

# Azure RBAC roles
$roles = @(
    'Reader',
    'Key Vault Reader',
    'Log Analytics Reader',
    'Security Reader'
)

# Assign Azure RBAC roles to the agent identity
$results = @()
foreach ($role in $roles) {
    $existing = Get-AzRoleAssignment -ObjectId $AgentObjectId `
                                     -RoleDefinitionName $role `
                                     -Scope $scope `
                                     -ErrorAction SilentlyContinue

    if ($existing) {
        $results += [pscustomobject]@{ Role = $role; Status = 'AlreadyExists' }
        continue
    }

    New-AzRoleAssignment -ObjectId $AgentObjectId `
                         -RoleDefinitionName $role `
                         -Scope $scope `
                         -ObjectType 'ServicePrincipal' | Out-Null

    if ($LASTEXITCODE -ne 0) {
        $results += [pscustomobject]@{ Role = $roleName; Status = "Failed" }
        continue
    }

    $results += [pscustomobject]@{ Role = $roleName; Status = 'Assigned' }
}

Write-Host "`n=== Summary ===" -ForegroundColor Cyan
$results | Format-Table -AutoSize
Allow other users access
Access to agents is controlled by existing security roles in Microsoft Defender. Users with the Security Reader or Security Admin role can view and interact with agent sessions once the agent is set up.
Start a Recon Agent session
For information about the available session entry points, see Start a new session.
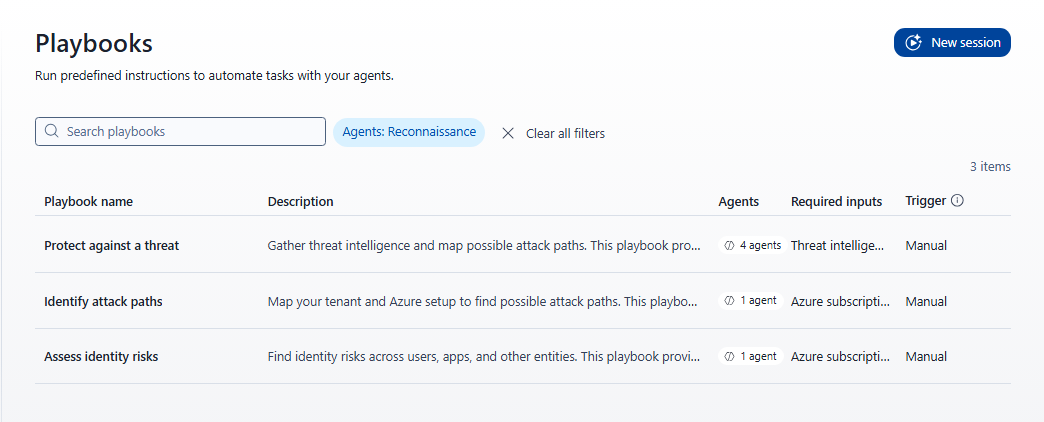
The Recon Agent participates in the following playbooks:
| Playbook | Required input |
|---|---|
| Assess identity risks | An Azure subscription and managed identity. |
| Identify attack paths | An Azure subscription. |
| Protect against a threat | A threat intelligence article. |
Use these steps to start an Assess identity risks session:
In the navigation pane, select Perception > Sessions.
Select New session.
Select the Assess identity risks playbook.
The Additional inputs needed panel opens. Two inputs are required:
Field Description Azure subscription The Azure subscription ID or name to scope the session to. Each session is limited to one subscription. The administrator preconfigures this list during Recon Agent setup and you can only use preconfigured subscriptions. Managed identity Select the managed identity. 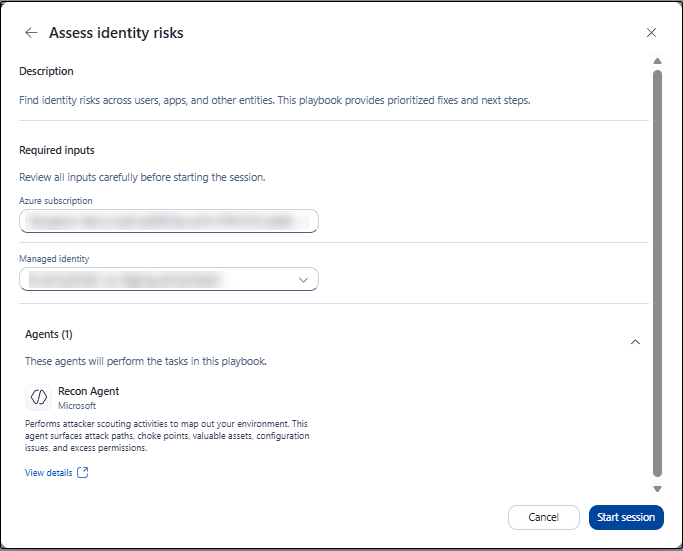
Note
When you set up the Identify attack paths playbook, a subscription picker appears for defining the session scope. The picker lists subscriptions available to the signed-in user, not the Recon Agent application. To start the playbook, the signed-in user needs read access to the entire subscription. This limitation applies only when the session starts. After the session starts, the Recon Agent uses its own identity for reconnaissance.
Fill in both fields and select Start session.
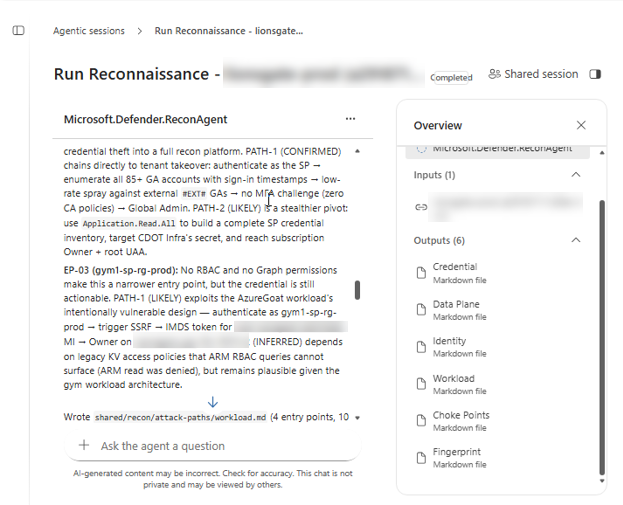
The session opens with a Running status. The agent shows its progress as it drafts a task list and starts its work.
Monitor session progress
While the session is running, the right-side panel shows:
- Overview: Shows the session summary and current status.
- Progress: Tracks completed steps. For example, the value changes from 0/1 to 1/1 when the task is complete.
- Recon Agent: Identifies the active agent for the session.
- Inputs: Shows the target environment and use case you provided.
- Outputs: Lists files generated so far and updates as the session progresses.
Understand the report
The report contains the following sections:
- Key findings: Summarizes the most significant risks and indicators with supporting evidence, such as IP addresses that host malicious content and their DNS resolution history. Each finding is labeled confirmed, likely, or inferred to indicate the strength of the evidence.
- Asset inventory table: Lists discovered assets with the columns Indicator, Type, Threat Verdict, Confidence, and First Seen.
- Attack-path graph: Shows realistic paths that an attacker could use and the relationships between assets, identities, and access. For example, a path might connect an organization, a privileged user's on-behalf-of token, and a production asset. Where applicable, the graph identifies the fastest, stealthiest, and widest routes.
- MITRE ATT&CK mapping: Maps each relevant finding to MITRE ATT&CK techniques. The report classifies techniques as applicable, not applicable, or insufficient data so you can assess how much of the attack surface your current detections cover.
- Detection coverage gaps: Identifies attack paths that existing Defender detections don't cover. Where coverage exists, the report includes relevant Defender alerts and Kusto Query Language (KQL) hunting queries.
Important
Recon Agent outputs are AI-generated and based on data available through read-only API access. Review the findings for accuracy before you use them to plan remediation or communicate risk. The report includes the banner "AI-generated content may be incorrect. Check it for accuracy."
View Recon Agent output
The session displays Recon Agent output as Markdown files.