Note
Access to this page requires authorization. You can try signing in or changing directories.
Access to this page requires authorization. You can try changing directories.
![]()
Project Freta accepts four types of memory images:
- Hyper-V Memory Snapshot (
.vmrsfiles) - LiME image (
.limefiles) - Elf Core Dump of Physical Memory (
.corefiles) - Raw Physical Memory Dump (
.rawfiles)
From a forensics perspective, the less impact made to the running system while snapshotting memory, the better. Best case scenario is to obtain a memory dump from a virtualized machine, in which the host takes a memory dump of a guest without the guest (and any malware running on it) being able to detect it and without any modification to the RAM or file contents. Less ideal are memory dumps of a running system taken from within the system, since this requires code to the run (and potentially the output to be stored) on the machine itself, which modifies the system state and potentially overwrites evidence.
Following are four methods of obtaining memory snapshots from running systems, in rough descending order of preference.
Capture a Hyper-V Linux Guest
Hyper-V memory snapshots are virtual machine runtime state (VMRS) files. To take a snapshot of a virtual machine's memory in Hyper-V, you need to use the Checkpoint functionality, either via the Hyper-V Manager or PowerShell.
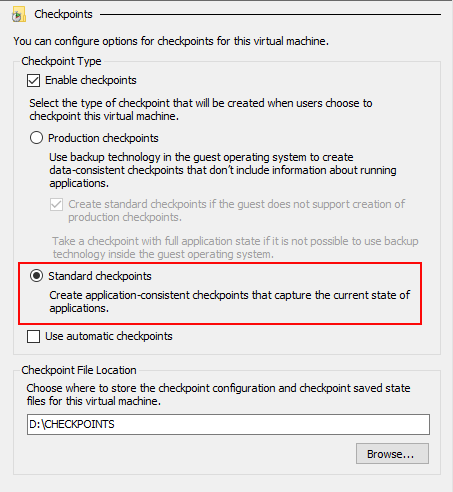
Prior to doing so, we recommend that you ensure the VM has checkpoints enabled and that they are configured as Standard checkpoints, rather than Production. As the UI indicates, we want to "capture the current state of applications". Also take note of the Checkpoint File Location path, as that's the location to which the VMRS file will be written.
Via the Hyper-V Manager
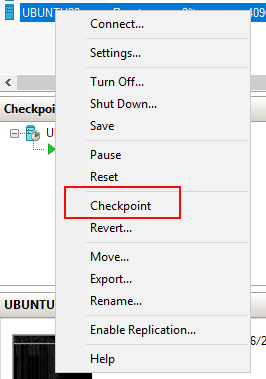
To create a checkpoint using the Hyper-V Manager, locate the appropriate Linux VM, right-mouse click, and select Checkpoint.
Via PowerShell
To create a checkpoint using PowerShell, use the Checkpoint-VM command and pass in the Linux VM name as an argument:
PS > Checkpoint-VM -Name [VMName]
This will instruct Hyper-V to take the checkpoint:

Upload the Image
Once extraction is complete via either method, browse to the checkpoint directory for the given VM:
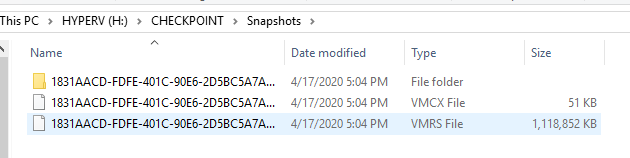
Identify the VMRS file and submit it to Project Freta for analysis.
Capture a Linux Instance using AVML
AVML is an X86_64 usermode volatile memory acquisition tool written
in Rust. It can be used to acquire memory without knowing the target
OS distribution or kernel, and no on-target compilation or fingerprinting
is needed.
AVML leverages the /proc/kcore interface present on several Linux
distributions. Unlike other on-instance memory capture methods, this
is a lighter touch as no modification to the kernel (e.g., loading of
a kernel module) is required. However, /proc/kcore is not universal,
so this tool is not always an option.
AVML is open source and available on GitHub. Compiled binaries are located under the releases folder, or you may opt to build it yourself.
Building AVML
Clone the AVML repo and browse to the
srcfolder$ git clone https://github.com/microsoft/avml $ cd avml/srcIf needed, install MUSL and Build the source according to the following from the AVML notes:
# Install MUSL
$ sudo apt-get install musl-dev musl-tools musl

# Install Rust via rustup
$ curl https://sh.rustup.rs -sSf | sh -s -- -y

# Add the MUSL target for Rust
$ rustup target add x86_64-unknown-linux-musl

# Build
$ cargo build --release --target x86_64-unknown-linux-musl

# Build without upload functionality
$ cargo build --release --target x86_64-unknown-linux-musl --no-default-features
The result should be a new
avmlfile (or similar) in thetarget/x86_64-unknown-linux-musl/releasefolder.
Note
You should build AVML on a different machine than the one on which you use it.
Using AVML
To obtain a memory snapshot using AVML, take the following steps.
Copy the
avmlfile to the target Linux machine (via USB or otherwise) and execute the following command, providing the flags, options, and filename as appropriate. Note that this can take a while to run, depending on the hardware characteristics of the target machine.$ avml [FLAGS] [OPTIONS] <filename> FLAGS: --compress compress pages via snappy --delete delete upon successful upload -h, --help Prints help information -V, --version Prints version information OPTIONS: --sas_block_size <sas_block_size> Specify maximum block size in MiB --sas_url <sas_url> Upload via Azure Blob Store upon acquisition --source <source> Specify input source [possible values: /proc/kcore, /dev/crash, /dev/mem] --url <url> Upload via HTTP PUT upon acquisition ARGS: <filename> name of the file to write to on local systemRetrieve the file and submit it to Project Freta for analysis.
Convert a VMWare Snapshot
Project Freta can ingest VMWare snapshots that have been converted for GDB using
the vmss2core tool with the -M flag.
Please take the following steps as detailed in the VMWare docs:
- Create a snapshot or suspend the virtual machine
- Locate the snapshot (.vmsn) or suspend file (.vmss) in the virtual machine directory; the vmss2core tool also accepts monolithic or non-monolithic memory (.vmem) files
- Run the vmss2core tool with the
-Mflag to create a core file (vmss.core) with a physical memory view suitable for the Gnu debugger gdb - Submit the file to Project Feta
Capture a Linux Instance using LiME
The Linux Memory Extractor (LiME) Loadable Kernel Module (LKM) is designed to acquire a full volatile memory (i.e., RAM) dump of the host system for forensic analysis or security research. It does it all in kernel space and can dump an image either to the local file system or over TCP. It's designed to give you as close of a copy of physical memory as possible while minimizing its interaction with (and therefore impact on) the host system, but it does require kernel modification via loading the kernel module.
The LiME LKM is open source and available on GitHub.
Building LiME
Clone the LiME repo
$ git clone https://github.com/504ensicsLabs/LiMEIf needed, install the GNU build tools to enable the
makecommand$ sudo apt install build-essentialBrowse to the
srcfolder and run themakecommand$ cd liME/src $ makeThe result should be a new
lime-5.4.0-26-generic.kofile (or similar) in the current directory.
Note
You should build the LiME LKM on a different machine than the one on which you use it.
Using LiME
To obtain a memory snapshot using LiME, take the following steps.
Copy the
lime-5.4.0-26-generic.kofile to the target Linux machine (via USB or otherwise) and execute the following command, substituting the path and format values as appropriate. Note that this can take a while to run, depending on the hardware characteristics of the target machine.$ sudo insmod lime-5.4.0-26-generic.ko "path=/media/USBDrive/image.lime format=raw"Retrieve the resulting
image.limefile (or whatever you chose to call it) and submit it to Project Freta for analysis.