Note
Access to this page requires authorization. You can try signing in or changing directories.
Access to this page requires authorization. You can try changing directories.
Learn about the workflow actions that are available in the SharePoint 2010 Workflow Platform in Microsoft SharePoint Designer 2013.Use this article only if you are working in SharePoint Designer 2013, but want to continue to use the SharePoint 2010 Workflow Platform.If instead you want to use the SharePoint Workflow Platform, see Workflow actions quick reference (SharePoint Workflow platform), along with other articles (mentioned in the "Additional resources" section.md) about new features that are available in the newer platform.To begin creating a workflow by using the 2010 Workflow Platform, select SharePoint 2010 Workflow in the Platform Type box in the Create Workflow dialog box.
Note
SharePoint 2010 workflows have been retired since August 1, 2020 for new tenants and removed from existing tenants on November 1, 2020. If you’re using SharePoint 2010 workflows, we recommend migrating to Power Automate or other supported solutions. For more info, see SharePoint 2010 workflow retirement.
Where to find the workflow actions
There are two ways to access the menu of available workflow actions.
While you are editing inside a workflow step, do one of the following:
On the Workflow tab, in the Insert group, click Actions.
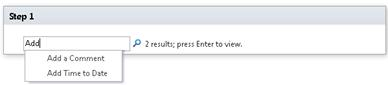
Double-click inside the workflow step. In the search box that appears, type text that appears in the name of the action that you want (such as "add"), and then press Enter. Actions and conditions that contain the text that you typed appear below the text box.
The actions available to you during workflow creation depend on the current context. For example, the Start Approval Process and Start Feedback Process actions are not available for sites that are based on Microsoft SharePoint Foundation 2013. Some list actions are available only inside an impersonation step, and others are available only when your workflow is associated with a document library or document content type. List actions that work on the current item, such as Set Content Approval Status and Set Field in Current Item, are not available in a site workflow.
Actions are organized into categories based on their area of application in a workflow. For example, actions that affect an item's behavior are listed under List Actions, actions pertinent to Document Sets under Document Set Actions, and custom workflow actions under Custom Actions. The categories for actions are:
Core Actions
Document Set Actions (appear only when your workflow is associated with a document library or a document content type)
List Actions
Relational Actions (appear only when your SharePoint site is running SharePoint)
Task Actions (appear only when your SharePoint site is running SharePoint)
Task Behavior Actions (appear only when you are customizing tasks in pre-built workflow actions, such as Start Approval Process and Start Feedback Process)
Utility Actions
Custom Actions
General actions
General actions are actions that display in the Actions list in all workflow contexts.
| Action | Description |
|---|---|
| Core Actions |
Actions in this category are the ones most commonly used in workflows. |
| Add a comment |
This action is initially displayed in a workflow step as Comment: comment text. Use this action to leave informative comments in the workflow designer for reference purposes. This is especially helpful when there are other users co-authoring the workflow. For example, if a variable in the current workflow doesn't have a user-friendly name, you can use this action to add a comment to indicate what the variable does in the workflow. Following is an example of what the action might look like in a workflow step: - Comment: This variable provides the department of the workflows initiator. Note: Anyone editing the workflow in Microsoft Visio 2013 will also be able to view the comments. |
| Add Time to Date |
This action is initially displayed in a workflow step as Add 0 minutes to date (Output to Variable: date). Use this action to add a specified number of minutes, hours, days, months, or years to a date value and to store the output value in a variable. The date value to which the time is added can be the current date, a specified date, or the result of a lookup. Following is an example of what the action might look like in a workflow step: - Add 7 days to Current Item:Modified (Output to: Variable: A week from Modified) |
| Do Calculation |
This action is initially displayed in a workflow step as Calculate value plus value (output to Variable: calc). Use this action to perform a calculation using two values and to store the output value in a variable. Possible calculations include addition, subtraction, multiplication, and division. Following are examples of what the action might look like in a workflow step: - Calculate 36divided by9 (Output to Variable:Number of Widgets/) - Calculate [fx :: Courses*, Filled Seats] plus 1 (Output to Variable: New Filled Seats) |
| Log to History List |
This action is initially displayed in a workflow step as Log this message to the workflow history list. Use this action to log a message in the workflow's history list about the workflow's actions or progress. The message can be a summary of a workflow event, or anything else that you want to capture about the current run of the workflow. Such messages can be helpful in troubleshooting workflow issues. For example, you can log a message that records an event like Copied to list A or Sent email to reviewers. After the workflow completes successfully, you can go to the Workflow History list and see the messages displayed in the Description column. Following is an example of what the action might look like in a workflow step: - Log A week from Modified variable set to the workflow history list Note: If you want an action that stops the workflow and then logs a message to the history list, use the Stop Workflow action instead. |
| Pause for Duration |
This action is initially displayed in a workflow step as Pause for 0 days, 0 hours, 5 minutes. Use this action to pause the workflow for a duration specified as a number of days, hours, and minutes. Note: The delay time that is initially displayed reflects the timer job interval, which has a default value of five minutes. |
| Pause until Date |
This action is initially displayed in a workflow step as Pause until this time. Use this action to pause the workflow until a particular date. You can use the current date, a specified date, or the result of a lookup. Following are examples of what the action might look like in a workflow step: - Pause until 1/1/2010 12:00:00 AM - Pause until Variable: A week from Modified |
| Send an Email |
This action is initially displayed in a workflow step as Email these users. Use this action to send an email message to a user or a group. It is commonly used to send a confirmation message to workflow participants. Email recipients can be a user or a group within the site collection, or anyone inside your organization. You can now specify a dynamic value, such as a lookup or a string, in your subject. Important: Outgoing e-mail must be configured in SharePoint Central Administration. Following is an example of what the action might look like in a workflow step: - Email Variable: approvers |
| Set Time Portion of Date/Time Field |
This action is initially displayed in a workflow step as Set time as 00:00 for date (Output to Variable: date1). Use this action to create a timestamp and to store the output value in a variable. You can set the time in hours and minutes and add the current date, a specified date, or the result of a lookup. For example, suppose you want to add a timestamp to any new customer order that is added to an orders list. Instead of using the current time when the order was actually received in the timestamp, you want to add a specific time so that you can have your workflow perform any operation (such as routing orders to the warehouse) on all new items that have the same timestamp. Another example: Suppose that you have a presentation scheduled for 9 a.m. on a particular day, and you want to receive an email reminder. You can use this action to add the time to the date, pause the workflow till the day before the presentation, and then have the workflow send you the reminder. Following is an example of what the action might look like in a workflow step: - Set time as 00: 00 for Current Item:Modified (Output to Modified time variable set to midnight) |
| Set Workflow Status |
This action is initially displayed in a workflow step as Set workflow status to Canceled. Use this action to set the status of the workflow. The default options are Canceled, Approved, and Rejected. If you type a new status value in the dropdown list in the action, your new status is automatically added to the dropdown list for subsequent use. For example, you can add a custom status that is more user-friendly and informative than Completed or Canceled, such as Expense Report Approved. Note: - You cannot rename or delete a custom status value once it has been created. However, you do not ever have to use it. - A custom status is applicable to the current workflow only, and cannot be used in another workflow. - A workflow cannot use custom status values that you define in the action if the action is used inside an impersonation step. If the Set Workflow Status action is the last step in a workflow where you have also used a custom value, you can see your custom value in the Status column in the list when the workflow pauses or completes. Following is an example of what the action might look like in a workflow step: - Set workflow status to Specification status: Ready for Design Review |
| Set Workflow Variable |
This action is initially displayed in a workflow step as Set workflow variable to value. Use this action to direct the workflow to assign value data to a workflow variable. Following is an example of what the action might look like in a workflow step: - Set Variable: Expense report total to Current Item:Total |
| List Actions |
Actions in this category perform operations on list items. Note: Some actions in this category appear in some but not all workflow contexts. For example, some list actions only appear when you click inside an impersonation step in your workflow, while some appear only when your workflow is attached to a document library or document content type. For more information, see Actions available only within an impersonation step and Actions available when the workflow is associated to a document library or document content type later in this article. |
| Check In Item |
This action is initially displayed in a workflow step as Check in item in this list with comment: comment. Use this action to check in an item that is currently checked out. Following is an example of what the action might look like in a workflow step: - Check in item in Expense Reports with comment: Expense report approved Note: You can check in items only in document libraries. |
| Check Out Item |
This action is initially displayed in a workflow step as Check out item in this list. Use this action to check out an item that is currently checked in. Following is an example of what the action might look like in a workflow step: - Check out item in Current Item Note: - You can check out items only from a library in your site. - Before checking the item out, the workflow first verifies that the item is currently checked in. |
| Copy List Item |
This action is initially displayed in a workflow step as Copy item in this list to this list. Use this action to copy a list item to another list. (If there is a document in the list item, the workflow also copies the document to the destination list.) Following is an example of what the action might look like in a workflow step: - Copy item in Current Item to Archive Requests Important: There must be at least one column similar in both the source list and the destination list. |
| Create List Item |
This action is initially displayed in a workflow step as Create item in this list (Output to Variable: create). Use this action to create a new list item in the list that you specify. You can supply the fields and values in the new item. You can use this action whenever you want a new item to be created containing specified information. For example, create an announcement whenever an important company-related document (such as a contract) is approved, or archive documents. Note: - The output variable is the ID of the new item created in the list. Following is an example of what the action might look like in a workflow step: - Create item in Orders (Output to Variable: New Order ID) |
| Delete Item |
This action is initially displayed in a workflow step as Delete item in this list. Use this action to delete an item from a list. Following is an example of what the action might look like in a workflow step: - Delete item in Documents |
| Discard Check Out Item |
This action is initially displayed in a workflow step as Discard check out of item in this list. Use this action to check an item back in without retaining any changes that have been made to it since it was last checked out. Following is an example of what the action might look like in a workflow step: - Discard check out of item in Documents |
| Set Content Approval Status |
This action is initially displayed in a workflow step as Set content approval status to this status with comments. Use this action to set the content approval status field to a value such as Approved, Rejected, or Pending. (You can also type a custom status in the action.) Following is an example of what the action might look like in a workflow step: - Set content approval status to Approved with Looks good Note: Content approval must be enabled in the list for this action to function. This action works on the item that the workflow is currently acting upon, and therefore is not available in a site workflow. |
| Set Field in Current Item |
This action is initially displayed in a workflow step as Set field to value. Use this action to set a field in the current item to a value. Following is an example of what the action might look like in a workflow step: - Set Content Type ID to Specification Note: - If you want to pause the workflow until the value of a field changes use the Wait for Field Change in Current Item action instead. - The Set Field in Current Item action is not available when you are working in a site workflow. |
| Update List Item |
This action is initially displayed in a workflow step as Update item in this list. Use this action to update a list item. You can specify the fields and the new values in those fields. Following is an example of what the action might look like in a workflow step: - Update item in Documents |
| Wait for Field Change in Current Item |
This action is initially displayed in a workflow step as Wait for field to equal value. Use this action to pause the workflow until the specified field in the current item has changed to a specified value. Following is an example of what the action might look like in a workflow step: - Wait for Approval Statusto equal1;#Rejected Note: If you want the workflow to change the value of the field, rather than having the workflow wait for the field to change, use the Set Field in Current Item action instead. |
| Task Actions |
Actions in this category pertain to task items. |
| Assign a Form to a Group |
This action is initially displayed in a workflow step as Assign a custom form to these users. Use this action to create a custom task form and to assign the form to one or more participants or groups. Participants provide their responses in the fields of the form and, when they are done, click Complete Task on the form. Following is an example of what the action might look like in a workflow step: - Assign Asset Reporting to Marketing Note: There is not a return value that identifies the task data. |
| Assign a To-do Item |
This action is initially displayed in a workflow step as Assign a to-do item to these users. Use this action to assign a to-do task to one or more participants or groups, prompting them to perform their tasks and then, when they are done, to click the Complete Task button on their task form. Following is an example of what the action might look like in a workflow step: - Assign Submit expense report to Marketing |
| Collect Data from a User |
This action is initially displayed in a workflow step as Collect data from this user (Output to Variable: collect). Use this action to assign a task to the participant, prompting them to provide the needed information in a custom task form, and then to click the Complete Task button on the task form. This action has an output clause???that is, the workflow stores the information returned by the action in a corresponding variable. The list-item ID of the completed task item from the action is stored in the collect variable. Following is an example of what the action might look like in a workflow step: - Collect Expense report from Marketing (Output to Variable: Marketing Expense Report) |
| Utility Actions |
Most actions in this category can be used to extract information from text strings. You can cut up a text string and use it in several different scenarios in a workflow. For example, suppose that your company wants to stamp all incoming documents by using a specific name format such as date_department (for example: 07142009_sales.docx), and you want to run workflows that assign tasks to a reviewer based on the date in the stamp on that file. You could use a utility action to get the first 8 characters of the document name (07142009) and convert them into a date by using lookup coercions, so that you can assign tasks that have that due date. For more information on lookup coercions, see the See Also section. |
| Extract Substring from End of String |
This action is initially displayed in a workflow step as Copy 0 characters from end of string (Output to Variable: substring). Use this action to copy a specified number of characters from the end of a string and to store the output value in a variable. You specify the number of characters that the workflow copies from the string. Following is an example of what the action might look like in a workflow step: - Copy 15 characters from end of Current Item:Name (Output to Variable: Copy15CharFromEndOfName) |
| Extract Substring from Index of String |
This action is initially displayed in a workflow step as Copy from string, starting at 0 (Output to Variable: substring. Use this action to copy all characters starting from a specified character in a string and to store the output in a variable. Following is an example of what the action might look like in a workflow step: - Copy from Current Item:Name, starting at 4 (Output to Variable: CopyStringFromChar4) |
| Extract Substring from Start of String |
This action is initially displayed in a workflow step as Copy 0 characters from start of string (Output to Variable: substring). Use this action to copy a specified number of characters from the start of a string and to store the output in a variable. You specify the number of characters that the workflow copies from the string. Following is an example of what the action might look like in a workflow step: - Copy 15 characters from start of Current Item:Name (Output to Variable: Copy15CharFromStartOfName) |
| Extract Substring of String from Index with Length |
This action is initially displayed in a workflow step as Copy from string, starting at 0 for 0 characters (Output to Variable: substring). Use this action to copy a specified number of characters starting from a particular character in a string and to store the output in a variable. You specify the number of characters that the workflow copies from the string. Following is an example of what the action might look like in a workflow step: Copy from Current Item:Name, starting at 4 for 15 characters (Output to Variable: CopyfromChar4for15CharOfName) |
| Find Interval Between Dates |
This action is initially displayed in a workflow step as Find minutes between date and date (Output to Variable: time). Use this action to calculate the time difference, in terms of minutes, hours, or days, between two dates and to store the output in a variable. Following is an example of what the action might look like in a workflow step: - Find minutes between CurrentItem:Modified and Today (Output to Variable: Last Modified In Minutes) |
Actions available when your SharePoint site is running SharePoint
Actions such as Start Approval Process, Declare Record, and Lookup Manager of a User are available only when your SharePoint site is running SharePoint.
| Action | Description |
|---|---|
| Document Set Actions |
Actions in this category pertain to a Document Set. A Document Set is a folder in which documents are stored. In a workflow, a Document Set is treated as a single item. Note: To be able to use Document Sets in your library, you must add the Document Set content type from your Library Settings page in your SharePoint site. |
| Start Document Set Approval Process |
This action is initially displayed in workflow steps as Start Approval process for the contents of this Document Set with the users specified by this column. Use this action to start an approval action on a Document Set and all of the documents that it contains. When you use this action, both the status of the Document Set and the status of all of the documents that it contains it are changed (for example, to Approved or to Rejected). If, on the other hand, you use the Start Approval Process action on the Document Set, only the status of the Document Set itself is changed, and not the statuses of the individual documents that it contains. Following is an example of what the action might look like in a workflow step: - Start Bill of material approval process for the contents of this Document Set with the users specified by Variable: Bill of Materials Approvers |
| Capture a version of the Document Set |
This action is initially displayed in workflow steps as Capture a version of this Document Set that includes the type versions of the contents with comment: comment. Use this action to lock the version of the Document Set that contains the version of documents, major or minor, that you specify in the action. Following is an example of what the action might look like in a workflow step: - Capture a version of this Document Set that includes the last major versions of the contents with comment: Last major version of the Bill of Material |
| Send Document Set to Repository |
This action is initially displayed in workflow steps as Submit Document Set using this action to this destination content organizer with this explanation (Output to Variable: submit file result). Use this action to move or copy a Document Set to a document repository. A document repository can be a library in your SharePoint site, or an entire site (like the Document Center), that routes records to a specific destination by using rules that you define. Following is an example of what the action might look like in a workflow step: - Submit Document Set using Copy to DocumentRepository:GUID with Copy final bill of Material to repository (Output to Variable: Copy Document Set to repository) Note: Before you can define rules and route documents, you must enable the Content Organizer site feature in your SharePoint site. For more information, see the Configure the content organizer to route records topic in the See Also section. |
| Set Content Approval Status of the Document Set |
This action is initially displayed in workflow steps as Set content approval status for the contents of this Document Set to this status with comments. Use this action to set content approval of a Document Set to Approved, Rejected, or Pending. Following is an example of what the action might look like in a workflow step: - Set content approval status for the contents of this Document Set to Approved with The bill of materials is approved Note: Content approval must be enabled in the list before you can use this action. |
| Task Actions |
Actions in this category are used in approval scenarios. There are two pre-built workflow actions in this category: Start Approval Process and Start Feedback Process. Pre-built actions work sort of like sub-workflows, meaning that the workflow logic is already defined in the actions. All you need to do is supply the appropriate information. These actions are used in the globally reusable workflows Approval-SharePoint and Collect Feedback-SharePoint that are included with SharePoint. For information about when to use these workflows and when to use the actions, see the When should you use the approval and feedback actions? section of this article. Also available is the Start Custom Task Process, which also has built-in logic, but which (unlike the previous two actions.md) does not come pre-built with what the workflow should be doing at each phase. A category of actions called Task Behavior Actions appear in the Actions list only when you customize the behavior of an approval action such as Assign Item for Approval or Assign Item for Feedback. For more information on Task Behavior Actions, see the Actions available within task actions section of this article. |
| Start Approval Process |
This action is initially displayed in a workflow step as Start Approval process on Current Item with these users. Use this action to route a document for approval. Approvers can approve or reject the document, reassign the approval task, or request changes to the document. The Start Approval Process action behaves like a pre-built workflow: the logic is already defined in the action. The action has distinct phases built in to define task behaviors, task process behaviors, logging to the History Log, e-mail notifications, and completion conditions. Although the action comes with this pre-built logic, it still needs information from you???such as who the reviewers are, whether the approval tasks are assigned one at a time ("in serial", the default) or all at once ("in parallel"), and the due dates or permitted durations for task completion. You can assign tasks to both internal and external participants. An external participant can be either an employee in your organization who isn't a user in the site collection or anyone outside of your organization. Following is an example of what the action might look like in a workflow step: -Start Specification Approval process on Current Item with Variable: Approvers |
| Start Feedback Process |
This action is initially displayed in a workflow step as Start Feedback process on Current Item with these users. Use this action to route a document for feedback. Reviewers can submit feedback or reassign the feedback task. The Start Feedback Process action behaves like a pre-built workflow: the logic is already defined in the action. The action has distinct phases built in to define task behaviors, task process behaviors, logging to the History Log, e-mail notifications, and completion conditions. Although the approval action comes with this pre-built logic, it still needs information from your end???such as who the reviewers are, whether the approval tasks are assigned one at a time ("in serial", the default) or all at once ("in parallel"), and the due dates or permitted durations for task completion. You can assign tasks to both internal and external participants. An external participant can be either an employee in your organization who isn't a user in the site collection, or anyone outside of your organization. Following is an example of what the action might look like in a workflow step: - Start Specification Feedback process on Current Item with Variable: Reviewers |
| Start Custom Task Process |
This action is initially displayed in a workflow step as Start Task process on Current Item with these users. Use the Start Custom Task Process action (an approval process template) if neither of the two preceding approval actions meets your needs. The Start Custom Task Process also allows logic to be built inside of it; but unlike the other two approval actions, it does not come pre-built with every action that the workflow needs in each of its phases. You can specify your own actions and conditions in task behaviors or completion conditions. Following is an example of what the action might look like in a workflow step: - Start Video Lesson Approval process on Current Item with Variable: Approvers |
| List Actions |
Actions in this category perform operations on list items. |
| Declare Record |
This action displays in a workflow step as Declare this item as a record. Use this action to identify a document as a record and to apply the record restrictions settings you may have defined in the Record Declaration Settings page on your SharePoint site. There are no variables to set for this action. You can define record declaration settings at the top-level site in your site collection. Record declaration settings govern how records are treated, such as whether they can be edited or deleted, what metadata is applied to them, and what the record-retention policy is. Record declaration settings specify restrictions that should be applied after an item is declared as a record, as well as which user roles are allowed to declare records and whether record declaration is available to all site users. |
| Undeclare Record |
This action displays in a workflow step as Undeclare the item as a record. Use this action to undo any record declaration settings that are applied to a record. There are no variables to set for this action. You can define record declaration settings at the top-level site in your site collection. Record declaration settings govern how records are treated, such as whether they can be edited or deleted, what metadata is applied to the record, and what a record's retention policy is. Record declaration settings specify restrictions that should apply after an item is declared as a record, user roles allowed to declare records, and if record declaration is available to all site users. |
| Relational Actions |
The action in this category enables you to look up a user's manager and to store that output value in a variable. |
| Lookup Manager of a User |
This action is initially displayed in workflow steps as Find Manager of this user (output to Variable: manager). Use this action to look up a user's manager and to store that output value in a variable. Following is an example of what the action might look like in a workflow step: - Find Manager of Workflow Context:Initiator (output to Variable: manager) |
Actions available within task actions
Actions such as Start Approval Process and Start Feedback Process can be used in workflows to assign list items for approval or feedback. While these actions are pre-built (that is, much of the workflow logic is already defined in the action), you will supply additional information required by the action (for example, by identifying the approvers or reviewers to whom tasks are to be assigned).
Note: If these actions do not fully meet your needs, you can customize them in the browser, in SharePoint Designer 2013, and in development environments that are compatible with SharePoint, including Visual Studio. You can also customize the Start Custom Task Process action by using the same tools. This action is a template that you can use to define a new task process for your organization.
When you customize task behavior inside actions such as Start Approval Process and Start Feedback Process, a new category of actions, titled Task Behavior Actions, are available.
Note: Which actions in this category are available varies depending on where in the workflow you are currently working.
| Action | Description |
|---|---|
| End Task Process | This action is initially displayed in a workflow step as End Task Process. Use this action to end the task process. The main workflow then continues to the next action. |
| Set Content Approval Status (as author) | This action is initially displayed in a workflow step as Set content approval of item that the task process is running on to this status (run as the workflow author). It allows you to set the approval status of the list item to Approved, Rejected, or Pending by using the permissions of the workflow author instead of those of person who starts the workflow. This action is commonly used if the person who starts an approval workflow might not have the neeecessary permissions to approve a document.The list item specified in the action is the item that the action is currently running on. This may or may not be the same item that the workflow overall is running on. Note: Content approval must be enabled in the list for this action to function. |
| Wait for Change in Task Process Item | This action displays in a workflow step as Wait for change in item that the task process is running on. Use this action to pause the task process until a value in the item on which the approval process is running changes. |
| Wait for Deletion in Task Process Item | This action displays in a workflow step as Wait for deletion of item that the task process is running on. Use this action to pause the task process until a value in the item on which the approval process is running is deleted. |
| The following action appears only when, customizing the Start Approval Process action, you click changing the behavior of a single task, and then click inside the Before a Task is Assigned step. | |
| Set Task Field | This action is initially displayed in a workflow step as Set Task field to value. Use this action to set a specific field in the current task item to a specified value. This action can be used on a task that has not yet been created. |
| The following actions appear only when, customizing the Start Approval Process action, you click changing the behavior of a single task, and then click inside the When a Task is Pending or When a Task Expires step. | |
| Rescind Task | This action is displayed in a workflow step as then Rescind this task. Use this action to complete the task without an outcome. |
| Append Task | This action is displayed in a workflow step as then Append a new task and assign to this user. Use this action to assign a new task to the specified user at the end of the current stage in the approval action. If the current stage was Molly;Diane;Oliver, then appending a task to Diane would change the stage to Molly;Diane;Oliver;Diane. |
| Delegate Task | This action is initially displayed in a workflow step as then Delegate this task to this user. Use this action to rescind a task assignment to a current user and then assign the same task to a different user. If the new assignment is to a group, only a single task will be assigned to the group as a whole and not one task to each group member. To assign one task to each group member, use the Forward Task action instead. |
| Escalate Task | This action is initially displayed in a workflow step as then Escalate this task to the current assignee's manager. Use this action to assign the task to the manager of the user to whom the task is currently assigned. There are no variables to set for this action. |
| Forward Task | This action is initially displayed in a workflow step as then Forward this task to this user. Use this action to rescind a task assignment to a current user and assign the same task to a different user. If the new assignment is to a group, one task will be assigned to each member of the group and not only a single task to the group as a whole. To assign a single task to the group as a whole, use the Delegate Task action instead. |
| Insert Task | This action is initially displayed in a workflow step as then Insert a task assigned to this user. Use this action in the approval process to insert, following the current stage, a new stage in which the specified user is the only participant. |
| Reassign Task | This action is initially displayed in a workflow step as then Reassign this task to this user. Use this action to reassign a task to another user. |
| Request a Change | This action is initially displayed in a workflow step as then Request a change of this user. Use this action to request a change from a different user and then, when the requested change is completed, to have a new task assigned to the current user. |
| Send Task Email | This action is initially displayed in a workflow step as then Email these users. Use this action to include the Edit Task button in the email task notification that is sent to the specified users. |
When should you use the approval and feedback actions?
In Microsoft Office SharePoint Designer 2007, you used task actions in approval scenarios. With pre-built reusable workflows in SharePoint, such as Approval - SharePoint and Collect Feedback - SharePoint, you are probably wondering how they differ from the task actions Start Approval Process and Start Feedback Process. Although both the task actions and the pre-built workflows can be used in both collecting feedback and collecting approval scenarios, the pre-built workflows provide a more sophisticated and complete solution.
If the pre-built reusable workflows do not meet your needs, you customize them by using SharePoint Designer 2013. If customizing a pre-built workflow to meet your needs will be more work that creating a new workflow, you can leverage the Start Approval Process and Start Feedback Process actions in your new workflow. If you want the structure that these actions provide, but not the all of their preconfigured functionality, you can use the Start Custom Task Process action.
Note that the various task actions can be used in scenarios that are not strictly approval or feedback processes. For example, you can use a task action to send email messages that remind employees to complete their timesheets.
The following table presents a comparison between the three task actions on the one hand and the pre-built reusable workflows on the other:
| Feature | Task actions | Pre-build reusable workflows |
|---|---|---|
| Number of users involved in the process |
A single user or group per task action. |
In the pre-built workflows, multiple users and groups can be specified in multiple assignment stages. Each assignment stage enables you to make two specifications: whether the tasks are assigned in serial or in parallel, and to which users, groups, and other participants the tasks are assigned. |
| Pre-loaded workflow logic |
The three task actions do not have built-in logic. You must use other actions and conditions to build out an approval or feedback mechanism. |
The pre-built workflows are already equipped with all of the built-in logic to provide a start-to-finish approval or feedback collection experience. You can use their default logic, or customize them to meet your needs. |
| Order in which tasks are assigned |
In the three task actions, tasks can only be assigned in parallel, both for individual users and for each member of a group. That is: all tasks assigned by a task action are assigned at the same time, in a single distribution stage. |
In the pre-built workflows, tasks can be assigned either in a single distribution stage or in multiple stages; and within each stage, tasks can be assigned either in serial or in parallel. |
| Data binding against task information |
The three task actions do not come equipped with ready-to-use lookups. Collect data from a user is an action that has an output clause: the data generated at a workflow's run time is stored in the variable in the output clause. To build an approval or feedback scenario on your own, you must then supply this variable in several different actions in the workflow |
The pre-built workflows take advantage of data sources (including Current Item, pre-defined Workflow Variables and Parameters, the context of the current workflow, and Task Results), making it easier to customize the workflow to meet your needs. For example, to send e-mail to the person to whom the current task is assigned, you can use the Send an Email action and configure the action to send email to Current Task: Assigned To. |
| Special features for task participants |
The three task actions do not provide special features (such as task reassignment and change request options) for task participants. |
In the pre-built workflows, approval actions can allow a task participant to reassign the task to another user or to request a change from the task process owner with just a single click. |
| Task completion |
In the three task actions, the only button available to indicate task completion is always labeled Complete Task. |
In the pre-built workflows, you can add more meaningful buttons, such as Approve and Reject to indicate task outcome in the task completion form. |
Actions available when the workflow is associated to a document library or document content type
Some workflow actions (such as Shared Documents) are available only when the workflow is associated to a document library, or to the Document content type or a child of that content type..
| Action | Description |
|---|---|
| Core Actions |
|
| Send Document to Repository |
This action is initially displayed in a workflow step as Submit File using this action to this destination router with this explanation (Output to Variable: submit file result). Use this action to move or copy the document associated to the list item to a document repository. A document repository can be a library in your SharePoint site, or an entire site (like the Document Center), that routes records to a specific destination by using rules that you define. Following is an example of what the action might look like in a workflow step: - Submit File using Move to Archive:DocumentID Value with The file is ready for archival (Output to Variable: Submit file for archival) |
| Document Set Actions |
Actions in this category pertain to a Document Set. A Document Set is a folder in which documents are stored. In a workflow, a Document Set and all of the documents that it contains are treated as a single item. Note: - To be able to use Document Sets in your library, you must add the Document Set content type from your Library Settings page in your SharePoint site. - Document Sets are a feature of SharePoint. For more information about Document Sets Actions, see the Actions available when your SharePoint site is running SharePoint section of this article. |
| List Actions |
This category of actions performs operations on list items. |
| Delete Drafts |
This action is displayed in a workflow step as Delete all drafts (minor versions) of the item. Use this action to delete all existing draft or minor versions of the current item. There are no variables to set for this action. Note: Versioning with minor versions must be enabled on the SharePoint list for this action to function. |
| Delete Previous Versions |
This action is displayed in a workflow step as Delete all previous versions of the item. Use this action to delete all existing previous versions of the current item. There are no variables to set for this action. Note: Versioning must be enabled on the SharePoint list for this action to function. |
Actions available only within an impersonation step
Some list actions are available only inside an impersonation step in. Impersonation steps direct the workflow to perform actions by impersonating the workflow author instead of the workflow initiator. Impersonation steps are useful in scenarios such as approval and publishing, in which people submitting content for approval may not have the same permissions that the people approving the content have. Impersonation steps are also helpful in automating site administrator tasks (for example, in a workflow that automatically assigns permissions to users).
Note: The "workflow author" is the person who last published the workflow.> An impersonation step cannot be nested inside of another step of any kind.
| Action | Description |
|---|---|
| Add List Item Permissions |
This action is initially displayed in a workflow step as Add these permissions to item in list. Use this action to grant the specified permission levels for the specified item to the specified user or users. Following is an example of what the action might look like in a workflow step: - Add Contribute, Read to item in Images |
| Inherit List Item Parent Permissions |
This action is initially displayed in a workflow step as Inherit parent permissions from item in this list. Use this action to force a list item that has unique permissions to inherit the parent permissions from its list. Following is an example of what the action might look like in a workflow step: - Inherit parent permissions from item in Images |
| Remove List Item Permissions |
This action is initially displayed in a workflow step as Remove these permissions from item in list. Use this action to remove specified permission levels for a specified item from a specified user or users. Following is an example of what the action might look like in a workflow step: - Remove Contribute from item in Images |
| Replace List Item Permissions |
This action is initially displayed in a workflow step as Replace these permissions of item in list. Use this action to replace, for a specified user or users, their current permission level for a specified item with a specified new permission level. Following is an example of what the action might look like in a workflow step: - Replace Read of item in Images |
Actions within a site workflow
A site workflow operates at a site-level and is not attached to any more specific object (such as an individual item or content type). When you are working inside a site workflow, actions that work on a current item, such as Set Content Approval Status and Set Field in Current Item, are not available to you. For more information about these actions, see the General actions section of this article.