Note
Access to this page requires authorization. You can try signing in or changing directories.
Access to this page requires authorization. You can try changing directories.
Form customizers are SharePoint Framework components that give you an option to override the form experience at a list or library level by associating the component with the used content type. Form customizer components can be used in SharePoint Online, and you build them using modern JavaScript tools and libraries.
Important
Form customizers were released as part of the SharePoint Framework v1.15, so ensure that you are using the right version in your environment. See v1.15 release notes for details.
Tip
You can find the output from this tutorial from GitHub.
Create an extension project
Create a new project directory in your favorite location.
md form-customizerGo to the project directory.
cd form-customizerCreate a new HelloWorld extension by running the Yeoman SharePoint Generator.
yo @microsoft/sharepointWhen prompted, enter the following values (select the default option for all prompts omitted below):
- What is your solution name?: form-customizer
- Which type of client-side component to create?: Extension
- Which type of client-side extension to create? Form Customizer
- What is your Form Customizer name? HelloWorld
- Which template would you like to use?: No JavaScript Framework
At this point, Yeoman installs the required dependencies and scaffolds the solution files along with the HelloWorld extension. This might take a few minutes.
Type the following into the console to start Visual Studio Code.
code .Note
Because the SharePoint client-side solution is HTML/TypeScript based, you can use any code editor that supports client-side development to build your extension.
Open the ./src/extensions/helloWorld/HelloWorldFormCustomizer.manifest.json file.
This file defines your extension type and a unique identifier (
id) for your extension. Theidis used to associate the form customizer with a content type, enabling custom form rendering for that content type.
Code your Form Customizer
Open the ./src/extensions/helloWorld/HelloWorldFormCustomizer.ts file.
Notice that the base class for the Form Customizer is imported from the sp-listview-extensibility package, which contains SharePoint Framework code required by the Form Customizer.
import { Log } from '@microsoft/sp-core-library';
import {
  BaseFormCustomizer
} from '@microsoft/sp-listview-extensibility';
The logic for your Form Customizer is contained in the onInit(), render(), and onDispose() methods.
onInit()is where you'll execute the setup needed for your extension. This event occurs afterthis.contextandthis.propertiesare assigned, but before the page DOM is ready. As with web parts,onInit()returns a promise that you can use to do asynchronous operations;render()isn't called until your promise has resolved. If you don’t need that, simply returnPromise.resolve<void>();.render()occurs when the component is rendered. It provides anevent.domElementHTML element where your code can write its content.onDispose()occurs immediately before the form host element is deleted. It can be used to free any resources that were allocated during form rendering. For example, ifrender()mounted a React element,onDispose()must be used to free it; otherwise, a resource leak would occur.
The following are the contents of render() and onDispose() in the default solution:
  public render(): void {
    // Use this method to perform your custom rendering.
    this.domElement.innerHTML = `<div class="${ styles.helloWorld }"></div>`;
  }

  public onDispose(): void {
    // This method should be used to free any resources that were allocated during rendering.
    super.onDispose();
  }
By default, the form customizer component does not render any information. Let's update the render method as follows.
  public render(): void {
    // Use this method to perform your custom rendering.
    this.domElement.innerHTML = `<div class="${ styles.helloWorld }"><h1>Super cool custom form component</h1></div>`;
  }
Debug your Form Customizer
You can test and debug your Form Customizer within a live SharePoint Online site. You do not need to deploy your customizations to the tenant app catalog to do this, which makes the debugging experience simple and efficient.
To test your extension, you'll need to first create a list to test the customizer in. So move to the site in your SharePoint Online tenant where you want to test the form customizer.
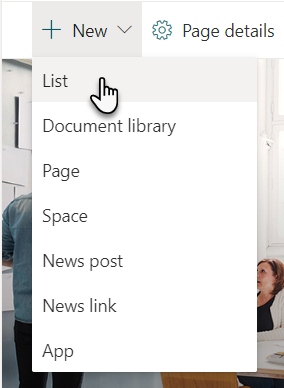
On the toolbar, select New, and then select List.
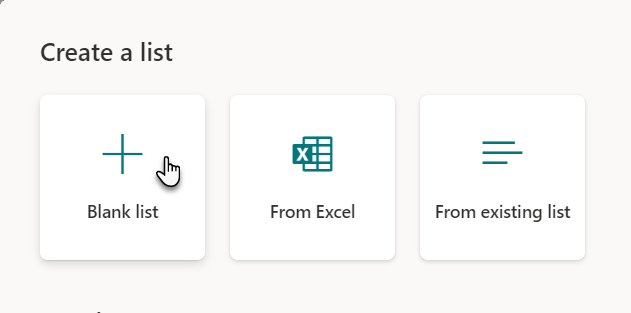
Choose Blank list from the new list creation experience
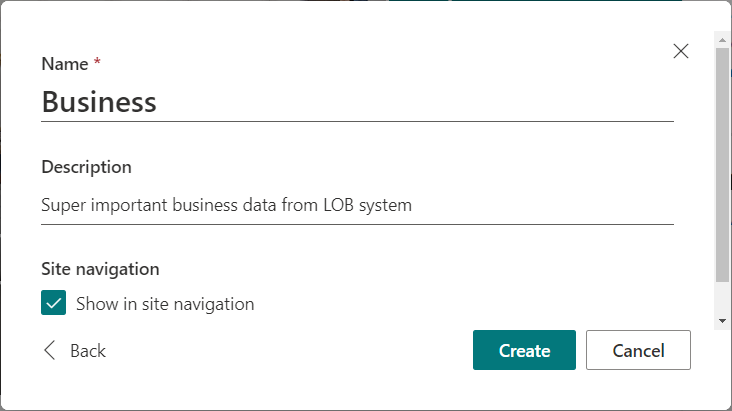
Create a new list named Business, and then select Create.
Within Visual Studio Code, open the ./config/serve.json file.
Update the
pageUrlattributes to match the URL of the list that we created in the preview steps. After the changes, your serve.json should look like the following code:{ "$schema": "https://developer.microsoft.com/json-schemas/spfx-build/spfx-serve.schema.json", "port": 4321, "https": true, "serveConfigurations": { "default": { "pageUrl": "https://yourtenant.sharepoint.com/sites/demo/_layouts/15/SPListForm.aspx", "formCustomizer": { "componentId": "fb3e7dee-a6fa-4e80-add1-e06081167bb5", "PageType": 8, "RootFolder": "/sites/demo/Lists/business", "properties": { "sampleText": "Value" } }Let's call out a few specific topics from the serve.json file
- You can see multiple different configurations that can be used to debug new, edit, and view forms with specific query parameter differences. You can define the used configuration in your heft start command, for example, as heft start --serve-config helloWorld_EditForm.
- componentId is automatically associated to be the first list formatting component in your solution (if you have multiple components)
- To simplify the debugging, you do not need to define the target content type
idto which the component is associated, but in the runtime, the association is performed in the content type level by updating at least one of the following properties in the content type:- ContentType.NewFormClientSideComponentId - component id for new form
- ContentType.NewFormClientSideComponentProperties - optional configuration details
- ContentType.DispFormClientSideComponentId - component id for edit form
- ContentType.DispFormClientSideComponentProperties - optional configuration details
- ContentType.EditFormClientSideComponentId - component id display form
- ContentType.EditFormClientSideComponentProperties - optional configuration details
Compile your code and host the compiled files from the local machine by running this command:
heft startWhen the code compiles without errors, it serves the resulting manifest from https://localhost:4321.
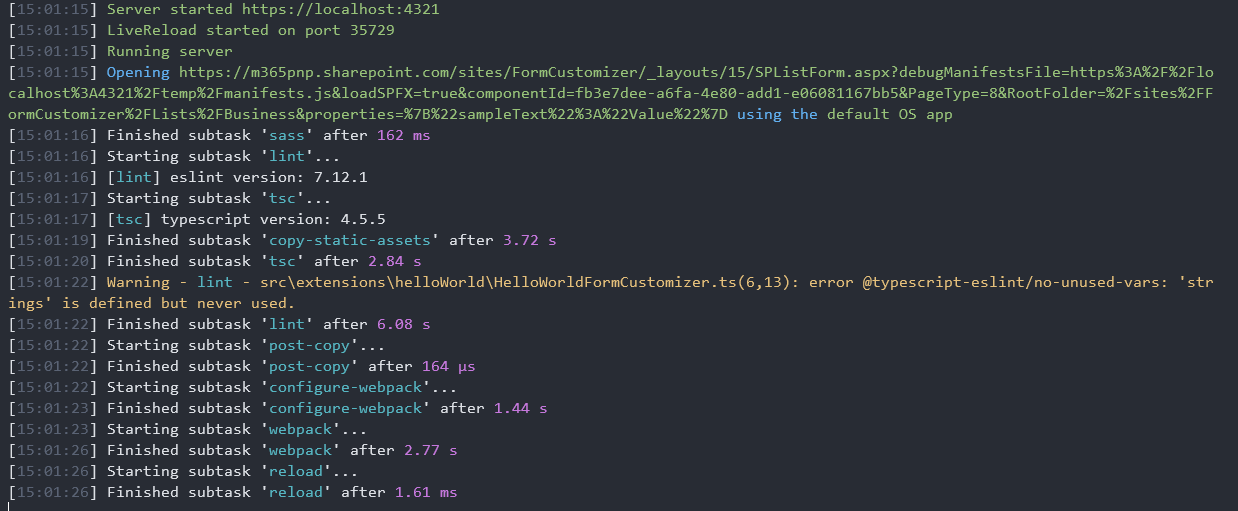
This will start your default browser and load the page defined in serve.json file.
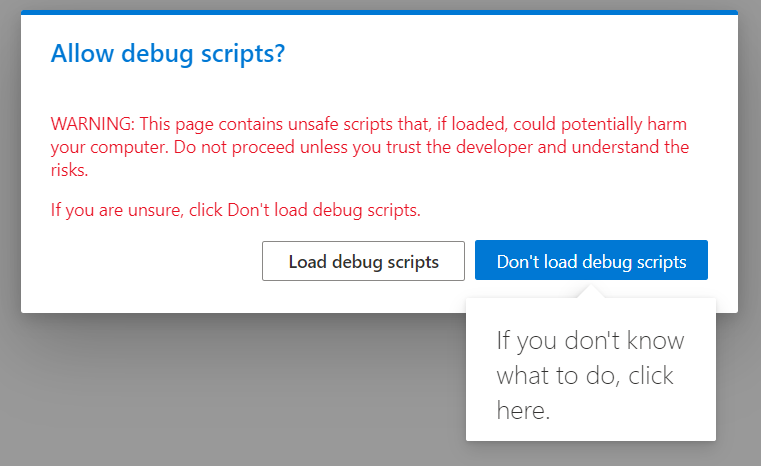
Accept the loading of debug manifests by selecting Load debug scripts when prompted.
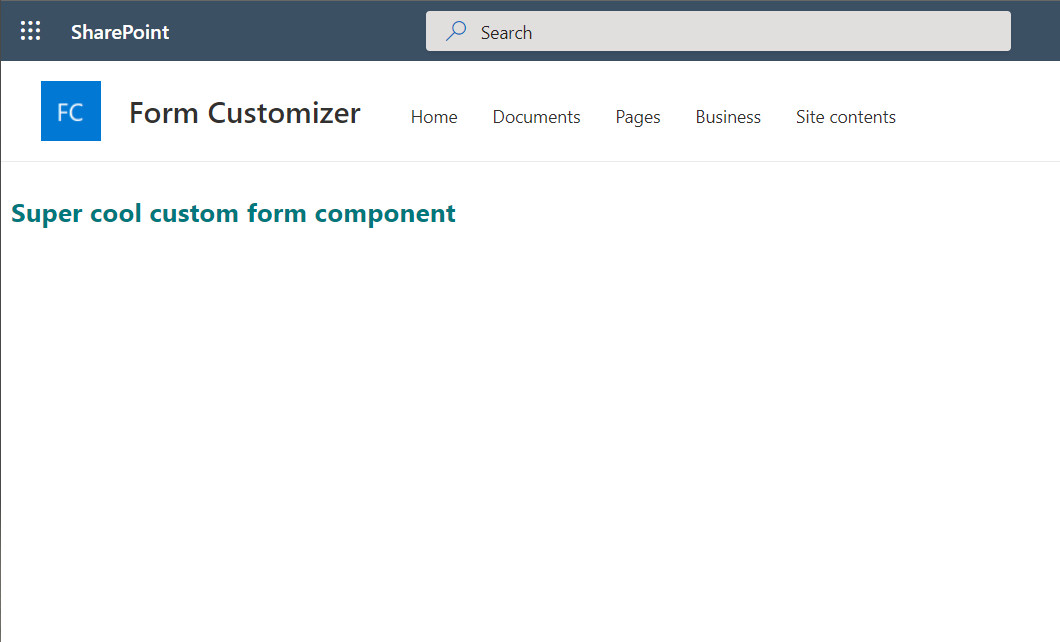
Notice how the custom component is rendered in the page based on the custom content, which we updated to the render method.
Add form item editing capabilities to the sample
Now that we have created the baseline component and tested that it works properly. We will be creating a separate rendering logic for display, edit, and new form,s and to support saving new items to the list.
Open the ./src/extensions/helloWorld/loc/myStrings.d.ts file, and add new Title to the IHelloWorldFormCustomizerStrings interface . Interface should be as follows after your edits..
declare interface IHelloWorldFormCustomizerStrings {
  Save: string;
  Cancel: string;
  Close: string;
  Title: string;
}

declare module 'HelloWorldFormCustomizerStrings' {
  const strings: IHelloWorldFormCustomizerStrings;
  export = strings;
}
Open the ./src/extensions/helloWorld/loc/en-us.js file, and add new Title string to the file. File content should be as follows after your edits.
define([], function() {
  return {
    "Save": "Save",
    "Cancel": "Cancel",
    "Close": "Close",
    "Title": "Title"
  }
});
Open the ./src/extensions/helloWorld/HelloWorldFormCustomizer.module.scss file, and update the styling definition as follows. We are adding error styling for the component.
.basics {
  background-color: "[theme:white, default:#ffffff]";
  color: "[theme:themePrimary, default:#0078d4]";
  padding: 0.5rem;

  .error {
    color: red;
  }
}
Move to the top of the HelloWorldFormCustomizer.ts file.
Locate the line
import styles from './HelloWorldFormCustomizer.module.scss';and add the following lines immediately after it:import { FormDisplayMode } from '@microsoft/sp-core-library'; import { SPHttpClient, SPHttpClientResponse } from '@microsoft/sp-http'; import * as strings from 'HelloWorldFormCustomizerStrings';Include _item and _etag private types inside of the HelloWorldFormCustomizer class as shown in this code snippet. Notice that the class definition already exists in your code.
// This already exists in YOUR code
export default class HelloWorldFormCustomizer
  extends BaseFormCustomizer<IHelloWorldFormCustomizerProperties> {

// Added for the item to show in the form; use with edit and view form
private _item: {
  Title?: string;
} = {};
// Added for item's etag to ensure integrity of the update; used with edit form
private _etag?: string;
Update the onInit() method as follows. This code is using this.displayMode to determine the status of the rendering and then fetches the selected list item if that's needed.
public onInit(): Promise<void> {
  if (this.displayMode === FormDisplayMode.New) {
    // we're creating a new item so nothing to load
    return Promise.resolve();
  }

  // load item to display on the form
  return this.context.spHttpClient
    .get(this.context.pageContext.web.absoluteUrl + `/_api/web/lists/getbytitle('${this.context.list.title}')/items(${this.context.itemId})`, SPHttpClient.configurations.v1, {
      headers: {
        accept: 'application/json;odata.metadata=none'
      }
    })
    .then(res => {
      if (res.ok) {
        // store etag in case we'll need to update the item
        this._etag = res.headers.get('ETag') || undefined;
        return res.json();
      }
      else {
        return Promise.reject(res.statusText);
      }
    })
    .then(item => {
      this._item = item;
      return Promise.resolve();
    });
}
Update the render() method as follows. Render the form either in display-only or in edit mode, depending on the display mode of the form. In this case, we use the same rendering for new and edit experience, but you could easily have a dedicated option if needed.
  public render(): void {
    // render view form
    if (this.displayMode === FormDisplayMode.Display) {

      this.domElement.innerHTML =
                    `<div class="${styles.basics}">
                      <label for="title">${strings.Title}</label>
                      <br />
                        ${this._item?.Title}
                      <br />
                      <br />
                      <input type="button" id="cancel" value="${strings.Close}" />
                    </div>`;

      document.getElementById('cancel')?.addEventListener('click', this._onClose.bind(this));
    }
    // render new/edit form
    else {
      this.domElement.innerHTML =
                  `<div class="${styles.basics}">
                    <label for="title">${strings.Title}</label><br />
                    <input type="text" id="title" value="${this._item?.Title || ''}"/>
                    <br />
                    <br />
                    <input type="button" id="save" value="${strings.Save}" />
                    <input type="button" id="cancel" value="${strings.Cancel}" />
                    <br />
                    <br />
                    <div class="${styles.error}"></div>
                  </div>`;

      document.getElementById('save')?.addEventListener('click', this._onSave.bind(this));
      document.getElementById('cancel')?.addEventListener('click', this._onClose.bind(this));
    }
  }
Update the _onSave methods in the the HelloWorldFormCustomizer class as follows.
private _onSave = async (): Promise<void> => {
  // disable all input elements while we're saving the item
  this.domElement.querySelectorAll('input').forEach(el => el.setAttribute('disabled', 'disabled'));
  // reset previous error message if any
  const errorElement = this.domElement.querySelector(`.${styles.error}`);
  if (errorElement) {
    errorElement.innerHTML = '';
  }

  const title: string = (document.getElementById('title') as HTMLInputElement).value;

  let request: Promise<SPHttpClientResponse>;
  switch (this.displayMode) {
    case FormDisplayMode.New:
      request = this._createItem(title);
      break;
    case FormDisplayMode.Edit:
      request = this._updateItem(title);
      break;
    default:
      return;
  }

  const res: SPHttpClientResponse = await request;

  if (res.ok) {
    // You MUST call this.formSaved() after you save the form.
    this.formSaved();
  }
  else {
    const error: { error: { message: string } } = await res.json();

    const errorElement = this.domElement.querySelector(`.${styles.error}`);
    if (errorElement) {
      errorElement.innerHTML = `An error has occurred while saving the item. Please try again. Error: ${error.error.message}`;
    }
    this.domElement.querySelectorAll('input').forEach(el => el.removeAttribute('disabled'));
  }
}
Add new method _createItem to the HelloWorldFormCustomizer class.
private _createItem(title: string): Promise<SPHttpClientResponse> {
  return this.context.spHttpClient
    .post(this.context.pageContext.web.absoluteUrl + `/_api/web/lists/getByTitle('${this.context.list.title}')/items`, SPHttpClient.configurations.v1, {
      headers: {
        'content-type': 'application/json;odata.metadata=none'
      },
      body: JSON.stringify({
        Title: title
      })
    });
}
Add new method _updateItem to the HelloWorldFormCustomizer class.
private _updateItem(title: string): Promise<SPHttpClientResponse> {
  return this.context.spHttpClient
    .post(this.context.pageContext.web.absoluteUrl + `/_api/web/lists/getByTitle('${this.context.list.title}')/items(${this.context.itemId})`, SPHttpClient.configurations.v1, {
      headers: {
        'content-type': 'application/json;odata.metadata=none',
        'if-match': this._etag || '*',
        'x-http-method': 'MERGE'
      },
      body: JSON.stringify({
        Title: title
      })
    });
}
Now the code is complete to support minimal New, Edit, and Display experiences, and you can test out the different experiences using different configurations for debugging.

Deployment of your extension
Whenever you are ready to start using your component, there are a few steps to consider related to the component's association with the content type. Steps for deployment are as follows:
- Deploy solution to SharePoint App Catalog
- Install the solution to the site collection where you want to use the extension if you are not using the tenant-scoped deployment
- Associate the custom component to the content type using the specific properties in
ContentTypeobject. There are a few options to do this:- You can provision the used list and content type from your solution if you are using site scoped deployment option
- You can associate the component with content types using REST or CSOM APIs. Notice that if you associate the component in the site collection or in the content type hub level, it's automatically inherited to all new content type instances