Create and run queries in the eDiscovery Center
APPLIES TO:  2013
2013  2016
2016  2019
2019  Subscription Edition
  SharePoint in Microsoft 365
Once you have defined your sources, and placed them on hold if necessary, you can run queries to narrow down and extract exactly the content you need for a particular case.
Efficient queries can make it much easier for you and other people involved in the case to manage the content, because it reduces the overall volume and helps ensure that the content that you deliver is more likely to be relevant.
Before creating queries, you should add content sources to your case. Find more information about working with content sources in the article Add content to a case and place sources on hold in the eDiscovery Center.
Note
A query can contain a maximum of 100 SharePoint sources, and 500 keywords.
By default, a query searches across all content sources, you can choose which discovery sets or sources a query searches if you don't need to search them all, which can make your queries run faster. You can also refine your queries in other ways. For more information, see Searching and using keywords in the eDiscovery Center.
If your case is not already open, in an eDiscovery Center, click Cases, and then open the case you want to create queries for. The case should already have content sources, such as Web sites.
In the Search and Export section, under Queries, click New Item.
Type a descriptive name for your query.
In the Query box, type the keywords you want to use to narrow down your query. Find tips for writing queries in the See Also section.
To narrow down content by a date range, enter the Start Date and End Date.
Note
If you type the dates in the Start Date and End Date boxes, use the format mm/ dd / yyyy ; for example, you would use 03/01/2013 to specify March 1, 2013. Use the mm/ dd / yyyy format even if the regional settings on the local computer are configured with a different format, such as dd /mm/ yyyy . Alternatively, select the start and end dates using the date picker.
To limit results to the author of a document or list item, or to a specific sender of e-mail messages, type the names or e-mail addresses in the Author/Sender box.
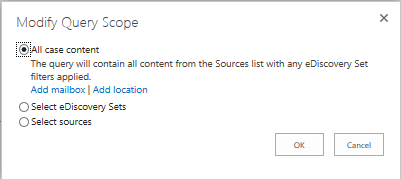
If you have multiple sources and Discovery Sets, but don't need to search them all, click Modify Query Scope. Then, specify the discovery sets or content sources you want.

To narrow down your query by specific types of content, click the SharePoint tabs, and then select the checkboxes for the type of content you want. For example, you can select only only PowerPoint slides for SharePoint.
To analyze or further refine your query, click Advanced Query Options., and do one or more of the following.
- To examine the syntax and structure of your query, view the SharePoint Query sections, and the table of sources that shows filters, queries, and refiners,
- When you are ready to run your query, click Search. The results are ranked based on relevance, such as how frequently a search term appears.
Note
Once you add queries or content sources to an eDiscovery case, changing the regional settings for the site is not supported.
Add more content sources while creating a query
On the Query:New Item page, in the Sources section, click Modify Query Scope.
In the dialog that appears, click All case content,
Click Add location for SharePoint content.
Specify the person's Web site you want to add.
Click OK.
Note
If you update a query and rerun it, only the first page of the new results will be refreshed. If you are viewing multiple pages of query results, and you are not viewing the first page, the page will not be refreshed with the new results.
Find more information about eDiscovery
For more information about eDiscovery cases, see the following articles:
Scenario: eDiscovery in SharePoint Server 2013 and Exchange Server 2013
Plan and manage cases in the eDiscovery Center
Add content to a case and place sources on hold in the eDiscovery Center