Note
Access to this page requires authorization. You can try signing in or changing directories.
Access to this page requires authorization. You can try changing directories.
Note
This article applies to the preview version of AI capabilities in SharePoint (previously referred to as Knowledge Agent).
Important
AI in SharePoint capabilities require sites to be explicitly opted in to the AI in SharePoint public preview, or for the tenant to be opted in at the tenant level. Sites that are not opted in do not receive preview benefits.
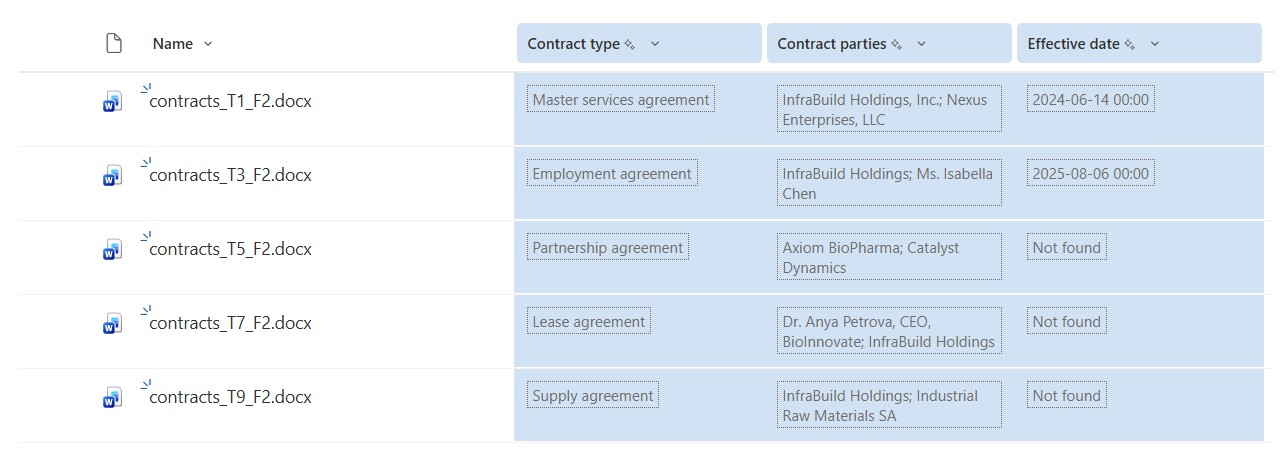
AI capabilities in SharePoint help you automatically generate metadata for your document libraries using autofill columns.
The Create autofill columns capability analyzes files in the library and suggests metadata columns and extraction prompts. These columns automatically populate metadata from file content, helping organize libraries, improve discovery, and support automation scenarios.
Get suggested columns and metadata
To get suggested columns and metadata based on the first 20 files in your document library, follow these steps.
Launch the quick action
Select the AI in SharePoint icon in the lower-right corner of your document library.
From the quick actions menu, select Create autofill columns.
The chat panel opens and displays a list of suggested prompts related to the creation of columns.
Note
If this is the first time using AI in SharePoint in the library, it will automatically suggest up to three columns based on the available files.
You can also request your own column in the chat panel.
Use a suggested prompt
From the chat panel, select an action. For this example, we use create autofill columns or add autofill columns.
In the chat box, review the instruction provided. If needed, you can modify the text to better suit your intent. Once you're ready, select Send (
 ) to submit your action.
AI in SharePoint analyzes up to 20 recent files in the document library to generate column suggestions. These files are selected across supported file types (such as Office documents and PDF files) to provide representative analysis.
If you select specific files before running Autofill, AI analyzes only the selected files.
The suggested columns appear highlighted and marked as AI-generated. This might take a few moments.
Tip
The suggested column information is summarized in the chat panel.

Review the suggested columns and the associated metadata to make sure they're appropriate for your content.
To remove a suggested column:
From the document library page, select the column name, and then select Remove column.
From the chat panel, on the column card, select Remove.
To rename the column or to refine the metadata in a suggested column:
From the document library page, select the column name, and then select Edit column.
From the chat panel, on the column card, select Edit.
On the Edit column panel, you can change the column name or modify the instruction that generates the metadata. After you edit the instruction, test it on up to 10 files to make sure it gives you the information you want. When you're done making changes for that column, select Save.

Enter a custom prompt
In the chat panel’s text box, enter your own instruction.
Tip
When requesting a column, be sure to specify a clear name and what type of information you would like to capture (for example, reason for document creation or project rationale), as well as any specifics around format and length. This helps ensure the column meets your needs.
Select Send (
) to submit your action.
Save your changes
When you're ready to save all of the column changes, select Save changes.
On the Save and apply your changes? confirmation screen, verify that you want to update the current library view or save as a new view, and then select Apply changes.
Tip
If you create a new view, it will be the name of the library appended with a numerical value. The naming experience will be improved in future updates, but for now you can rename the view from the library command bar.
You're returned to the updated library, and processing begins for up to the first 20 files in the library. You can verify and monitor the progress in the activity panel.
After these prompts are saved on a column, any new files uploaded to the library are automatically processed, and the extracted information is saved to the corresponding columns.
Newly Uploaded Files
After you save the changes and create autofill metadata columns for a library, all newly uploaded files are automatically processed with metadata. This applies regardless of whether the uploader has a Copilot license. Any new file added to the library will have metadata applied automatically.
All newly added files are also included as part of your Copilot benefits. Even if the library is connected to a pay‑as‑you‑go meter, new files in this library are not charged at a pay‑as‑you‑go rate and are instead covered by the Copilot license.
Apply Change to Existing Files
You can apply the same metadata logic to existing files in the library by selecting the files you want to process. Once selected, click the 'autofill' button to get documents processed and updated with metadata.
We are also developing a feature that will allow AI capabilities to apply metadata to the entire library without requiring manual file selection. This enhancement is planned to ship around general availability (GA).
Requirements and limitations
Supported file types: .csv, .docx, .pdf, .xlsx, and other Microsoft 365-compatible formats.
Supported languages: All languages supported through Microsoft 365 Copilot for text-based prompts and responses, but can only process files in English.
Supported column types: Text, Multiple lines of text, Number, Yes/No, Date and time, Choice, Hyperlink, Currency, and Managed metadata.
Limitations:
Person or Group, Location, Image, and Lookup column types are currently unsupported.
For optimal performance, we recommend adding no more than 10 columns per library and processing files no larger than 65 pages.
AI in SharePoint can process files only, not folders. If files within a folder are used to configure the library, the configuration applies to the entire library.
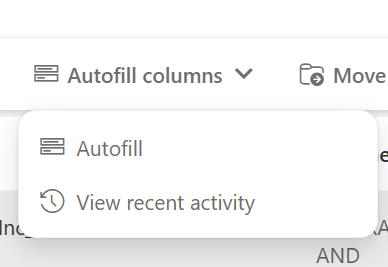
AI in SharePoint processes up to 20 files during initial column configuration. To extract information from additional files, select the files and choose Autofill columns > Autofill from the command bar. You can monitor progress by selecting Autofill columns > View autofill activity.
If a managed metadata column type is used, it can only use the first 100 terms of a mapped term set. If a preferred term or synonym matches, the preferred term is saved to the column.
Encrypted files cannot be analyzed, and their metadata is not included in the results. If encrypted files are present, they may appear as not processed.
AI in SharePoint can configure document libraries only. The following library types aren't supported: FormServerTemplates, SitePages, Style Library, and SiteAssets.
This service is available only for SharePoint sites — including hub sites, sites associated to a hub site, and the primary site of a site collection. Subsites aren’t supported.