Step 1: Install the SharePoint Migration Tool (SPMT)
Download and install
Download and install SPMT using one of the links listed below.
| Public preview | First release | General Availability |
|---|---|---|
| Install here | Install here | Install here |
Before you begin
Before you begin using SPMT, review the required permissions, prerequisites, and endpoints.
| What | Description |
|---|---|
| Permissions required | Global or SharePoint Admin. To migrate at the organization-level, you must sign in as a Global or SharePoint admin in Microsoft 365. Site Admin. To migrate at the site collection level, you must be a site admin for that site collection. Learn more: Understanding permissions when using the SharePoint Migration Tool |
| Prerequisites and Endpoints | Review the SPMT system prerequisites and endpoints |
| SPMT Settings | Review SPMT settings to understand how settings can impact your migration |
Understanding Custom scripts
Allow or prevent Custom Script (NoScript)
In Microsoft 365, tenants can control if users can run custom script on personal sites and self-service created sites.
During migration, some web parts require this setting set to allow. Otherwise, the web part won't be migrated.
At least 24 hours before you start migration, do the following:
Go to Settings in the SharePoint admin center, and sign in with an account that has admin permissions for your organization.
At the bottom of the page, select classic settings page.
Under Custom Script, select:
Allow users to run custom script on personal sites
Allow users to run customer script on self-service created sitesLeave these settings in place during your migration.
Note
Changes to this setting might take up to 24 hours to take effect.
For more info, see, Allow or prevent custom script.
Proxy connections
Proxy connections aren't supported for either SharePoint or file share migrations. By default, SPMT doesn't use system proxy credentials and web requests fail if Internet Explorer proxy is configured. Examples of errors you may see include "SharePoint sign in fail" or "can't load document library". However, you can modify the SPMT app config file to follow your system proxy settings.
If you wish to use your system proxy settings, use one of these methods:
Update proxy
Download the latest version of SPMT. Start SPMT.
If SPMT doesn't connect to Microsoft 365, go to %localappdata%\Apps\SharePointMigrationTool\SPMT.
Open the microsoft.sharepoint.migrationtool.advancedapp.exe.config file.
Uncomment the default proxy setting shown here:
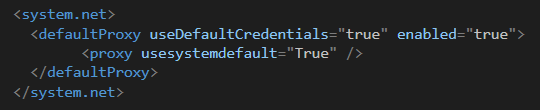
Restart SPMT.
If SPMT doesn't upgrade
If SPMT can't upgrade itself, go to %localappdata%\Apps\SharePointMigrationTool\InstallerClient.
Open the installclient.exe.config file.
Add the following configuration at line 31, just after the
<appSettings></appSettingstag:Launch installclient.exe and SPMT should autoupgrade to latest SPMT release.
Open the microsoft.sharepoint.migrationtool.advancedapp.exe.config file.
Comment out the default proxy setting:
Restart SPMT.
Step 2: Scan and assess a SharePoint site (site migration only)
Note
Currently, the SharePoint Migration Tool is not available for users of Office 365 operated by 21Vianet in China.
Feedback
Coming soon: Throughout 2024 we will be phasing out GitHub Issues as the feedback mechanism for content and replacing it with a new feedback system. For more information see: https://aka.ms/ContentUserFeedback.
Submit and view feedback for