Note
Access to this page requires authorization. You can try signing in or changing directories.
Access to this page requires authorization. You can try changing directories.
Applies to: ![]() SQL Server 2022 (16.x) only.
SQL Server 2022 (16.x) only.
This article describes a step-by-step process to set up authentication with Microsoft Entra ID with app registration, and demonstrates how to use different Microsoft Entra authentication methods.
Note
Microsoft Entra ID was previously known as Azure Active Directory (Azure AD).
In this tutorial, you learn how to:
- Create and register a Microsoft Entra application
- Grant permissions to the Microsoft Entra application
- Create and assign a certificate
- Configure Microsoft Entra authentication for SQL Server through Azure portal
- Create logins and users
- Connect with a supported authentication method
Prerequisites
A physical or virtual Windows Server on-premises with an instance of SQL Server 2022 (16.x).
For SQL Server on Azure VMs, review Enable Microsoft Entra authentication for SQL Server on Azure VMs.
The server and instance enabled by Azure Arc. For more information, see Connect your SQL Server to Azure Arc.
Access to Microsoft Entra ID is available for authentication purpose. For more information, see Microsoft Entra authentication for SQL Server.
A supported version of SQL Server Management Studio is installed on the client machine.
A supported certificate.
Warning
When configuring Microsoft Entra authentication for SQL Server, the certificate used for Microsoft Entra login must have a unique Common Name (CN). If multiple certificates in the computer's certificate store share the same CN, SQL Server might not select the correct certificate for Microsoft Entra authentication, and Microsoft Entra logins will fail.
Network requirements for enabling Microsoft Entra ID authentication
Microsoft Entra ID supports CSP certificates. Microsoft Entra ID doesn't support CNG certificates.
Authentication prerequisites
Note
You can use Azure to automatically create the Azure Key Vault certificate and Microsoft Entra application when you set up a Microsoft Entra admin for the server. For more information, see Tutorial: Using automation to set up the Microsoft Entra admin for SQL Server.
Microsoft Entra application registration for SQL Server. Registering a SQL Server instance as a Microsoft Entra application allows the instance to query Microsoft Entra ID, and allows the Microsoft Entra application to authenticate on behalf of the SQL Server instance. Application registration also requires a few permissions, which are used by SQL Server for certain queries.
SQL Server uses a certificate for this authentication, which is stored in Azure Key Vault (AKV). The Azure Arc agent downloads the certificate to the SQL Server instance host.
Warning
Connections authenticated by Microsoft Entra ID are always encrypted. If SQL Server is using a self-signed certificate, you must add trust server cert = true in the connection string. SQL Server and Windows authenticated connections don't require encryption, but it's strongly recommended.
SQL Server connects directly to Microsoft Entra ID for authentication. Either explicit firewall URLs need to be opened for direct access, or use a proxy server. Microsoft Entra ID doesn't use the Arc Connected Machine Agent proxy for authentication. If the machine requires using a proxy server, Microsoft Entra ID requires that the machine-level WinHTTP proxy is set using the following commands (replace <http://proxyserver:port> with the appropriate value):
netsh winhttp set proxy proxy-server="<http://proxyserver:port>"
Microsoft Entra ID authentication doesn't utilize the Arc agent proxy setting. The Arc Agent proxy can be set using the following commands (replace <http://proxyserver:port> with the appropriate value):
azcmagent config set proxy.url "<http://proxyserver:port>"
Create and register a Microsoft Entra application
- Go to the Azure portal, select Microsoft Entra ID > App Registrations > New Registration.
- Specify a name - The example in this article uses SQLServer.
- Select Supported account types and use Accounts in this organization directory only
- Don't set a redirect URI
- Select Register
See the application registration below:

Grant application permissions
Select the newly created application, and on the left side menu, select API Permissions.
- Select Add a permission > Microsoft Graph > Application permissions
- Check Directory.Read.All
- Select Add permissions
Or,
Select Add a permission > Microsoft Graph > Application permissions
Check Application.Read.All
Check Group.Read.All
Check User.Read.All
Select Add permissions
Select Grant admin consent

Note
To grant Admin consent to the permissions above, your Microsoft Entra account requires the Privileged Role Administrator role or higher permissions.
Create and assign a certificate
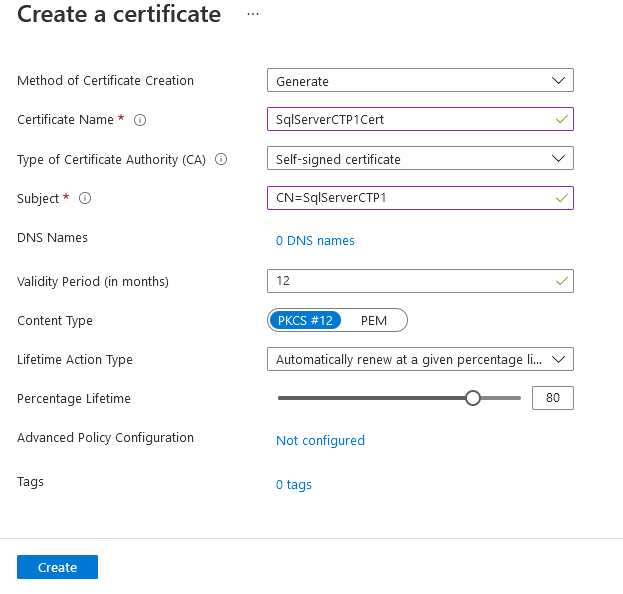
Go to the Azure portal, select Key vaults, and select the key vault you wish to use or create a new one. Select Certificates > Generate/Import
For the Method of certificate creation, use Generate.
Add a certificate name and subject. The certificate name must be unique. A certificate name that matches an existing certificate causes an error when the login is created.
The recommended validity period is at most 12 months. The rest of the values can be left as default.
Select Create.
Note
Once the certificate is created, it might say it's disabled. Refresh the site and it will show the certificate as enabled.
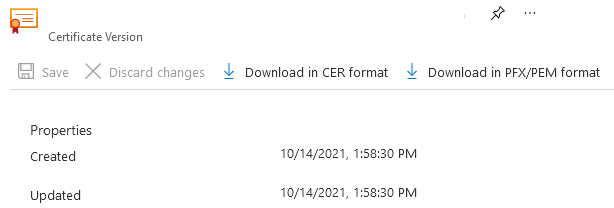
Navigate to the new certificate, and select the row for the certificate's latest version. Select Download in CER format to save the certificate's public key.
Note
This doesn't need to be done on the SQL Server host. Rather, any client that will access the Azure portal for the next step.
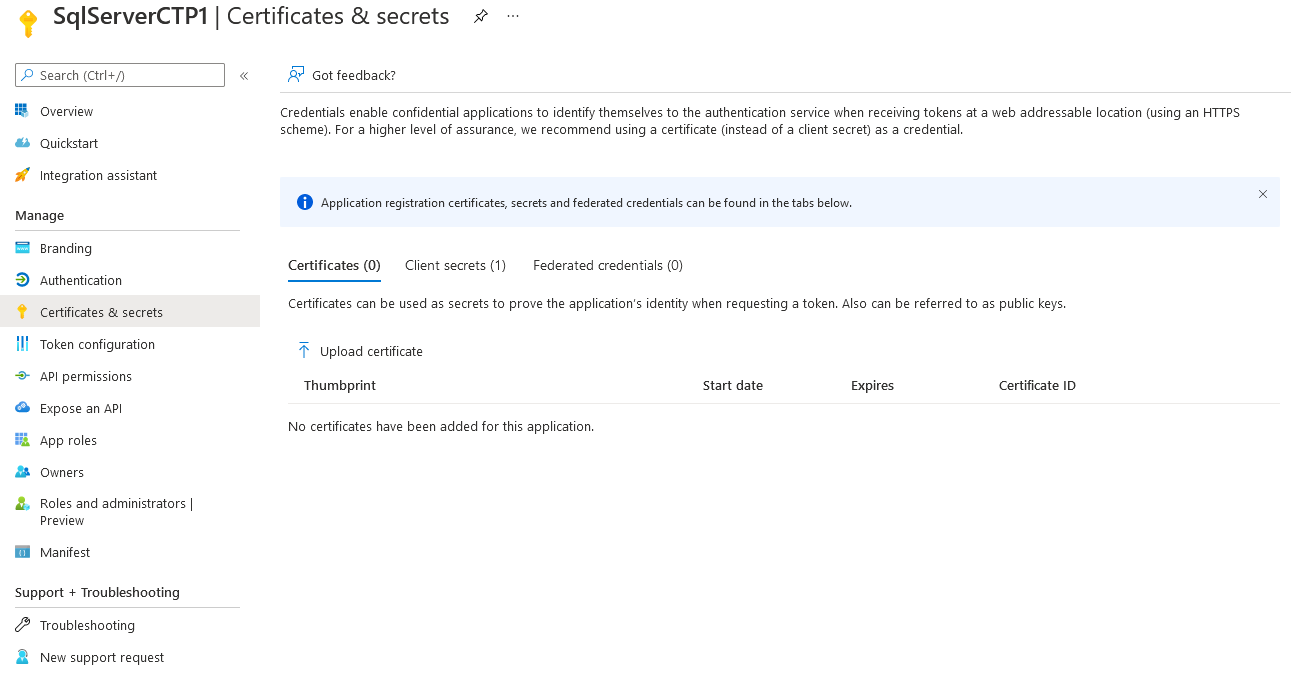
In the Azure portal, navigate to the app registration created above and select Certificates list
- Select upload certificate.
- Select the public key (.cer file) downloaded in the last step.
- Select Add.
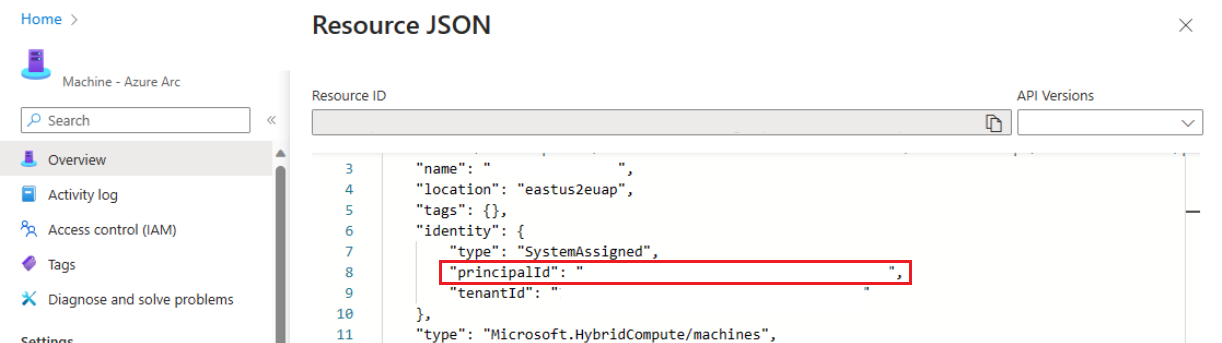
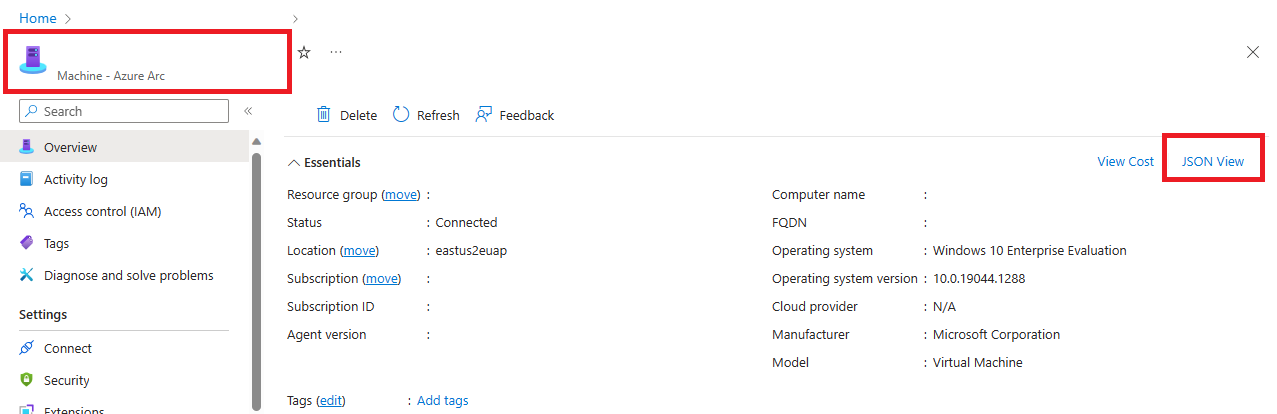
In the Azure portal, get the object ID of the Azure Arc Machine.
Under Azure Arc Resources>Machines, select the machine.
In Overview, find JSON View.
Under Identity, copy the value for principalId.
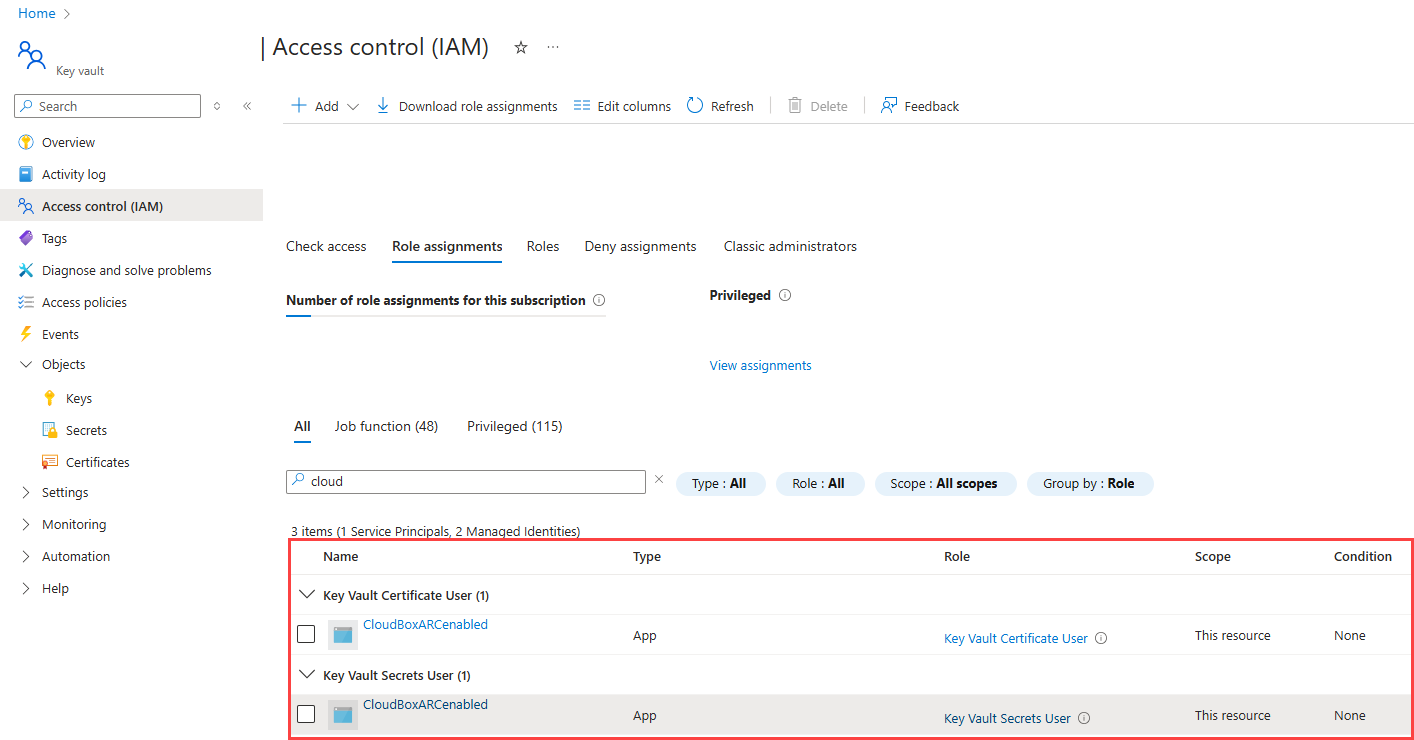
In the portal, navigate to the Azure Key Vault instance where the certificate is stored, and grant access to the Azure Machine resource(s). In your Azure Key Vault navigation menu, navigate to Settings, and Access configuration. For detailed steps to manage role assignments, review Assign Azure roles using the Azure portal.
Your experience depends on your key vault access configuration:
To use Azure role-based access control (recommended):
Add the following roles to your Resource.
- Key Vault Certificate User
- Key Vault Secrets User
Verify the roles in this location:
To use Vault access policy:
Select Access policies from the navigation menu.
Select Create.
For Secret permissions, select Get>List.
For Certificate permissions, select Get>List.
Select Next.
For Principal page, search for the name of your Machine - Azure Arc instance, which is the hostname of the SQL Server host.
Select Review + create.
Verify that the value for Principal>Object ID matches the Principal ID of the managed identity assigned to the instance.
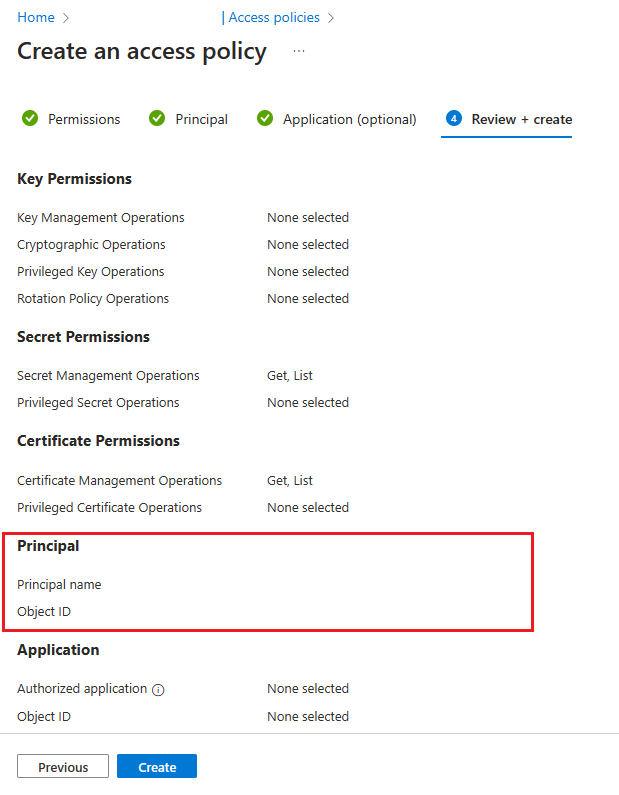
To confirm, go to the resource page and select JSON View in the top right of the Essentials box on the Overview page. Under identity you'll find the principalId
Select Create.
You must select Create to ensure that the permissions are applied. To ensure permissions have been stored, refresh the browser window, and confirm that your Azure Arc instance is present.


Configure Microsoft Entra authentication for SQL Server through Azure portal
The steps in Azure portal apply to SQL Server 2022 (16.x).
The steps in Azure portal do not apply to SQL Server 2025 (17.x).
Note
You can configure Microsoft Entra authentication with any of the following experiences:
Go to the Azure portal, and select SQL Server – Azure Arc, and select the instance for your SQL Server host.
Check the status of your SQL Server - Azure Arc resource and see if it's connected by going to the Properties menu. For more information, see Validate the SQL Server - Azure Arc resources.
Select Microsoft Entra ID and Purview under Settings in the resource menu.
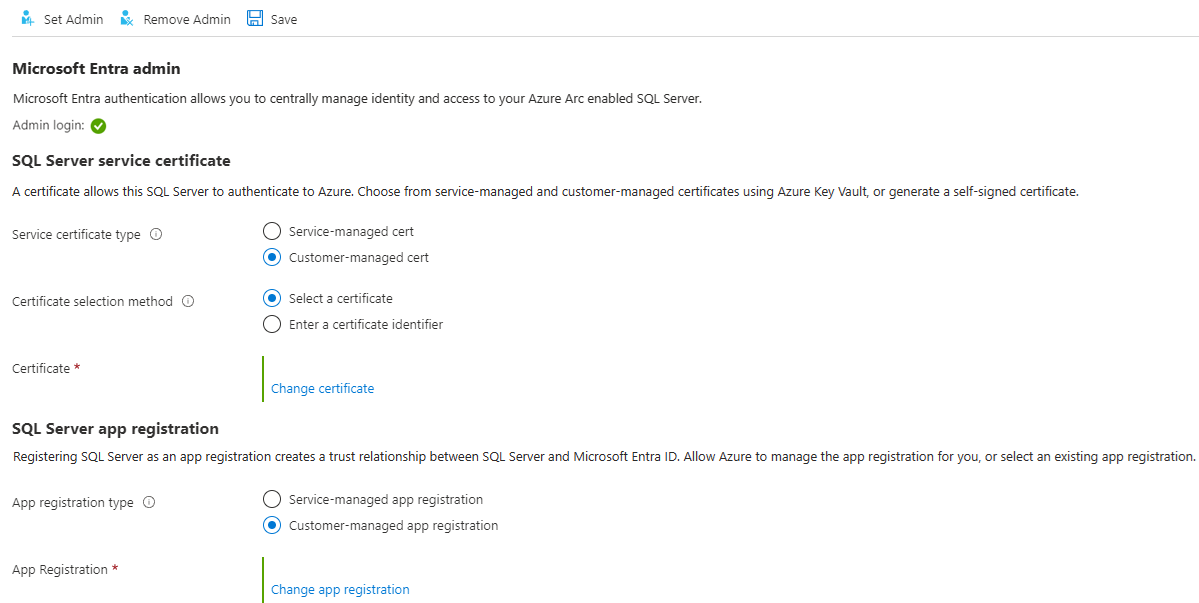
Select Set Admin to open the Microsoft Entra ID pane, and choose an account to set as an admin login for SQL Server.
Select Customer-managed cert and Select a certificate.
Select Change certificate, and select your AKV instance and certificate that you created earlier in the new pane.
Select Customer-managed app registration.
Select Change app registration, and select the app registration you created earlier.
Select Save. This sends a request to the Arc server agent, which configures Microsoft Entra authentication for that SQL Server instance.
It takes several minutes to download certificates and configure settings. After setting all parameters and selecting Save on the Azure portal, the following message might appear:
SQL Server's Azure Arc agent is currently processing a request. Values below may be incorrect. Please wait until the agent is done before continuing.Wait until the save process is confirmed with
Saved successfully, before attempting a Microsoft Entra login.The Azure Arc server agent can only update once the previous action has completed. This means that saving a new Microsoft Entra configuration before the last one has finalized can cause a failure. If you see the message Extended call failed when you select Save, wait 5 minutes and then try again.
Once the Microsoft Entra admin login is granted the
sysadminrole, changing the Microsoft Entra admin in the Azure portal doesn't remove the previous login that remains as asysadmin. To remove the login, it must be dropped manually.The Microsoft Entra admin change for the SQL Server instance takes place without a server restart, once the process is completed with the SQL Server's Azure Arc agent. For the new admin to display in
sys.server_principals, the SQL Server instance must be restarted, and until then, the old admin is displayed. The current Microsoft Entra admin can be checked in the Azure portal.

Create logins and users
After the Azure Arc agent on the SQL Server host has completed its operation, the admin account selected in the Microsoft Entra ID menu in the portal is a sysadmin on the SQL Server instance. Sign into SQL Server with the Microsoft Entra admin account that has sysadmin permissions on the server using a client like SQL Server Management Studio (SSMS).
Note
All connections to SQL Server that are done with Microsoft Entra authentication require an encrypted connection. If the Database Administrator (DBA) hasn't set up a trusted SSL/TLS certificate for the server, logins likely fail with the message:
The certificate chain was issued by an authority that is not trusted.
To fix this, either configure the SQL Server instance to use an SSL/TLS certificate which is trusted by the client or select trust server certificate in the advanced connection properties. For more information, see Configure SQL Server Database Engine for encrypting connections.
Create login syntax
The same syntax for creating Microsoft Entra logins and users on Azure SQL Database and Azure SQL Managed Instance can now be used on SQL Server.
Note
On SQL Server, any Microsoft Entra account that has the ALTER ANY LOGIN or ALTER ANY USER permission can create Microsoft Entra logins or users, respectively. Otherwise, only accounts with sysadmin permissions can create Microsoft Entra logins or users.
To create a login for a Microsoft Entra account, execute the following T-SQL command in the master database:
CREATE LOGIN [principal_name] FROM EXTERNAL PROVIDER;
For users, the principal name must be in the format user@tenant.com. In Microsoft Entra ID, this is the user principal name. For all other account types, like Microsoft Entra groups or applications, the principal name is the name of the Microsoft Entra object.
Here's some examples:
-- login creation for Microsoft Entra user
CREATE LOGIN [user@contoso.com] FROM EXTERNAL PROVIDER;
GO
-- login creation for Microsoft Entra group
CREATE LOGIN [my_group_name] FROM EXTERNAL PROVIDER;
GO
-- login creation for Microsoft Entra application
CREATE LOGIN [my_app_name] FROM EXTERNAL PROVIDER;
GO
To list the Microsoft Entra logins in the master database, execute the T-SQL command:
SELECT * FROM sys.server_principals
WHERE type IN ('E', 'X');
To grant a Microsoft Entra user membership to the sysadmin role (for example admin@contoso.com), execute the following commands in master:
CREATE LOGIN [admin@contoso.com] FROM EXTERNAL PROVIDER;
GO
ALTER SERVER ROLE sysadmin ADD MEMBER [admin@contoso.com];
GO
The sp_addsrvrolemember stored procedure must be executed as a member of the SQL Server sysadmin server role.
Create user syntax
You can create a database user from Microsoft Entra ID either as a database user associated with a server principal (login), or as a contained database user.
To create a Microsoft Entra user from a Microsoft Entra login in a SQL Server database, use the following syntax:
CREATE USER [principal_name] FROM LOGIN [principal_name];
The principal_name syntax is the same as for logins.
Here are some examples:
-- for Azure AD user
CREATE USER [user@contoso.com] FROM LOGIN [user@contoso.com];
GO
-- for Azure AD group
CREATE USER [my_group_name] FROM LOGIN [my_group_name];
GO
-- for Azure AD application
CREATE USER [my_app_name] FROM LOGIN [my_app_name];
GO
To create a Microsoft Entra contained database user, which is a user not tied to a server login, the following syntax can be executed:
CREATE USER [principal name] FROM EXTERNAL PROVIDER;
Use Microsoft Entra group name or Microsoft Entra application name as <principal name> when creating a Microsoft Entra database user from a group or application.
Here are some examples:
-- for Azure AD contained user
CREATE USER [user@contoso.com] FROM EXTERNAL PROVIDER;
GO
-- for Azure AD contained group
CREATE USER [my_group_name] FROM EXTERNAL PROVIDER;
GO
--for Azure AD contained application
CREATE USER [my_group_name] FROM EXTERNAL PROVIDER;
GO
To list the users created in the database, execute the following T-SQL command:
SELECT * FROM sys.database_principals;
A new database has Connect permission by default. All other SQL Server permissions must be explicitly granted by authorized grantors.
Microsoft Entra guest accounts
The CREATE LOGIN and CREATE USER syntax also supports guest users. For example, if testuser@outlook.com is invited to the contoso.com tenant, it can be added as a login to SQL Server with the same syntax as creating any other Microsoft Entra user or login. When creating guest users and logins, use the guest account's originating email, not its user principal name in the tenant. In the examples, outlook.com is provided even though the account is registered in the contoso.com tenant.
Create a guest user from an existing login
CREATE USER [testuser@outlook.com] FROM LOGIN [testuser@outlook.com];
Create a guest user as a contained user
CREATE USER [testuser@outlook.com] FROM EXTERNAL PROVIDER;
Connect with a supported authentication method
SQL Server supports several Microsoft Entra authentication methods:
- Default
- Username and password
- Integrated
- Universal with multifactor authentication
- Service principal
- Managed identity
- Access token
Use one of these methods to connect to the SQL Server instance. For more information, see Microsoft Entra authentication for SQL Server.
Authentication example using SSMS
Note
While Microsoft Entra ID is the new name for Azure Active Directory (Azure AD), to prevent disrupting existing environments, Azure AD still remains in some hardcoded elements such as UI fields, connection providers, error codes, and cmdlets. In this article, the two names are interchangeable.
Below is the snapshot of the SQL Server Management Studio (SSMS) connection page using the authentication method Azure Active Directory - Universal with MFA.

During the authentication process, a database where the user was created must be explicitly indicated in SSMS. Expand Options > Connection Properties > Connect to database: database_name.
For more information, see Using Microsoft Entra multifactor authentication.
SQL Server tools that support Microsoft Entra authentication for Azure SQL are also supported for SQL Server 2022 (16.x).
Location where Microsoft Entra ID parameters are stored
Warning
Microsoft Entra ID parameters are configured by the Azure Arc agent and shouldn't be reconfigured manually.
On Linux, Microsoft Entra ID parameters are stored in mssql-conf. For more information about the configuration options in Linux, see Configure SQL Server on Linux with the mssql-conf tool.
Known issues
- Updating certificate doesn't propagate:
Once Microsoft Entra authentication is configured for SQL Server, updating the certificate in SQL Server - Azure Arc resource's Microsoft Entra ID and Purview pane might not propagate fully. This results in the save being successful but the old value still being displayed. To update the certificate, do the following:
- Select Remove Admin.
- Select Save.
- Select Set Admin and reconfigure Microsoft Entra authentication with the new certificate.
- Select Save.