Note
Access to this page requires authorization. You can try signing in or changing directories.
Access to this page requires authorization. You can try changing directories.
Applies to: ![]() SQL Server
SQL Server
This article shows you how to perform a SQL Server migration in Azure Arc to Azure SQL Managed Instance in the Azure portal for your SQL Server instance enabled by Azure Arc.
You can try Azure SQL Managed Instance for free for up to a year.
Note
You can provide feedback about your migration experience directly to the product group.
Overview
Azure SQL Managed Instance is a fully managed lift-and-shift platform as a service (PaaS) target to run your SQL Server workloads on the Azure cloud platform. After your SQL Server instance is enabled by Azure Arc, you can assess your SQL Server data estate to identify an optimal SQL Managed Instance configuration. Then you can migrate your SQL Server databases to SQL Managed Instance directly from the Azure portal.
When your SQL Server instance is enabled by Azure Arc, you can:
- Evaluate and assess whether your SQL Server instance is ready to migrate to SQL Managed Instance.
- Identify potential migration issues, and learn how to mitigate them.
- Optimize for performance and cost with guidance around service tiers, configuration, and sizing.
Discovery of SQL Server instances and generation of readiness reports happen automatically every weekend, but you can start them manually at any time. The process takes only a few minutes to complete. No extra configuration or setup is required.
First, you choose an appropriate SQL Managed Instance target and prepare your environment. Then, you can migrate your SQL Server databases to SQL Managed Instance directly from the Azure portal through a fully managed and automated process.
Database migration is available by default for all SQL Server instances enabled by Azure Arc, starting with SQL Server 2014 (12.x).
The Database Migration pane also has a useful summary of the migration status for your instance, such as the number of total databases, the recommended target, the number of completed migrations, and the number of ongoing migrations:

Integrated migration methods
Choose the migration method that best fits your needs on the Database migration pane. After an initial configuration to prepare your environment, the migration process automates the rest based on your selection.
Microsoft Copilot can help you choose the right migration method based on your requirements.
The following table summarizes the two methods built into the migration process:
| Managed Instance link | Log Replay Service (LRS) | |
|---|---|---|
| Method | Real time replication
|
Continuous backup and restore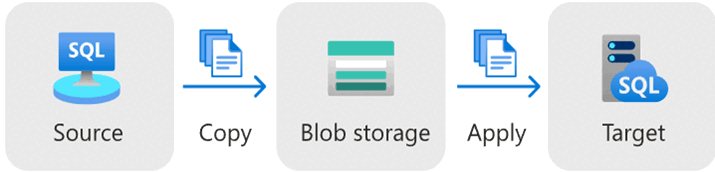
|
| Underlying technology | Distributed availability group | Log shipping |
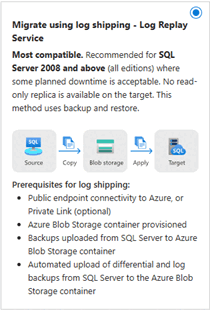
| Description | Most performant method with near real-time replication. Provides a read-only (R/O) database on the target, so you can query your data in near-real time during the migration to offload R/O workloads on the secondary, or check data during the migration. Best possible minimum downtime migration. | Most compatible migration method. Upload backups to an intermediary Azure blob storage account that the LRS service automatically restores to SQL Managed Instance continuously. No R/O database replica is available on the target. |
| Supported versions | SQL Server 2016 and later on Windows Server 2016 and later | SQL Server 2012 and later on Windows Server 2012 and later |
| Supported editions | Enterprise, Standard, and Developer editions | All editions |
| Simultaneous migration | Yes, up to 10 databases with Azure Extension for SQL Server version 1.1.3348.364 or later. 1 database with earlier versions. |
Unlimited |
| Recommended for | Business-critical workloads that require minimum downtime during migration and access to a read-only database on the target, with a destination target of either a General Purpose or Business Critical SQL Managed Instance. | General purpose workloads where some planned downtime is acceptable and destination target of a General Purpose SQL Managed Instance. Not recommended for Business Critical SQL managed instance targets. |
For an in-depth comparison of the two migration methods, see Compare Managed Instance link with LRS for migration.
Microsoft Copilot assisted migration
Microsoft Copilot is built into the experience to assist you throughout the migration process. Interactively chatting with Microsoft Copilot searches through the Microsoft knowledgebase to help you along the way as you migrate to Azure.
Microsoft Copilot provides AI-powered assistance to help you make decisions or take actions at certain points with prompts such as:
- How are assessments made?
- Help me compare.
- Start the migration.
- Help me choose the right migration method.
- Monitor the migration.
- Complete the migration.
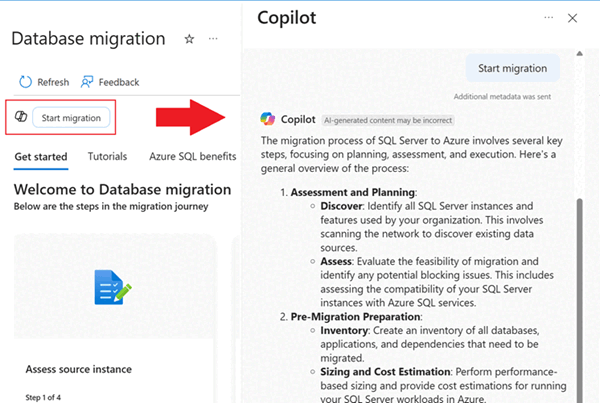
Select the Copilot icon on the Database migration pane to open the Copilot chat window:
Prerequisites
To use SQL Server migration in Azure Arc, you need the following prerequisites:
- An active Azure subscription. If you don't have one, you can create a free account.
- Your SQL Server instance must be enabled by Azure Arc with the latest version of the Azure extension for SQL Server.
Before you start the migration process, make sure that you've prepared your environment for your chosen migration method:
- Prepare for Managed Instance link migration.
- Prepare for LRS migration.
Update the extension
Before starting the migration, make sure you have the current version of the Azure extension for SQL Server installed on your SQL Server instance. The extension is updated independently of SQL Server, so having the latest version ensures you have all the latest features and fixes for migration.
To update your extension, see Update the extension.
Migrate to Azure SQL Managed Instance
The following tiles on the Database Migration pane guide you through the migration of your SQL Server databases to Azure SQL Managed Instance:
- Assess source instance: Assess your SQL Server instance to determine its readiness to migrate to SQL Managed Instance.
- Select target: Select a SQL Managed Instance target for your migration.
- Migrate data: Migrate your SQL Server databases to SQL Managed Instance.
- Monitor and cutover: Monitor the migration process and cut over to the SQL Managed Instance target.
The following screenshot shows the tiles on the Database migration pane for your SQL Server instance in the Azure portal:

Assess source instance
To assess the source instance, follow these steps:
Go to your SQL Server instance in the Azure portal.
Under Migration, select Database migration to open the Database migration pane. Under Assess source instance, select View report to open the Assessments pane.

On the Assessments pane:
- Use Run assessment to start a new assessment if one wasn't run recently.
- Use View assessment details in the Azure SQL MI tile to learn more about your assessment results, including the readiness of your SQL Server instance to migrate to SQL Managed Instance. You also learn about the recommended service tier and configuration for your target instance.
Select target
After you assess your SQL Server instance, select a SQL Managed Instance target.
On the Assessments pane, select Create or select target. Or, on the Database migration pane, select Select target. Both options open the Create or select target pane where you can identify a migration target.

On the Create or select target pane, under Target exists, select one of the following options:
- Yes, I have already created a target: Select an existing SQL Managed Instance target.
- No, I want to create a new target: Create a new SQL Managed Instance target.

Fill in the required information for the SQL Managed Instance target. Then use either Select target or Create target to proceed to the next step based on your Target exists selection.
- If you already have an instance as a target, choosing Select target takes you to the Database migration pane for your SQL Server instance. The instance name is populated as the selected target. Then you can proceed to the Migrate data step.
- If you chose to create a new instance, you're guided to the Create Azure SQL Managed Instance pane on the Database migration pane to create the target instance. After you finish, check the progress of the deployment on the Database migration pane for your SQL Server instance. The target name populates in the Target tile. Then you can proceed to the Migrate data step.
Migrate data
After your target is ready, start the migration process.
Note
If newly added databases aren't visible in the Azure portal, you might need to restart the Arc agent.
Once you've prepared your environment for Managed Instance link migration, you can migrate your SQL Server databases to Azure SQL Managed Instance.
Note
Creating each link can take up to 10 minutes. Use the Activity log to track background changes during the link creation process.
Follow these steps to migrate your SQL Server databases to SQL Managed Instance by using the Managed Instance link:
On the Database migration pane, select Migrate data.
On the New data migration pane, choose Migrate using real-time replication (online):

On the Select source databases tab, check the boxes next to the databases that you want to migrate, and then use Next: Settings to proceed to the next page:

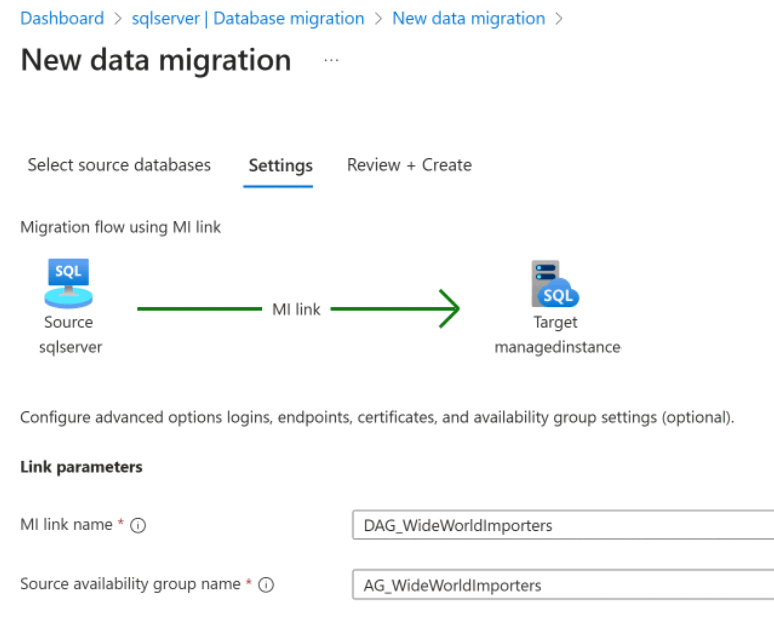
The Azure Extension for SQL Server version
1.1.3348.364or later supports selecting up to 10 databases to migrate simultaneously. If your extension version is earlier, you can only select, and migrate, one database at a time.On the Settings tab, provide the name of the MI link. The name of the availability group is autogenerated - customize it, only if you need to. You can also use Test connection to test the connection to the source SQL Server instance, though be aware that false positives can occur in some network configurations. Use Next: Review + create to proceed to the next page:
You can also test the connection to the target SQL Managed Instance
On the Review + create tab, review the settings, and check for warnings. It's possible to start the migration with some warnings, but not others. Select Start data migration to migrate your data to your SQL Managed Instance target.

Note
When you start the migration process by using the Managed Instance link migration method, the system grants just-in-time permissions for the entire workflow until creating the distributed availability group completes, at which point just-in-time permissions are removed.
Monitor replication lag before cutover
After you start your migration, you can monitor for replication lag between the primary and secondary replicas. A large discrepancy indicates that the secondary replica is having trouble keeping up with the primary replica, which is typically caused by slow network throughput in the link between the two instances, mismatched resource allocation between the two replicas, or by an excessively high workload on the primary replica.
Monitoring replication lag is especially important when cutting over to the target SQL Managed Instance. Cutting over performs a planned failover which requires the secondary replica to be fully synchronized with the primary replica before the failover execute. If replication lag is high, the failover might take longer to complete, and in some cases, it might even fail.
On the Database migration pane, select Monitor migrations and then check the Lag column. Two dashes indicates there is no lag, while a time value indicates the amount of lag.
If replication lag is high, wait for the secondary replica to catch up with the primary replica before cutting over. You might need to perform additional troubleshooting steps if the lag persists, such as pausing workloads on the primary replica, improving link network throughput between the two instances, or increasing resource capacity on the secondary replica. The easiest way to stop workloads on a SQL Server primary replica is to cut application connections to the instance.
You can also use a T-SQL script to monitor replication lag. For more information, see Monitoring replication lag.

Monitor and cutover
After you start your migration, you can monitor the progress. On the Database migration pane, select Monitor migrations.
The Monitor and cutover pane shows useful information about the migration process, such as:
- The databases that successfully migrated and the databases that are still in progress.
- The chosen migration method.
- The target instance and target database.
- The duration of the current migration of each database.
- The time when the migration started.

You can complete or cancel the migration from the Monitor and cutover pane. You can also view logs for information about the migration. Selecting a database takes you to a pane with more details about the source and target.
After the migration finishes, the migration status shows Ready for cutover. To cut over to the SQL Managed Instance target, select Cutover on the Monitor and cutover pane. You can also use the database details pane.
Select a database and then use Cutover to open the Cutover pane and see different options based on the migration method that you selected.
Note
Completing the cutover or canceling the migration when you migrate with the Managed Instance link grants just-in-time permissions until the link is removed or the migration is canceled.
Reverse a migration
Reverse migration back to SQL Server from Azure SQL Managed Instance might be supported depending on the update policy of your SQL managed instance. For supported scenarios and version compatibility (SQL Server 2022, SQL Server 2025, and Always-up-to-date update policies), see Reverse a migration.
Reverse migration isn't available through the SQL Server migration in Azure Arc experience. You can manually reverse a migration through other tools such as native backup and restore, or manually configuring a link in SSMS.
Limitations
The limitations of the Managed Instance link and LRS apply to migrations through the Azure portal.
Monitoring the migration through the Azure portal is available only to SQL Server instances that meet monitoring licensing requirements.
Migrating from a SQL Server failover cluster instance (FCI) isn't currently supported by either migration method.
Troubleshoot common issues
To troubleshoot common issues when migrating to Azure SQL Managed Instance, see Troubleshoot migration issues.
Related content
- Assessment rules for SQL Server to Azure SQL Managed Instance migration
- Assessment rules for SQL Server to Azure SQL Database migration
- Migrate SQL Server to Azure SQL
- SQL Server enabled by Azure Arc
- Deployment options for SQL Server enabled by Azure Arc
- Migration experience feedback directly to the product group