Identify the requirements for HPC Cache
Before you set up Azure HPC Cache, you'll need to meet some prerequisites. In this unit, you'll discover the requirements and other considerations before deploying an Azure HPC Cache solution.
Network requirements for HPC Cache
Azure HPC Cache has three network requirements:
- Set up a custom DNS server
- Define a dedicated subnet
- Verify TCP/UDP port access
Set up custom DNS for HPC Cache
If you plan to use servers in your datacenter, you'll need to configure a DNS server so that Azure resources can resolve your internal storage server names.
If you plan to use Azure-based storage such as Azure NetApp Files, or you plan to copy your data into Azure Blob Storage, then you don't need to configure a separate DNS server.
In the Azure portal:
- Create the virtual network that will host the Azure HPC Cache
- Create the DNS server
- Add the DNS server to the cache's virtual network
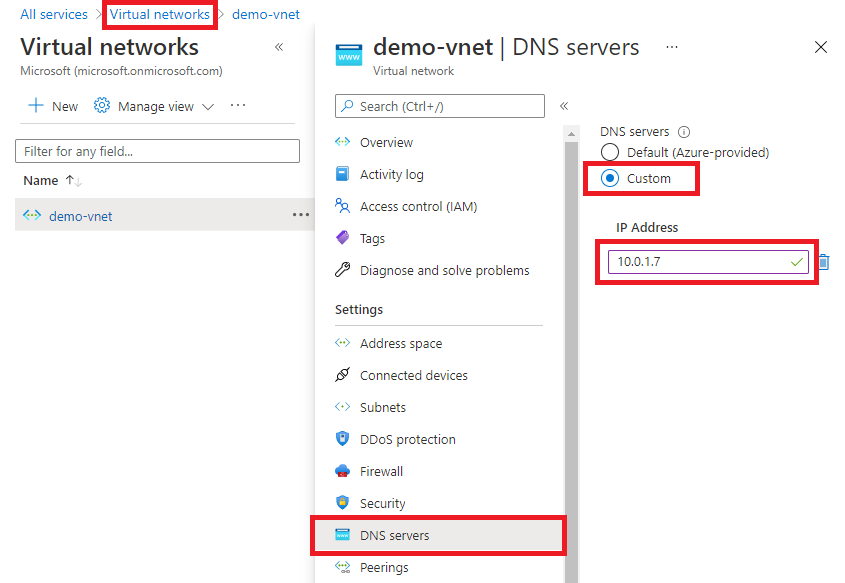
Follow these steps to add the DNS server to the virtual network in the Azure portal:
- Open the virtual network in the Azure portal.
- Select DNS servers from the Settings menu in the sidebar (you might need to expand the Settings menu).
- Select Custom.
- Enter the DNS server's IP address in the field.
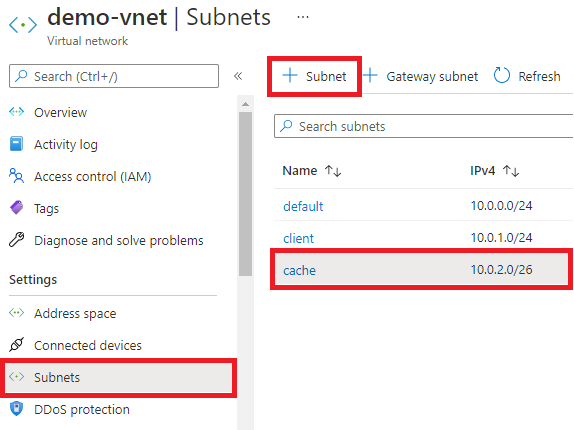
Define a dedicated subnet for HPC Cache
The cache manages its own IP addresses to provide high availability. To avoid IP address conflicts, the cache must be in its own dedicated subnet with a range of at least 64 IP addresses.
To provide high availability, HPC Cache must be able to move IP addresses among its resources. If there are network hosts inside the subnet, HPC Cache might use an IP address that was already assigned to another host. This creates a network conflict and causes issues with both hosts that share the same IP address.
If you're running multiple caches, each one needs its own dedicated subnet.
We highly recommend having a high-speed network connection like Azure ExpressRoute in place between Azure and the datacenter where the storage is.
Verify TCP/UDP port access for HPC Cache
Ensure firewall rules and Azure network security groups enable traffic between storage server ports and your internal network.
Different storage servers use different TCP/UDP ports to access data. You can use a tool like rpcinfo to identify which TCP and UDP ports are used on your storage server. Commonly used TCP/UDP ports include:
- 111
- 2049
- 4045
- 4046
- 4047
Obtain Azure permissions for HPC Cache
The cache needs to be able to create virtual network interfaces (NICs). The user creating the cache must have sufficient Azure privileges in the subscription to create NICs.
Set up NFS storage permissions for HPC Cache
The cache needs to have root permissions to perform the read, write, and metadata operations on storage. Configure your storage target to allow root access to Azure HPC Cache.
- Confirm that
no_root_squashis enabled. Otherwise, root access from the cache will be blocked. - Examine export policies to ensure that there are no restrictions on root access.
- Make sure that the cache has access to the lowest level of the export (parent directories, not subdirectories).