Connect local storage to HPC Cache
After the Azure HPC Cache instance is created, it's time to point it to your data. Ideally there's an ExpressRoute or other high-speed connection between Azure and the data.
From the Azure portal, select the HPC Cache resource. On the left menu, choose Storage Targets in the Settings column.
Storage targets
An HPC Cache storage target is the storage location where your HPC data is kept, like a NetApp or EMC Isilon appliance.
Select Add Storage Target in the upper-left corner, and then fill in the fields on the pane that appears.
Provide a name for your storage target. This name doesn't have the strict requirements that other fields have and can include spaces.
Leave the Target type as NFS.
For the Hostname field, enter the fully qualified domain name (FQDN) of your storage server. Your custom DNS server will resolve this name.
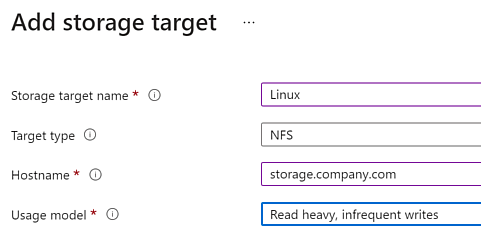
Usage model
The Usage model field lets you choose the closest match for how you plan to use your cache. Based on your choice, Azure HPC Cache applies internal settings to optimize your cache for that workload type. If you decide later that your usage model has changed, you can change your selection.
The usage model names should help you choose the best option. In general, the options at the top provide the better performance, but might not have the latest data. Select the usage model based on how frequently the source data changes.
This table summarizes the usage model differences:
| Usage model | Data being cached | Storage target verification | Storage target max write-back delay |
|---|---|---|---|
| Read heavy, infrequent writes | Read-only | Never | None |
| Greater than 15% writes | Read-write | 8 hours | 20 minutes |
| Clients bypass the cache | Read-only | 30 seconds | None |
| Greater than 15% writes, frequent back-end checking (30 seconds) | Read-write | 30 seconds | 20 minutes |
| Greater than 15% writes, frequent back-end checking (60 seconds) | Read-write | 60 seconds | 20 minutes |
| Greater than 15% writes, frequent write-back | Read-write | 30 seconds | 30 seconds |
| Read heavy, checking the backing server every 3 hours | Read-only | 3 hours | None |
Select OK. The cache begins establishing the connection to the storage server.