Connect HPC clients to HPC Cache
After the storage targets are successfully created, it's time to define the namespace and join the NFS clients to Azure HPC Cache.
Define the namespace
A namespace is a path that clients use to access storage. Client machines will use a namespace to access the data in the cache instead of accessing the storage targets directly. You must create at least one namespace before clients can access the cache.
To add a new namespace, select the Namespace option in the Settings column on the left menu.
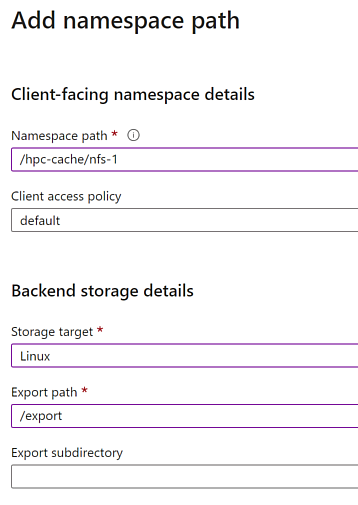
Select the Add namespace path button at the top, and then complete the fields on the pane that opens.
- The namespace path must begin with the slash character (
/). You could use something like/hpc-cache/nfs-1. - Select the client access policy for this path from the dropdown menu.
- Select the storage target from the drop-down menu.
- Select the export path on that storage server.
- If needed, select an optional export subdirectory.
- The namespace path must begin with the slash character (
Select OK.
You can have up to 10 namespace paths for NFS storage targets.
Client requirements
NFS clients require network access, installed NFS utilities, and a local path for the mount command.
Client machines need network access to the cache's virtual network and private subnet.
Install the NFS utilities by using either sudo yum install -y nfs-utils or sudo apt-get install nfs-common.
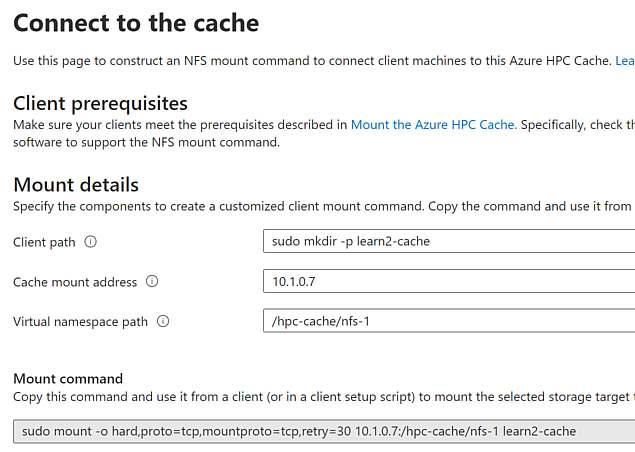
Create a local directory on each client by using a command like sudo mkdir -p /mnt/hpc-cache/target. Copy this command.
Copy the mount command
Azure HPC Cache provides a mount command that you can copy and paste for your NFS clients.
With the cache open in the Azure portal, select the Mount Instructions option in the Settings tab, and then complete the fields.
- In the Client path field, paste the full
sudo mkdircommand. - Select a cache mount address. Rotate these addresses across the clients to evenly distribute the network traffic.
- Select your virtual namespace path from the drop-down menu.
- The mount field automatically populates; you can copy the command to the clipboard.
Run the HPC workload
Now that the clients are configured to access Azure HPC Cache, they can begin their HPC workloads.