Create a custom domain in Microsoft 365
When an organization has a domain name that it wants to add to Microsoft 365, the administrator or Microsoft partner should first verify the organization owns the domain. Domain ownership can sometimes be problematic, particularly if a former employee registered the domain with their personal information and then left the organization.
One of the most common methods that companies previously used to find out who originally registered the domain was to check the domain's WHOIS record. They would do so by using an Internet WHOIS register, such as who.is. However, the Internet Corporation for Assigned Names and Numbers (ICANN), which is a non-profit organization that oversees and coordinates various aspects of the internet's domain name system (DNS), no longer requires that WHOIS information be publicly available. As such, checking WHOIS may likely result in no usable response other than verifying who the registrar is.
As an alternative, organizations typically employ one of the following methods:
- Historical WHOIS databases. There are services that maintain historical WHOIS records, allowing you to search for past registration information even if it's no longer publicly available. Examples include services like DomainTools' Domain History or Whois History.
- Domain registrar. Contacting the current domain registrar directly may provide some insights. They may be able to provide historical information or guide you on the next steps to obtain the original registration details.
- Domain transfer documentation. Domain transfers allow the movement of a domain name from one registrar to another. The domain owner typically initiates this process for various reasons, such as better pricing, improved services, or consolidation of domain management. When a domain transfer occurs, the transfer documentation may contain information about the original registrant. This information is typically available to the current domain owner or the domain registrar. You should verify the organization has administrative access to manage DNS for the domain. Different DNS hosting providers grant varying levels of access to DNS records for a hosted domain.
- Legal assistance. In cases where it's crucial to determine the original domain registration information, seeking legal advice may be necessary. An attorney experienced in domain name disputes or intellectual property law can guide you through the legal process and help obtain the required information.
After an organization verifies that it owns the domain, it should then verify that it can make changes to the DNS records for the domain. At that point, the organization should add the domain to Microsoft 365. To do so, an organization typically needs to follow these steps:
- Access DNS Management. The organization should have administrative access to the DNS management system for the domain in question. This access could be through a domain registrar, a DNS hosting provider, or an internal DNS server within the organization's network.
- Identify DNS Management Method. The organization should determine the specific method or platform used to manage the DNS records for the domain. The method could be a web-based control panel provided by the domain registrar or DNS hosting provider, or it might involve direct access to the DNS server using a management tool or command-line interface.
- Locate DNS Zone. The organization should then identify the DNS zone corresponding to the domain within the DNS management system. This zone contains the DNS records that control how DNS resolves the domain on the internet.
- Make DNS Record Changes. The organization should be able to modify the DNS records within the DNS zone. Depending on the DNS management method, this process typically involves locating the relevant DNS record (such as MX, TXT, CNAME, or others) and making the necessary changes to its configuration.
- Save and Publish Changes. After an organization modifies the DNS record, it must save and publish the changes within the DNS management system. This action ensures that the updated DNS records propagated throughout the DNS infrastructure and become effective.
- Verify DNS Record Propagation. Once the organization changes the DNS records and saves them, the organization should verify the updated DNS records propagated. DNS propagation refers to the time it takes for a process called DNS replication to distribute the updated DNS records across DNS servers worldwide. This propagation period can vary and usually takes anywhere from a few minutes to several hours.
- Perform Microsoft 365 Domain Verification. After confirming that the DNS records propagated, the organization can proceed with the domain verification process within the Microsoft 365 administration portal. This process typically involves adding a specific TXT record or CNAME record to the DNS zone of the domain to prove ownership and control.
- Verify Domain Ownership. Once an organization adds the TXT record or CNAME record to the DNS zone, it can initiate the domain verification process within the Microsoft 365 admin portal. Microsoft 365 then attempts to validate the presence of the DNS record to confirm domain ownership. It may take some time for the verification process to complete, as the DNS record may need to propagate to all DNS servers.
This verification process helps ensure a successful setup and configuration of Microsoft 365 services with the custom domain.
The following sections examine the steps involved in verifying that you own the domain and adding DNS records to connect to Microsoft 365 services.
Tip
If you need help with the following steps, consider working with a Microsoft small business specialist. With Business Assist, you and your employees get around-the-clock access to small business specialists as you grow your business, from onboarding to everyday use.
Step 1: Add a TXT or MX record to verify you own the domain
Recommended: Verify with a TXT record
You must first prove that you own the custom domain that you want to add to Microsoft 365.
Sign in to the Microsoft 365 admin center. In the left-hand navigation pane, select Show all, then select Settings, and then select Domains.
In a new browser tab or window, sign in to your DNS hosting provider, and then find where you manage your DNS settings (for example, Zone File Settings, Manage Domains, Domain Manager, DNS Manager).
Go to your provider's DNS Manager page and add the TXT record indicated in the admin center to your domain. Adding this record doesn't affect your existing email or other services. You can safely remove it once you connect your domain to Microsoft 365.
Example:
- TXT Name: @
- TXT Value: MS=ms######## (unique ID from the admin center)
- TTL: 3600 (or your provider default)
Save the record, go back to the admin center, and then select Verify. It typically takes around 15 minutes for record changes to register, but sometimes it can take longer. Give it some time and a few tries to pick up the change.
When Microsoft 365 finds the correct TXT record, you verified that you own the domain.
Verify with an MX record
If your registrar doesn't support adding TXT records, you can verify you own the domain by adding an MX record.
- Sign in to the Microsoft 365 admin center. In the left-hand navigation pane, select Show all, then select Settings, and then select Domains.
- In a new browser tab or window, sign in to your DNS hosting provider, and then find where you manage your DNS settings (for example, Zone File Settings, Manage Domains, Domain Manager, DNS Manager).
- Go to your provider's DNS Manager page and add the MX record indicated in the admin center to your domain.
Important
This MX record's Priority must be the highest of all existing MX records for the domain. Otherwise, it can interfere with sending and receiving email. You should delete this record as soon as you finish verifying that you own the domain.
When you create the MX record, you must set the following fields to these values:
- Record Type: MX
- Priority: Set to any large value not used already.
- Host Name: @
- Points to address: Copy the value from the admin center and paste it here.
- TTL: 3600 (or your provider default)
When Microsoft 365 finds the correct MX record, you verified that you own the domain.
Step 2: Add DNS records to connect Microsoft services
In a new browser tab or window, sign in to your DNS hosting provider, and find where you manage your DNS settings (for example, Zone File Settings, Manage Domains, Domain Manager, DNS Manager).
You must add several different types of DNS records depending on the services you want to enable.
Add an MX record for email (Outlook, Exchange Online)
Before you begin: If users already have email with your domain (such as user@yourdomain.com), create their accounts in the Microsoft 365 admin center before you set up your MX records. By doing so, they continue to receive email. After you update your domain's MX record, all new email for anyone who uses your domain now comes to Microsoft 365. Any email you already have stays at your current email host, unless you decide to migrate email and contacts to Microsoft 365.
When you add a domain in the Microsoft 365 admin center, it initiates the Domain setup wizard. The wizard provides the information you need to create the MX record.
On your hosting provider's website, add a new MX record. You must set the following fields to these values:
- Record Type: MX
- Priority: Set to the highest value available, typically 0.
- Host Name: @
- Points to address: Copy the value from the admin center and paste it here.
- TTL: 3600
Note
Exchange Online only supports TTL values less than 6 hours (21,600 seconds).
Save the record, and then remove any other MX records.
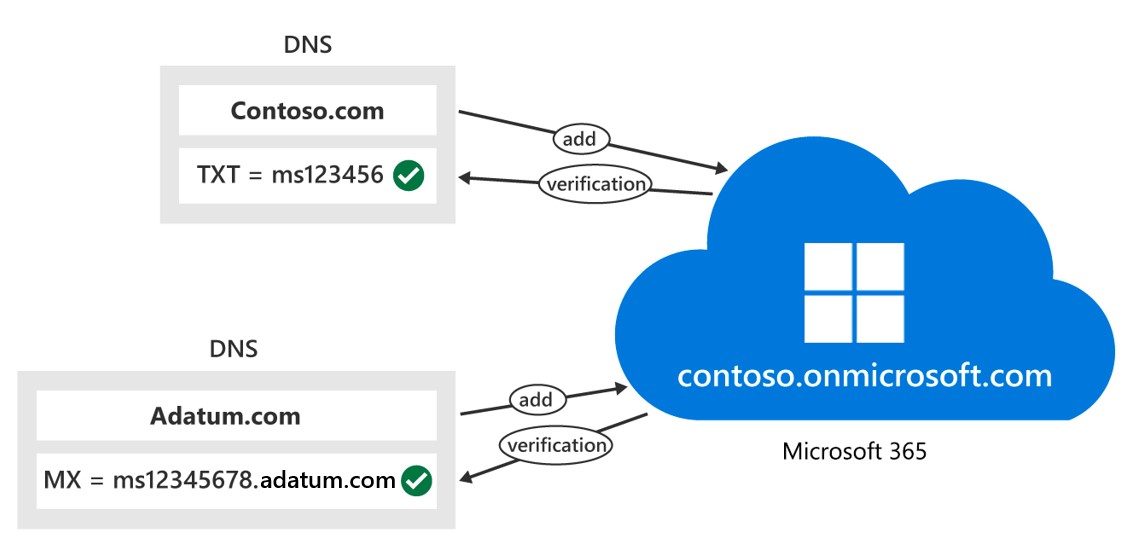
The following diagram shows how public domains, managed in their respective provider portals, must point to Microsoft 365 to receive emails and use them in Microsoft 365.
Add CNAME records to connect other services (Teams, Exchange Online, MDM)
The domain setup wizard provides the information you need to create the CNAME record.
On your hosting provider's website, add CNAME records for each Microsoft 365 service that you want to connect. You must set the following fields to these values for each CNAME record that you create:
- Record Type: CNAME (Alias)
- Host: Paste the values you copy from the admin center here.
- Points to address: Copy the value from the admin center and paste it here.
- TTL: 3600 (or your provider default)
Add or edit an SPF TXT record to help prevent email spam (Outlook, Exchange Online)
Before you begin: If you already have an SPF record for your domain, don't create a new one for Microsoft 365. Instead, add the required Microsoft 365 values to the current record on your hosting provider's website so that you have a single SPF record that includes both sets of values.
On your hosting provider's website, edit the existing SPF record or create an SPF record. You must set the following fields to these values:
- Record Type: TXT (Text)
- Host: @
- TXT Value: v=spf1 include:spf.protection.outlook.com -all
- TTL: 3600 (or your provider default)
Save the record.
At this point, you should validate your SPF record by using one of these SPF validation tools.
Important
SPF is designed to help prevent spoofing, but there are spoofing techniques that SPF can't protect against. To protect against these techniques, you should first set up SPF, and then you should set up DKIM and DMARC for Microsoft 365. For more information, see Use DKIM to validate outbound email sent from your domain in Microsoft 365 and Use DMARC to validate email in Microsoft 365.
Add SRV records for communications services (Teams, Skype for Business)
On your hosting provider's website, add SRV records for each Microsoft 365 service you want to connect. You must set the following fields to these values for each SRV record that you create:
- Record Type: SRV (Service)
- Name: @
- Target: Copy the value from the admin center and paste it here.
- Protocol: Copy the value from the admin center and paste it here.
- Service: Copy the value from the admin center and paste it here.
- Priority: 100
- Weight: 1
- Port: Copy the value from the admin center and paste it here.
- TTL: 3600 (or your provider default)
Save the record.
Hosting providers sometimes impose restrictions on field values within SRV records. Some common workarounds for these restrictions include:
- Name. If your hosting provider doesn't allow setting this field to @, leave it blank. Use this approach only when your hosting provider has separate fields for the Service and Protocol values. Otherwise, see the Service and Protocol notes in the next item.
- Service and Protocol. If your hosting provider doesn't provide these fields for SRV records, you must specify the Service and Protocol values in the record's Name field. Depending on your hosting provider, the Name field may have a different name, such as: Host, Hostname, or Subdomain. To add these values, you must create a single string, separating the values with a dot. For example: _sip._tls
- Priority, Weight, and Port. If your hosting provider doesn't provide these fields for SRV records, you must specify them in the record's Target field. Depending on your hosting provider, the Target field may have a different name, such as: Content, IP Address, or Target Host. To add these values, you must create a single string, separating the values with spaces and sometimes ending with a dot, as seen in Example 1. You should check with your provider if you're unsure. You must include the values in this order: Priority, Weight, Port, Target.
- Example 1: 100 1 443 sipdir.online.lync.com.
- Example 2: 100 1 443 sipdir.online.lync.com