Exercise - Build the production application image
In the previous exercise, you built the staging workflow for building and publishing the application image. In this unit, you build a production workflow that uses the tagged version trigger.
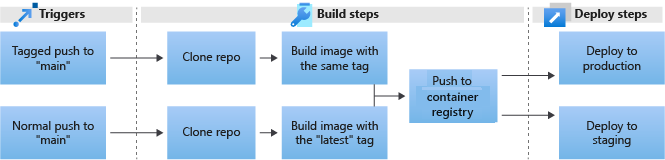
In this exercise, you:
- Build the Actions workflow.
- Create the
on tagtrigger. - Build and push the production image.
- Generate a personal access token (PAT).
- Trigger the tag event.
Create the GitHub Actions workflow
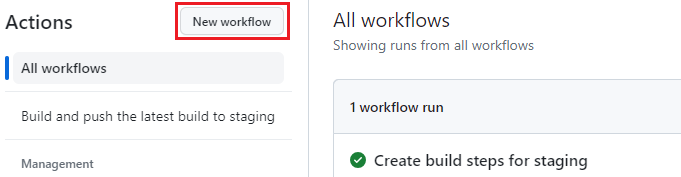
To start building the pipeline, go to your fork of the sample repository in the GitHub website and select the Actions tab.
In the left pane, select New workflow.
On the Choose a workflow page, select set up a workflow yourself.
Copy and paste the basic workflow into the editing pane:
# This is a basic workflow to help you get started with Actions

name: CI

# Controls when the action will run. Triggers the workflow on push or pull request
# events but only for the main branch
on:
  push:
    branches: [ main ]
  pull_request:
    branches: [ main ]

# A workflow run is made up of one or more jobs that can run sequentially or in parallel
jobs:
  # This workflow contains a single job called "build"
  build:
    # The type of runner that the job will run on
    runs-on: ubuntu-latest

    # Steps represent a sequence of tasks that will be executed as part of the job
    steps:
      # Checks out your repository under $GITHUB_WORKSPACE, so your job can access it
      - uses: actions/checkout@v2

      # Runs a single command using the runners shell
      - name: Run a one-line script
        run: echo Hello, world!

      # Runs a set of commands using the runners shell
      - name: Run a multi-line script
        run: |
          echo Add other actions to build,
          echo test, and deploy your project.
Above the editing pane, rename the file from
main.ymltobuild-production.yml.Change the
namekey fromCItoBuild and push the tagged build to production.
Create the 'on' tag trigger
Change the default triggers in the on key.
Remove the second trigger and leave only the
pushtags.Replace the
brancheskey with the followingtagskey. This key means the workflow runs only on specific tags. In this case, the workflow runs only if the tag follows thev*pattern, which includesv1.0.0.name: Build and push the tagged build to production on: push: tags: - 'v*'
Configure the checkout step
As in the previous exercise:
- Change the
jobskey fromubuntu-latesttoubuntu-20.04. - Rename the
buildkey tobuild_push_image. - In the
stepskey, delete the last two example steps from the template and keep thecheckoutoption.
- Change the
Create a new step that gathers the necessary version information. You use the
::set-outputinternal command to create this step. Add the following lines below the checkout action:- name: Fetch latest version id: fetch_version run: echo ::set-output name=TAG::${GITHUB_REF#refs/tags/}Your YAML file, without the comments, should look like the following example:
name: Build and push the tagged build to production on: push: tags: - 'v*' jobs: build_push_image: runs-on: ubuntu-20.04 steps: - uses: actions/checkout@v2 - name: Fetch latest version id: fetch_version run: echo ::set-output name=TAG::${GITHUB_REF#refs/tags/}
Add Docker steps
Same as for the staging workflow, add the Docker Login and Build and push Docker images steps.
In the right panel, search for Docker Login. Select the first result published by Docker.
Under Installation, select the copy icon to copy the usage YAML.
Paste the copied YAML below the
Fetch latest versionaction.Add the following values to the
registry,username, andpasswordkeys:registry:${{ secrets.ACR_NAME }}username:${{ secrets.ACR_LOGIN }}password:${{ secrets.ACR_PASSWORD }}
Delete the other keys, because they aren't used in this exercise.
In the right panel under Marketplace, search for build and push docker images, and select the first result published by Docker.
Under Installation, select the copy icon to copy the usage YAML.
Paste the copied YAML below the last key from the previously copied
docker-loginaction.Rename the
namekey fromBuild and push Docker imagestoBuild and push production images.Add the following values to the
context,push, andtagskeys:context:.push:truetags:${{secrets.ACR_NAME}}/contoso-website:latest,${{secrets.ACR_NAME}}/contoso-website:${{ steps.fetch_version.outputs.TAG }}
Notice how the value of the
tagskey differs from the staging workflow. Usingsteps.in the YAML is a common practice to refer to previous steps in the pipeline. When you usedset-outputin thefetch_versionstep, you set the output of the step to the value of theGITHUB_REFvariable. This output is now available in the pipeline inside thestepsobject.Delete the other keys, because they aren't used in this exercise.
Add another action called
docker/setup-buildx-actionbetween the checkout action and the login action, to set up the build engine for Docker to use. Copy the following snippet and paste it between thecheckoutandloginactions.- name: Set up Buildx uses: docker/setup-buildx-action@v3.0.0Your YAML file, without the comments, should look like the following example:
name: Build and push the tagged build to production on: push: tags: - 'v*' jobs: build_push_image: runs-on: ubuntu-20.04 steps: - uses: actions/checkout@v2 - name: Fetch latest version id: fetch_version run: echo ::set-output name=TAG::${GITHUB_REF#refs/tags/} - name: Set up Buildx uses: docker/setup-buildx-action@v3.0.0 - name: Docker Login uses: docker/login-action@v3.0.0 with: registry: ${{ secrets.ACR_NAME }} username: ${{ secrets.ACR_LOGIN }} password: ${{ secrets.ACR_PASSWORD }} - name: Build and push production images uses: docker/build-push-action@v5.0.0 with: context: . tags: ${{secrets.ACR_NAME}}/contoso-website:latest,${{secrets.ACR_NAME}}/contoso-website:${{ steps.fetch_version.outputs.TAG }} push: true
Commit the changes
To commit your changes, select the Commit changes button at upper right. Enter a description for the commit, and then select Commit changes.
This time, the production action doesn't trigger, because you didn't push a new tag, but the earlier staging action triggers and builds a new latest image.
Generate a personal access token (PAT)
You need a PAT to push your tags in the next step and to run the deploy script in a later unit.
Go to the fork of the sample repository in the GitHub website. On the top right hand corner, select your profile photo, then select Settings.
Select Developer settings at the bottom of the left menu.
Select Personal access tokens > Tokens (classic) from the dropdown.
Select Generate a personal access token.
Under Note, provide a name for your PAT, such as myPersonalAccessTokenLM.
Under Select scopes, select the checkbox next to workflow.
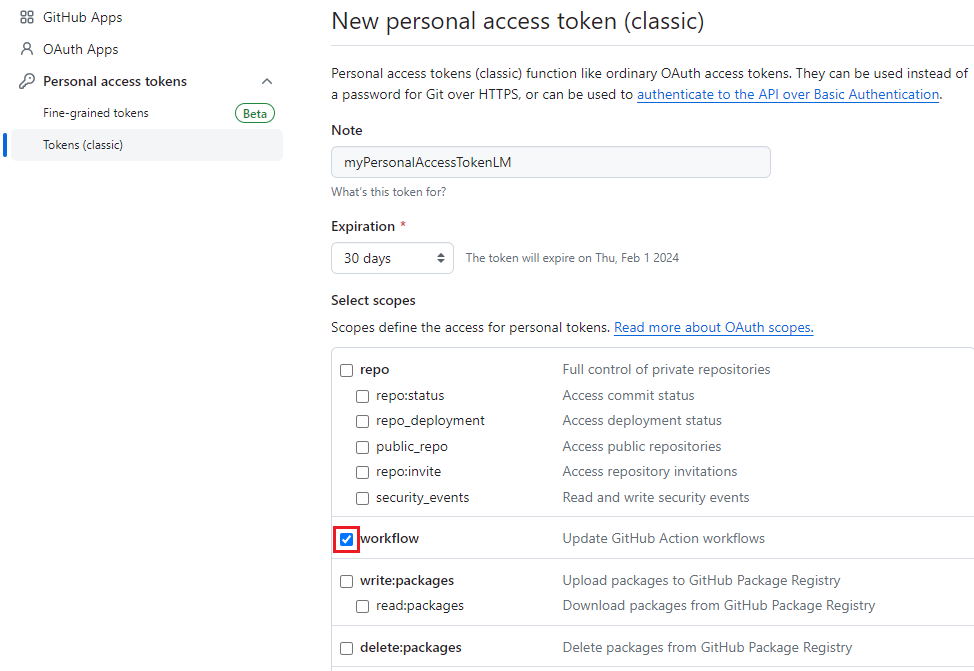
Note
The Workflow scope grants admin repo access to the Github actions. You need this access to push your tags in the next step and to run the deploy script in a later unit.
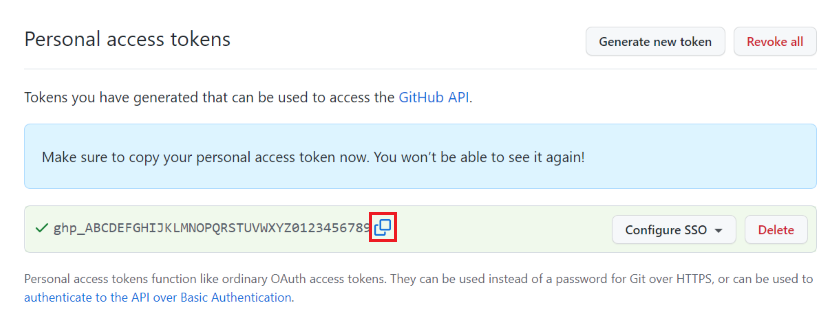
Select Generate token at the bottom of the page.
Select the copy icon to copy your PAT. Save the PAT to use in later steps.
Trigger the tag event
In Azure Cloud Shell, go to your cloned repository and run
git pull.Run the following command:
git tag -a v2.0.0 -m 'My first tag'Run the following command. When prompted, provide your PAT as the password.
git push --tagsImportant
The original repo uses v1.0.0, so you must push a different tag because duplicates can't exist.
Select the Actions tab and check the running process.
When the process completes, run the following command in Cloud Shell, replacing
<ACR_NAME>with yourACR_NAME, to confirm that two tags are listed in the results.az acr repository show-tags --repository contoso-website --name <ACR_NAME> -o table
Proceed to the next unit to learn about using Helm, a packaging tool for Kubernetes applications, to automate your pipeline.