Exercise - Program the Altair by using CP/M
In this exercise, you'll learn how to start programming the Altair emulator.
Connect to the web terminal
- Switch back to the web terminal in your web browser.
- If required, authenticate the web terminal.
- The Altair emulator might have started running before you connected to the web terminal. If so, press the RESET button on Azure Sphere to restart the Altair emulator. When Azure Sphere restarts, the CP/M
>prompt will appear in the web terminal.
Get started with CP/M
For more information about CP/M, see the CP/M reference manual.
Here are some CP/M commands to get you started:
Get a directory listing:
dirErase a file:
era *.txtCopy Microsoft BASIC
mbasic.comfrom drive A to drive B:pip b:=a:mbasic.comList the contents of a file:
type hw.cRename a file:
ren hello.c=hw.c
Get started with Microsoft BASIC-80
For more information on Microsoft BASIC, see the Microsoft BASIC-80 reference manual.
Microsoft BASIC-80 is included on drive A.
To start Microsoft BASIC, from the CP/M command prompt, enter:
mbasic B:TEST.BASAfter Microsoft BASIC starts, it opens or creates a file called TEST.BAS on drive B.
Enter your first program:
10 for i = 1 to 1000
20 print i
30 next i
Save your program to disk:
save "B:TEST.BAS"Load your program from disk:
load "B:TEST.BAS"Stop the program from running by selecting Ctrl+C.
Quit BASIC:
system
You can learn more about BASIC from the following BASIC applications included with the Altair emulator:
- DISKRW.BAS
- STARTREK.BAS
- TICTACTOE.BAS
- SIMPLE.BAS
- LOOPY.BAS
- WEATHER.BAS
- IOT.BAS
Use ports to read temperature and air pressure
The BASIC language has an extensibility mechanism called ports. The Altair emulator includes support for ports that the IOT.BAS application uses. The IOT.BAS application calls in port 43 to read the temperature and port 44 to read the air pressure. These calls are routed to the C sphere_port_in value in main.c of the Altair emulator.
If you have an Avnet Azure Sphere Starter Kit, the temperature and pressure data is read from the onboard sensors. If you have an Azure Sphere device from Seeed Studio, random temperature and pressure data is used.
The following BASIC program is a listing of IOT.BAS:
10 PRINT
20 PRINT "Avnet onboard temperature and pressure sensor App"
30 PRINT
70 A$=""
80 C=INP(43)
90 IF C = 0 THEN GOTO 120
100 A$=A$+CHR$(C)
110 GOTO 80
120 PRINT "Temperature is ";A$;" degrees Celsius."
130 A$=""
140 C=INP(44)
150 IF C = 0 THEN GOTO 180
160 A$=A$+CHR$(C)
170 GOTO 140
180 PRINT "Air pressure is ";A$;" hPa."
210 PRINT
This is the sphere_port_in C function found in main.c of the Altair emulator application:
/// <summary>
/// Support for BASIC Port In for IOT.BAS temperature and pressure example
/// Example shows environment temperature and pressure example
/// </summary>
/// <param name="port"></param>
/// <returns></returns>
static uint8_t sphere_port_in(uint8_t port) {
  static bool reading_data = false;
  static char data[10];
  static int readPtr = 0;
  uint8_t retVal = 0;
  if (port == 43) {
    if (!reading_data) {
      readPtr = 0;
      snprintf(data, 10, "%d", onboard_telemetry.latest.temperature);
      publish_telemetry(onboard_telemetry.latest.temperature, onboard_telemetry.latest.pressure);
      reading_data = true;
    }
    retVal = data[readPtr++];
    if (retVal == 0x00) {
      reading_data = false;
    }
  }
  if (port == 44) {
    if (!reading_data) {
      readPtr = 0;
      snprintf(data, 10, "%d", onboard_telemetry.latest.pressure);
      reading_data = true;
    }
    retVal = data[readPtr++];
    if (retVal == 0x00) {
      reading_data = false;
    }
  }
  return retVal;
}
Run the IOT.BAS application
To start Microsoft BASIC, from the CP/M command prompt, enter:
mbasic A:IOT.BASAfter Microsoft BASIC starts, it opens the IOT.BAS application.
Run the application:
run
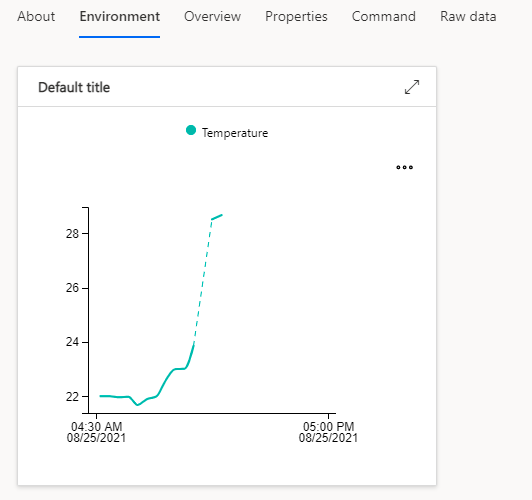
When you run this application, temperature and pressure data is published to Azure IoT Central. You can view the data in the Azure IoT Central web portal, under the Environment tab for your device.
Extend the IOT.BAS app
Make the IOT.BAS application read the temperature and pressure every five seconds. When the temperature and pressure are read, the data is sent to Azure IoT Central and plotted on the Environment chart.
To pause the app for approximately 5 seconds, add a loop:
250 FOR J = 0 TO 30000: NEXT JSave your changes by using the BASIC
savecommand:save "B:IOT.BAS"
Get started with the Word-Master text editor
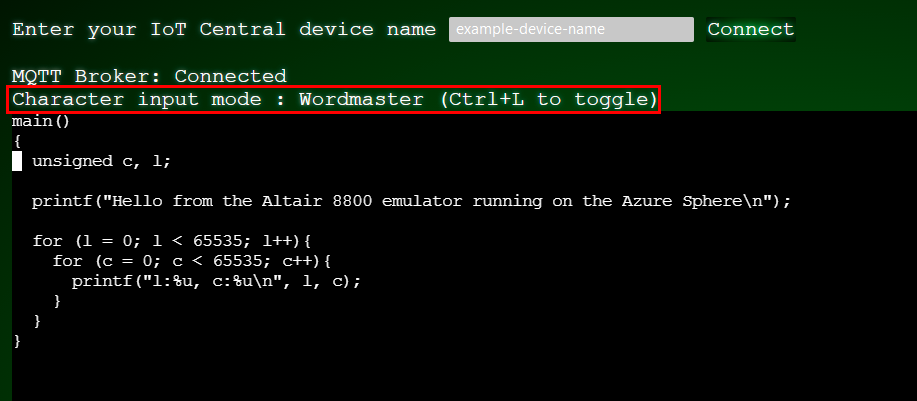
The CP/M disk image includes the Word-Master text editor. To use Word-Master, you must switch the web terminal to character input mode. In character input mode, the web terminal sends each character that you type as an MQTT message to the Altair emulator.
To switch between line input mode and character input mode, select Ctrl+L. When you're finished with Word-Master, switch back to line input mode. Web terminal communications over MQTT in line input mode are more efficient.
For more information, view the Word-Master user's guide.
The following table lists the Ctrl characters that Word-Master uses. This list is sourced from the Experiencing the Altair 8800 blog.
VIDEO MODE SUMMARY

^O   INSERTION ON/OFF           RUB  DELETE CHR LEFT
^S   CURSOR LEFT CHAR           ^G   DELETE CHR RIGHT
^D   CURSOR RIGHT CHAR          ^\   DELETE WORD LEFT
^A   CURSOR LEFT WORD           ^T   DELETE WORD RIGHT
^F   CURSOR RIGHT WORD          ^U   DELETE LINE LEFT
^Q   CURSOR RIGHT TAB           ^K   DELETE LINE RIGHT
^E   CURSOR UP LINE             ^Y   DELETE WHOLE LINE
^X   CURSOR DOWN LINE           ^I   PUT TAB IN FILE
^^   CURSOR TOP/BOT SCREEN      ^N   PUT CRLF IN FILE
^B   CURSOR RIGHT/LEFT LINE     ^@   DO NEXT CHR 4X
^W   FILE DOWN 1 LINE           ^P   NEXT CHR IN FILE
^Z   FILE UP 1 LINE             ^V   NEXT CHR(S) TO VIDEO
^R   FILE DOWN SCREEN           ESC  EXIT VIDEO MODE
^C   FILE UP SCREEN             ^J   DISPLAY THIS
In character input mode, the following keyboard mappings will improve your editing experience:
Keyboard key            Word-Master Ctrl Sequence
----------------------------------------------
Insert                  ^O   INSERTION ON/OFF
Delete                  ^G   DELETE CHR RIGHT
Cursor Left             ^S   CURSOR LEFT CHAR
Cursor Right            ^D   CURSOR RIGHT CHAR
Cursor Up               ^E   CURSOR UP LINE
Cursor Down             ^X   CURSOR DOWN LINE
Compile assembler applications
The CP/M disk image includes a demo assembler application. Follow these steps to edit, assemble, and load the demo file:
Copy the demo app (demo.asm) to drive B by using the
pipcommand:pip b:=a:demo.asmEdit the demo.asm file with Word-Master. From the CP/M command prompt, enter:
a:wm b:demo.asmSwitch the web terminal to character input mode by selecting Ctrl+L.
Make your changes to the demo.asm file.
Save your updates to the demo.asm file:
- Select the Esc key.
- Select E to exit. Your file changes are saved to disk.
Switch the web terminal to line input mode by selecting Ctrl+L.
Assemble the demo.asm file:
a:asm b:demoLoad and link the assembled code:
a:load b:demoRun the demo application:
b:demo
Compile C applications
The CP/M disk image includes a simple C application. Follow these steps to edit, compile, and link the hw.c (helloworld) file:
Copy the hw.c source code to read/write drive B by using the
pipcommand:pip b:=a:hw.cEdit the hw.c file with Word-Master:
a:wm b:hw.cSwitch the web terminal to character input mode by selecting Ctrl+L.
Make your changes to the hw.c file.
Save your updates to the hw.c file:
- Select the Esc key.
- Select E to exit. Your file changes are saved to disk.
Switch the web terminal to line input mode by selecting Ctrl+L.
Compile the hw.c file:
a:cc hwLink the hw application:
a:clink hwRun the hw application:
b:hwStop the hw application from running by selecting Ctrl+C.