Exercise - Scale a web app manually
You should scale out a system when you expect an increase in traffic. You might also scale out in response to declining performance.
In the hotel reservation system example, you increase the number of instances of the web app when you anticipate extra traffic because of a special event, a special offer, or seasonal fluctuations. You scale the system back when the demand drops.
In this exercise, you create an App Service plan and deploy a web app using this plan. You monitor the performance of the web app under load. Then scale out the app and verify that the plan improved the app's performance.
The exercise uses a sample web app that implements a web API. The web API exposes HTTP POST and GET operations that create and retrieve customer bookings for a hotel reservations website. The bookings aren't saved. The GET operation simply retrieves dummy data.
The exercise also runs a client app that simulates several users issuing POST and GET operations simultaneously. This app provides the workload that you use to test the performance of the web app before and after scaling.
Create an App Service plan and web app
Important
You need your own Azure subscription to run this exercise, and you might incur charges. If you don't already have an Azure subscription, create a free account before you begin.
Sign in to the Azure portal.
On the Azure portal menu or from the Home page, select Create a resource. The Create a resource pane appears.
In the left menu pane, under Categories, select Web, search for and select Web App, and then select Create. The Create Web App pane appears.
On the Basics tab, enter the following values for each setting.
Note
The web app must have a unique name. We suggest using something like <your name or initials>hotelsystem. Use this name wherever you see
<your-webapp-name>in this exercise.Setting Value Project Details Subscription Select the Azure subscription you'd like to use for this exercise Resource Group Select the Create new link, and enter a new resource group called mslearn-scale Instance Details Name See Note before table. Enter a unique name that you can remember for later in this exercise Publish Code Runtime stack .NET 6 (LTS) Operating System Windows Region Accept default App Service Plan Windows Plan Accept default Pricing plan Accept default Select Review + create > Create. Wait for the web app to be created and deployed.
Build and deploy the web app
In the Azure taskbar, select the Cloud Shell icon to open AzureCloud Shell, and run the following command to download the source code for the hotel reservation system.
 Bash
Bashgit clone https://github.com/MicrosoftDocs/mslearn-hotel-reservation-system.gitGo to the mslearn-hotel-reservation-system/src folder.
Bashcd mslearn-hotel-reservation-system/srcBuild the apps for the hotel system. There are two apps: a web app that implements the web API for the system and a client app that you use to load test the web app.
Bashdotnet buildPrepare the HotelReservationSystem web app for publishing.
Bashcd HotelReservationSystem dotnet publish -o websiteGo to the website folder, which contains the published files. Zip the files and deploy them to the web app that you created in the previous task. Copy the following code to Notepad and replace
<your-webapp-name>with the name of your web app, then paste the edited code block into Cloud Shell and run it.Bashcd website zip website.zip * az webapp deploy --src-path website.zip --name <your-webapp-name> --resource-group mslearn-scaleUse your web browser to go to
http://<your-webapp-name>.azurewebsites.net/api/reservations/1. A JSON document appears that contains the details for reservation number 1.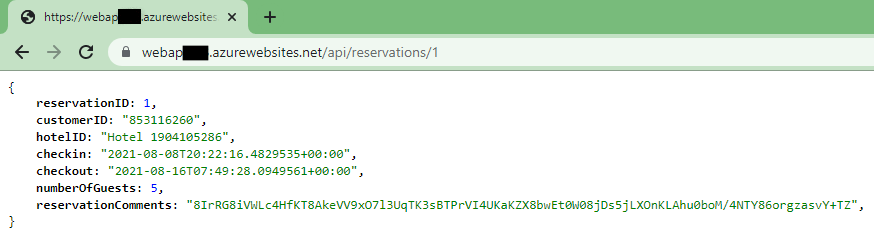
Monitor the performance of the web app before scaling out
Return to Cloud Shell, and go to the ~/mslearn-hotel-reservation-system/src/HotelReservationSystemTestClient folder.
Bashcd ~/mslearn-hotel-reservation-system/src/HotelReservationSystemTestClientEdit the App.config file in this folder by using the code editor.
Bashcode App.configUncomment the line that specifies the
ReservationsServiceURI, and replace the value YOUR WEBSITE NAME with the name of your web app. The file should look like this example.text<?xml version="1.0" encoding="utf-8" ?> <configuration> <appSettings> <add key="NumClients" value="100" /> <add key="ReservationsServiceURI" value="https://<your-webapp-name>.azurewebsites.net/" /> <add key="ReservationsServiceCollection" value="api/reservations" /> </appSettings> </configuration>Note
The
NumClientssetting in this file specifies the number of clients that can simultaneously try to connect to the web app and perform work. The work consists of creating a reservation, and then running a query to fetch the details of the reservation. All the data used is fake. It's not persisted anywhere. Leave this value set to100.Save the file by selecting Ctrl+S.
Edit the HotelReservationSystemTestClient.csproj file in this folder by using the code editor.
Bashcode HotelReservationSystemTestClient.csprojEdit the line that specifies the
TargetFramework, so that it matches the Runtime stack that you selected for your web app. Change theTargetFrameworkvalue tonetcoreapp7.0. The file should look like this example.text<Project Sdk="Microsoft.NET.Sdk"> <PropertyGroup> <OutputType>Exe</OutputType> <TargetFramework>netcoreapp7.0</TargetFramework> </PropertyGroup> <ItemGroup> <PackageReference Include="Newtonsoft.Json" Version="12.0.1" /> <PackageReference Include="System.Configuration.ConfigurationManager" Version="4.5.0" /> </ItemGroup> <ItemGroup> <ProjectReference Include="..\HotelReservationSystemTypes\HotelReservationSystemTypes.csproj" /> </ItemGroup> </Project>Save the file by selecting Ctrl+S, and close the code editor by pressing Ctrl+Q.
Rebuild the test client app with the new configuration.
Bashdotnet buildRun the client app. You see several messages appear as the clients start running, make reservations, and run queries. Allow the system to run for a couple of minutes. The responses are slow, and soon the client requests start to fail with HTTP 408 (Timeout) errors.
Bashdotnet run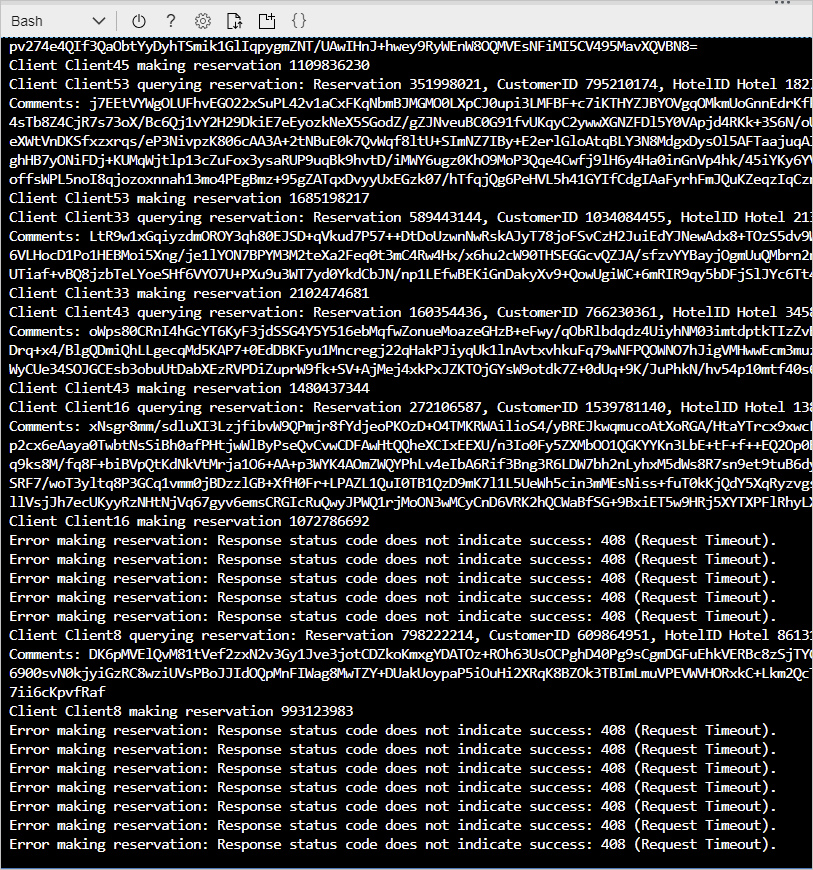
In the Azure portal, select Go to resource to open your web app.
In the left menu pane, select Monitoring, and then select Metrics.
On the right side of the menu bar of your web app pane, select the Local Time: Last 24 hours (Automatic) time range, then select Last 30 minutes, and then select Apply.
In the pane, under Chart Title, add the following metrics to the chart:
- Select Add metric, and under the Metric dropdown list, select CPU Time. For Aggregation, select Sum.
- Select Add metric, and under the Metric dropdown list, select Http Server Errors. For Aggregation, select Sum.
- Select Add metric, and under the Metric dropdown list, select Http 4xx. For Aggregation, select Sum.
- Select Add metric, and under the Metric dropdown list, select Response Time. For Aggregation, select Avg.
In the right menu bar, select Pin to dashboard. The Pin to dashboard pane appears; select the Create New tab.
In the Dashboard name dropdown list, enter your web app name, and then select Create and pin.
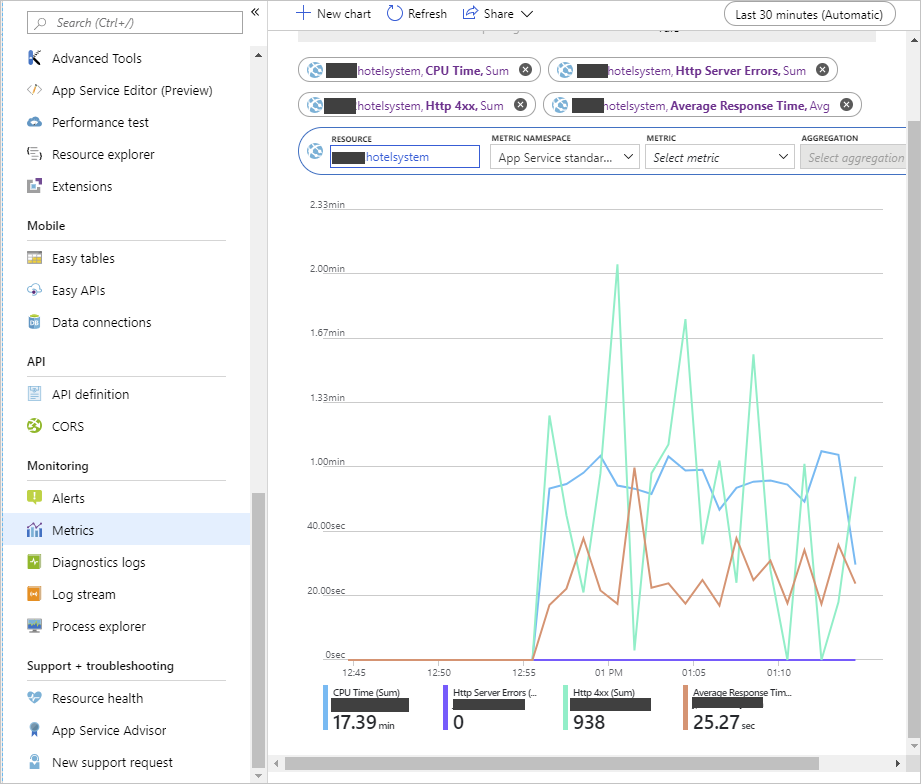
Allow the system to run for five minutes to stabilize, and then note the CPU Time, the number of HTTP 4xx errors, and the average response time. You should see a significant number of HTTP 4xx errors. These errors are HTTP 408 Timeout errors. The average response time is several seconds. You might see the occasional HTTP server error, depending on how the web server is coping with the burden.
Leave the client app running while you perform the next task.

Scale out the web app and verify the performance improvement
In the Azure portal, select your web app name (App service), and in the left menu pane, under Settings, select Scale out (App Service plan). The Scale out (App Service plan) pane appears.
On the Configure tab, select Manual scale and set the Instance count to 5. Select Save.

Switch to Cloud Shell that's running the client app. You should see fewer requests failing with errors, although some still time out.
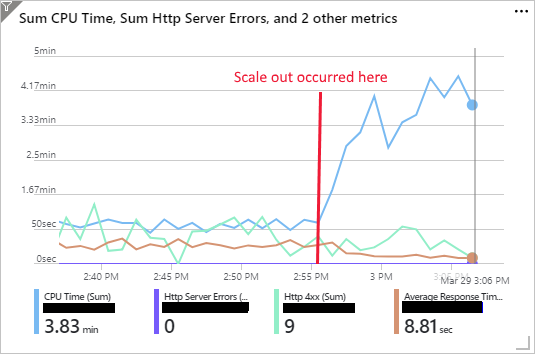
Run the app for another five minutes. Next, go to the chart that shows the metrics for the app on the dashboard in the Azure portal. You should see that the CPU time increases dramatically because there's now five times more CPU power available. The average response time should drop, and the number of HTTP 4xx errors should also decrease. The following chart shows a typical set of results. The point at which scale out occurred is noted.
If you want to experiment some more, try increasing the instance count for the App Service plan to 10. The maximum number of instances supported by the S1 tier is 10. You should notice a further increase in CPU time, and a corresponding drop in response time and HTTP 4xx errors.
Return to Cloud Shell that's running the client app. Select Enter to stop the app.
In the Azure portal, set the instance count back to 1. Select your web app, and in the left menu pane, select Scale out (App Service plan). On the Configure tab, set the instance count to 1, and select Save.
