Create a holographic anchor
The process of creating a holographic anchor involves three basic steps:
Use the Anchor wizard to select the holographic anchor method.
Use the wizard to import a custom 3D model that you want to use as the anchor, and to assign the 3D model as the anchor for the guide. The 3D model can be a representation of a physical object or a generic 3D object. If you don't select a custom 3D model, a default holographic anchor will be used.
In the HoloLens app, in Author mode, use gestures to align the holographic anchor to a physical object in the real world.
Watch the following video to see an overview of how to create a holographic anchor in Dynamics 365 Guides.
Set up a holographic anchor
You can access the Anchor wizard from the Outline page. The Outline page automatically appears after you create or open a guide.
On the Outline page, select Set your anchor now.
On the Choose an anchor method page, select Select for the Holographic anchor method.
In step 1 of the wizard, select Import, find your custom 3D model, and then select Open to import it. The model is added to the 3D parts tab in the gallery.
Drag the 3D model from the 3D parts tab to the Assign holographic anchor box. The 3D model is assigned as the holographic anchor for the guide. When you've finished, select Next to move to the next step.

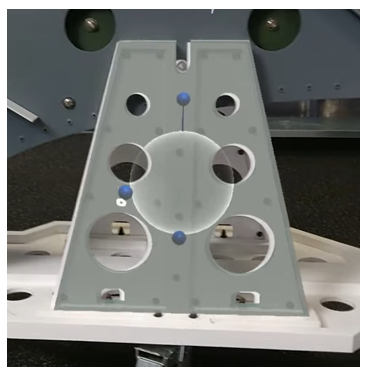
Put on your HoloLens, open the guide, and then use air tap and hold to move the holographic anchor directly over a physical object in your work environment. If you must rotate the object, use air tap and hold to move the blue spheres.
Tip
On HoloLens 2, you can use your hand to directly select and place a holographic anchor when you author a guide. For more information, see the HoloLens 2 gestures unit later in this module.
Take a picture of the place where you put the holographic anchor, to help the operator find it.
Go back to the PC app, and then select Next in the wizard two times. (You can skip step 2 of the wizard if you took a photo of the location in the previous step.)
In step 4 of the wizard, select the Import button to import the photo that you took in step 6. Then drag it to the Import photo of anchor location box. When you've finished, select Next to move to the next step.

In step 5 of the wizard, if you want to change the default instructions for the operator, select Edit Step card text, and then enter your instructions. When you've finished, select Next to move to the next step, and then select Confirm.


Best practices for holographic anchors
Consider the following points when you work with holographic code anchors:
Size - Select a holographic anchor that isn't too small or too large.
- Medium-size digital objects are best. Very small or very large holograms are difficult to manipulate.
- Shoebox size or slightly larger is ideal.
Placement - Select a holographic anchor that is as close as possible to the center of the work that is being done. The farther you place digital content from the holographic anchor, the less accurate it becomes.
Shape - Select a holographic anchor that has a non-uniform or uncommon shape. Unusual shapes are easiest to align to.
Avoid objects that are mirrored. This can cause 180-degree misalignment.
Select shapes that have clear edges and corners, to help orient your content correctly.
Recognizable - Select a holographic anchor that is obvious, easily recognizable, and easy for the operator to find. Make sure that the operator can access the object without encountering any obstructions.
Alignment direction - Always align the holographic anchor to your physical object from the same direction. In this way, you help maximize repeatability for operators.
Placement from different perspectives can cause misalignment.
Always look at the holographic anchor from multiple angles to make sure that it's aligned to the physical object.