Map records manually with Power Automate
After you've defined the details of the condition to be evaluated in the rule item, you can configure the action to be taken. Typically, the action to take consists of creating a new record, such as a case, in the application.
When you define the action to take, you need to specify two main parts:
Record to create - Identifies the type of record that will be created.
Configure in Microsoft Power Automate - Uses Power Automate to populate fields in the record, such as the customer, case origin, or service level.
Power Automate is used because of the flexibility it provides around automation. With Power Automate, you can connect to network Microsoft Dataverse tables that are used by Customer Service, and you can also use other available Power Automate connecters to incorporate data from other applications or services if needed. For example, your organization might have latitude and longitude data included on case records if it needs to be escalated and worked on in person. By using Power Automate, details from the associated customer's address can be passed to a geolocation service. The latitude and longitude that are returned from the service can be entered into the case record when it's created.
Before you configure the rule in Power Automate, you'll need to specify the record to create. You should complete this step first because when the Power Automate flow is created, it automatically inserts a step to create a record in that Dataverse table.
When you select Save and open Power Automate, a Power Automate flow will open on a new tab. The flow needs to connect to the Microsoft Dataverse connector to populate data, so you might need to sign in to the connector. After you've signed in, the flow will appear.
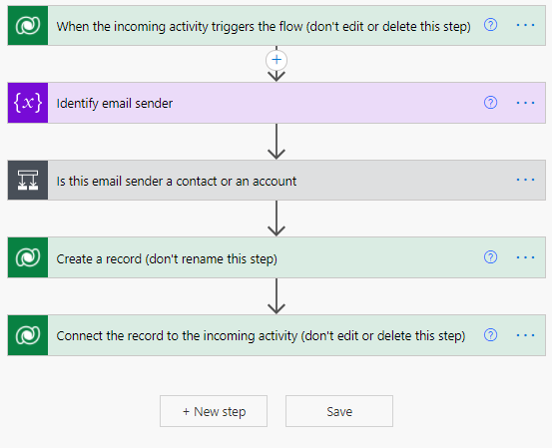
Initially, the flow will include five items:
When the incoming activity triggers the flow - The flow triggers based on information that is coming from Dynamics 365.
Identify email sender - Captures the name of the person whom the email came from.
Is this email sender a contact or an account - Determines if the email was received from an existing account or contact in the system.
Create a record - Creates the new record in the system.
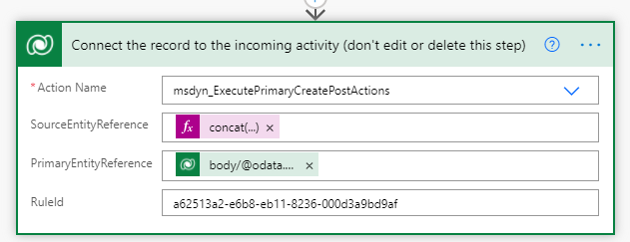
Connect the record to the incoming activity - Associates the created record with original incoming email activity record.
You should consider the template as a good starting point for creating the record. If used in its current form, the template will help you create the record; however, you should examine the record closely and make changes as needed.
Three steps where editing or deleting is limited:
When the incoming activity triggers the flow - Don't edit or delete this step.
Create a record - You can modify this step as needed, but make sure that you don't rename or delete it.
Connect the record to the incoming activity - Don't edit or delete this step.
Other than the preceding steps, other steps can be edited, added, or removed to better fit your needs. Before you start making major changes to the flow, you should be aware of what each step does and how the information is used throughout the flow. The ensuing sections examine each default step in greater detail.
When the incoming activity triggers the flow
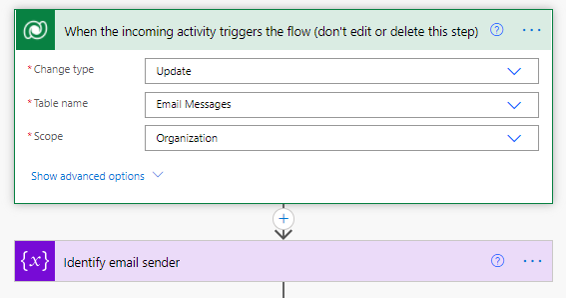
The triggering step that defines how the flow is getting triggered is When the incoming activity triggers the flow. All information in the step is predefined and based on the activity type that was specified when the rule was created.
Two main items that this step specifies:
Change type - Defines what record event will trigger the flow. In this case, it's triggered after an email activity that was created in the system is updated, which happens when the rule runs against the item.
Table name - Defines the Microsoft Dataverse table that the activity is associated with. In this case, because the rule is associated with an email activity, it's using the Email Messages table.
Important
Remember, you shouldn't edit or delete this step from the flow.
Identify email sender
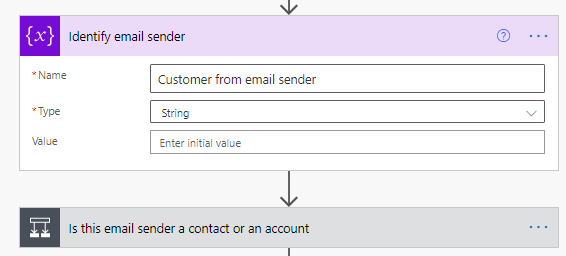
To ensure that you have associated the created record with the correct contact or account record, you need to identify whom the email was sent from. To complete this task, you will enter an initialize variable step to capture what you need. The Identify email sender step grabs the name of the sender of the email and stores it. After you have captured the sender's information, you can match it against potential contact or account records in a future step.
Is this email sender a contact or an account
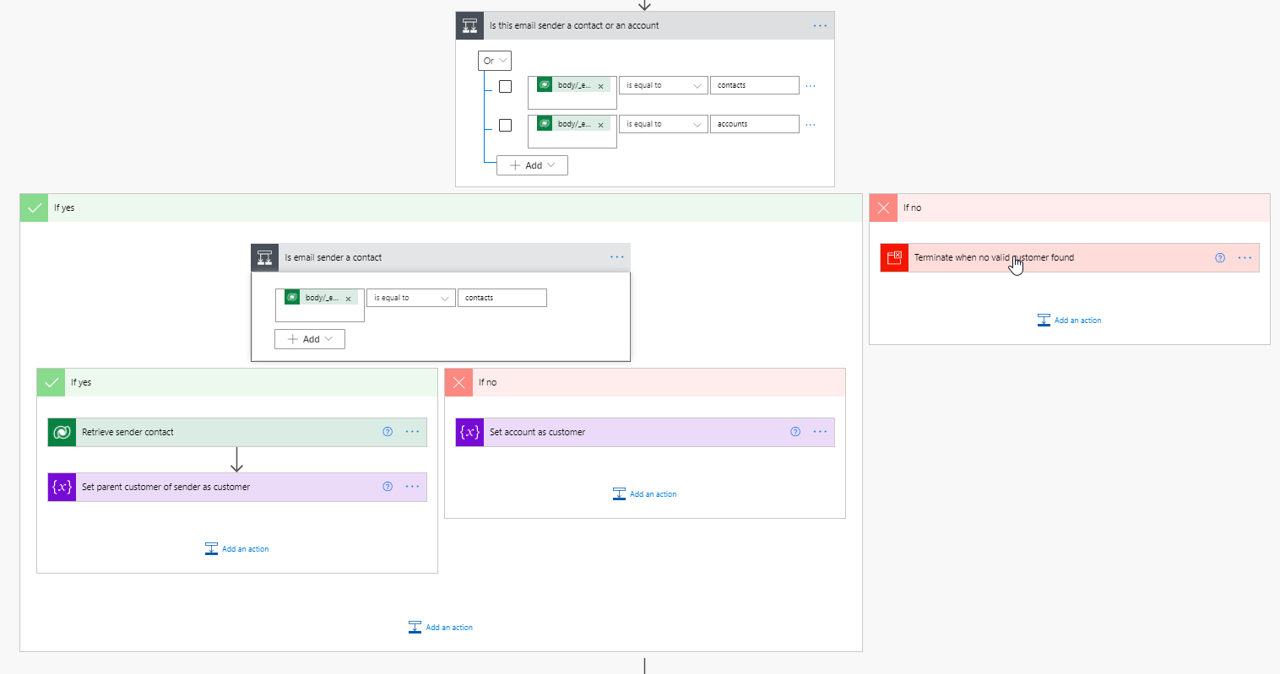
The Is this email sender a contact or an account step determines if the person whom the email was received from is an account or contact. After you have identified that information, you can associate the email activity with the correct record in the application later in the flow. Additionally, you will use this step when the case record is created to ensure that the case is associated with the correct customer.
In this case, a condition step has been inserted that evaluates if the sender type is an account or contact record. If the sender type isn't an account or contact, the flow is canceled. Otherwise, it determines which type it is and then captures it as a variable to use later in the flow.
Create a record
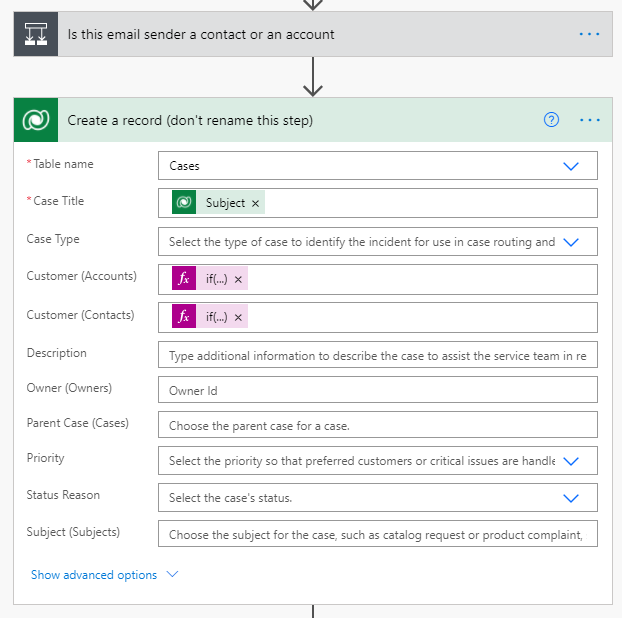
The Create a record step creates the record in Dynamics 365. Other than potentially adding more steps to the flow, this step is the one that you'll likely modify the most to ensure that data is populating on the record as it should. For example, you might want to set the case origin field to email, or you might want to have the flow set the value on the service level field to a value like gold. This step could help make routing the case easier in the future, if needed.
Some data is predefined, such as expressions that set the Customer Accounts or Customer Contacts fields based on whether the item came from an account or contact record. You can edit or remove those expressions based on your needs. As you modify this step, follow the standard practices for working with the Microsoft Dataverse connector in a Power Automate flow.
For more information, see Microsoft Dataverse.
Connect the record to the incoming activity
The final step in the flow will connect the record back to the incoming activity, such as the email that was originally received. Like the triggering step, all information in the Connect the record to the incoming activity step is prepopulated, so you should leave it in its current state. Any editing or deleting will affect the flow.
After you've finished modifying the flow based on your needs, you can save and exit the flow to return to your rule.

