Exercise - Sign in users with MSAL
In this exercise, you'll use the Microsoft Authentication Library for Java (MSAL4J) to add authentication in a sample Java web application and allow users to sign in with their Microsoft Entra accounts.
The sample application you'll in this exercise is a Java servlet application that allows users to sign in and displays the user name and basic profile information. It also allows you to call the Microsoft Graph API to show some user information.
Create a Java web application
From your shell or command line:
Create a folder for the application.
mkdir ~/javawebappClone the sample application from the GitHub repository into the new folder.
git clone https://github.com/Azure-Samples/ms-identity-java-servlet-webapp-authentication.git ~/javawebappChange into the folder where the sample application for this exercise is located.
cd ~/javawebapp/ms-identity-java-servlet-webapp-authentication/2-Authorization-I/call-graph
Configure the application
To configure the code, open the application project in your preferred IDE like IntelliJ or VS Code.
Open the
./src/main/resources/authentication.propertiesfile.Find the string
{enter-your-tenant-id-here}. Replace the existing value with the Directory (tenant) ID (as shown in the following image), because the app was registered with the Accounts in this organizational directory only option.Find the string
{enter-your-client-id-here}and replace the existing value with the Application (client) ID (clientId) of the registered application copied from the Azure portal.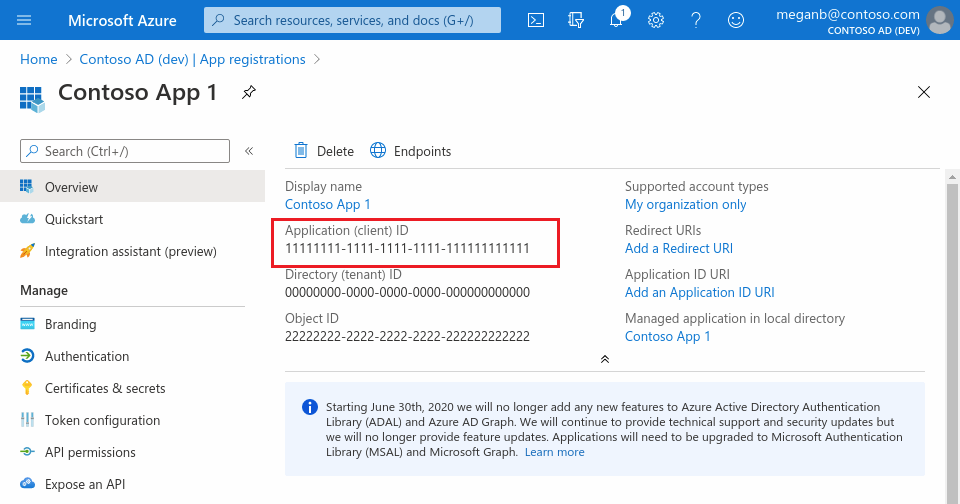
Find the string
{enter-your-client-secret-here}and replace the existing value with the key you saved during the creation of the app in the Azure portal.
Run the application
Make certain that your Tomcat server is running and you have privileges to deploy a web app to it. Make certain that your server host address is
http://localhost:8080.Compile and package the project using Maven:
cd ~/javawebapp/2-Authorization-I/call-graph
mvn clean package
Find the resulting
.warfile in./target/msal4j-servlet-graph.war. To deploy to Tomcat, copy this.warfile to the/webapps/directory in your Tomcat installation directory and start the Tomcat server.Open your browser and navigate to
http://localhost:8080/msal4j-servlet-graph/. You'll be redirected to sign in with Microsoft Entra ID. On successful sign-in, you should see a page like the following: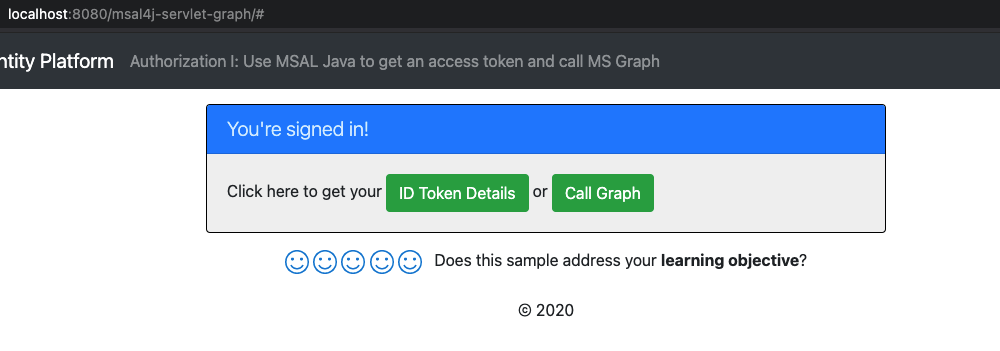
Select the ID Token Details button to see some of the ID token's decoded claims.
Overview of authentication code
You can find most of the authentication code in the sample application under the project's java/com/microsoft/azuresamples/msal4j/ directory. It contains multiple servlets that provide the authentication endpoints in the application for signing in, signing out, and handling the redirect callback from Microsoft Entra ID. These servlets use the helper classes in the directory java/com/microsoft/azuresamples/msal4j/helpers/ to call the authentication methods provided by MSAL. There's a servlet filter defined in AuthenticationFilter.java that redirects unauthenticated requests to protected routes to a 401 unauthorized HTTP error page.
To add authentication to your application, you'll need to include the servlet classes under java/com/microsoft/azuresamples/msal4j/authservlets and java/com/microsoft/azuresamples/msal4j/authwebapp directories, the helper classes in the directory java/com/microsoft/azuresamples/msal4j/helpers/ and the authentication servlet filter AuthenticationFilter.java in your projects. Here are more details of the MSAL authentication code.
MSAL4J is available on Maven. You'll need to add MSAL4J as a dependency in the project's
pom.xmlfile:<dependency> <groupId>com.microsoft.azure</groupId> <artifactId>msal4j</artifactId> <version>1.9.1</version> </dependency>The first step of the sign-in process is to send a request to the Microsoft Entra tenant's
/authorizeendpoint. The MSAL4JConfidentialClientApplicationinstance is leveraged to construct an authorization request URL. The app redirects the browser to this URL, which is where the user will sign in.final ConfidentialClientApplication client = getConfidentialClientInstance(); AuthorizationRequestUrlParameters parameters = AuthorizationRequestUrlParameters .builder(Config.REDIRECT_URI, Collections.singleton(Config.SCOPES)) .responseMode(ResponseMode.QUERY).prompt(Prompt.SELECT_ACCOUNT).state(state).nonce(nonce).build(); final String authorizeUrl = client.getAuthorizationRequestUrl(parameters).toString(); contextAdapter.redirectUser(authorizeUrl);- AuthorizationRequestUrlParameters: Parameters that must be set in order to build an AuthorizationRequestUrl.
- REDIRECT_URI: The redirect URI is the URI the identity provider will send the security tokens back to. Microsoft Entra ID will redirect the browser (along with auth code) to this URI after collecting user credentials. It must match the redirect URI in the Microsoft Entra app registration.
- SCOPES: Scopes are permissions requested by the application. Normally, the three scopes
openid profile offline_accesssuffice for receiving an ID token response for a user sign in and are set by default by MSAL.
The user is presented with a sign-in prompt by Microsoft Entra ID. If the sign-in attempt is successful, the user's browser is redirected to our app's redirect endpoint with a valid authorization code in the endpoint. The ConfidentialClientApplication instance then exchanges this authorization code for an ID Token and Access Token from Microsoft Entra ID.
// First, validate the state, then parse any error codes in response, then extract the authCode. Then: // build the auth code params: final AuthorizationCodeParameters authParams = AuthorizationCodeParameters .builder(authCode, new URI(Config.REDIRECT_URI)).scopes(Collections.singleton(Config.SCOPES)).build(); // Get a client instance and leverage it to acquire the token: final ConfidentialClientApplication client = AuthHelper.getConfidentialClientInstance(); final IAuthenticationResult result = client.acquireToken(authParams).get();- AuthorizationCodeParameters: Parameters that must be set in order to exchange the Authorization Code for an ID and/or access token.
- authCode: The authorization code that was received at the redirect endpoint.
- REDIRECT_URI: The redirect URI used in the previous step must be passed again.
- SCOPES: The scopes used in the previous step must be passed again.
If
acquireTokenis successful, the token claims are extracted. If the nonce check passes, the results are placed incontext(an instance ofIdentityContextData) and saved to the session. The application can then instantiate this from the session (by way of an instance ofIdentityContextAdapterServlet) whenever it needs access to it:// parse IdToken claims from the IAuthenticationResult: // (the next step - validateNonce - requires parsed claims) context.setIdTokenClaims(result.idToken()); // if nonce is invalid, stop immediately! this could be a token replay! // if validation fails, throws exception and cancels auth: validateNonce(context); // set user to authenticated: context.setAuthResult(result, client.tokenCache().serialize());