Exercise - Business critical high availability
In this exercise, you'll upgrade your database to the Business Critical tier. You'll see how it provides read replicas and increased performance.
You'll use the ostress tool you used in the previous exercise to create a workload. You'll then initiate a failover by using the Azure PowerShell module in Azure Cloud Shell. Finally, you'll view the effect the failover has on the ostress workload.
Basic high availability in the Azure SQL Business Critical service tier
In this exercise, you'll complete the following steps:
- Deploy the database from the previous exercise in the Business Critical tier.
- Run the ostress workload.
- Use PowerShell to initiate a failover.
- View the results in ostress.
- Connect to a readable secondary.
Deploy the same database in the Business Critical tier
In a previous module, you learned how to scale a database by using T-SQL. The goal of this exercise is to upgrade the database that you used in the previous exercise from General Purpose to Business Critical. You'll use the Azure Cloud Shell to upgrade the database. Because there's a limit on the frequency of failovers, you'll use the same sample database but name it AdventureWorks-bc.
In the Azure Cloud Shell terminal on the right side of this page, run the following PowerShell script to configure your environment:
$resourceGroup = "<rgn>Sandbox resource group name</rgn>"
$database = "AdventureWorks-bc"
$server = Get-AzureRmSqlServer -ResourceGroupName $resourceGroup
$server = $server.ServerName

# Specify your default resource group and Azure SQL Database logical server
az configure --defaults group=$resourceGroup sql-server=$server

# Confirm the defaults are set
az configure --list-defaults
Run this command to create a database in the Business Critical service tier:
az sql db create --name $database `
--edition BusinessCritical `
--family Gen5 `
--capacity 2 `
--sample-name AdventureWorksLT `
--read-scale Enabled `
--zone-redundant false
This command takes some time to finish. While it's running, you can review some of the parameters used:
family: This parameter specifies the generation of the hardware. To be consistent with the previous exercise, we usedGen5.capacity: This parameter specifies the number of DTUs or vCores. To be consistent with the previous exercise, we used2vCores.sample-name: To be consistent with the previous exercise, we used theAdventureWorksLTdatabase sample.edition: This parameter name is a bit misleading. It really refers to the service tier, which isn't the same as the edition that's used in SQL Server.read-scale: This option isn't enabled by default, but there's no additional cost associated with it. By enabling it, you're enabling one of your secondary replicas to be used as a readable secondary.zone-redundant: By default, this parameter is set to false. You can set it to true if you want a "Multi-Az" deployment at no additional cost. You'll learn more about Availability Zones in the next unit.Note
Availability Zones are available only in certain regions. They're not currently available in Azure SQL Managed Instance.
After the database is created, you should see detailed information about the updates in the Azure Cloud Shell output. You'll see two main categories (though you'll also see indicators under several other properties):
currentServiceObjectiveName: Should beBC_Gen5_2.BCstands for Business Critical.currentSku:name: Should beBC_Gen5.tier: Should beBusinessCritical.
Another way to check the service tier is to go to your database in the Azure portal. On the Overview tab, see the Pricing tier.
Tip
There are many other ways to view these updates. One other way is by using SSMS. If you right-click your database and select Properties > Configure SLO, you can view the changes.
Run the ostress workload
As in the previous exercise, you'll use ostress to repeatedly query your Azure SQL database.
If you closed the Command Prompt you used in the previous exercise, open a new Command Prompt window on your local computer. Use
cdto go to the directory in the repository you cloned or downloaded earlier that contains the availability module. For example, you might use this command:cd C:\Users\username\mslearn-azure-sql-fundamentals\05-AvailabilityThe ostress workload connects and runs a simple query 50,000 times.
Use the following ostress script to run the workload. Replace
serverNamewith the name of your Azure SQL Database logical server. Replacepasswordwith your password. This command is slightly different from the one in the previous exercise. The database name is nowAdventureWorks-bc..\ostress.exe -S"serverName.database.windows.net" -Q"SELECT COUNT(*) FROM SalesLT.Customer" -U"cloudadmin" -d"AdventureWorks-bc" -P"password" -n1 -r50000If your workload is running properly, you should see the result of the query,
847, repeatedly appearing in the Command Prompt window.If you want to stop running the ostress workload before it's done, you can select Ctrl+C in the terminal.
If you want to run the workload again, you can run the command again.
Initiate a failover and view the results
Configure your windows so that you can see this browser and the Command Prompt window at the same time.
Run the following code in the Azure Cloud Shell terminal. This command is the same as the one you used in the previous exercise.
# create a failover
Invoke-AzSqlDatabaseFailover -ResourceGroupName $resourceGroup `
    -ServerName $server `
    -DatabaseName $database
While this command is running, you should observe any changes that appear in the terminal. You'll notice that you can't access the database while the failover occurs. This time is very short. After you become disconnected, you should be reconnected after about 5 seconds! This failover is more than six times faster than the one in the General Purpose tier.
Remember that databases or managed instances in the Business Critical service tier essentially have an Always On availability group deployed behind the scenes, so when you fail over, all that happens is a change in pointers in the back end as Azure redirects you to one of the secondaries. That's why the failover is so much faster than it would be in General Purpose.
Connect to the read-only replica
Because you enabled the read-scale parameter, you can use one of the secondary replicas for read-only workloads. To access the read-only replica in applications, you just have to add this parameter to your connection string for a database:
ApplicationIntent=ReadOnly;
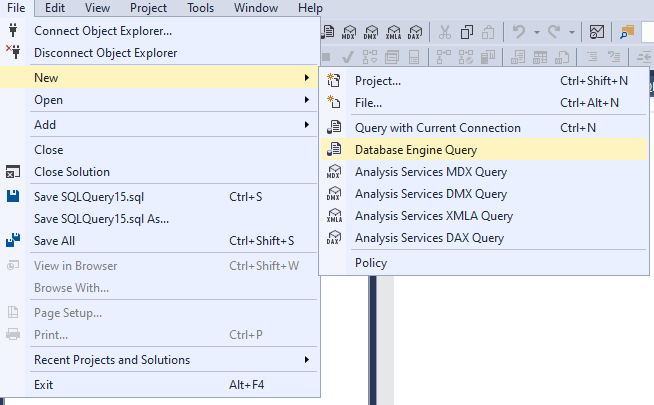
In SSMS, create a new query connection. (Select File > New > Database Engine Query.)
In the Connect to Server dialog box, use the configuration that you've been using to connect to your Azure SQL Database logical server. (That is, use SQL Server Authentication.) Select Options.
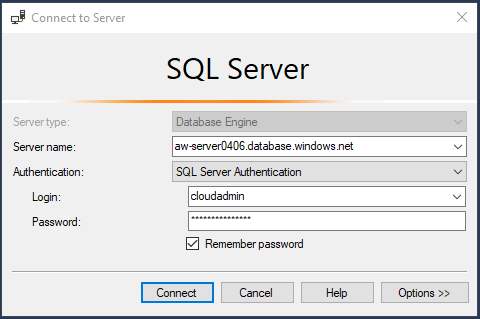
Select Connection Properties, and then select Reset All. Under Connect to database, select Browse server and then select your AdventureWorks-bc database. Select OK.
Select Additional Connection Parameters and paste the following into the text box. Select Connect.
ApplicationIntent=ReadOnly;With SSMS, you have to specify the server and database to which you want to connect read-only. That's because there might be multiple databases in a server that have different capabilities for readable secondaries.
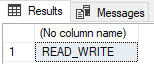
As a test, try the following query on your new database engine query. Observe the results. Are they what you'd expect?
SELECT DATABASEPROPERTYEX(DB_NAME(), 'Updateability')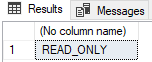
You can optionally reconnect and update the Additional Connection Parameters. (Replace
ReadOnlywithReadWrite.) Confirm that you're accessing the read/write primary replica.ReadWriteis the default, so if you don't select anything, that's what you'll get: