Deploy Azure Stack HCI
Microsoft recommends purchasing Integrated Systems built by our hardware partners and validated by Microsoft to provide the best experience running Azure Stack HCI. Integrated Systems ship with the Azure Stack HCI operating system preinstalled and they integrate validated driver and firmware updates into the deployment and management interface. You can also run Azure Stack HCI on validated nodes, which offer a basic building block for HCI clusters to give customers more hardware choices.
The following section reviews the process of deploying an Integrated System in Contoso’s proof-of-concept environment. If you use validated nodes, you must perform extra steps.
Process to Deploy Azure Stack HCI
To implement Azure Stack HCI, you should:
Set up the Azure Stack HCI hardware: After you receive an Azure Stack HCI-integrated system purchased from the Azure Stack HCI Catalog through a Microsoft hardware partner, you should set it up in your data center. The system should have the Azure Stack HCI operating system preinstalled. You also need to configure network connectivity from your internal network to the cluster.
Create the cluster: Assign computer names that match your custom naming conventions to the Azure Stack HCI operating-system instances that are running on Azure Stack HCI nodes and join them to your AD DS domain. While this typically is your existing domain, you can deploy a self-contained AD DS environment using Azure Stack HCI VMs that are dedicated to the Azure Stack HCI environment. If you do this, ensure that you:
- Avoid placing configuration and disk files of the VMs that are hosting domain controllers on clustered storage. Instead, use local, nonclustered disks with one domain controller per node.
- Deploy another domain controller on a physical server that isn't part of the Azure Stack HCI cluster.
Next, create a failover cluster using Windows Admin Center or PowerShell. Ensure that the computer on which you run Windows Admin Center is joined to the same Active Directory domain in which you'll create the cluster, or a trusted domain.
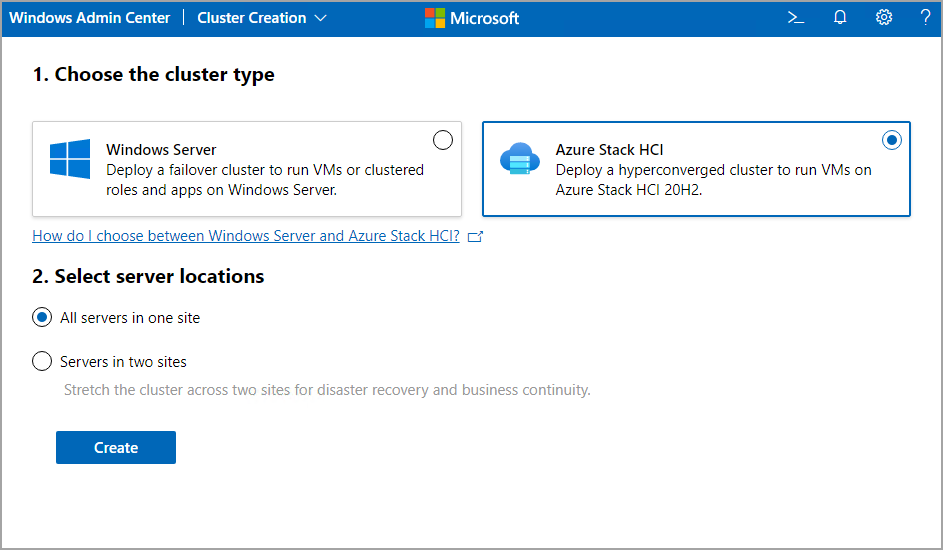
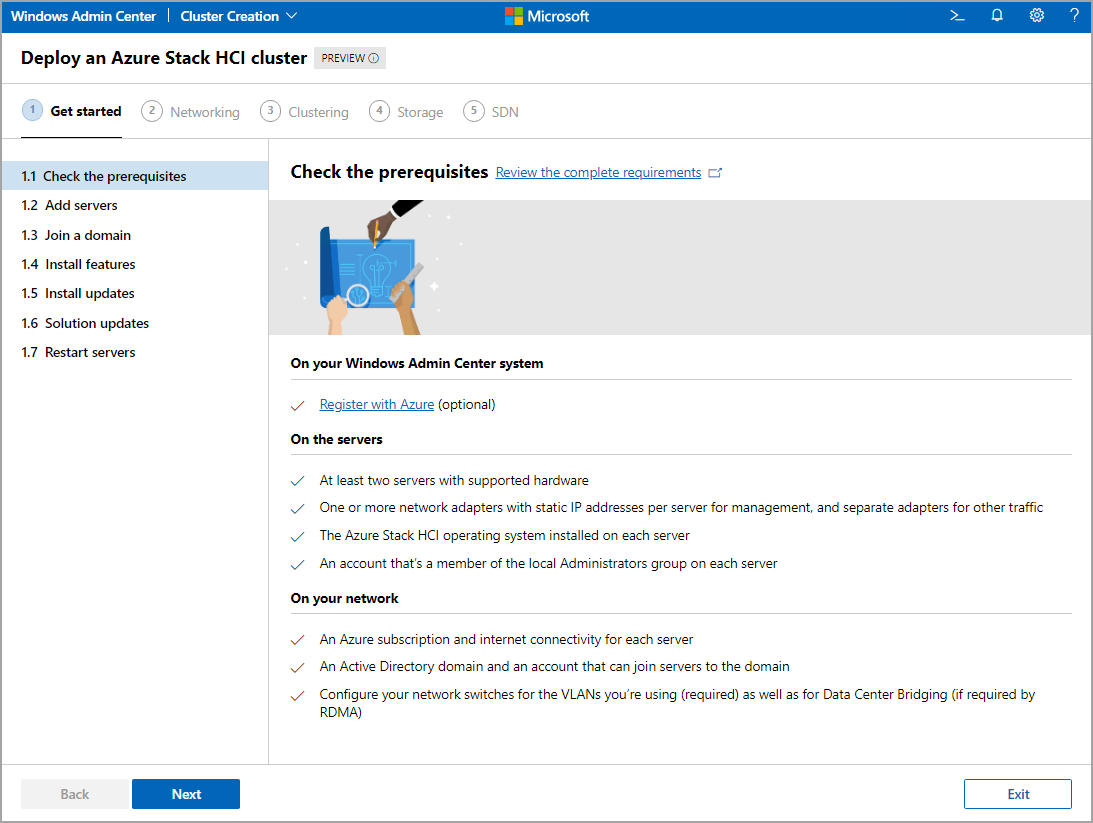
The Create Cluster wizard of the Windows Admin Center guides you through five main deployment steps:
- Get started: Gets all the servers ready for clustering, including picking servers to cluster, joining an Active Directory domain, installing required roles and features, installing updates, and restarting the servers.
- Networking: Assigns network traffic types to network adapters and then automatically deploys host networking on each server according to best practices using the Network ATC service. This process involves specifying which network adapters should carry each traffic types (storage, compute, and management), and optionally customizing the settings. Alternatively, the wizard steps you through manual configuration if you prefer or are running Azure Stack HCI, version 20H2.
- Clustering: Creates the cluster and validates it. If you’re creating a stretched cluster, this phase also sets up two sites for the cluster in Active Directory Domain Services if you haven’t already done so.
- Storage: Pools the drives in each server together into a cluster-wide storage pool (or pools if the cluster stretches across two sites) using Storage Spaces Direct.
- SDN: Installs the Network Controller component of SDN. Once the Network Controller is set up, you can then configure other SDN components such as Software Load Balancer (SLB) and RAS Gateway after the wizard finishes.
After the wizard completes, you must perform these steps to complete your initial deployment:
Set up a cluster witness: This step is highly recommended for all clusters. You can use an SMB file share outside the cluster with write-access from all cluster nodes or a blob container in an Azure Storage account, serving as an Azure Cloud Witness.
Register with Azure: Azure Stack HCI is an Azure service, and you need to register it with Azure within 30 days of installation. At the registration time, Azure Stack HCI version 21H2 integrates automatically with Azure Arc, which provides enhanced monitoring and management, including the ability for delegated users to create their own VMs (self-service) on Azure Stack HCI clusters directly from the Azure portal. This integration also simplifies provisioning of such Azure hybrid services as Azure Monitor, Azure Backup, and Azure Site Recovery.
Validate the cluster: Following the deployment, you run cluster validation tests to identify any potential hardware or configuration issues.
Configure storage: Create clustered volumes on a single-site cluster or clustered and replicated volumes in a stretched cluster.
Deploy workloads: Create VMs and deploy workloads into them. If you have deployed Network Controller component of SDN, you can configure and manage network services like microsegmentation and Quality of Service policies for your workloads on traditional VLAN networks.
Integrate with Azure services: Use Windows Admin Center to implement integration between Azure Stack HCI VM-based workloads and Azure.
If applicable, perform additional hardware vendor-specific configuration.
Optionally, with Software Defined Networking (SDN), create virtualized networks, attach VMs to those networks, configure network services like microsegmentation, quality of service policies and attach virtual appliances to VMs in your virtual networks. With Software Load Balancers, provision load balancing and Network Address Translation (NAT) capabilities for your workloads. Provide connectivity from your virtual networks to external networks using gateways.
Note
SDN implementation is not available for stretched clusters.