Deploy Bicep files by using a pipeline
Now that you've created a basic pipeline, you're ready to set up the pipeline to deploy your Bicep files. In this unit, you'll learn how to deploy Bicep code from a pipeline and how to set up the deployment steps.
Note
The commands in this unit are shown to illustrate concepts. Don't run the commands yet. You'll practice what you learn here soon.
Service connections
When you deploy a Bicep file from your own computer, you use the Azure CLI or Azure PowerShell. Before you can deploy your code, you sign in to Azure. Usually, the tools ask you to enter your email address and password in a browser. After your credentials are verified, your permissions to deploy resources are confirmed and you can use the tools to deploy your Bicep file.
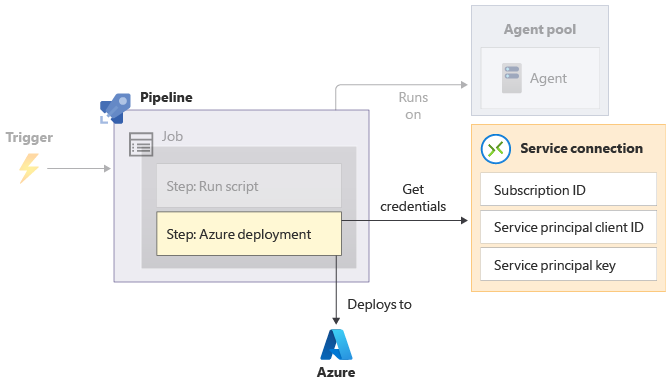
Deployment by pipeline requires authentication, too. Because pipelines run without human intervention, pipelines authenticate to Azure by using a service principal. A service principal's credentials consist of an application ID and a secret, which usually is a key or a certificate. In Azure Pipelines, you use a service connection to securely store these credentials so that your pipeline can use them. A service connection also includes some other information to help your pipeline identify the Azure environment that you want to deploy to.
Tip
In this module, you'll use Azure DevOps to automatically create a service principal when it creates a service connection. The module Authenticate your Azure deployment pipeline by using service principals provides a more detailed explanation of service principals including how they work, as well as how you create them, assign them roles, and manage them.
When you create a service connection, you name the connection. Steps refer to the service connection by using this name, so your pipeline YAML code doesn't need to contain secret information.
When your pipeline starts, the agent that's running your deployment steps has access to the service connection, including its credentials. A pipeline step uses the credentials to sign in to Azure, just like you sign in yourself. Then, the actions that are defined in the step use the service principal's identity.
You must ensure that your service principal has the permissions it needs to execute your deployment steps. For example, you might need to assign the service principal the Contributor role for the resource group it deploys your resources to.
Warning
It might seem easier to store your service principal's credentials in your YAML file, and then sign in by using the az login command. You should never use this approach to authenticate your service principal. Credentials in a YAML file are stored in clear text. Anyone who has access to your repository can see and use the credentials. Even if you restrict access to your Azure DevOps organization and project, whenever someone clones your repository, the YAML file that holds the credentials will be on that person's computer. It's important to use a service connection whenever you work with Azure from a pipeline. Service connections also provide other security and access control features.
Service connections are created in your Azure DevOps project. Multiple pipelines can share a single service connection. However, it's usually a good idea to set up a service connection and the corresponding service principal for each pipeline and each environment you deploy to. This practice helps increase the security of your pipelines, and it reduces the likelihood of accidentally deploying or configuring resources in a different environment than the one you expect.
You also can set up your service connection so that it can be used only in specific pipelines. For example, when you create a service connection that deploys to your website's production environment, it's a good idea to ensure that only your website's pipeline can use this service connection. Restricting a service connection to specific pipelines stops someone else from accidentally using the same service connection for a different project and potentially causing your production website to go down.
Deploy a Bicep file by using the Azure Resource Group Deployment task
When you need to deploy a Bicep file from a pipeline, you can use the Azure Resource Group Deployment task. Here's an example of how to configure a step to use the task:
- task: AzureResourceManagerTemplateDeployment@3
  inputs:
    connectedServiceName: 'MyServiceConnection'
    location: 'westus3'
    resourceGroupName: Example
    csmFile: deploy/main.bicep
    overrideParameters: >
        -parameterName parameterValue
The first line specifies AzureResourceManagerTemplateDeployment@3. It tells Azure Pipelines that the task you want to use for this step is named AzureResourceManagerTemplateDeployment, and you want to use version 3 of the task.
When you use the Azure Resource Group Deployment task, you specify inputs to tell the task what to do. Here are some inputs you might specify when you use the task:
connectedServiceNameis the name of the service connection to use.locationneeds to be specified even though its value might not be used. The Azure Resource Group Deployment task can also create a resource group for you, and if it does, it needs to know the Azure region in which to create the resource group. In this module, you'll specify thelocationinput value, but its value isn't used.resourceGroupNamespecifies the name of the resource group that the Bicep file should be deployed to.overrideParameterscontains any parameter values you want to pass into your Bicep file at deployment time.
When the task starts, it uses the service connection to sign in to Azure. By the time the task runs the deployment you specified, the task has authenticated. You don't need to run az login.
Run Azure CLI and Azure PowerShell commands
Two of the most useful built-in tasks in Azure Pipelines are the Azure CLI and Azure PowerShell tasks. You can use these tasks to execute one or more Azure CLI or PowerShell commands.
In future Microsoft Learn modules, you'll see how the Azure CLI command can help you to automate more parts of your deployment process from a pipeline.
Variables
Often, your pipelines contain values that you want to keep separate from your YAML file. For example, when you deploy a Bicep file to a resource group, you specify the name of the resource group. The resource group name probably is different when you deploy to different environments. You also might need to provide parameters for your Bicep files, including secrets, like database server passwords. Don't store these values in your pipeline YAML file or anywhere else in your Git repository. Instead, to increase security and to make your pipeline definitions reusable, use variables.
Create a variable
The Azure Pipelines web interface has an editor you can use to create variables for your pipeline:
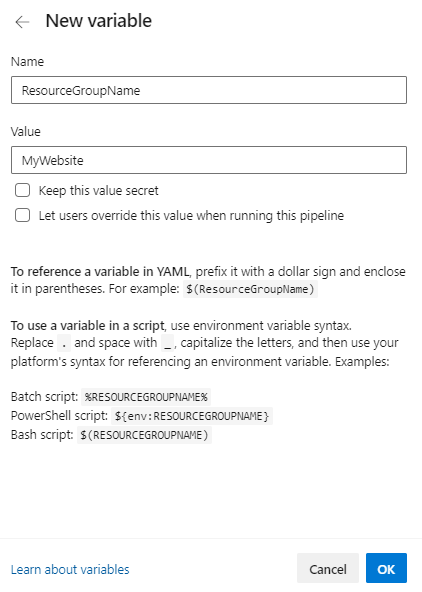
You can set an Azure Pipelines variable value as secret. When you set a variable value as secret, you can't view the value after you've set it. Azure Pipelines is designed to not reveal secret values in your pipeline logs.
Warning
By default, Azure Pipelines obfuscates secret variable values in pipeline logs, but you need to follow good practices as well. Your pipeline steps have access to all variable values, including secrets. If your pipeline includes a step that doesn't handle a secure variable securely, there's a chance the secret variable might be shown in the pipeline logs.
You can let users override a variable value when they run your pipeline manually. The value a user provides is used only for that specific pipeline run. Variable overrides can be useful when you're testing your pipeline.
Use a variable in your pipeline
After you create a variable, you'll use a specific syntax to refer to the variable in your pipeline's YAML file:
- task: AzureResourceManagerTemplateDeployment@3
  inputs:
    connectedServiceName: $(ServiceConnectionName)
    location: $(DeploymentDefaultLocation)
    resourceGroupName: $(ResourceGroupName)
    csmFile: deploy/main.bicep
    overrideParameters: >
      -environmentType $(EnvironmentType)
The pipeline definition file format includes a special $(VariableName) syntax. You can refer to any variable by using this approach, whether it's secret or not.
Tip
In the preceding example, notice that the Bicep file's name isn't stored in a variable. Just like Bicep parameters, you don't need to create variables for everything. It's a good idea to create variables for anything that might change between environments and for anything that is secret. Because the pipeline will always use the same template file, you don't need to create a variable for the path.
System variables
Azure Pipelines also uses system variables. System variables contain predefined information you might want to use in your pipeline. Here are some of the system variables you can use in your pipeline:
Build.BuildNumberis the unique identifier for your pipeline run. Despite its name, theBuild.BuildNumbervalue often is a string, and not a number. You might use this variable to name your Azure deployment so you can track the deployment back to the specific pipeline run that triggered it.Agent.BuildDirectoryis the path on your agent machine's file system where your pipeline run's files are stored. This information can be useful when you want to reference files on the build agent.
Create variables in your pipeline's YAML file
In addition to using the Azure Pipelines web interface to create variables, you can set variable values in your pipeline's YAML file. You might use this option when you have values that aren't secret, when the values can be stored in your repository, and when you want to keep variable values in one place in the file, so you can refer to them throughout the pipeline definition. You can use this approach to track changes to the variable in your version control system.
To set a variable in your YAML file, add a variables section:
trigger: none

pool:
  vmImage: ubuntu-latest

variables:
  ServiceConnectionName: 'MyServiceConnection'
  EnvironmentType: 'Test'
  ResourceGroupName: 'MyResourceGroup'
  DeploymentDefaultLocation: 'westus3'

jobs:
- job:
  steps:
  - task: AzureResourceManagerTemplateDeployment@3
    inputs:
      connectedServiceName: $(ServiceConnectionName)
      location: $(DeploymentDefaultLocation)
      resourceGroupName: $(ResourceGroupName)
      csmFile: deploy/main.bicep
      overrideParameters: >
        -environmentType $(EnvironmentType)
This pipeline example defines four variables: ServiceConnectionName, EnvironmentType, ResourceGroupName, and DeploymentDefaultLocation.
Later in this module, you'll see how you can mix variables defined in different places together in one pipeline.