Exercise - Use variable and output loops
For your toy company, you need to deploy virtual networks in each country/region where you're launching the teddy bear. Your developers have also asked you to give them the fully qualified domain names (FQDNs) of each of the regional Azure SQL logical servers you've deployed.
In this exercise, you'll add the virtual network and its configuration to your Bicep code, and you'll output the logical server FQDNs.
During the process, you'll:
- Update your Bicep code to specify a parameter for each virtual network's subnets.
- Add a variable loop to create a subnet array, which you'll use in the virtual network resource declaration.
- Add an output loop to create the list of logical server FQDNs.
- Deploy the Bicep file and verify the deployment.
Add the virtual network to your Bicep file
Open the main.bicep file.
Below the parameter declarations, add the following parameters:
@description('The IP address range for all virtual networks to use.')
param virtualNetworkAddressPrefix string = '10.10.0.0/16'

@description('The name and IP address range for each subnet in the virtual networks.')
param subnets array = [
  {
    name: 'frontend'
    ipAddressRange: '10.10.5.0/24'
  }
  {
    name: 'backend'
    ipAddressRange: '10.10.10.0/24'
  }
]
Below the parameters, add a blank line, and then add the
subnetPropertiesvariable loop:var subnetProperties = [for subnet in subnets: { name: subnet.name properties: { addressPrefix: subnet.ipAddressRange } }]At the bottom of the file, below the
databasesmodule loop, add the following resource loop:resource virtualNetworks 'Microsoft.Network/virtualNetworks@2021-08-01' = [for location in locations: { name: 'teddybear-${location}' location: location properties:{ addressSpace:{ addressPrefixes:[ virtualNetworkAddressPrefix ] } subnets: subnetProperties } }]Note
This example uses the same address space for all the virtual networks. Ordinarily, when you create multiple virtual networks, you would give them different address spaces in the event that you need to connect them together.
Save the changes to the file.
Add outputs to the database module
Open the modules/database.bicep file.
At the bottom of the file, add the following outputs:
output serverName string = sqlServer.name output location string = location output serverFullyQualifiedDomainName string = sqlServer.properties.fullyQualifiedDomainNameSave the changes to the file.
Flow the outputs through the parent Bicep file
Open the main.bicep file.
At the bottom of the file, add the following output loop:
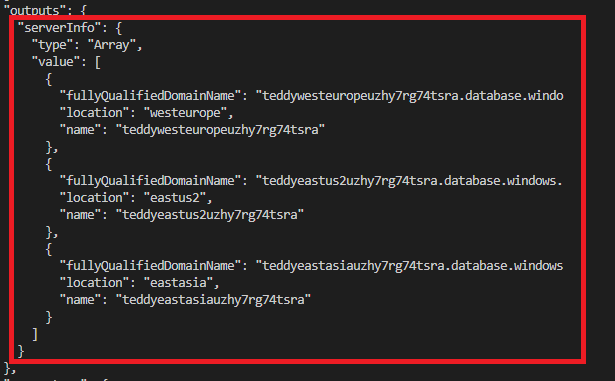
output serverInfo array = [for i in range(0, length(locations)): { name: databases[i].outputs.serverName location: databases[i].outputs.location fullyQualifiedDomainName: databases[i].outputs.serverFullyQualifiedDomainName }]Save the changes to the file.
Verify your Bicep file
After you've completed all of the preceding changes, your main.bicep file should look like this example:
@description('The Azure regions into which the resources should be deployed.')
param locations array = [
'westeurope'
'eastus2'
'eastasia'
]
@secure()
@description('The administrator login username for the SQL server.')
param sqlServerAdministratorLogin string
@secure()
@description('The administrator login password for the SQL server.')
param sqlServerAdministratorLoginPassword string
@description('The IP address range for all virtual networks to use.')
param virtualNetworkAddressPrefix string = '10.10.0.0/16'
@description('The name and IP address range for each subnet in the virtual networks.')
param subnets array = [
{
name: 'frontend'
ipAddressRange: '10.10.5.0/24'
}
{
name: 'backend'
ipAddressRange: '10.10.10.0/24'
}
]
var subnetProperties = [for subnet in subnets: {
  name: subnet.name
  properties: {
    addressPrefix: subnet.ipAddressRange
  }
}]
module databases 'modules/database.bicep' = [for location in locations: {
name: 'database-${location}'
params: {
location: location
sqlServerAdministratorLogin: sqlServerAdministratorLogin
sqlServerAdministratorLoginPassword: sqlServerAdministratorLoginPassword
}
}]
resource virtualNetworks 'Microsoft.Network/virtualNetworks@2021-08-01' = [for location in locations: {
  name: 'teddybear-${location}'
  location: location
  properties:{
    addressSpace:{
      addressPrefixes:[
        virtualNetworkAddressPrefix
      ]
    }
    subnets: subnetProperties
  }
}]
output serverInfo array = [for i in range(0, length(locations)): {
name: databases[i].outputs.serverName
location: databases[i].outputs.location
fullyQualifiedDomainName: databases[i].outputs.serverFullyQualifiedDomainName
}]
Your database.bicep file should look like this example:
@description('The Azure region into which the resources should be deployed.')
param location string
@secure()
@description('The administrator login username for the SQL server.')
param sqlServerAdministratorLogin string
@secure()
@description('The administrator login password for the SQL server.')
param sqlServerAdministratorLoginPassword string
@description('The name and tier of the SQL database SKU.')
param sqlDatabaseSku object = {
name: 'Standard'
tier: 'Standard'
}
@description('The name of the environment. This must be Development or Production.')
@allowed([
'Development'
'Production'
])
param environmentName string = 'Development'
@description('The name of the audit storage account SKU.')
param auditStorageAccountSkuName string = 'Standard_LRS'
var sqlServerName = 'teddy${location}${uniqueString(resourceGroup().id)}'
var sqlDatabaseName = 'TeddyBear'
var auditingEnabled = environmentName == 'Production'
var auditStorageAccountName = take('bearaudit${location}${uniqueString(resourceGroup().id)}', 24)
resource sqlServer 'Microsoft.Sql/servers@2021-11-01-preview' = {
name: sqlServerName
location: location
properties: {
administratorLogin: sqlServerAdministratorLogin
administratorLoginPassword: sqlServerAdministratorLoginPassword
}
}
resource sqlDatabase 'Microsoft.Sql/servers/databases@2021-11-01-preview' = {
parent: sqlServer
name: sqlDatabaseName
location: location
sku: sqlDatabaseSku
}
resource auditStorageAccount 'Microsoft.Storage/storageAccounts@2021-09-01' = if (auditingEnabled) {
name: auditStorageAccountName
location: location
sku: {
name: auditStorageAccountSkuName
}
kind: 'StorageV2'
}
resource sqlServerAudit 'Microsoft.Sql/servers/auditingSettings@2021-11-01-preview' = if (auditingEnabled) {
parent: sqlServer
name: 'default'
properties: {
state: 'Enabled'
storageEndpoint: environmentName == 'Production' ? auditStorageAccount.properties.primaryEndpoints.blob : ''
storageAccountAccessKey: environmentName == 'Production' ? listKeys(auditStorageAccount.id, auditStorageAccount.apiVersion).keys[0].value : ''
}
}
output serverName string = sqlServer.name
output location string = location
output serverFullyQualifiedDomainName string = sqlServer.properties.fullyQualifiedDomainName
If they don't, either copy the examples or adjust your templates to match the examples.
Deploy the Bicep template to Azure
In the Visual Studio Code terminal, deploy the Bicep template to Azure by running the following code. This process can take a couple of minutes to finish, and then you'll have a successful deployment.
az deployment group create --template-file main.bicep
In the Visual Studio Code terminal, deploy the Bicep template to Azure by running the following Azure PowerShell command. This process can take a couple of minutes to finish, and then you'll have a successful deployment.
New-AzResourceGroupDeployment -TemplateFile main.bicep
Caution
Be sure to use the same login and password that you used previously, or the deployment won't finish successfully.
Wait for the deployment to finish.
Verify the deployment
After the deployment is finished, you want to verify that new virtual networks are deployed and that they have subnets configured as you expect.
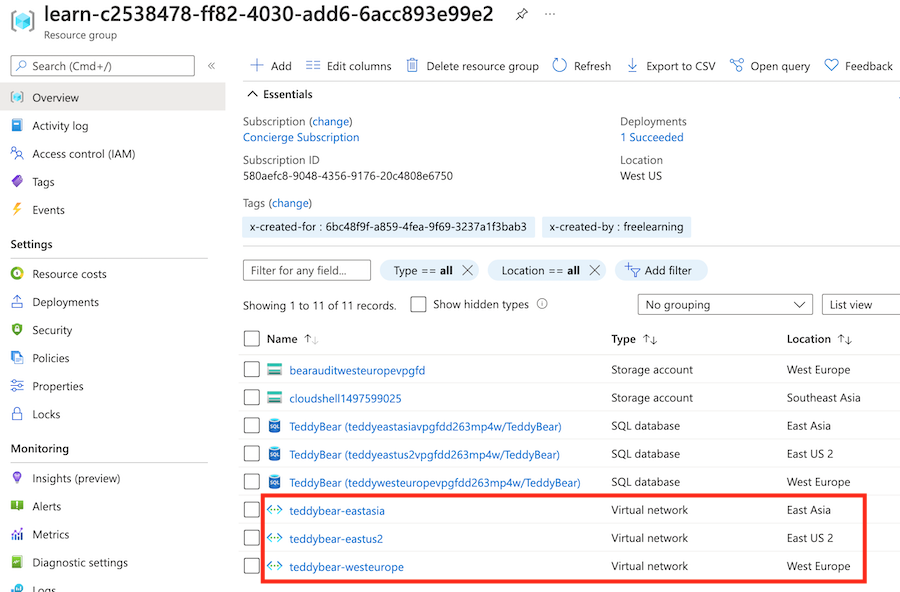
Go to the Azure portal and make sure that you're in the sandbox subscription.
Select
[sandbox resource group name] .Verify that the virtual networks have been deployed to the three Azure locations.
Select the virtual network named
teddybear-eastasia.In the search bar, enter Subnets. Under Settings, select Subnets.

Verify that the deployed subnets have the names and IP addresses that were specified in the
subnetsparameter's default value.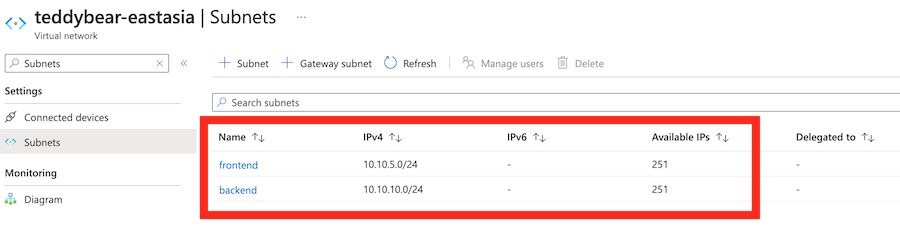
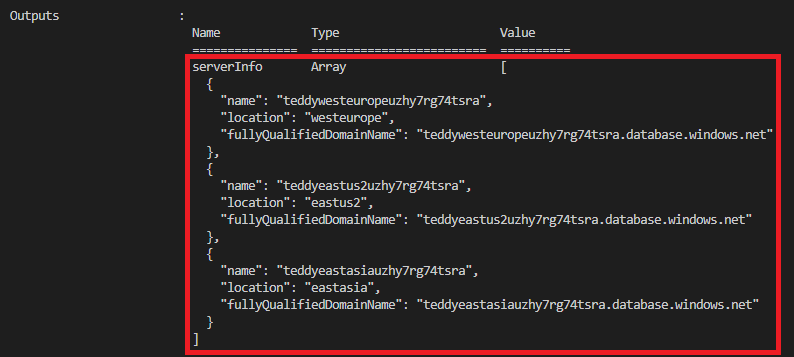
Check the output of the deployment command. It should include the name and FQDN of all three of the logical servers that were deployed, as shown here:
Go to the Azure portal and make sure that you're in the sandbox subscription.
Select
[sandbox resource group name] .Verify that the virtual networks have been deployed to the three Azure locations.
Select the virtual network named
teddybear-eastasia.In the search bar, enter Subnets. Under Settings, select Subnets.
Verify that the deployed subnets have the names and IP addresses that were specified in the
subnetsparameter's default value.
Check the output of the deployment command. It should include the name and FQDN of all three of the logical servers that were deployed, as shown here: