Exercise - Write a function app in Azure Functions to analyze photos
In this unit, you'll use Azure Functions to write an app that's triggered each time an image is uploaded to the photos container in your storage account. The function app will use the Custom Vision model you created to determine whether the photo contains a polar bear.
Create a function app in Azure
You can write a function app in Azure Functions in the Azure portal or externally by using tools like Visual Studio. In this exercise, you'll write a function app in the portal. You'll use JavaScript to write the function app, and you'll run the function app by using the Azure Functions Node.js runtime. The function app is triggered each time an image is uploaded to the photos container you created in Blob Storage. Then, the function app passes each blob that's uploaded to Custom Vision to be analyzed for polar bears.
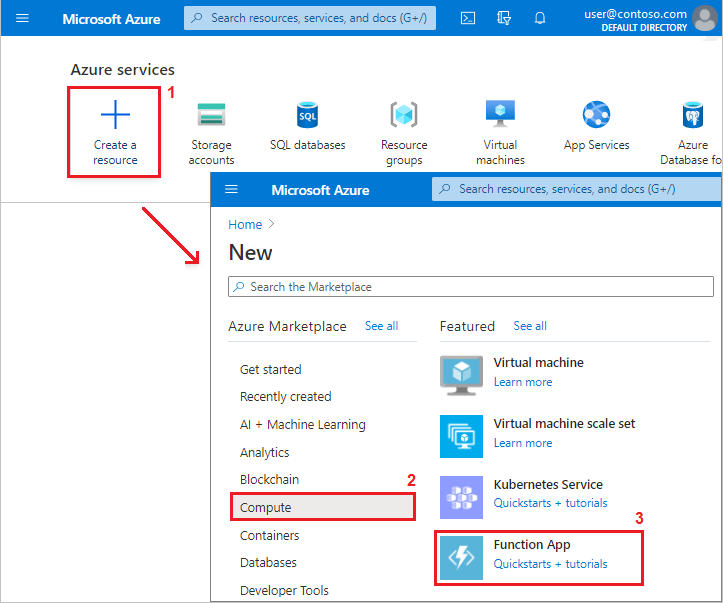
In your browser, return to the Azure portal. In Azure services, select Create a resource. In the resource menu, select Compute, and then select Function App.
Create a new function app in Azure
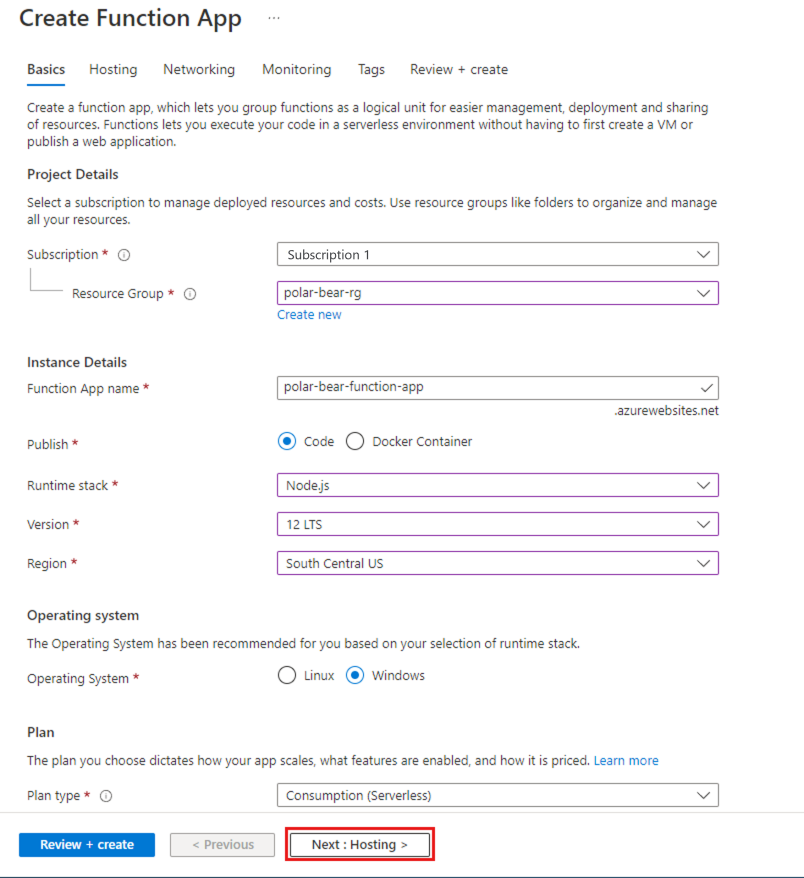
In Create Function App, on the Basics tab, enter, or select the following values:
- Subscription: Select the subscription you want to use.
- Resource Group: Select polar-bear-rg.
- Function App name: Enter a name that's unique in Azure for your new app.
- Publish: Leave Code selected.
- Runtime stack: Select Node.js.
- Region: Select South Central US.
- Operating System: Select your system.
- Plan Type: Select Consumption (Serverless).
- Select Next : Hosting.
Configure the basic settings for a new function app
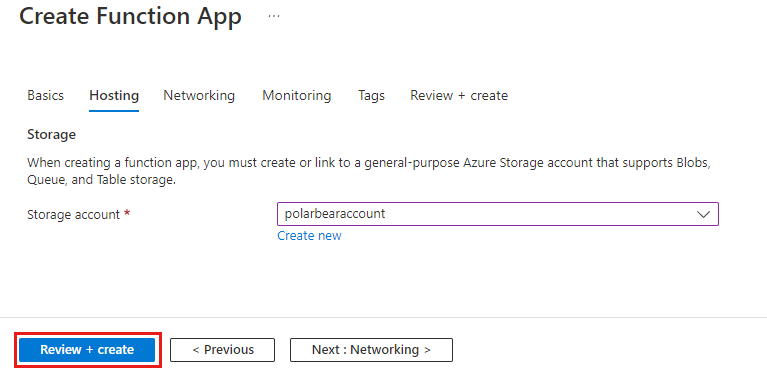
On the Hosting tab, select the storage account you created to upload wildlife photos to. Then select Review + create.
Configure the hosting settings for a new function app
Wait for validation to finish, and then select Create.
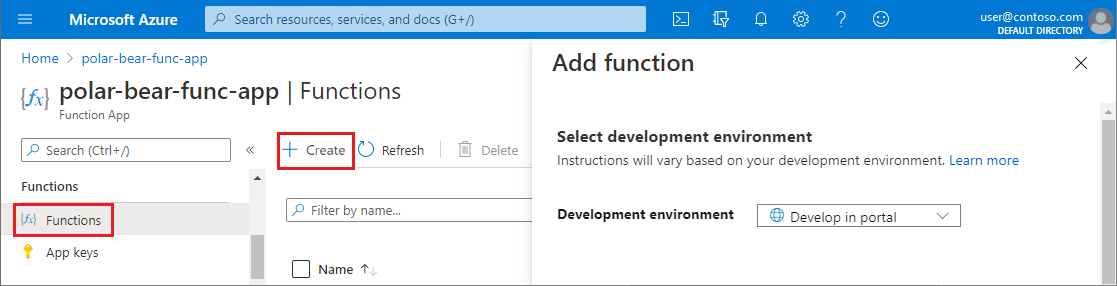
Wait for the function app to deploy, and then open the app in the Azure portal. In the resource menu, under Functions, select Functions, and then select Create.
Add a function
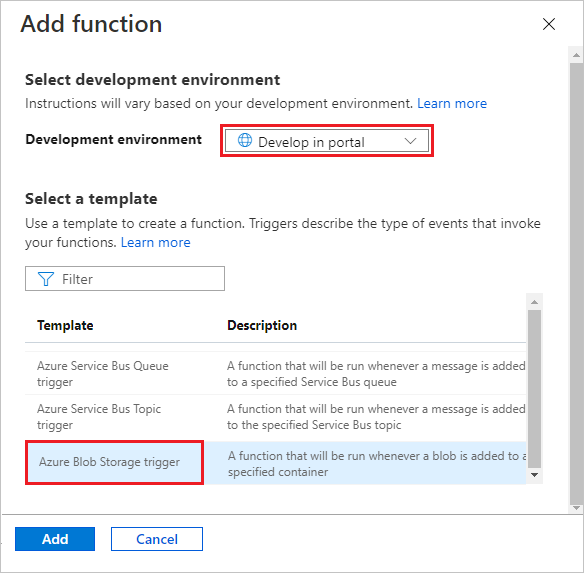
In Add function:
- For Development environment, select Develop in portal.
- Under Template, select Azure Blob Storage trigger.
Configure the settings and choose a template for a function
Note
If you're prompted to install the
Microsoft.Azure.WebJobs.Extensions.Storageextension, select Install.Wait for the installation to finish, and then select Continue.
(If you're not prompted to install the extension, you might have to wait a few minutes before you can proceed to the next step.)
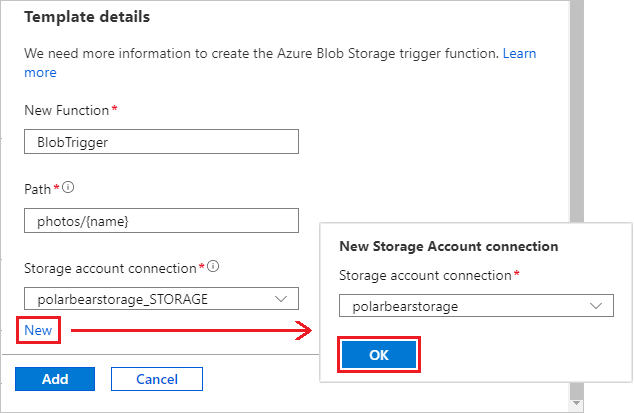
In Template details:
For New Function, enter BlobTrigger.
For Path, enter photos/{name} so that the function app triggers when blobs are uploaded to the
photoscontainer.Under Storage account connection, select New.
Note
Copy and then save the value that's shown in Storage account connection. You'll use the value in a later step.
In New Storage Account connection, select the storage account you created earlier, and then select OK.
Configure the template to create a blob-triggered function
Select Add. The portal view changes to show the new app.
On the overview page for the new trigger function, under Developer, select Code + Test. The index.js file for the trigger opens in the portal.

Open the index.js file for the trigger function
Copy the following code and replace the function app code in the Azure portal with the code:
module.exports = function (context, myBlob) {
    var predictionUrl = process.env.PREDICTION_URL;
    var predictionKey = process.env.PREDICTION_KEY;
    var storageConnectionString = process.env.<CONNECTION_STRING_NAME>;

    var storage = require('azure-storage');
    var blobService = storage.createBlobService(storageConnectionString);
    var blobName = context.bindingData.name;
    var blobUri = context.bindingData.uri;

    // Read the blob's metadata
    blobService.getBlobMetadata('photos', blobName, (err, result, response) => {
        if (!err) {
            var latitude = result.metadata.latitude;
            var longitude = result.metadata.longitude;
            var id = result.metadata.id;

            // Generate a shared access signature for the Custom Vision service
            var now = new Date();
            var expiry = new Date(now).setMinutes(now.getMinutes() + 3);

            var policy = {
                AccessPolicy: {
                    Permissions: storage.BlobUtilities.SharedAccessPermissions.READ,
                    Start: now,
                    Expiry: expiry
                },
            };

            var sas = blobService.generateSharedAccessSignature('photos', blobName, policy);

            // Pass the blob URL to the Custom Vision service
            var request = require('request');

            var options = {
                url: predictionUrl,
                method: 'POST',
                headers: {
                    'Prediction-Key': predictionKey
                },
                body: {
                    'Url': blobUri + '?' + sas
                },
                json: true
            };

            request(options, (err, result, body) => {
                if (!err) {
                    var probability =  body.predictions.find(p => p.tagName.toLowerCase() === 'polar-bear').probability;
                    var isPolarBear = probability > 0.8; // 80% threshold
                     if (isPolarBear) {
                        context.log('POLAR BEAR detected by ' + id + ' at ' + latitude + ', ' + longitude);
                    }
                    else {
                        context.log('Other wildlife detected by ' + id + ' at ' + latitude + ', ' + longitude);
                    }

                    context.done();
                }
                else {
                    context.log(err);
                    context.done();
                }
            });
        }
        else {
            context.log(err);
            context.done();
        }
    });
};
The modified function app uses the npm request module to call the Custom Vision service, passing the URL of the image to be analyzed. It parses the JSON results and retrieves the value that indicates the probability that the image contains a polar bear. Then, it writes the results to the output log. The threshold for determining whether an image contains a polar bear is 80 percent:
var isPolarBear = probability > 0.8; // 80% thresholdAnother notable aspect of this code is its use of a shared access signature.
The
photoscontainer that you created is private. To access the blobs stored there, you must have access to the storage account or have the storage account's access key. A shared access signature allows other users and services to access individual blobs, but only for a specified length of time and optionally with read-only access.The code that you pasted into the portal uses the Azure Storage SDK for Node.js (azure-storage) to generate a read-only shared access signature for the blob associated with the URL that's passed to Custom Vision. The code appends the shared access signature to the blob URL as a query string. The shared access signature is valid for 3 minutes and it allows read access only. Your code can submit private blobs to Custom Vision for analysis without putting the blobs in a public container, in which anyone could download them.
Replace
<CONNECTION_STRING_NAME>on line 4 with the storage account connection string that you saved earlier (for example,polarbearstorage_STORAGE). This connection string was added to the application settings when you added theBlobTriggerfunction to the function app. Its name derives from the storage account name. If needed, you can look up the storage account connection string in the Application settings of the function app.After you add your storage account connection string, select Save to finish making changes to the index.js file. When the file is saved, the function's output log opens at the bottom of the page.
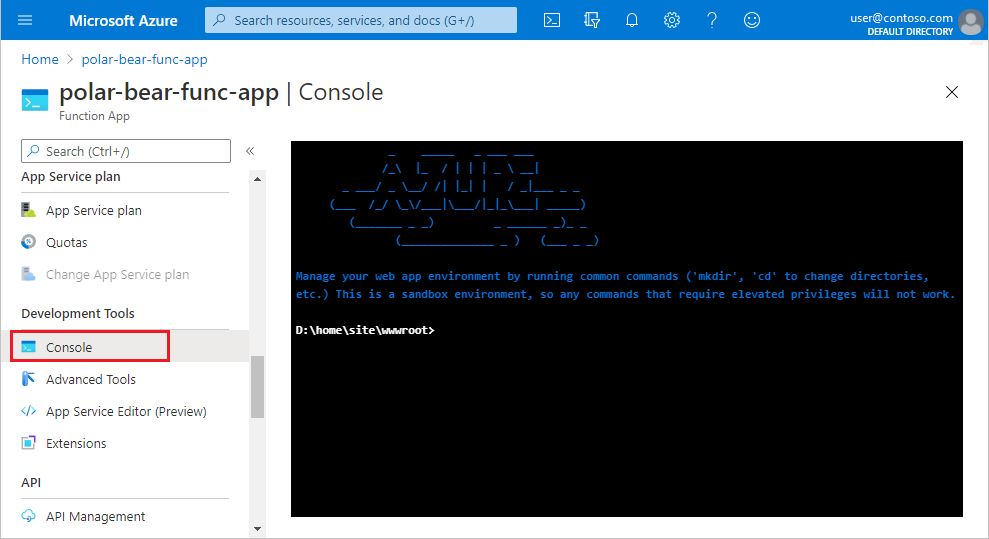
In the Azure portal, open a console.
- On the function app overview page, in the resource menu, under Development Tools, select Console.
Open a function app console
In the console, run the following commands to install the npm request package and the Azure Storage SDK for Node.js, so your function app can use them.
npm install request
npm install azure-storage
Note
Ignore any warning messages that appear. For simplicity, we're using an older version of a JavaScript library.
Wait for the installation commands to finish. Then, you'll add two application settings to the function app.
- In the resource menu, under Settings, select Configuration.
- In Application settings, select New application setting.
- In Add/Edit application setting, add a setting named PREDICTION_URL. Set the value to the Custom Vision prediction URL that you saved in the preceding unit. Leave Deployment slot setting cleared. Select OK.
- Repeat the preceding step to add a setting named PREDICTION_KEY. Set the value to the Custom Vision prediction key that you saved in the preceding unit. Leave the Deployment slot setting cleared. Select OK.
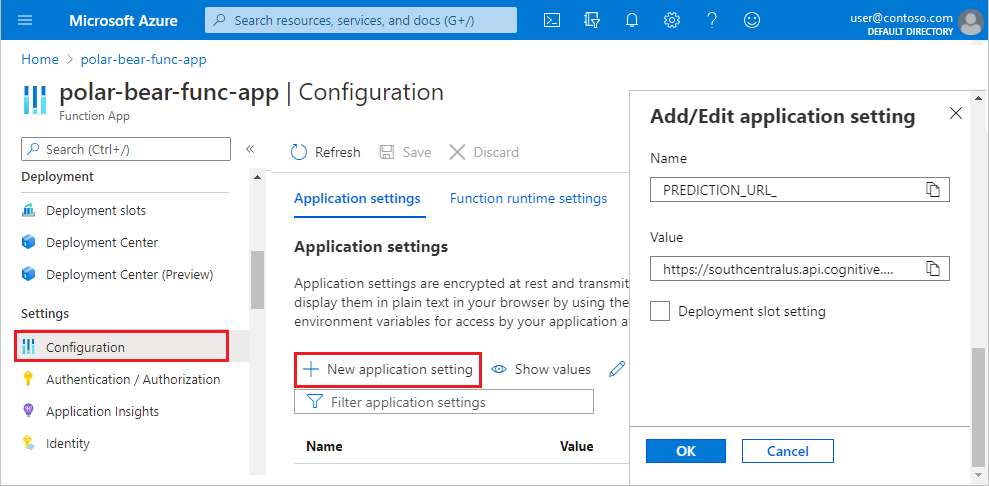
Configure the application settings for the function app
To finish, select Save. If you're prompted, select Continue to finish the save action.
Note
Instead of hard-coding the Custom Vision URL and authentication key in the function app code, you're storing the values in the function app's application settings. The values are more secure when they're saved in the application settings.
To return to your
BlobTriggerfunction app, in the resource menu, under Functions, select Functions, and then select BlobTrigger:
Open the BlobTrigger function app
In the resource menu, under Developer, select Code + Test. Below the code that's shown, select the Logs up arrow. The log output pane opens.
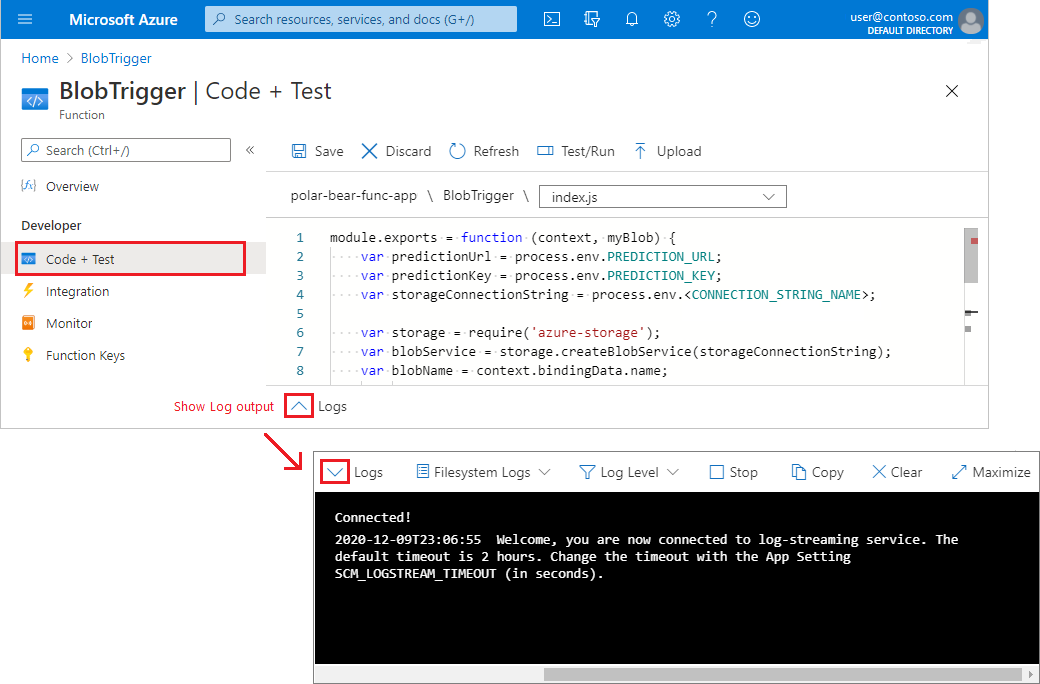
Open the function's output log
Keep the Logs pane open because we'll use it in a later step.
To open the
photosBlob Storage container, in the resource menu, under Data storage, select Containers. In the list of containers, select thephotoscontainer.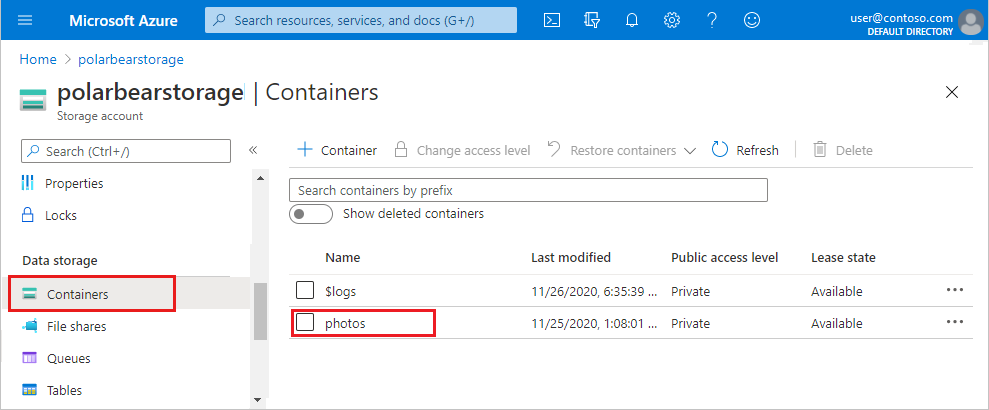
Open the photos container for your Blob Storage account
Next, upload an image to the photos container to try out your function app.
- In the
photoscontainer pane, select Upload. - In Upload blob, under Files, select the folder icon.
- In Windows Explorer, go to the photos folder in your project directory.
- Select the image_12.jpg file, and select Open.
- In Upload blob, select Upload. When the upload is finished, select X to close the pane.
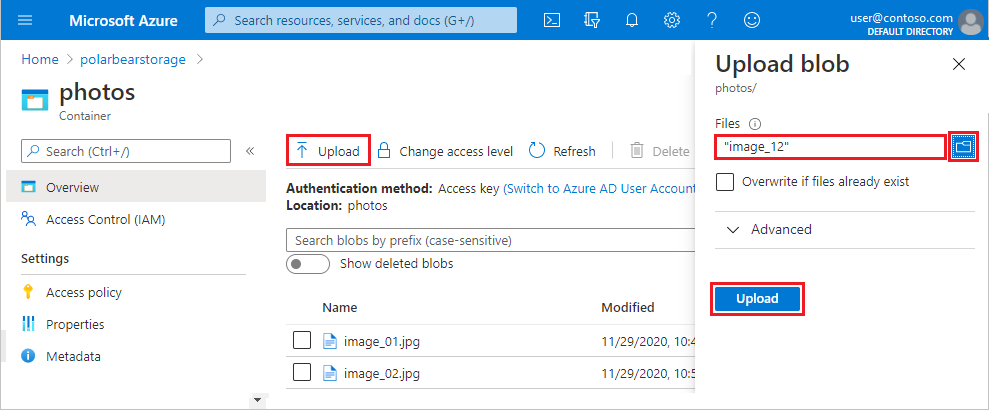
Upload a photo to the container
Here's what image_12.jpg looks like:

Image 12 in Blob Storage
- In the
In your browser, return to the function app log. Confirm that the function app executed, and that Custom Vision indicates that image_12.jpg contains a polar bear.
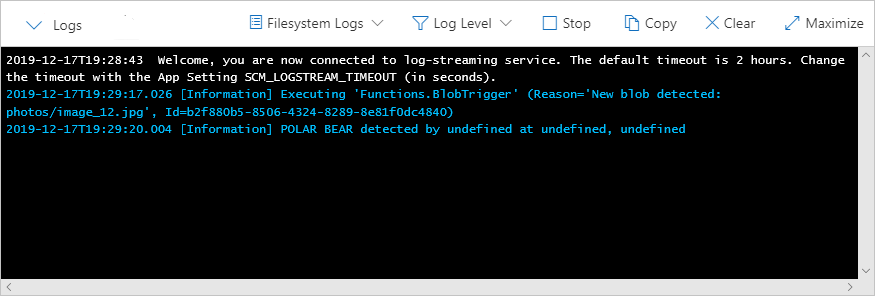
View the output log details for uploading and analyzing image 12
The text undefined at undefined, undefined appears in the log output because the function attempted to read the latitude, longitude, and camera ID from blob metadata and include them in the output. Those metadata values don't exist because you uploaded the blob manually. That condition will change when your virtual cameras upload photos to Blob Storage.
Run the camera array
Next, run the simulated camera array you created earlier. Then, you'll check the log output from the function app to verify that images are being uploaded to Blob Storage and analyzed for polar bears.
In a Command Prompt or terminal window, return to the project directory. Run the following code to run run.js:
node run.jsIn the Azure portal, return to the
BlobTriggerfunction and watch the output log for a minute or two. Confirm that the function is being triggered and that it's calling Custom Vision to determine whether each photo uploaded to thephotoscontainer contains a polar bear.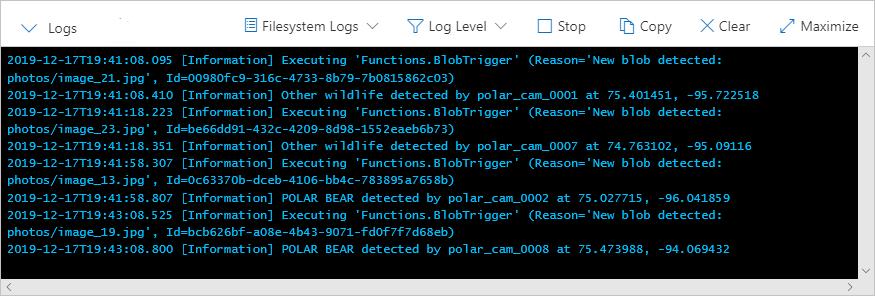
There be polar bears!
Return to the Command Prompt or terminal window in which run.js is running, and select Ctrl+C.
Congratulations! You've built a system that transmits wildlife photos to Blob Storage and uses an Azure AI Custom Vision model to determine which photos contain polar bears. The next step is to make the output more visual, and that starts with creating a SQL database by using Azure SQL Database.