Exercise - Deploy a SQL database in Azure SQL Database
In the last unit, you wrote a function app in Azure that passes each photo that's uploaded to a blob container to the Custom Vision service to determine whether the photo contains a polar bear. The only output from the function app was a log output that shows the verdict that was rendered by the Custom Vision service, and the ID and location of the camera that captured the photo.
Now, you'll use Azure SQL Database to create a SQL database and modify the function app to write to the database. The SQL Database sets the stage for visualizing polar bear sightings in Power BI, which draws information from the database.
Create a SQL database
Let's begin by using Azure Cloud Shell to create a SQL database in Azure SQL Database. The database collects output from the function app you deployed. Later, you'll connect the SQL Database to Power BI to show where cameras are capturing photos of polar bears.
In a browser, go to the Azure portal. In the global controls, select Azure Cloud Shell.

Open Azure Cloud Shell
You also can open Cloud Shell by going to https://shell.azure.com in a separate browser window.
Run the following code to create values for the SQL Database server, the admin username, the admin password, and the database name. Replace
<server-name>,<admin-username>,<admin-password>, and<database-name>in the code example with your own values.Keep in mind the following constraints when you choose the values:
SERVER_NAMEmust be unique in Azure. The server name can use only lowercase letters, numbers, and hyphens. The first character and the last character in the name can't be a hyphen.ADMIN_USERNAMEcan't be a name that's reserved in SQL Server, such asadminorsa. You can use the nameadminuser.ADMIN_PASSWORDmust be at least eight characters in length.
SERVER_NAME="<server-name>"
ADMIN_USERNAME="<admin-username>"
ADMIN_PASSWORD="<admin-password>"
DATABASE_NAME="<database-name>"
Note
Copy and save the admin username and password values to use later.
In Cloud Shell, run the following command to create a SQL database server in the
polar-bear-rgresource group. To paste commands in Cloud Shell, you can select Shift+Insert.az sql server create --name $SERVER_NAME --resource-group polar-bear-rg --location southcentralus --admin-user $ADMIN_USERNAME --admin-password $ADMIN_PASSWORDCreate a SQL database that's assigned to the S0 service tier.
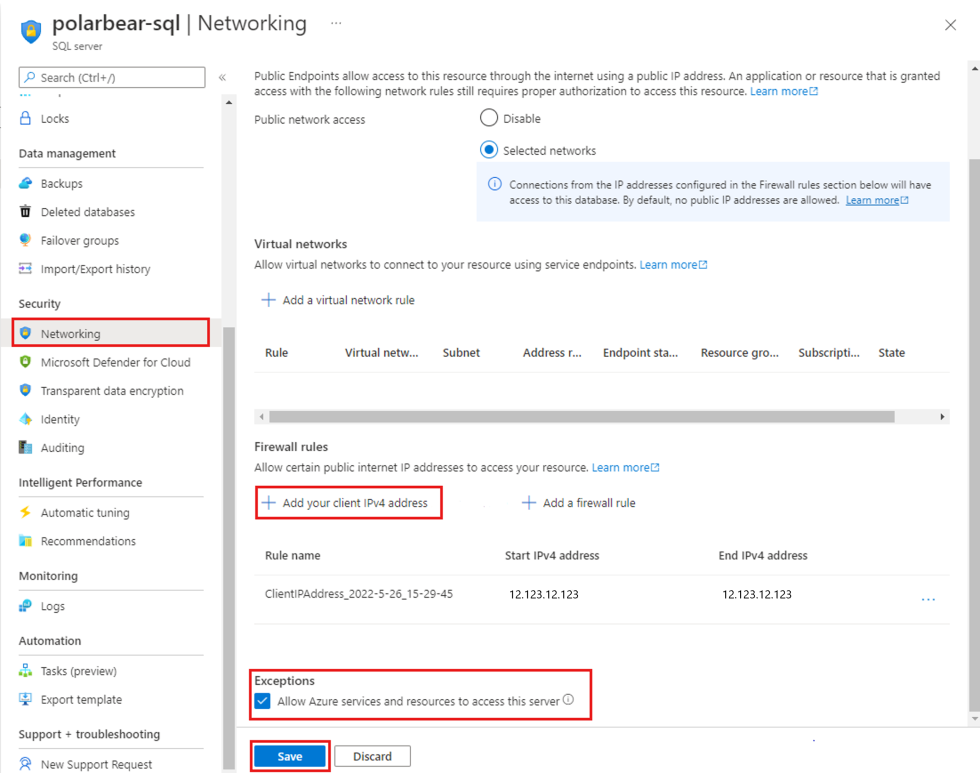
az sql db create --resource-group polar-bear-rg --server $SERVER_NAME --name $DATABASE_NAME --service-objective S0In the Azure portal, open your new SQL Database server. Then, in the resource menu, under Security, select Networking:
- So you can connect to the database from Power BI Desktop later, select Add your client IPv4 address.
- Select the checkbox Allow Azure services and resources to access this server.
- Select Save. If prompted, select OK.
Configure the SQL database server
Next, open the database. Then, in the resource menu, select Query editor, and enter the admin username and password you set in step 2. Select OK.
Copy the following code and paste it in the query window. Then, to create a SQL database table, select Run to run the code.
CREATE TABLE [dbo].[PolarBears]
(
    [Id] [uniqueidentifier] NOT NULL,
    [CameraId] [nvarchar](16) NULL,
    [Latitude] [real] NULL,
    [Longitude] [real] NULL,
    [Url] [varchar](max) NULL,
    [Timestamp] [datetime] NULL,
    [IsPolarBear] [bit] NULL,
    PRIMARY KEY CLUSTERED ([Id] ASC)
    WITH (STATISTICS_NORECOMPUTE = OFF, IGNORE_DUP_KEY = OFF) ON [PRIMARY]
)
ON [PRIMARY] TEXTIMAGE_ON [PRIMARY]
GO

ALTER TABLE [dbo].[PolarBears] ADD DEFAULT (newid()) FOR [Id]
GO

ALTER TABLE [dbo].[PolarBears] ADD DEFAULT (getdate()) FOR [Timestamp]
GO

ALTER TABLE [dbo].[PolarBears] ADD DEFAULT ((0)) FOR [IsPolarBear]
GO
Select the Tables folder to check that the
dbo.PolarBearstable was created and that it has the following schema: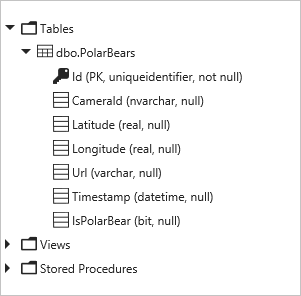
The dbo.PolarBears table
In the table, the
IsPolarBearcolumn is set to1or0to indicate whether the image in a row contains a polar bear. A value of1(True) means that the image shows a polar bear.
Modify the function app
The next step is to modify the function app you created to write output to the SQL Database.
In the Azure portal, go to your function app. In the resource menu, under Development Tools, select Console.
- In the function app console, run the following code to install the npm tedious package. You can ignore any warning messages. The
tediouspackage provides an API that Node.js apps use to talk to SQL Server and Azure SQL Database.
npm install tedious- In the function app console, run the following code to install the npm tedious package. You can ignore any warning messages. The
In the resource menu, select Functions and go to your
BlobTriggerfunction. Select Code + Test.In line 5 of the function, add the following code. Replace
DATABASE_SERVER_NAMEwith the name you assigned to the database server, and replaceDATABASE_NAMEwith the database name.var databaseUserName = process.env.DATABASE_USER_NAME; var databasePassword = process.env.DATABASE_PASSWORD; var databaseServer = 'DATABASE_SERVER_NAME.database.windows.net'; var databaseName = 'DATABASE_NAME';Note
In the code, don't replace the
DATABASE_USER_NAMEorDATABASE_PASSWORDplaceholders with other values. You'll create values for these placeholders in a later step.Near the end of the function, find the following statements:
        if (isPolarBear) {
            context.log('POLAR BEAR detected by ' + id + ' at ' + latitude + ', ' + longitude);
        }
        else {
            context.log('Other wildlife detected by ' + id + ' at ' + latitude + ', ' + longitude);
        }

        context.done();
    }
    else {
        context.log(err);
        context.done();
Replace the statements with the following code. Adjust the code indentation as needed.
// Update the database
var Connection = require('tedious').Connection;
var Request = require('tedious').Request;

var config =
{
    authentication:
    {
        type: 'default',
        options:
        {
            userName: databaseUserName,
            password: databasePassword
        }
    },
    server: databaseServer,
    options:
    {
        database: databaseName,
        encrypt: true
    }
};

var dbConnection = new Connection(config);

dbConnection.on('connect', err => {
    if (!err) {
        var query = "INSERT INTO dbo.PolarBears (CameraId, Latitude, Longitude, URL, Timestamp, IsPolarBear) " +
            "VALUES ('" + id + "', " + latitude + ", " + longitude + ", '" + blobUri + "', GETDATE(), " + (isPolarBear ? "1" : "0") + ")";

        var dbRequest = new Request(query, err => {
            // Called when request completes, with or without error
            if (err) {
                context.log(err);
            }

            dbConnection.close();
            context.done();
        });

        dbConnection.execSql(dbRequest);
    }
    else {
        context.log('DBConnection failed ' + err);
        context.done();
    }
    });
    context.log('dbConnection.connect()');
    dbConnection.connect();
    context.log('after dbConnection.connect()');
These statements connect to the database and execute an
INSERTcommand to record the latest polar bear sighting. The row added to the database includes the ID, latitude, and longitude of the camera that took the photograph, the URL of the blob that contains the photograph, the current date and time, and anIsPolarBearvalue that indicates whether the photograph contains a polar bear.Select Save.
In the portal, return to your function app overview page. Add two application settings to the function app:
- In the resource menu, select Settings, and then select Configuration.
- Select Application settings, and then select New application setting.
- In Add/Edit application setting, add a setting named
DATABASE_USER_NAME. Set the value to the admin name you specified when you created the database server. Select OK. - Repeat the preceding step to add a setting named
DATABASE_PASSWORD. Set the value to the password you specified when you created the database server. Select OK. - Select Save. If you're prompted, select Continue.
In a Command Prompt or terminal window, return to the project directory. Then, run run.js.
node run.jsLet run.js run for a couple minutes. Then, return to the database in the portal. In the query editor, run this code:
SELECT * FROM dbo.PolarBearsCheck that the table contains a few rows that represent images that were submitted to Custom Vision for analysis. Look at the
IsPolarBearcolumn in each row. How many images that were analyzed contain a polar bear?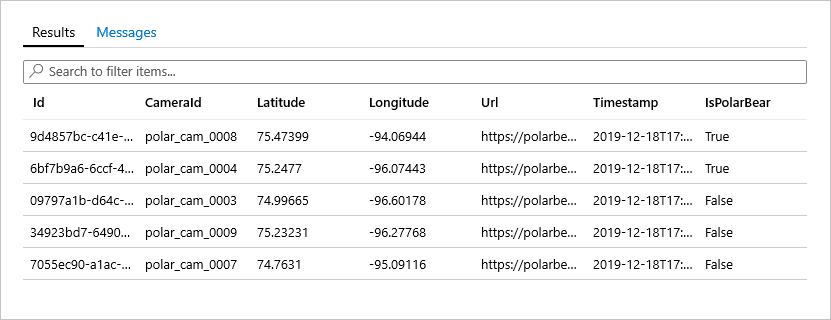
Rows written to the database by the function app
Return to the Command Prompt or terminal window, and select Ctrl+C to stop run.js.
Next, you'll use Power BI to produce a more compelling graphical visualization of the data.