Exercise - Create a Node.js app in Visual Studio Code
In this unit, use Visual Studio Code to build and run a Node.js application against the Azure sandbox containing your resources.
- Install npm packages that enable you to programmatically work with your Cosmos DB Core (SQL) database.
- Write JavaScript code that uploads the Contoso products dataset to a container.
Note
This exercise assumes that you've already installed Node.js and npm on your desktop computer and started your Learn sandbox and connected to it in Visual Studio Code.
Create Node.js project
Use a terminal at a folder location where you want your Node.js application. Enter the following command to open Visual Studio Code at the location.
code .On the Terminal menu, select New Terminal, or use keyboard shortcut, Ctrl + Shift + `.
In the Terminal window, run the following command to create a new folder named contoso-retail for the Node application and change into that folder.
mkdir contoso-retail && cd contoso-retailEnter the following commands to move to initialize a new Node application.
npm init -yThe npm init command creates a package.json file and displays its contents. This file contains the initial metadata for the application, containing a default name, description, and entry point.
On the File menu in Visual Studio Code, select Open folder, and then open the contoso-retail folder.
In the Explorer window, select the package.json file.
In the editor pane, change the following for the package.json file:
Property Value type module- the module's JavaScript code uses ES6 syntaxThe file should look like this. The sample code uses ES6 syntax so you need to set the type of the application to module.
{
    "name": "contoso-retail",
    "version": "1.0.0",
    "description": "Student and course grades maintenance",
    "main": "index.js",
    "type": "module",
    "scripts": {
        "test": "echo \"Error: no test specified\" && exit 1"
    },
    "keywords": [],
    "author": "",
    "license": "MIT"
}
On the File menu, select Save.
Configure Visual Studio Code to autosave file changes
- Turn autosave on using File > Preferences > Settings, Ctrl + ,.
- Search for files auto save.
- Select afterDelay of 1000.
Create .gitignore file
The .gitignore file prevents you from checking in files to source control that shouldn't be added.
Create a file, Ctrl + N, named .gitignore and add the following to it.
node_modules
.env
Create secrets environment file
In Visual Studio Code, on the File menu, select New Text File.
On the File menu, select Save As. Save the new file with the name
.env.Add the following variables to the file:
COSMOS_CONNECTION_STRING=
COSMOS_DATABASE_NAME=ContosoRetail
COSMOS_CONTAINER_NAME=Products
COSMOS_CONTAINER_PARTITION_KEY=categoryName
From the Azure explorer, Shift + Alt + A, select your subscription, then the Azure Cosmos DB node to see the resources.
Right-click on your Cosmos DB account and select Copy connection string.
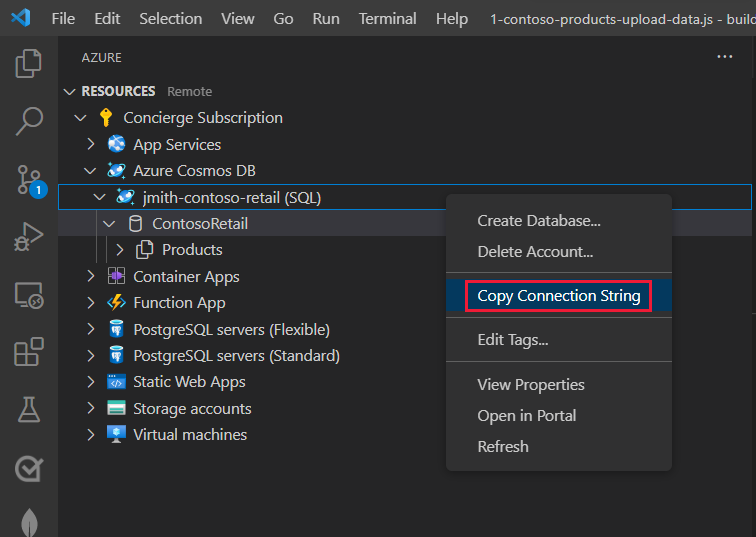
Paste the connection string into the
.envfile for the COSMOS_CONNECTION_STRING variable.
Install the Cosmos DB package
At the integrated terminal, add the Cosmos DB SDK.
npm install @azure/cosmosAt the integrated terminal, add the npm package to use the
.envfile for environment variables. This package reads the.envfile and adds those values into theprocess.envruntime object.npm install dotenv
Product shape
Understanding the JSON in the document helps you understand the input for the operations and the responses.
The products in this dataset have the following shape:
{
      "id": "FEEFEE3B-6CB9-4A75-B896-5182531F661B",
      "categoryId": "AE48F0AA-4F65-4734-A4CF-D48B8F82267F",
      "categoryName": "Bikes, Road Bikes",
      "sku": "BK-R19B-52",
      "name": "Road-750 Black, 52",
      "description": "The product called \"Road-750 Black, 52\"",
      "price": 539.99,
      "tags": [
        { "id": "461ADE06-0903-4BAF-97AB-CC713E5B1DD4", "name": "Tag-174" },
        ...
      ],
      "inventory": [
        { "location": "Dallas", "inventory": 91 },
        ...
      ]
    }
| Property | Description |
|---|---|
| id | Cosmos DB uses the custom identifier, id, to uniquely identify each item. The ID can be any data type such as number, string, etc. If you don't provide the ID, Cosmos DB creates one for you. |
| categoryName | This property is selected specifically for this dataset as the partition key. The product category name provides an even distribution of the data, which is ideal for the partition key. Also, the categoryName doesn't change often, which is important for a partition key. |
| tags and inventory | These represent subproperties that can be used to find and reshape the results of queries using the JOIN keyword. |
Create the script to add products to a container
In Visual Studio Code, on the File menu, select New Text File.
On the File menu, select Save As. Save the new file with the name 1-contoso-products-upload-data.js.
Copy the following JavaScript and paste it into the file.
import * as path from "path";
import { promises as fs } from "fs";
import { fileURLToPath } from "url";
const __dirname = path.dirname(fileURLToPath(import.meta.url));

// Get environment variables from .env
import * as dotenv from "dotenv";
dotenv.config();

// Get Cosmos Client
import { CosmosClient } from "@azure/cosmos";

// Provide required connection from environment variables
const cosmosSecret = process.env.COSMOS_CONNECTION_STRING;

// Authenticate to Azure Cosmos DB
const cosmosClient = new CosmosClient(cosmosSecret);

// Set Database name and container name
const databaseName = process.env.COSMOS_DATABASE_NAME;
const containerName = process.env.COSMOS_CONTAINER_NAME;
const partitionKeyPath = [`/${process.env.COSMOS_CONTAINER_PARTITION_KEY}`];

// Create DB if it doesn't exist
const { database } = await cosmosClient.databases.createIfNotExists({
  id: databaseName,
});

// Create container if it doesn't exist
const { container } = await database.containers.createIfNotExists({
  id: containerName,
  partitionKey: {
    paths: partitionKeyPath,
  },
});

// Get product data
const fileAndPathToJson = "products.json";
const items = JSON.parse(await fs.readFile(path.join(__dirname, fileAndPathToJson), "utf-8"));

let i = 0;

// Insert products into container
for (const item of items) {
  const { resource, activityId, statusCode } = await container.items.create(item);
  console.log(`[${i++}] activityId: ${activityId}, statusCode: ${statusCode}, ${resource.name} inserted`);
}

// Show container name - copy/paste into .env
console.log(`\n\ncontainerName: ${containerName}`);//

// Run script with
// node 1-contoso-products-upload-data.js
Create a new file, named products.json, and copy the contents of the sample data file, products.json into it.
The file contains an array of JSON objects.
In the Visual Studio Code terminal, execute the JavaScript file to upload the data into the Cosmos DB container:
node 1-contoso-products-upload-data.jsThe terminal displays the item count, activityId, statusCode, and the item name.
The operation's result object
The result object returned from an operation is documented in the Cosmos DB SQL reference documentation. While the result can have information specific to the operation, each result has some properties that are always returned and are helpful to determine what happened.
| Result property | Description |
|---|---|
| activityId | The unique event ID associated with the specific operation. This ID, along with your resource name and subscription, can help identify the issue if your operation fails and you need to contact support. |
| statusCode | The HTTP status code indicating the success or failure of the operation. |
| resource | This is a JSON object of the final object, such as a JSON doc in a container. |
View Cosmos DB documents in Visual Studio Code
In Visual Studio Code, open the Azure explorer, or use the keyboard shortcut, Shift + Alt + A.
Find and expand the Concierge Subscription node, then your Azure Cosmos DB resources node.
Find and expand your ContosoRetail database and its Products container.
Expand the Documents node to see the products the Node.js script added. The node name for each document is the name property.
Select the first product to see the entire JSON.

Check your work
- In Visual Studio Code, in the Azure Databases extension you see your Cosmos DB account, database, and container.
- When you expand your container, you see many items under the Documents node.