Integrate deployed technologies
At this point, you should have all the resources running and operational as individual technologies. In this part of the learning module, we're bringing the pieces together.
Azure Data Lake Storage Gen 2
First, let's set up the storage account and the data we're investigating.
Investigating the data
Download the following files to your local drive. There are seven files representing different sample datasets across common master data domains:
- Companies.csv
- Contacts.csv
- ContactsAddLater.csv
- Products.csv
- Employees.csv
- Persons.csv
- YellowSystems/Products.csv
Companies.csv
Notice in the data, that we have 10 rows of data containing a list of different companies. We have columns for an id, name, website, address, and a person_Id.

Notice that the addresses of many of the companies are similar. For example, 188, Quuen St Brisbane and 188 queen street brisbane. These addresses are fictitious, but we can clearly see that there's a data quality issue that we're hoping to fix.
The person_id column is referring to the identifier of an Employee, which is somewhere within one of the other files. Hence, we create what CluedIn calls Edges or Relationships between this column and the column of another Domain.
Contacts.csv
Notice in the data, that we have 10 rows of data containing 10 fictitious employees. We have columns for an id, first_name, last_name, full_name, email, and job.

We can also clearly see that the Job column has a data quality issue in it. We're receiving data that has different ways to spell the different Job Titles of the employees.
For the learning module, pay particular attention to Lorain Andrzej, as, as we start to look through the other files, there's no single identifier that we can use to stitch Lorain's record together consistently. Most notably, the email address ends with @wtb.gov.au and the record has an ID value of 1.
ContactsAddLater.csv
This file contains more employees, but contains some of the same data quality issues that are present on the Contacts.csv file.

Products.csv
In this file, we have 10 rows of data containing 10 fictitious products. We have columns for a SKU, Name, and Size. As you look across the other Products.csv files from YellowSystems (under the YellowSystems folder), you notice that there's no Identifier that can be used to uniquely stitch the products together. The lack of a unique identifier is why we need to use a fuzzy merging approach later in the exercise.

YellowSystemsProducts.csv
Notice that we have 10 rows of data containing the same 10 fictitious products mentioned in the Products.csv file under the Navision folder. However we can see that we don't have a SKU column that we can use to stitch the products together. Instead we have columns for an ItemId, Name, and CompanyId. Most likely, we can use the CompanyId to connect to the companies that we mentioned previously in the Companies.csv.

Employees.csv
Notice in this file that we have the same 10 employees. However, we do have different identifiers, column names, and details. We have columns for fname, lname, full, email, and person_id. If we take a look at Lorain Andrzej in this file, we don't have an Identifier of 1 or an email that ends in wtb.gov.au. Rather, we could assume that the email column and the person_id column could both be used to uniquely identify these employees.

We can also see that the names of the columns, are similar to the column names in the Contacts.csv and ContactsAddLater.csv files, but they're different. If we don't address this difference, it will most likely lead to some confused downstream users of the data.
Persons.csv
Finally, notice in the file that we have the same 10 employees however we once again have different identifiers, column names, and details. We have columns for id, first, last, email, full_name, gender, ip_address, and pid.

Once again, if we look at Lorain, we can see that this time the email ends with yahoo.com. However we can see that there's an identifier of 1 and a column called pid that has a value that we did see in the Employees.csv file. It's most likely that we could use different identifiers from each file to stitch this value together - however on the surface that would be quite a tricky SQL statement or Python script to create.
Upload the data to the Azure Data Lake Storage (ADLS) Gen2
Navigate to the Storage Account that you created in the earlier part of the module.
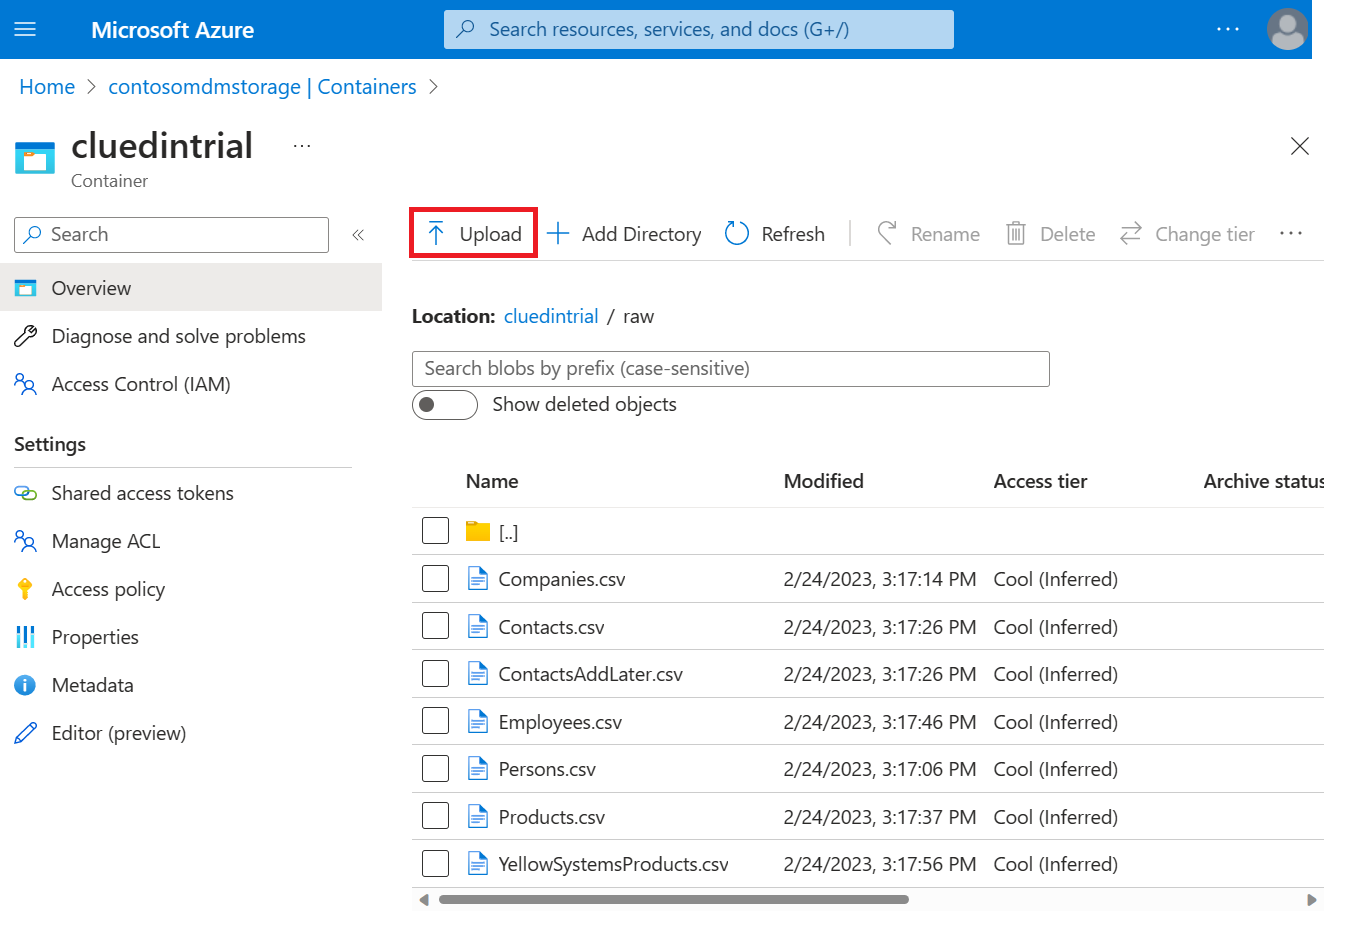
Navigate to your Container Storage in the left menu, and either select an existing Container, or create a new one called cluedintrial.
Inside the cluedintrial container, create a new directory called raw upload the downloaded files one at a time to the container using the Upload button.
Once all your files are uploaded, navigate to Security + networking > Networking in your ADLS Gen2 account.
Choose Enabled from selected virtual networks under Public network access.
In the Exceptions section, select Allow trusted Microsoft services to access this storage account and select Save.

Azure Key Vault
Here we set permissions for Microsoft Purview and Azure Data Factory to be able to access your Azure Key Vault:
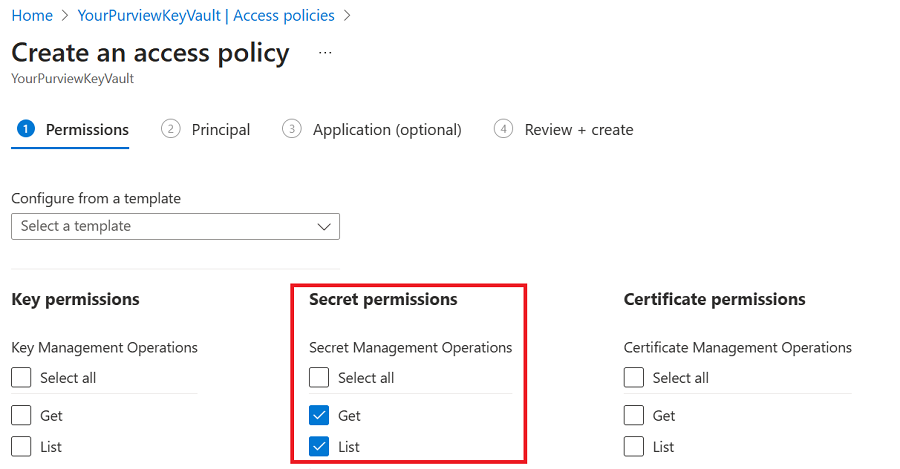
Open your Azure Key Vault in the Azure portal, and select Access policies in the menu.
Select Create to make a new policy.
Select Get and List from the Secret permissions list. Then select Next.
Search for and select your Microsoft Purview account on the Principal page.
Select Next, and then select Next again to get to the Review + Create page. Then select Create.
Repeat these steps for your Azure Data Factory account, so that your Azure Data Factory account also has Get and List permissions on secrets in your Azure Key Vault.
Now we create the secure credentials that Microsoft Purview and Azure Data Factory use to access your ADLS Gen2 account:
- Open your ADLS Gen2 storage account in the Azure portal, and select Access keys from the menu under Security + networking.
- Select the Show button for one of the keys, then copy the key value.
- Open your Azure Key Vault, and select Secrets from the menu under Objects.
- Select the Generate/Import button to create a new secret.
- Give your secret a name, and save the name for later use.
- For Secret value paste the key value from your ADLS Gen2 storage account.
- Select Create.
Microsoft Purview
Connect with Azure Key Vault
- Still in the Management menu, select Credentials.
- Select Manage Key Vault connections.
- Select New.
- Give your connection a friendly name, and then search for and select the key vault where you gave your Microsoft Purview account permissions earlier.
- Select Create.
- Close the Manage Key Vault connections window and select the + New button in the credentials window.
- Give your new credential a friendly name like "adlsgen2key" and select the Account key authentication method from the drop-down.
- Select the key vault connection you created.
- The Secret name is the name of the secret you created in Azure Key Vault to house your ADLS Gen2 account key.
- Select Create.
Register and scan data sources
Sign in to Microsoft Purview by choosing the Microsoft Purview Account in your resource group and then selecting the Open Microsoft Purview Governance Portal button. Microsoft Purview opens in a new tab.
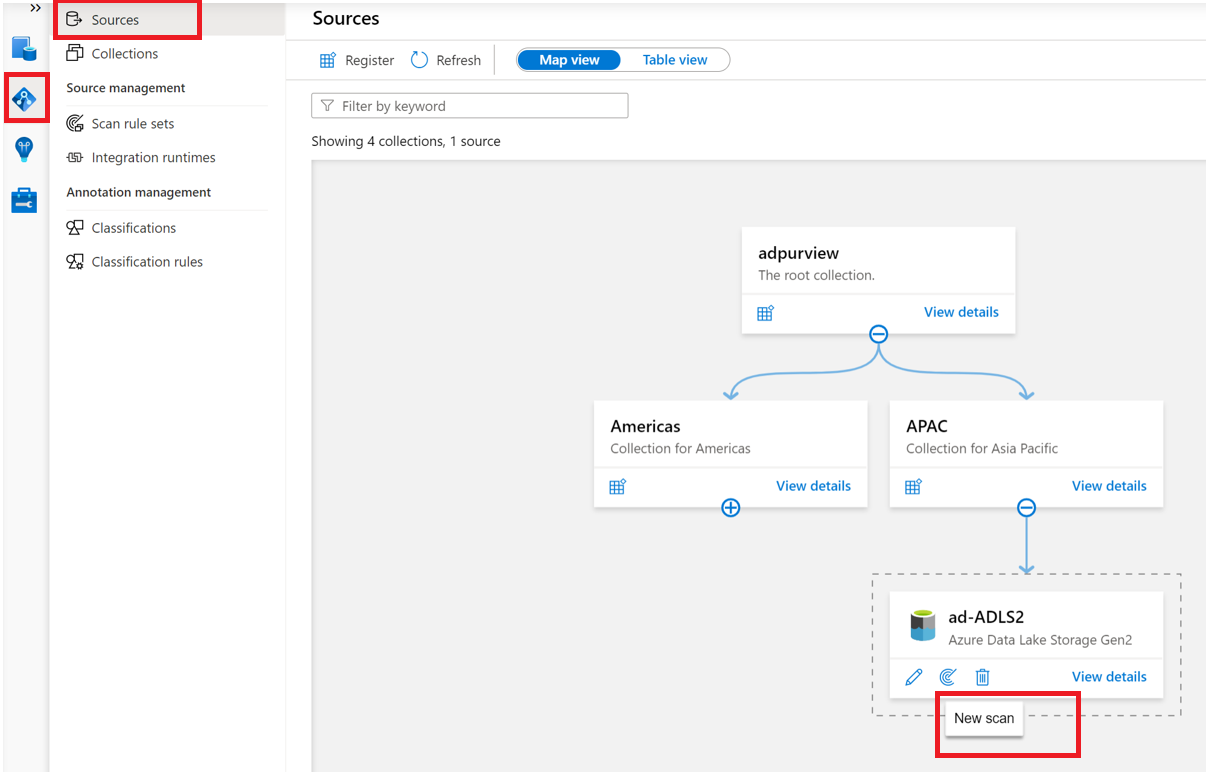
Select your Data Map on the left hand side menu and select Register. Choose ADLS Gen2 from the selection and in the drop-down, then select the instance that was created in the previous step.
Select Register.
After registering your account, select the New Scan icon under the ADLS Gen2 data source.
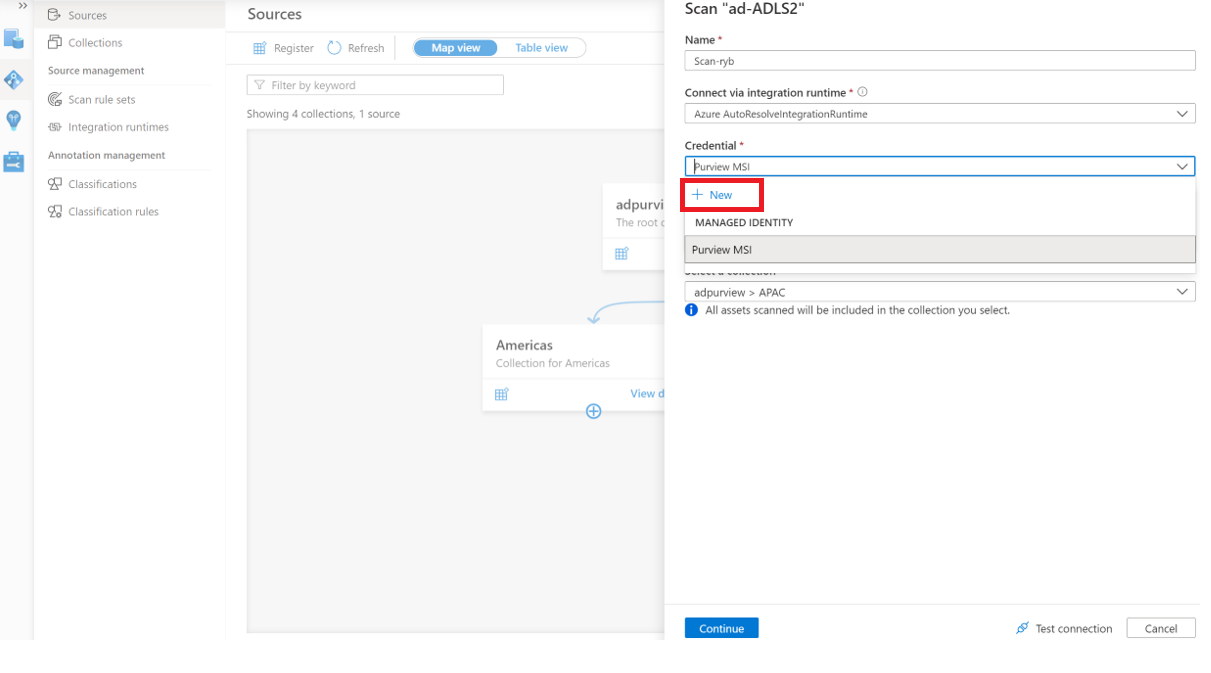
Provide a Name for the scan, select the account key credential you created earlier under Credential, and choose the appropriate collection for the scan (the root collection or your current subcollection), and select Test connection. On a successful connection, select Continue.
Select the cluedintrial folder you created earlier to scan.
Choose the system default scan rule set.
Set your scan to run once, and select Continue, then Save and Run. It takes only a few minutes to scan these files.
You can check the scan by selecting your ADLS Gen2 resource in the data map, choosing View details, and looking at the Last run status of the most recent scan.
After the scan is complete, you should validate that everything was success by selecting your ADLS Gen2 resource in Microsoft Purview and making sure that there are assets discovered. You can see the number of discovered assets listed above the scan details.
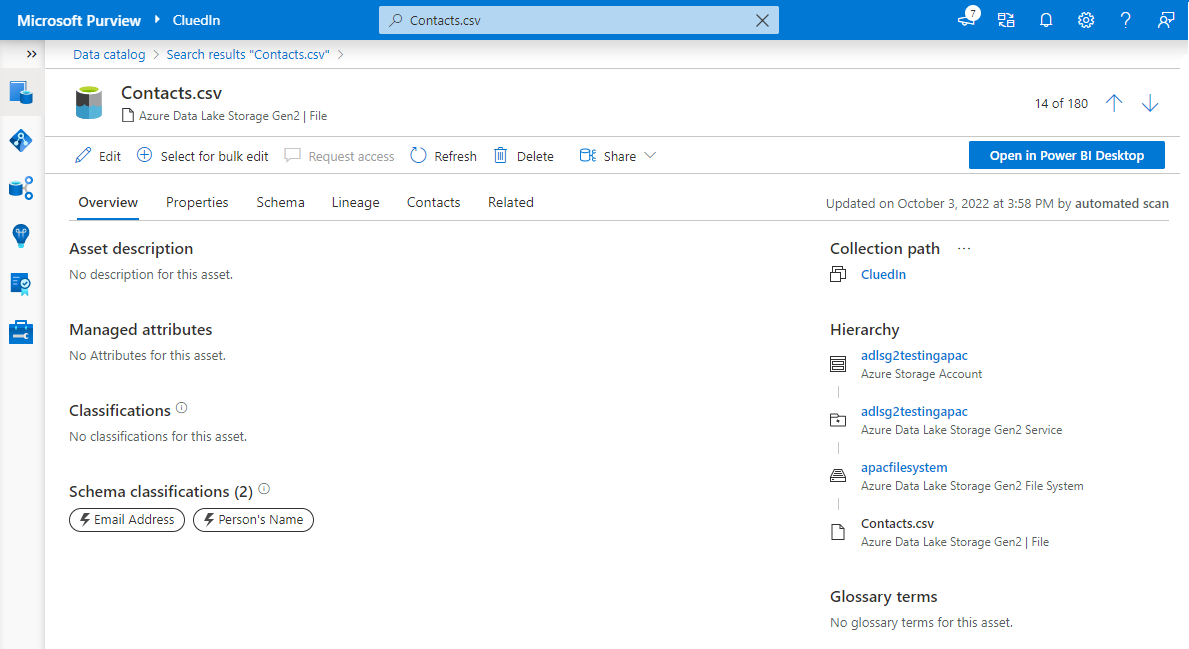
If you search in Microsoft Purview for Contacts.csv, then you should find your assets in Microsoft Purview.
Connect with Azure Data Factory
Select Management in the Microsoft Purview menu, then select Data Factory under Lineage connections.
Select New and create a connection to your Data Factory.
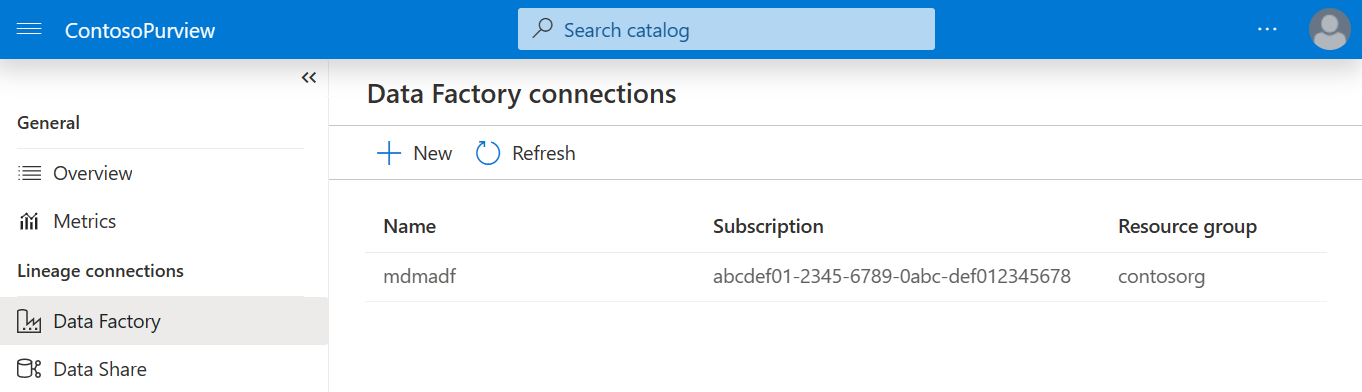
This connection allows Microsoft Purview to create automated lineage for you. The lineage is based off of the Azure Data Factory (ADF) scheduled pipelines that you have for regularly pulling in the data from the source systems to the raw folder. Also, it allows the lineage that CluedIn creates during data processing.
Flagging assets that can sync with CluedIn
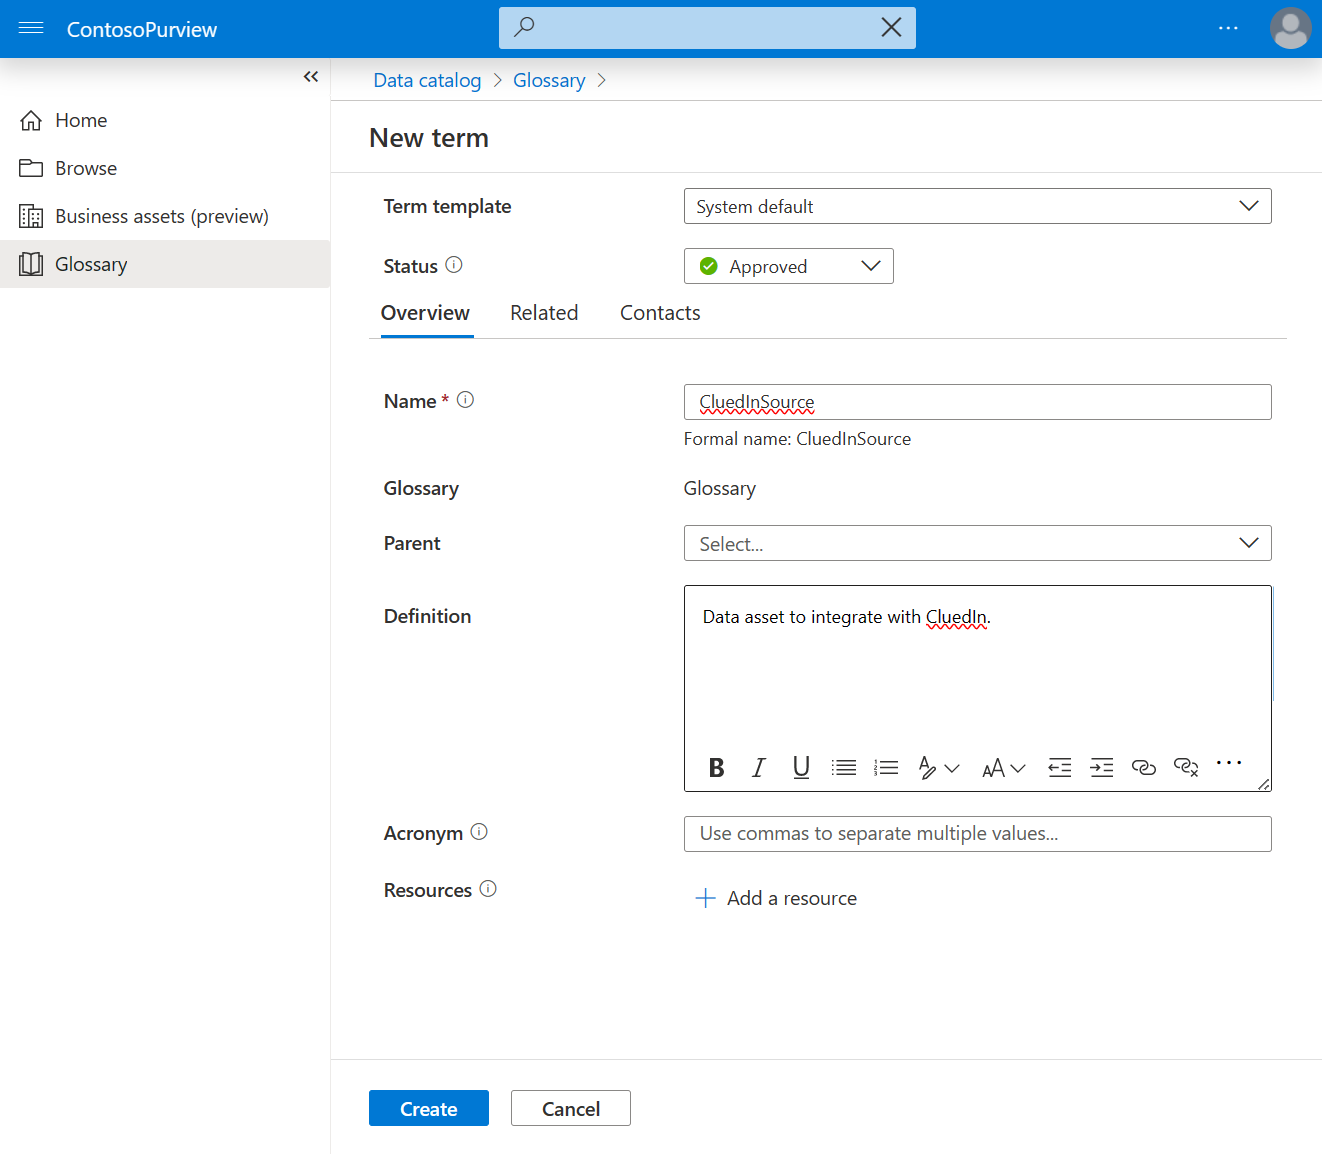
In Microsoft Purview, open the data catalog and select Glossary. Then select New term.
Select the System default template, and then create a new term CluedInSource. Set status to Approved, and select Create.
Create a second glossary term called CluedInADFAuto that we use later in this guide.
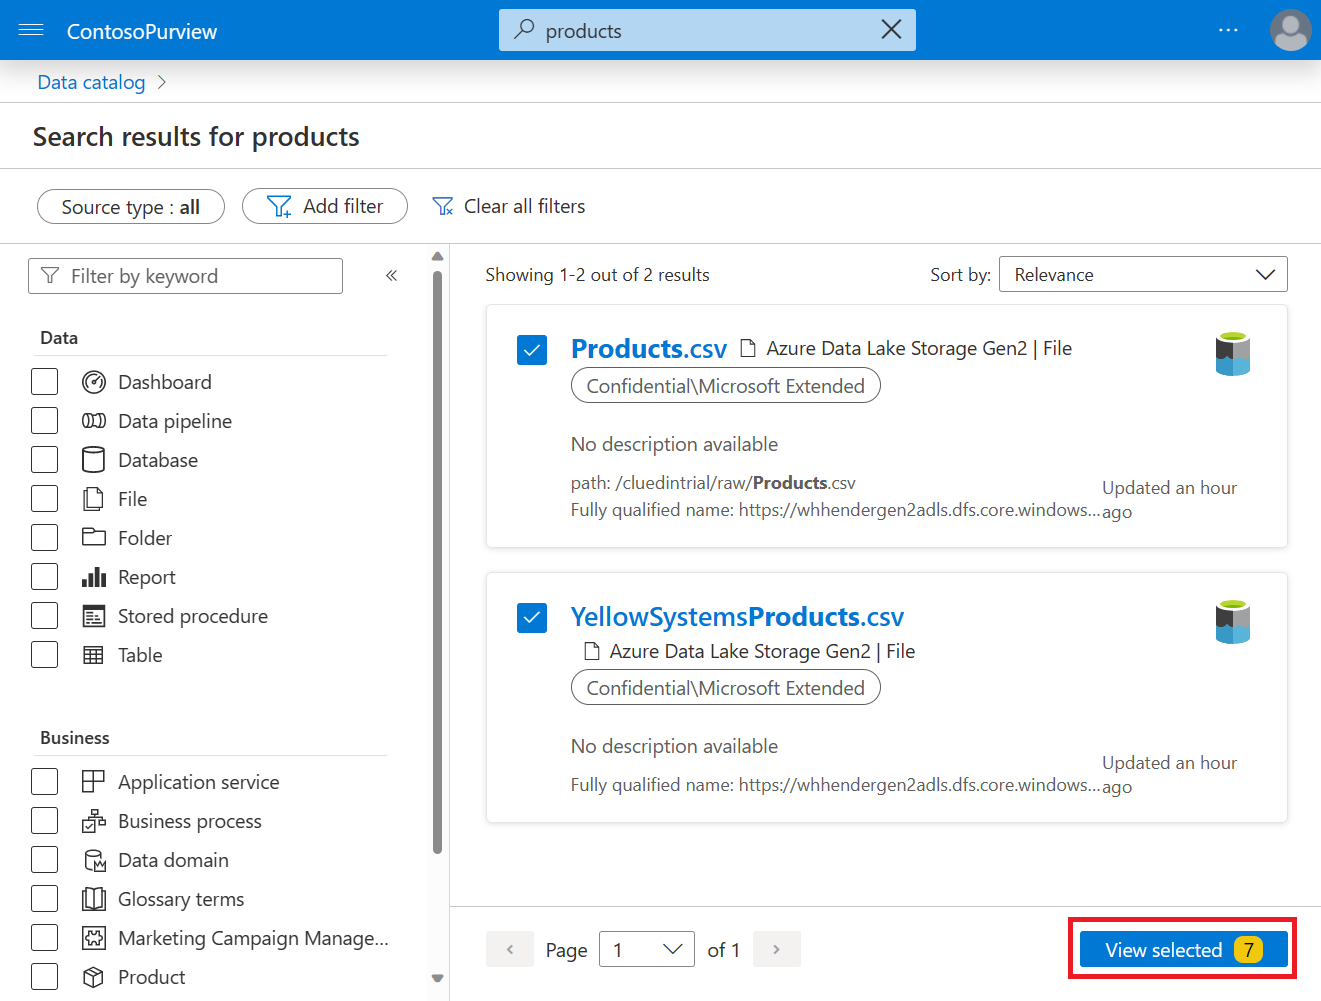
Return to the data catalog. Search for and select all seven assets. Then select View selected.
Select Bulk edit.
Set attribute to Term, operation to Add and new value to CluedInSource, then select Apply.
Add a second term attribute to add the CluedInADFAuto glossary tag.
CluedIn
You can now open your CluedIn instance by navigating to the CluedIn-AMA Managed Application. You can find the URL for your CluedIn instance either from the email you received from CluedIn, or by opening CluedIn in the Azure portal and selecting Parameters and Outputs and finding the cluedInInstanceAddress. Copy that into a new browser tab and press enter.
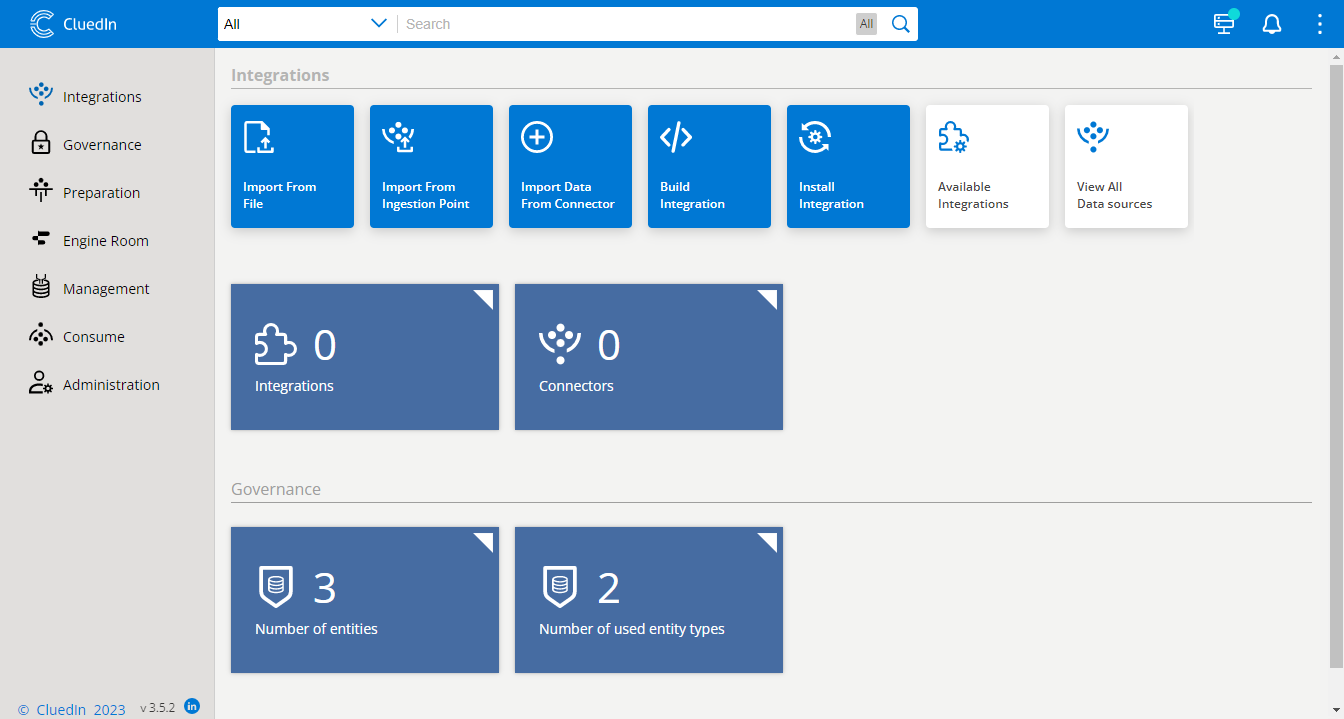
Sign in with the credentials you used in the installation process and the CluedIn home screen opens.
Connect CluedIn to Microsoft Purview
In your CluedIn Studio, go to Settings section, under Administration.
In the middle of the page, fill in these values:
- Purview: Base Url - which is formatted like
https://<your purview instance>.purview.azure.com - Purview: Client ID - the Application (client) ID from your service principal
- Purview: Client Secret - the client secret value from setting up your service principal.
- Purview: Tenant ID- the Azure Tenant ID where your Microsoft Purview account lives.
- Purview: Collection Name - the name of the collection where your data assets are housed.
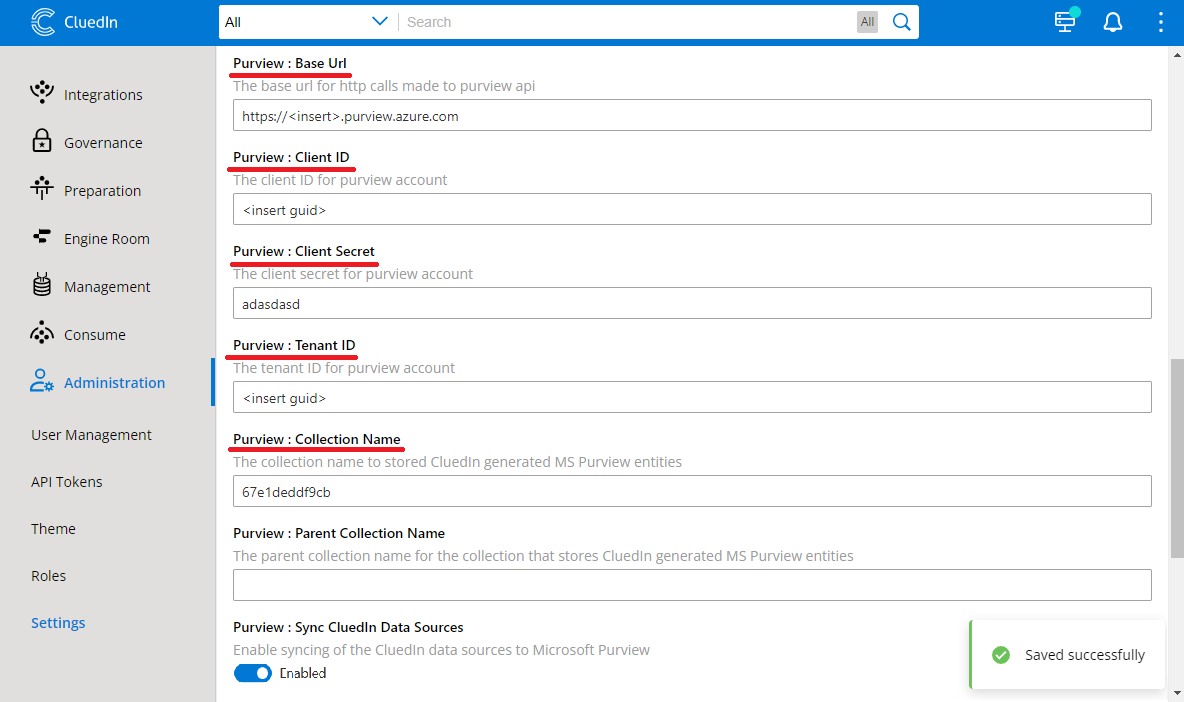
- Purview: Base Url - which is formatted like
Toggle on the settings for Purview SyncDataSources and Purview PollDataSources. These settings integrate the data sources from Microsoft Purview with CluedIn.
Notice the setting called Purview : Sync CluedIn Data Sources Keywords. Set it to CluedInSource. CluedIn now polls every 60 seconds to find Microsoft Purview assets that are tagged with a Glossary Term that matches the filter.
Wait at least 60 seconds for CluedIn to poll the data sources in your Microsoft Purview resource.
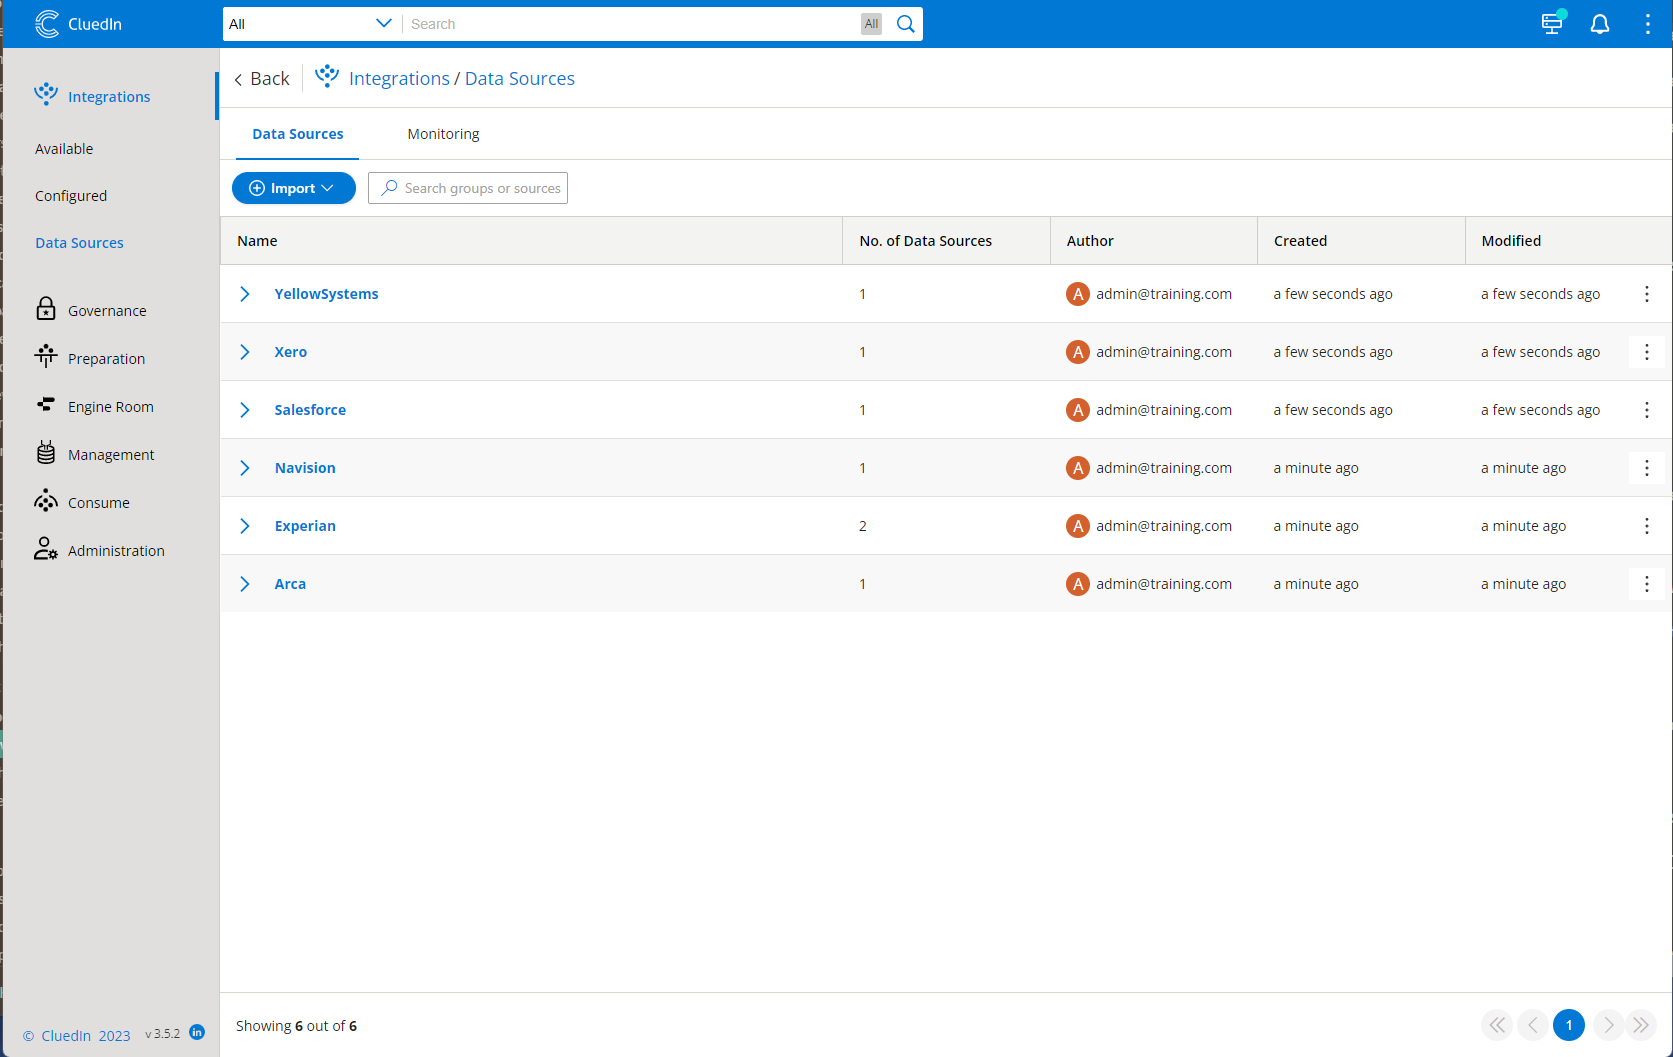
In CluedIn, go to the Datasources section under Integration. Notice that your seven files are now showing in CluedIn. However, only the metadata is registered.
Connect CluedIn to Azure Data Factory
Next, we provide CluedIn with the credentials of our Azure Data Factory so CluedIn can also automate the construction of the Azure Data Factory pipelines to copy the data into CluedIn.
In the Azure portal, open your Data Factory instance and select Access Control IAM. Grant your service principal the Data Factory Contributor role to allow it to create pipelines and triggers.
In your CluedIn Studio, select the Settings section, under Administration. Fill in the Azure Data Factory details:
- Purview : Azure Data Factory Base Url - is formatted like:
https://management.azure.com/subscriptions/{subscriptionId}/resourceGroups/{resourceGroup}/providers/Microsoft.DataFactory/factories/{factoryName}/ - Purview : Azure Data Factory Client ID - the Application (client) ID from your service principal
- Purview : Azure Data Factory Client Secret - the client secret value from setting up your service principal.
- Purview: Azure Data Factory Tenant ID - the Azure Tenant ID that is home to your Azure Data Factory account.
- Purview : Azure Data Factory Base Url - is formatted like:
Toggle on the setting for Purview : Azure Data Factory Pipeline Automation. This setting uses our Azure Data Factory instance to copy our data into CluedIn.
You also notice a setting called Search Filter for Azure Data Factory Pipelines. Set it to CluedInADFAuto.
We tagged our resources for this setting earlier, but you need to wait at least 60 seconds after set up to see the results.
Return to the Datasources section under Integration in CluedIn. Notice that all of your items in the list now have a new entry under them. When you select them, it takes you through to a preview of the data we have for our scenario.
Congratulations!
Great work! We integrated all the pieces of our data technology stack! Give yourself a pat on the back before moving on to the next section. This integration is the most difficult part. Everything else is just using the tools we put in place.
Next unit: Map your data
Having an issue? We can help!
- For issues related to this module, explore existing questions using the #Windows Training tag or Ask a question on Microsoft Q&A.
- For issues related to Certifications and Exams, post on Certifications Support Forums or visit our Credentials Help.