Exercise - Integrate Azure Cosmos DB with the IoT data pipeline
This exercise provides an overview of setting up the collection, processing, and storage of IoT telemetry generated, by using an Azure IoT Central application.
In this exercise, you:
- Create an Azure IoT Central application.
- Create an Azure function that logs an HTTP request payload.
- Configure and validate IoT telemetry rules of an Azure IoT Central application.
Prerequisites
To perform this exercise, you need:
- A Microsoft account or a Microsoft Entra account with the Global Administrator role in the Microsoft Entra tenant. The tenant must be associated with the Azure subscription and with the Owner or Contributor role in the Azure subscription.
- To complete the exercise unit Set up Azure Cosmos DB.
- An active Azure subscription. If you don't have an Azure subscription, create a free account before you begin.
Create an Azure IoT Central application
Navigate to the Create IoT Central Application page in the Azure portal. If prompted, sign in with your Azure account.
Enter the following information:
Field Description Subscription The Azure subscription you want to use. Resource group The resource group you want to use. You can create a new resource group or use an existing one. Resource name A valid Azure resource name such as adatum-iot-custom-application. Application URL A URL subdomain for your application such as adatum-iot-custom-application. The URL for an IoT Central application looks like https://adatum-iot-custom-application.azureiotcentral.com.Template In-store Analytics - Condition Monitoring Region The Azure region you want to use. Pricing plan Select one of the standard pricing plans. To learn about pricing, see Azure IoT Central pricing. Select Review + create. Then select Create.
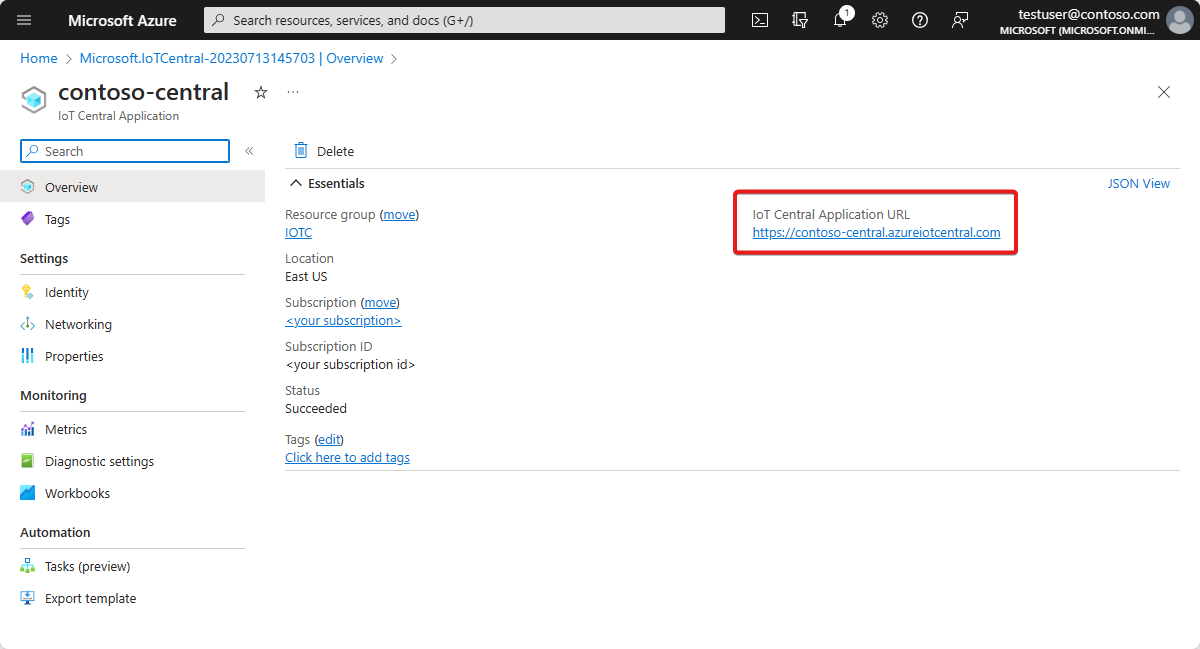
When the app is ready, you can navigate to it from the Azure portal:
Tip
To list all the IoT Central applications you have access to, navigate to IoT Central Applications.
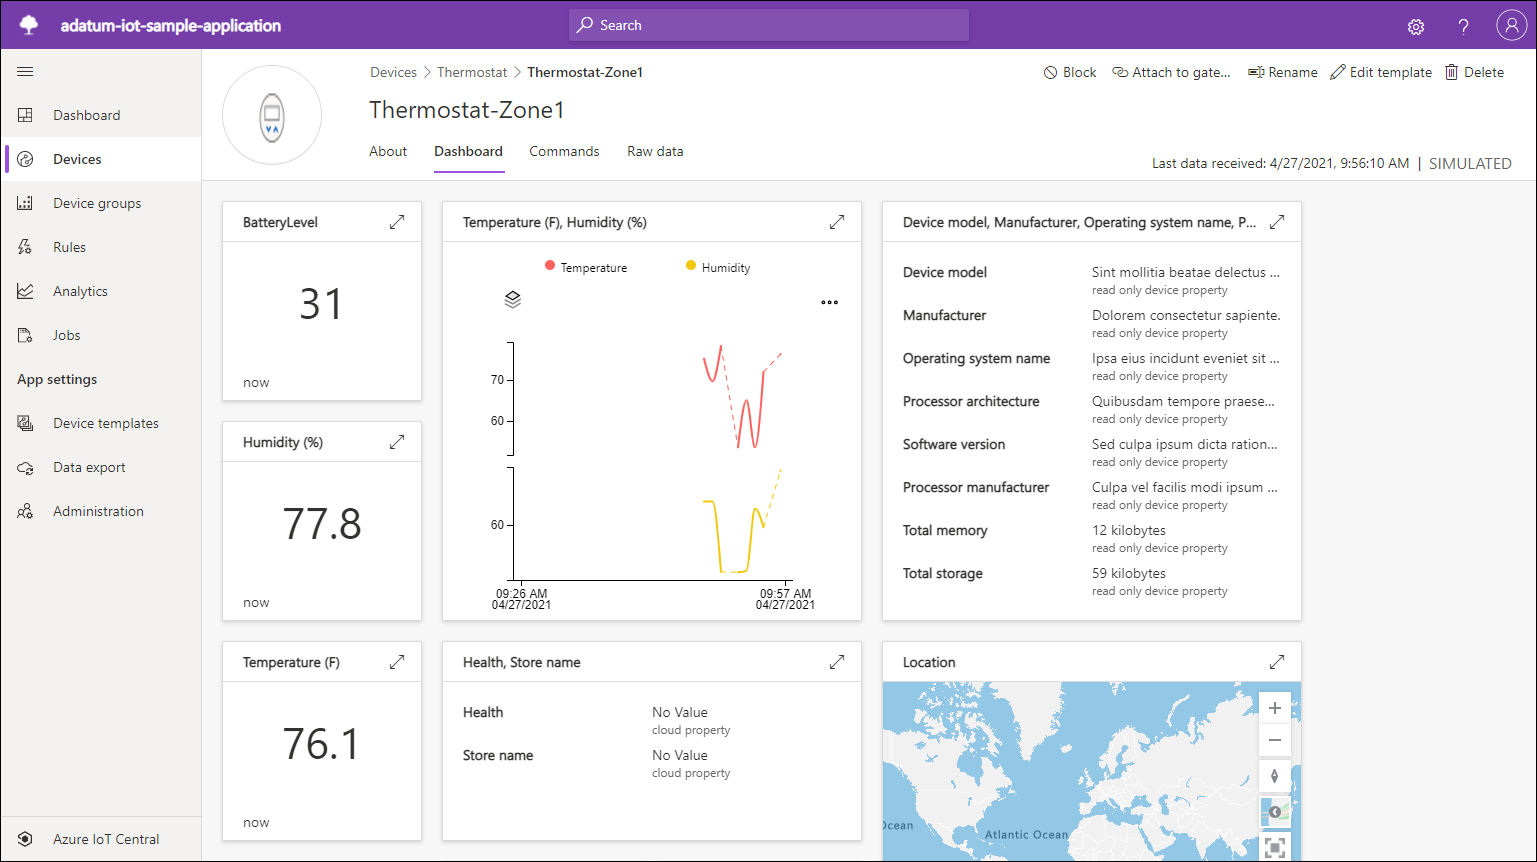
In a few minutes or less, the Dashboard page is displayed. Review the telemetry and analytics of the sample Azure IoT Central application:
On the Dashboard page of the IoT Central Application portal, in the vertical menu, select Devices.
In the Thermostat section, select Thermostat-Zone1.
On the Thermostat-Zone1 pane, review the content of the Dashboard tab.
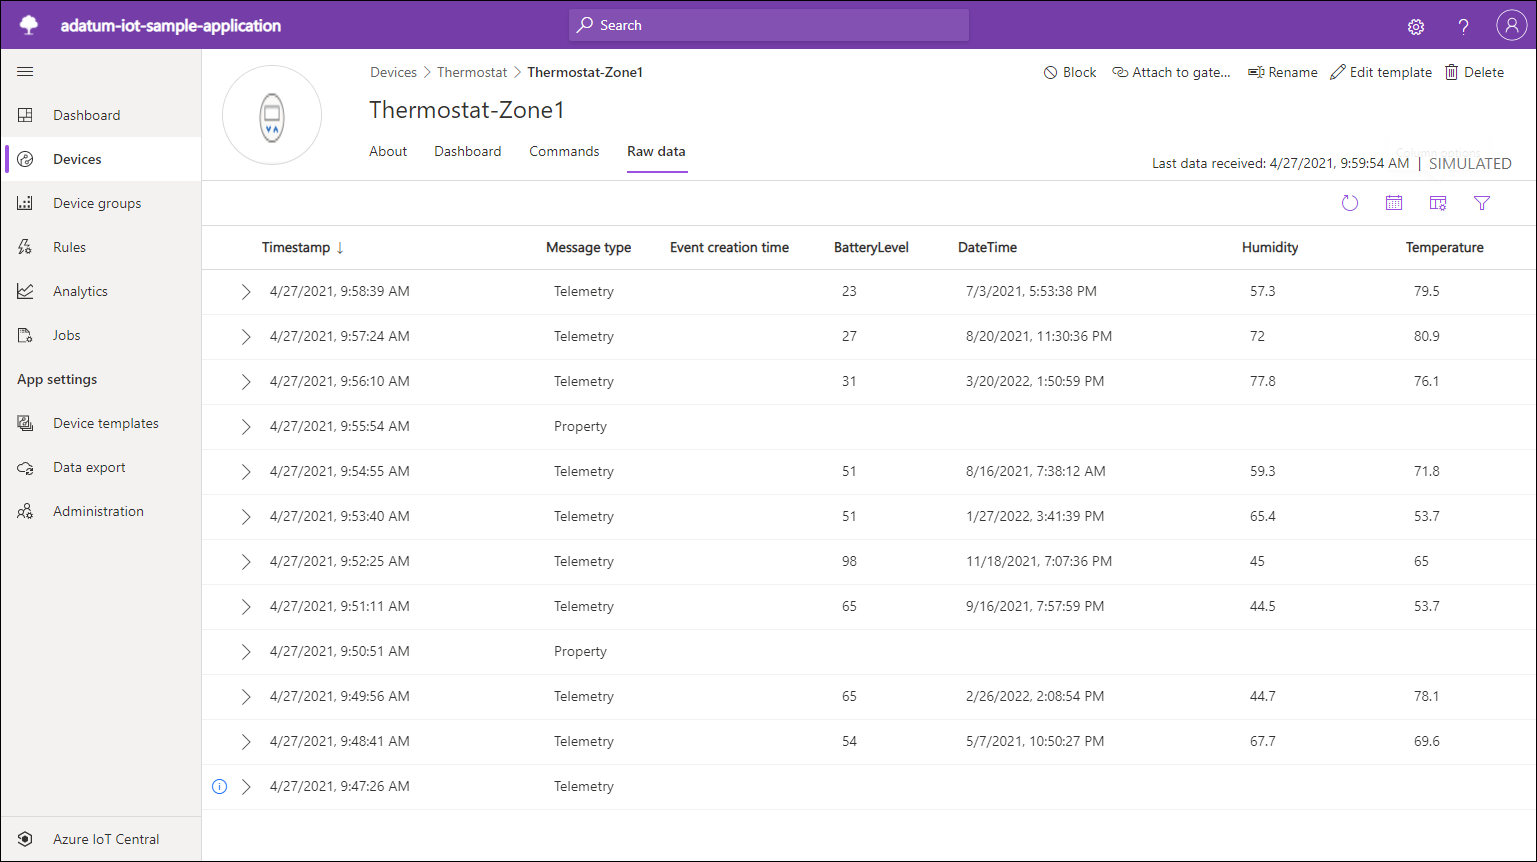
Select the Raw data tab, and review the content.
Create an Azure function that logs an HTTP request payload
In this task, you're creating an Azure Function app that implements the HTTP webhook functionality. Apply this functionality to forward the telemetry data from the Azure IoT Central application by creating an application rule.
Start a web browser, navigate to the Azure portal, and sign in to the Azure subscription you're using for this module.
Use the Search resources, services, and docs text box to search for Function App.
On the Function App pane, select + Create.
On the Basics tab, configure the following settings, and then select Review + create.
Setting Configuration Subscription Select the name of the Azure subscription you're using for this module. Resource Group Create a new resource group named function-app-RG. Function App name Enter a unique name that consists of lower-case letters, digits, or dashes, and starts with a letter. Publish Select Code. Runtime stack Select .NET. Version Select Version 6 (LTS), in-process model. Region Select the Azure region closest to the location of your lab environment, preferably matching the location you chose for the Azure IoT Central deployment. Operating system Windows Plan type Consumption (serverless) 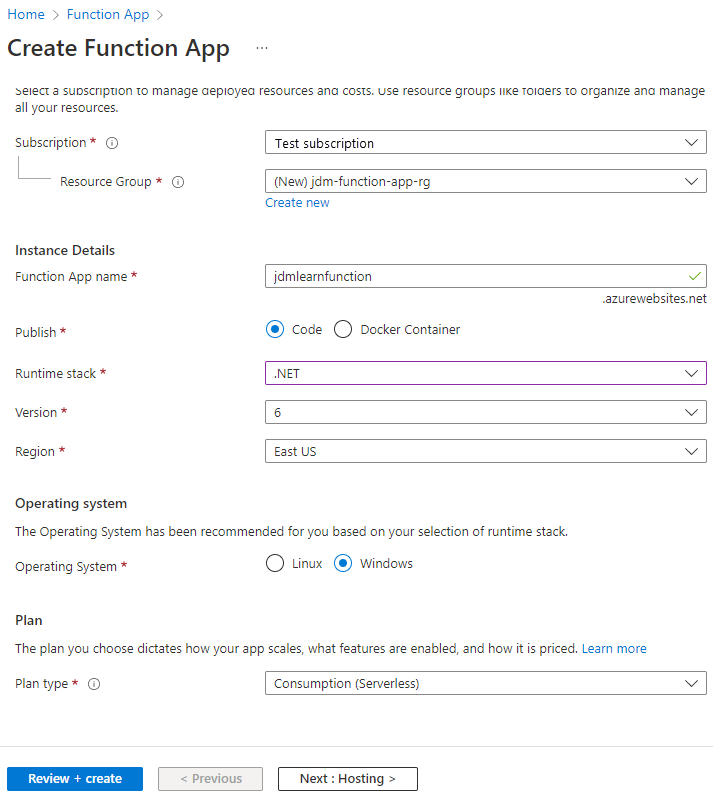
Select Create.
Note
Wait for the Azure Function app provisioning to complete. This might take about two minutes.
When the Azure Function app deployment is complete, select Go to resource.
On the Azure Function app pane, under Create in Azure portal, select Create function.
On the Add function pane, specify the following settings, and then select Create.
Setting Configuration Development environment Develop in portal Template HTTP trigger New Function HttpTrigger1 Authorization level Function 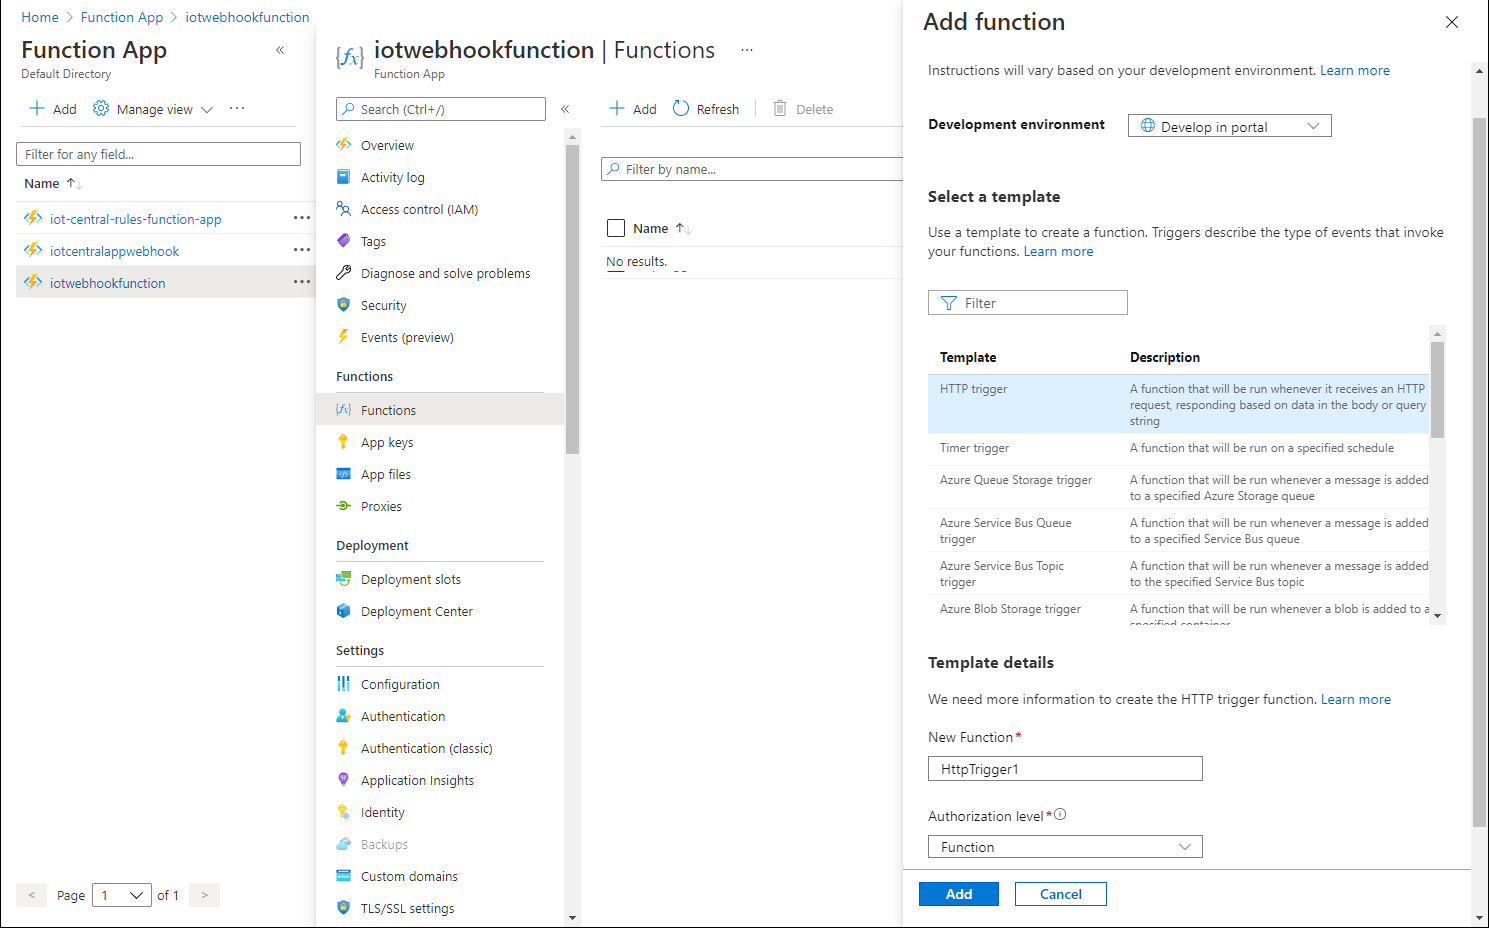
On the HttpTrigger1 pane, select Integration from the menu.
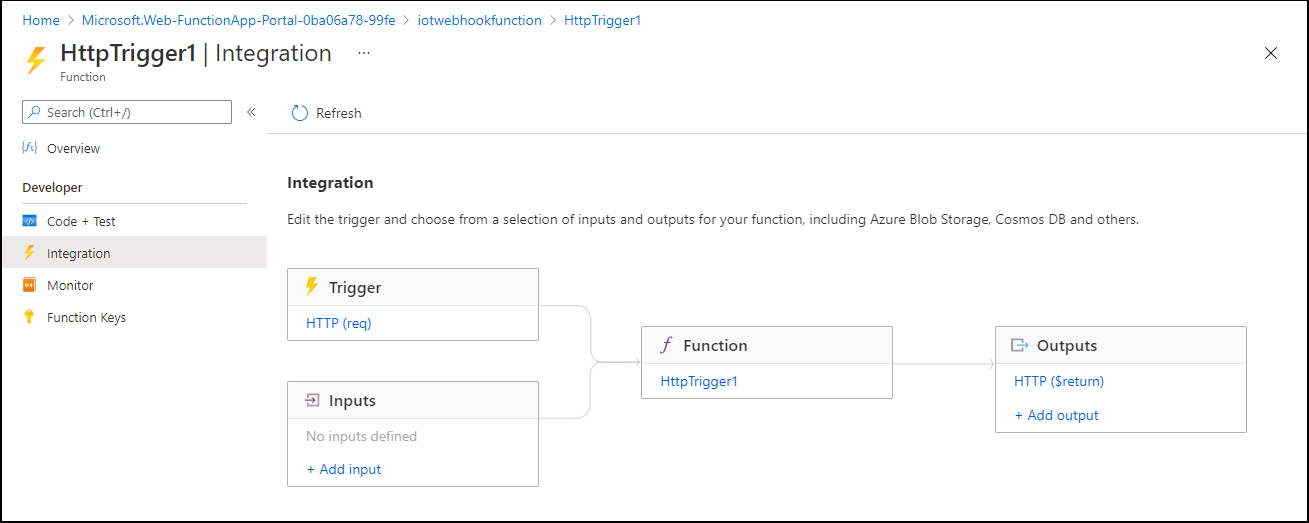
In the rectangle labeled Outputs, select + Add output.
Configure the following settings, and then select Add:
Setting Configuration Binding type Select Azure Cosmos DB. Document parameter name Replace the default value with outDoc. Database name Enter the name of the database you created in the previous exercise, iotdb. Collection Name Enter iotcollection. If true, creates the Cosmos DB database Select Yes. Cosmos DB account connection Select New. In the New Cosmos DB connection popup window, ensure that the Azure Cosmos DB Account option is selected. In the Database Account drop-down list, select the entry representing the Cosmos DB account you created in the previous exercise, and then select OK. Partition key (optional) Enter /pk/timestamp/deviceid. 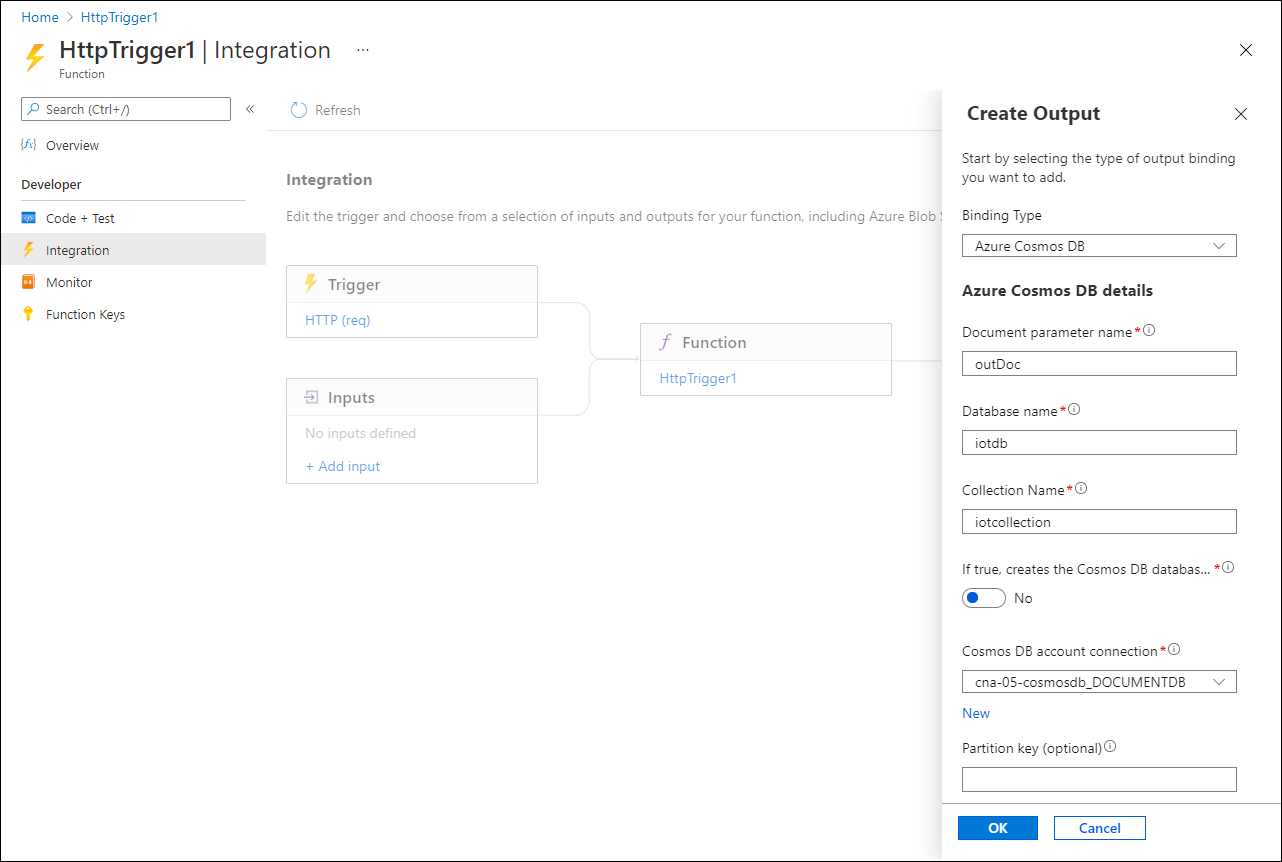
Note
When choosing an optimal partition key, it's important to consider the usage patterns and the 20 GB logical partition size limit. You could, for example, create a synthetic partition key consisting of a combination of deviceId and date.
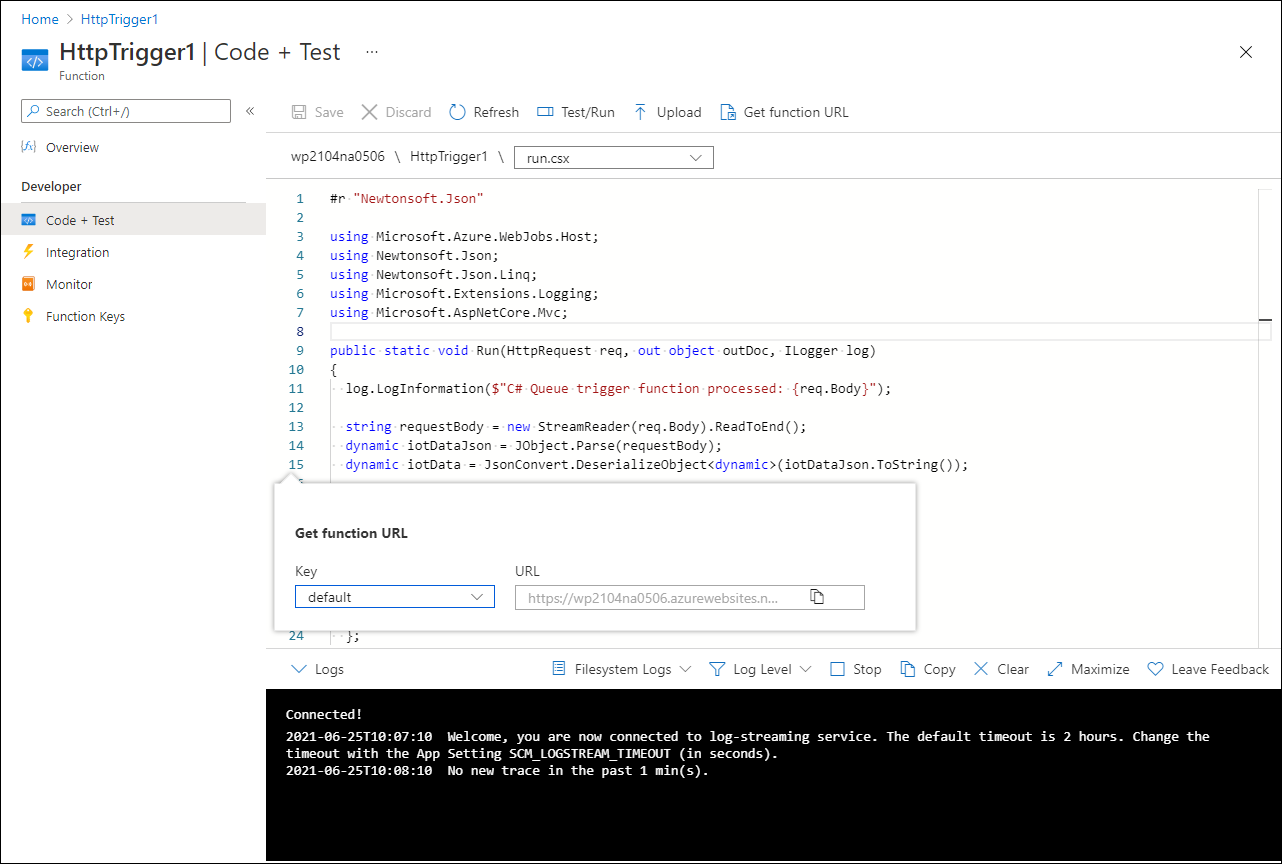
Select Code + Test.
Replace the existing code with the following content, and then select Save.
#r "Newtonsoft.Json"

using Microsoft.Azure.WebJobs.Host;
using Newtonsoft.Json;
using Newtonsoft.Json.Linq;
using Microsoft.Extensions.Logging;
using Microsoft.AspNetCore.Mvc;

public static void Run(HttpRequest req, out object outDoc, ILogger log)
{
  log.LogInformation($"C# Queue trigger function processed: {req.Body}");

  string requestBody = new StreamReader(req.Body).ReadToEnd();
  dynamic iotDataJson = JObject.Parse(requestBody);
  dynamic iotData = JsonConvert.DeserializeObject<dynamic>(iotDataJson.ToString());

  log.LogInformation($"{iotData}");

  outDoc = new {
    pk = iotData.device.id + "-" + iotData.timestamp.ToString("yyyyMMdd"),
    timestamp = iotData.timestamp,
    deviceId = iotData.device.id,
    temperature = iotData.device.telemetry.Thermostat_1o.temp.value
  };
}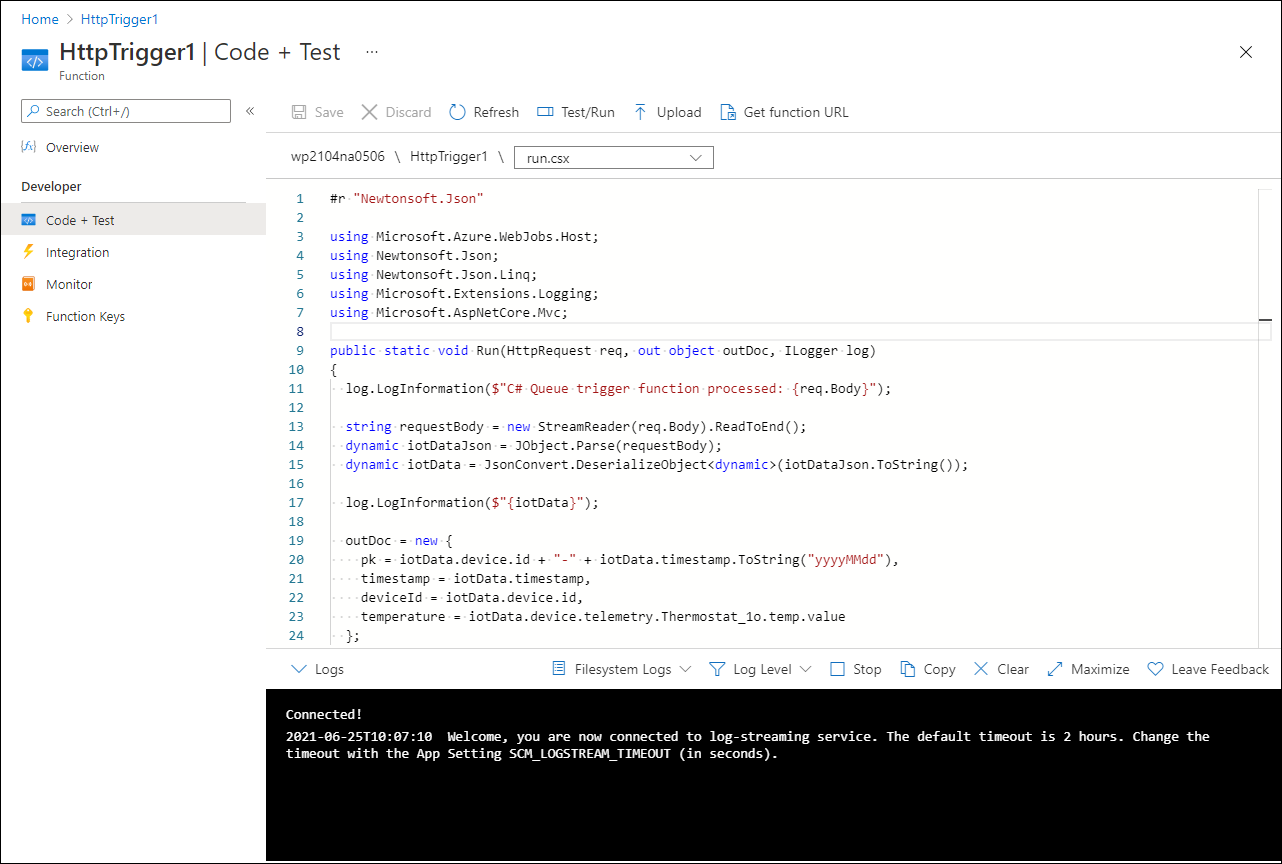
Note
The function logs the JSON-based payload of the HTTP request and constructs individual JSON elements to be stored in an individual document of the target Cosmos DB collection corresponding to the function output you configured. You could use the pk element, which consists of the concatenated deviceId property and date of the collected telemetry data point, as the partition key.
Select Get function URL for the function key and record its value.
Configure and validate IoT telemetry rules of an Azure IoT Central application
Switch back to the web browser window displaying the Devices page of Azure IoT Central application you created previously in this exercise.
In the vertical menu of the IoT Central Application portal, select Rules.
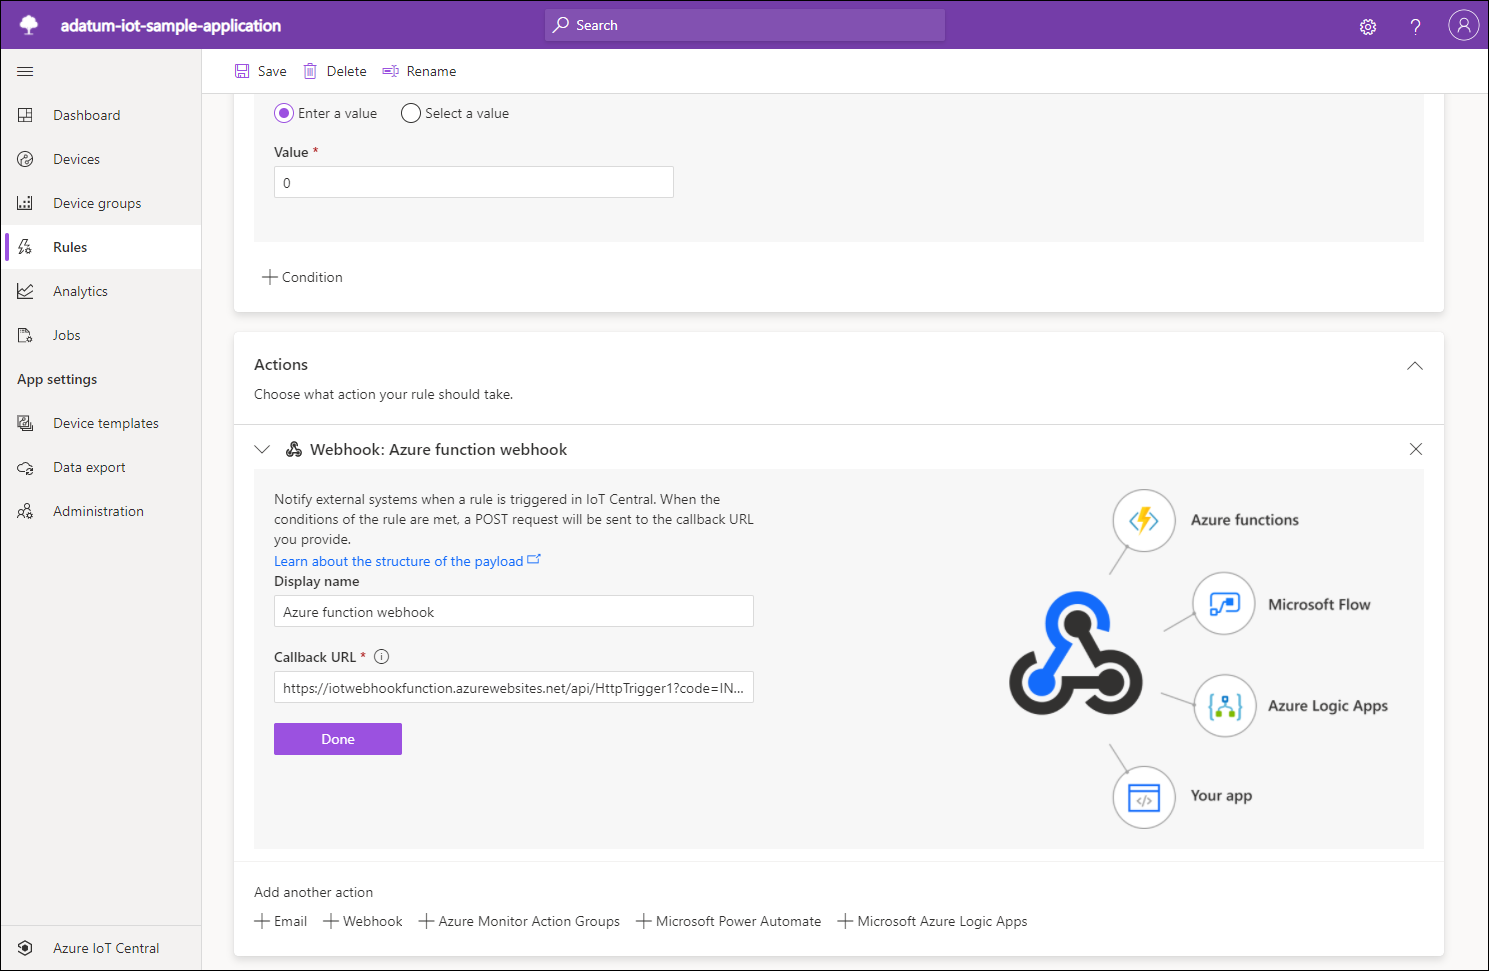
Select + New, and configure the following settings:
Setting Configuration Rule name Enter Adatum IoT telemetry rule. Device template Select Thermostat. Time aggregation Ensure that the settings are turned Off. Telemetry Select Temperature. Operator Select is greater than. Enter a value Enter 0. Action Select + Webhook. Display name Enter Azure function webhook. Callback URL Paste the value of the Azure function URL you recorded in the previous task of this exercise. 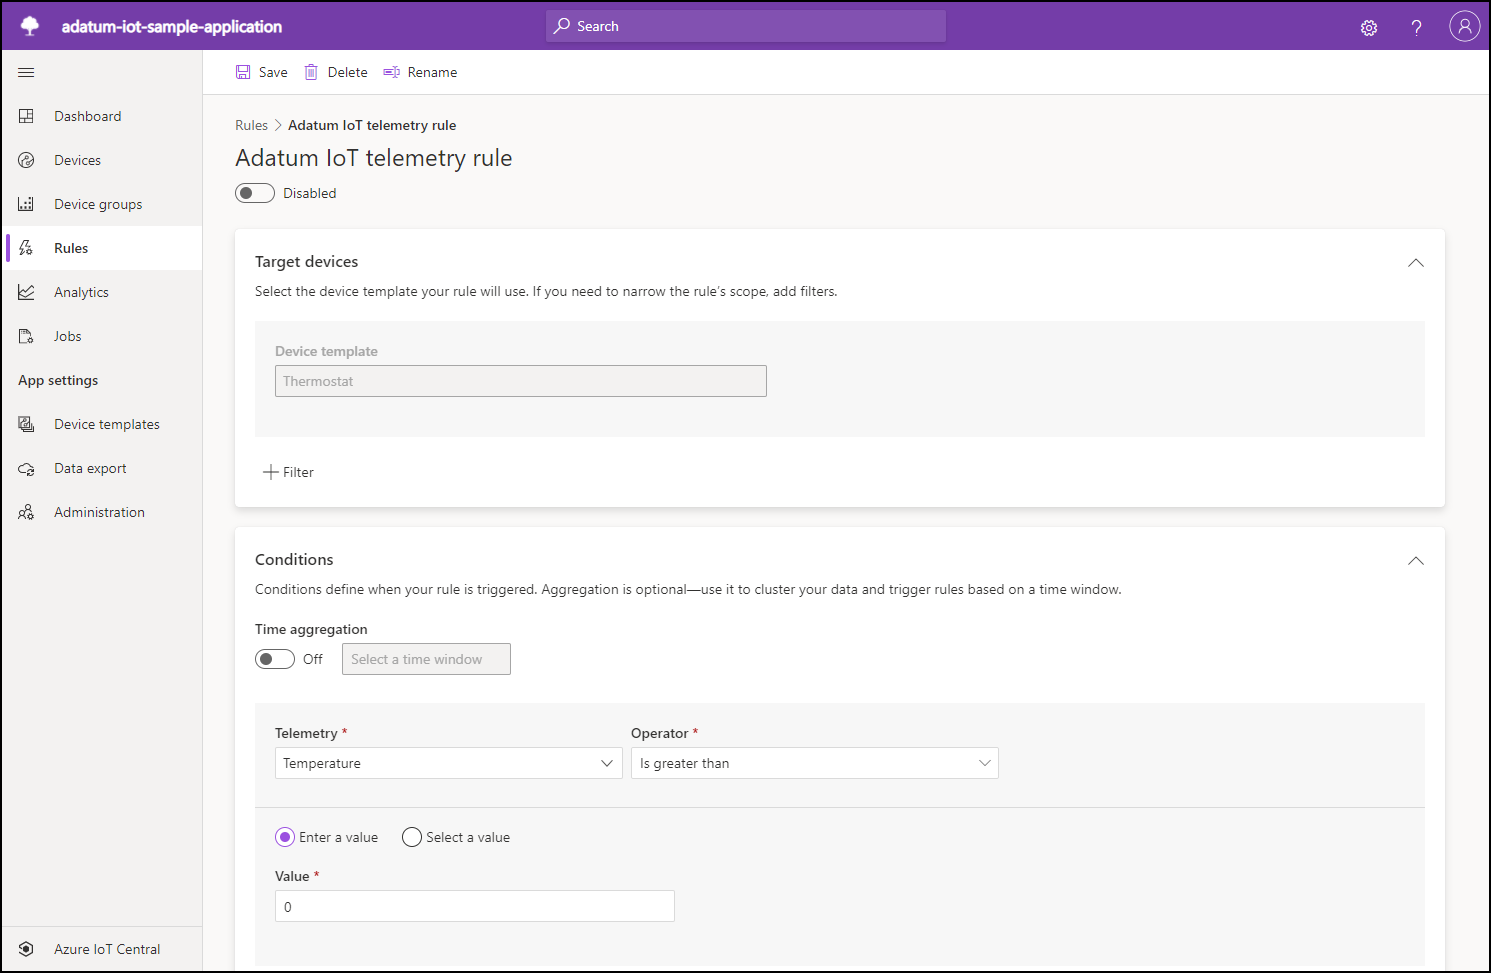
Note
The value of the temperature telemetry is intentionally artificially low to invoke the webhook functionality and trigger the function. In real-life scenarios, you'd adjust it to correspond to the condition that warrants the data collection that you intend to store in the target Cosmos DB collection.
Select Done, and then select Save.
Switch back to the web browser window displaying the HttpTrigger1 | Code + Test pane in the Azure portal.
Select Monitor, and then select the Logs tab.
Verify that the logs pane displays the messages generated in response to the HTTP trigger originating from the Azure IoT Central application webhook you configured previously in this task.
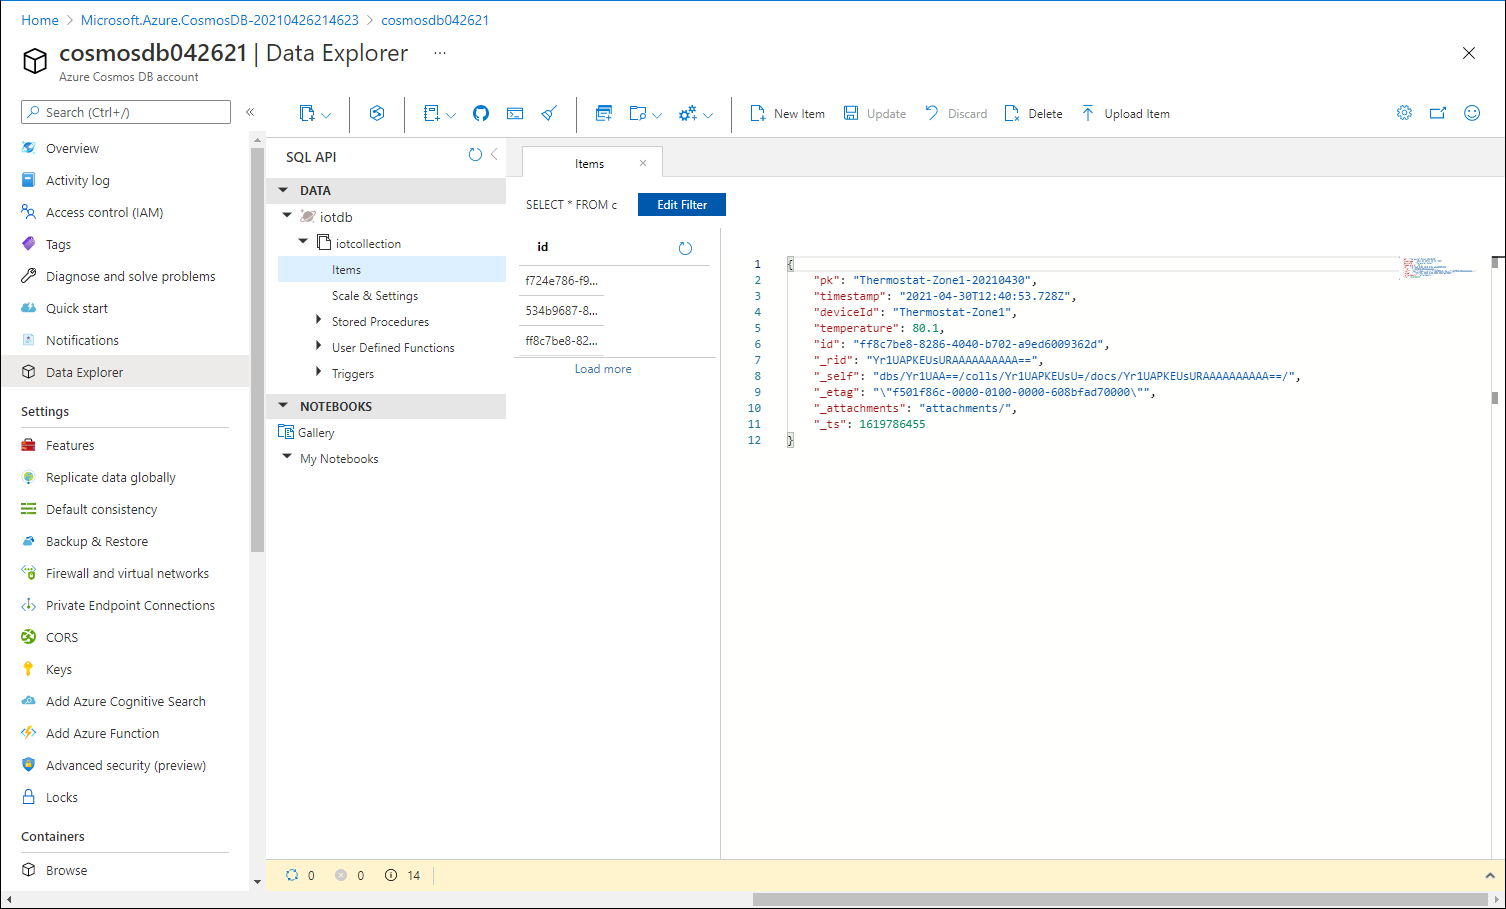
Switch to the web browser window displaying the Data Explorer pane of the Cosmos DB account you provisioned in the previous exercise.
In the NOSQL API section, select the circular arrow Refresh button, expand the iotdb node and the iotcollection within it. Select the Items node, and then select the first document in the list of items.
Verify that the details pane of the Items tab in the Data Explorer window displays the telemetry data generated by devices registered with the Azure Central IoT application and processed by the Azure function, including pk, timestamp, deviceId, and temperature.
Results
Congratulations! You completed the second exercise of this module. In this exercise, you created an Azure IoT Central application.