Formulas, formula lines, and formula versions
A formula defines the materials, ingredients, and outcomes of a specific process in process manufacturing. Along with the corresponding route, the formula defines the whole process and is used to plan and produce products in process manufacturing.
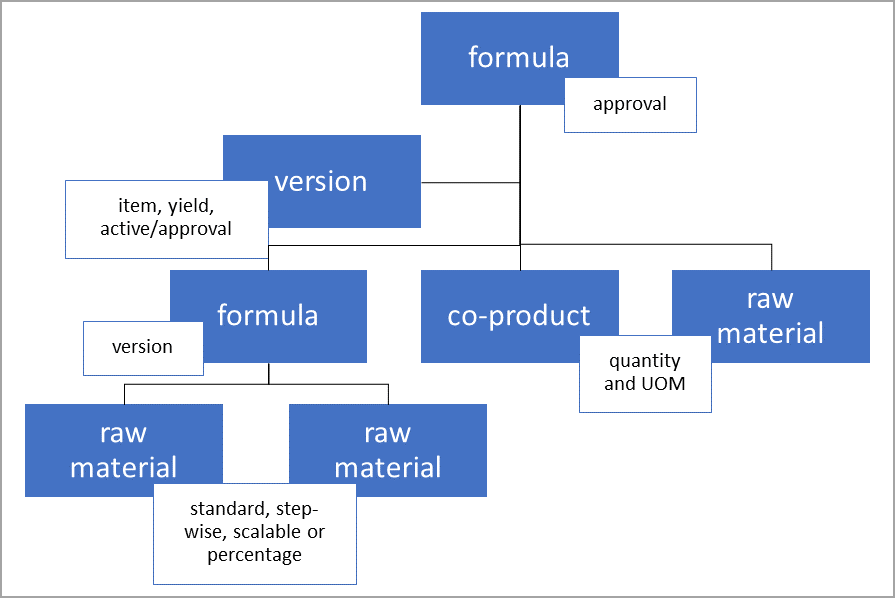
To add lines to a formula, you must assign the formula to at least one formula version. The formula version represents the link between the released product and the formula. A formula version is only valid for production if it is approved by an authorized employee. To use a formula for master planning, you must link it to an approved and active formula version. A single formula can have multiple formula versions; however, any change to the formula lines will impact all versions of the formula.
Each formula or planning item can have multiple approved formula and formula versions. Each formula can have different formula lines, co-products and by-products, cost definitions, batch size definitions, and so on. Of these multiple approved formula versions, you can have multiple active formula versions if the different versions do not overlap in the effective dates, sites, and/or quantity ranges.
A formula consists of the ingredients and quantities that are required to produce a specific quantity of a formula item. Depending on the task that you perform, you can access formula functionality from the Inventory and Warehouse management or the Product information management modules in Supply Chain Management.
Formulas and formula lines
A formula consists of one or more formula lines that identify the ingredients or items that make up the formula. A formula line can contain bill of materials (BOM) items, formula items, catch weight items, purchased items, co-products, or by-products. Because many items are used in multiple products, an item can be used in more than one formula.
An example of a formula is the formula for a chocolate chip cookie. The ingredients for this formula use multiple lines, such as flour, sugar, eggs, butter, and chocolate chips. The formula for the chocolate chip cookie contains ingredients that are likely used in other formulas. While making the chocolate chip cookies, you might have leftovers, such as crumbs, or some of the cookies might be overbaked or undercooked. These items can be set up as co-products or by-products, depending on the characteristic of the output. If the item can be reused in other processes or sold (if it represents a value), then you can set up the item as a co-product. If the item does not represent a value or if a cost is associated with disposing of the output (burden cost), then you can set up the item as a by-product.
When creating a formula line, you can use the line type to indicate how the system should handle the line when you run master planning and produce batch orders. Each line type gives a different result. The following table describes the line types that you can select.
| Line type | Description |
|---|---|
| Item | Select Item when the item is a raw material or a semi-finished item that is picked from inventory or when the item is a service. |
| Phantom | Select Phantom when you want to explode any lower-level formula items that are contained on formula lines. When you estimate the batch order, and the formula items are exploded, the component items are listed as formula lines on the batch order. Additionally, the corresponding routes are added to the production route. Formula items are exploded by using the current configuration. When you use the Phantom line type, you can handle production and measurement configurations that occur at different formula levels. If you select Phantom for a product on the Engineer FastTab of the Released product details page and then use this product in a formula, the line type of the formula line is changed to Phantom. You can't select Phantom for a catch weight item or for items where the production type is Co-product, By-product, or Planning item. |
| Pegged supply | Select Pegged supply to create a batch order, production order, kanban, transfer order, or purchase order for the ingredient that is contained on the formula line. The related order is determined based on the default order settings and the production type of the ingredient and is created when you estimate the batch order. The required ingredient quantities are reserved for the batch order. This method is often used in make-to-order scenarios. |
| Vendor | Select Vendor if the production process uses a subcontractor and you want to create a subproduction or purchase order for the subcontractor. The service or work that the subcontractor performs must be created by using a formula item or a service item. You can attach the item to the parent item as a formula line. The route must also contain an operation that is assigned to the subcontractor's operations resource as type Vendor. This operation is attached to the formula line by using the Oper. No. field. |
Formula versions
When creating a new formula, you must first create a formula version before adding the formula line items and their specific characteristics. Every formula must have at least one version. The Approved button on a formula version becomes available only after a version record has been successfully saved.
Each formula version record is associated with one or many co-products and by-products that can be produced as you produce the finished product. Many products can be made from the same ingredients in different batch sizes, in multiples, or by using different yields. You can create as many versions of a formula as you require.
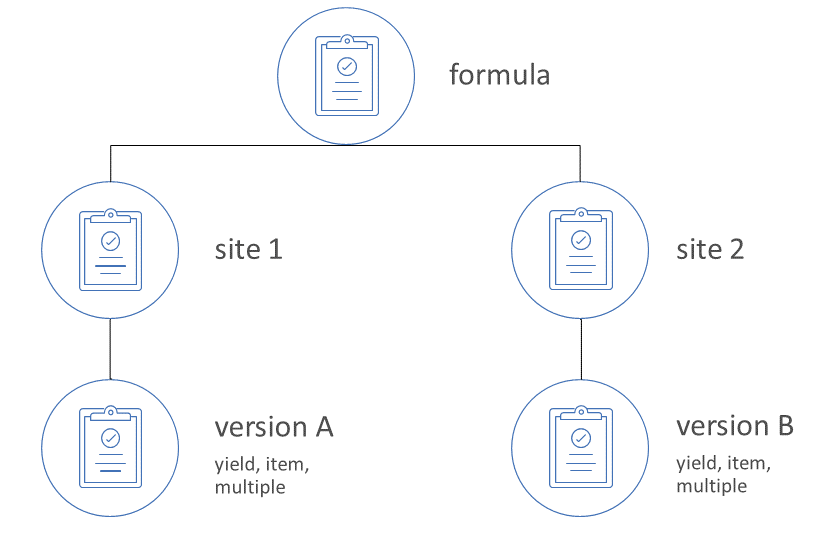
A site is a grouping of business resources, such as warehouses and production facilities, that share transactions and are located at a geographical location. The site entity is mandatory in Supply Chain Management as an inventory storage dimension.
You can define a formula version without a site; then, the related formula can work for all sites and a specific formula or route for an individual site. In the multisite production environment, this feature ensures that an appropriate formula is created, produced, and stored at the same site.
Production at multiple sites can involve a formula where the formula lines are the same at both sites. Each site would have a formula version for that shared formula where a different yield, formula item (produced item), effectivity dates, and formula multiple could be specified.
When you are planning materials and resources in an environment that has multiple production sites, the formula and route versions are selected according to the site, validity dates, and quantity that is specified in the respective versions of the formula and route.
To manage multiple active formula versions, use effective date ranges or From quantity fields. Multiple active formula versions can exist only if the date range and From quantity don't overlap.
Unlike BOMs, where one BOM is often associated with many BOM versions, only one formula version typically exists for each formula. Only one formula version can be activated for the coverage dimensions and quantity for a given product. However, many formula versions might exist for other reasons, and you can manually select them when you create a batch order.
Set up a formula to use Lot Inheritance from its components
Use the following steps to set up a formula to use Lot Inheritance from its components:
Create a batch attribute
Navigate to Inventory management > Setup > Batch > Batch attributes.
Select New.
In the Attribute field, enter or select Acidity.
In the Description field, enter or select Acidity.
In the Attribute Type field, enter or select Fraction.
In the Maximum field, enter or select 10.
In the Increment field, enter or select 0.01.
Select Save.
Close the page.
Assign the attribute to the item
Navigate to Product information management > Products > Released products.
Use the Quick Filter to filter on the Item number field with a value of M2004.
On the Action Pane, select Manage inventory.
Select Product specific.
Select New.
In the Attribute relation field, select Acidity.
Set Minimum to 1.
Set Maximum to 3.
In the Target field, enter or select 1.7.
Select Save.
Close the page.
Assign potency information
Navigate to Product information management > Products > Released products and select M2004 product on the Release product details page.
Select Edit.
Expand the Manage inventory FastTab.
In the Base attribute field, enter or select Acidity.
Select Save.
Copy the formula for item P2000
Navigate to Product information management > Products > Released products.
Use the Quick Filter to filter on the Item number field with a value of 'p2000'.
On the Action Pane, select Engineer.
Select Formula versions.
Select New.
Select Formula and formula version.
In the Number field, enter 001 and in the Name field, enter or select Formula123.
Select Yes in the Copy field.
In the Site field, enter or select 1.
Select OK.
In the Formula version field, Enter 2000 and select for P2000 from the drop-down.
Select OK.
Modify the M2004 and M2007 lines
In the list, select row M2004.
In the Ingredient type enter or select field, select 'Active'.
In the list, select row M2007.
In the Ingredient field, enter or select 'Compensating'.
Select Save.
Select Ingredients.
Select Compensation principle.
In the Active ingredient field, select M2004.
Select OK.
Close the page.
Approve and activate the formula
In the list, select the old formula version.
In the To date field, Enter current date
In the list, select the new formula version.
In the From date field, enter current date and select Formula version tab on the Action pane.
Select Approval.
In the Approved by field, select Glen John.
Select Select.
Select Yes in the Do you also want to approve the formula? field.
Select OK.
Select Activate.
Create a purchase order
Perform the below steps in USPI. Go to Procurement and sourcing > Purchase orders > All purchase orders.
Select New.
In the Vendor account field, enter or select US-102.
In the Warehouse field, select 13.
Select OK.
In the Item number field, enter or select m2004.
Set Quantity to 800.
On the Line details FastTab, under Financial dimensions tab, Update the ProductGroup as OJB2B
On the Action Pane, select Purchase.
Select Confirm.
Receive and enter a batch attribute value
On the Action Pane, select Receive.
Select Product receipt.
In the Product receipt field, enter or select 1234
Select Update line.
Select Registration.
Select Add registration line.
Select Confirm registration.
Select Save.
Close the page twice until you reach the page where you are posting product receipt order page.
Invoice and review pricing
In the Quantity field, select Registered quantity.
Select OK.
Note
If you get an error message while posting the order stating – “Blank is not allowed in the ProductGroup field for the combination.” Please follow the below steps
Navigate to General Ledger > Chart of Account > Structures > Configure account structures.
Search for Manufacturing PI P&L
Make sure for the main accounts, the “Blank values are allowed” option is checked
Select on Activate from the Action pane
Select on Activate
- Once the above steps are completed, please perform steps from “Receive and enter a batch attribute value “ to post the order
On the Action Pane, select Invoice.
Select Invoice.
In the Number field, enter 123.
In the Invoice date field, enter current date.
Select Update match status.
Select Post.
On the Purchase order lines.
Select Inventory.
Select Transactions.
Configure working time calendar
Go to Production Control > Setup > Calendars > Calendars.
Select 24hr and select Working times.
Select Compose working times.
In To date field, enter date.
In Working time template, select 24hr and select OK.
Close the page once the operation is completed.
Close it again until you reach Working time calendars page.
Select 8hr and select Working times.
Select Compose working times.
In To date field enter date.
In Working time template field enter 8Hr. Select OK.
Create and process the batch order
Go to Production control > Production orders > All production orders.
Select New batch order.
In the Item number field, enter or select p2000.
Select Create.
On the Action Pane, select Production order.
Select Estimate.
Select OK.
Select Start.
Select OK.
Complete batch reservation and balancing
Select Batch balancing under Process > Production Order from the Action pane
In the list, select M2004, M2002 and M2005
Note
If you do not see the Batch lines present for M2002 and M2005, Proceed with creating a Purchase orders for M2002 and M2005.
Select the Marked check box respectively for all the three items
Select Balance batch ingredients.
Select Confirm the formula.
Select OK.
Post the picking list and report as finished batch order
On the Action Pane, select View.
Select Picking list.
In the list, select the link for the picking list.
Select Post.
Select OK.
Close the page.
On the Action Pane, select Production order.
Select Report as finished.
Select a value in Batch number field and then click on the same batch number
Select New.
In the Batch number field, enter or select a value.
In the Manufacturing date field, enter a date.
Select Save.
Close the page.
In the Batch number field, select the created batch number.
Select OK.