Inbound operations
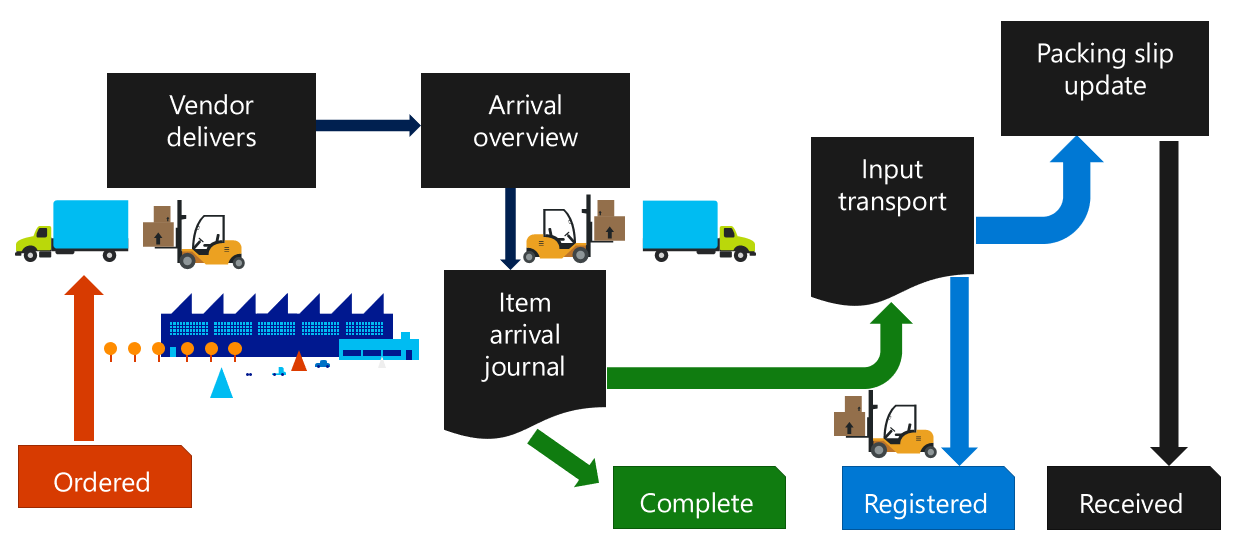
Consider the following scenario in the inbound process.
The Receiving clerk, wants to know what is expected to be received on the current day. On the Arrival overview page, they can get an overview of the current tasks and a rough estimate of quantities, volume, weight, different order types, and so on.
Later, a delivery arrives at one of the inbound docks, and the Receiving clerk receives a list of the delivery. On the Arrival overview page, they can perform the following tasks:
- Identify the matching receipt order and register the receipt as In progress. The lines that are required for a registration are automatically generated, and the receipt can be monitored, even though the transactions haven't yet been posted as Registered.
- Access the appropriate arrival journal reference (that is, the Item arrival journal or the Production input journal) and identify journals that are ready for a product receipt update.
Arrival overview page
The Arrival overview page provides an overview of items that are expected to arrive and the date when they are expected to arrive. As part of the arrival process, multiple sets of personal settings can be used.
To open the Arrival overview page, select Inventory management > Inbound orders > Arrival overview. On this page, you can view a list of orders that are expected to be received. The overview is divided into a header and lines.

The header information is grouped by the order type, expected receipt date, and delivery destination. When a header line is selected for arrival, all the detail lines that are related to the receipt reference are selected for arrival in the line details part of the page. When all related journal lines have been posted, this information isn't shown.
Users can define their personal settings on the Arrival overview profiles page.

In this example, the Receiving clerk wants to set up a new computer at a location that will be used to receive finished goods that come from production at Site 1. On the Arrival overview profiles page, they create a new setup that is named Site 1 production and specifies the following settings.
- On the Arrival options FastTab, in the Range field group, enter information about a day interval and the warehouses to include in the overview.
- On the Arrival options FastTab, in the Journal field group, enter a receiving warehouse, a location, and a journal name (item arrival/production input).
- On the Arrival query details FastTab, in the Site field group, in the Restrict to site field, enter a site to limit the view in the overview area.
- On the Arrival query details FastTab, in the Transaction types shown field group, set the Production orders option to Yes.
- On the Arrival query details FastTab, in the Miscellaneous group, set the Update on startup option to Yes if the view should be automatically updated at startup.
- Set the Update on range change option to Yes if the view should be automatically updated when range values are changed.
For this example, the Arrival overview profile name field on the Arrival options FastTab of the Arrival overview page is set to Site 1 production.
To automatically create arrival journals from the Arrival overview page, you need to define appropriate information in the Journal field group on the Arrival options FastTab.
- You must specify a journal name to create a journal.
- If you specify values in the Warehouse and Location fields, those values are applied on the journal lines. If you don't specify values, the system uses the values from the dimension that is specified on the inventory transactions.
Items that are received from one expected receipt order
On the Receipts FastTab, the Receiving clerk selects a line and then selects Start arrival.
All related lines that are in the specified range and that have a quantity to register are automatically selected. An item arrival journal is generated that has a match between the expected receipt order and the journal. The quantity is automatically initialized on all lines that are created.
Items that are received from more than one expected receipt order
On the Receipts FastTab, the Receiving clerk selects multiple lines and then selects Start arrival.
An item arrival journal is generated that has a match between all the expected receipt orders and the journal. All lines are created on one item arrival journal header, and the quantity is automatically initialized.
Receive items from one or more expected receipt orders
To get an overview of expected receipts in a date interval, the Receiving clerk enters the following information in the fields on the Arrival options FastTab on the Arrival overview page and then selects Update to update the view:
- Arrival overview profile name: Inquiry
- Show lines: All
- Days back: (Blank)
- Days forward: 0
- Warehouses: 11, 13
The Receiving clerk can view the following information:
- An overview of the registration tasks that are due for all the order lines that an item arrival journal has been created for but hasn't yet been posted. To view this information, they can select In progress in the Show lines field.
- Detailed line information for more than one order. They can select multiple header lines in the overview and then select Show all selected to view all the corresponding line detail information for all selected orders.
- Information about a specific purchase order. To show only information that is related to a specific reference number in the overview, they can enter an account number in the Account number field and an order number in the Reference numbers field.
- All related receipt orders for the system date and an infinite number of days back from it, and receipts to warehouses 11 and 13, regardless of status.
Update journals
To register one or more order lines that are due to be processed, the Receiving clerk can select the lines in the overview grid or in the line grid, and then select Journals > Show arrivals from receipts. The item arrival headers that match the lines are shown. To update the purchase order product receipt for the registered items, they can access the item arrival journal headers that are ready for update. To access these item arrival journal headers, they select Journals > Product receipt ready journals. All the header lines that are ready for product receipt update in the specified warehouse range are shown. (The header lines that are shown aren't related to the day interval.)
Start an arrival registration
By selecting multiple lines on the Arrival overview page, the Receiving clerk can start an arrival of more than one receipt reference. When they select a line from the receipts overview, the corresponding line details are selected. If a quantity for registration exists, the Start arrival button is available. They can use two methods to start the arrival registration:
- To filter the page so that it shows only records that meet specific criteria, in the Vendor reference field, scan a reference number from a vendor, such as the bar code for a delivery note.
- In the overview part or the details part of the Arrival overview page, manually select or cancel the selection of records for arrival registration. Then, when they select Start arrival, the selected records are automatically created in an item arrival journal. The records include line information and all unique field information is assigned.
Update arrival information and process a product receipt
When all goods have been registered, the Warehouse manager or Purchasing manager can update the received items with a product receipt to add the physical cost. To update arrival information and post a product receipt, follow these steps.
- Select Inventory management > Inbound orders > Arrival overview.
- On the Arrival overview page, select Journals > Product receipt ready journals to show a list of the journals that are ready for product receipt update.
- Select the journals that must be updated, and then select Functions > Product receipt.
- On the Posting page, enter the product receipt number, if it isn't already available on the journal, and then select OK to process the product receipt.
The Arrival overview page can help the warehouse manager and warehouse workers achieve an overview of expected work that must be done as part of an inbound process. The page can also be used to start the item arrival process, to help guarantee that items are tracked at the first entry into the warehouse.