Configure transportation management
Rate masters
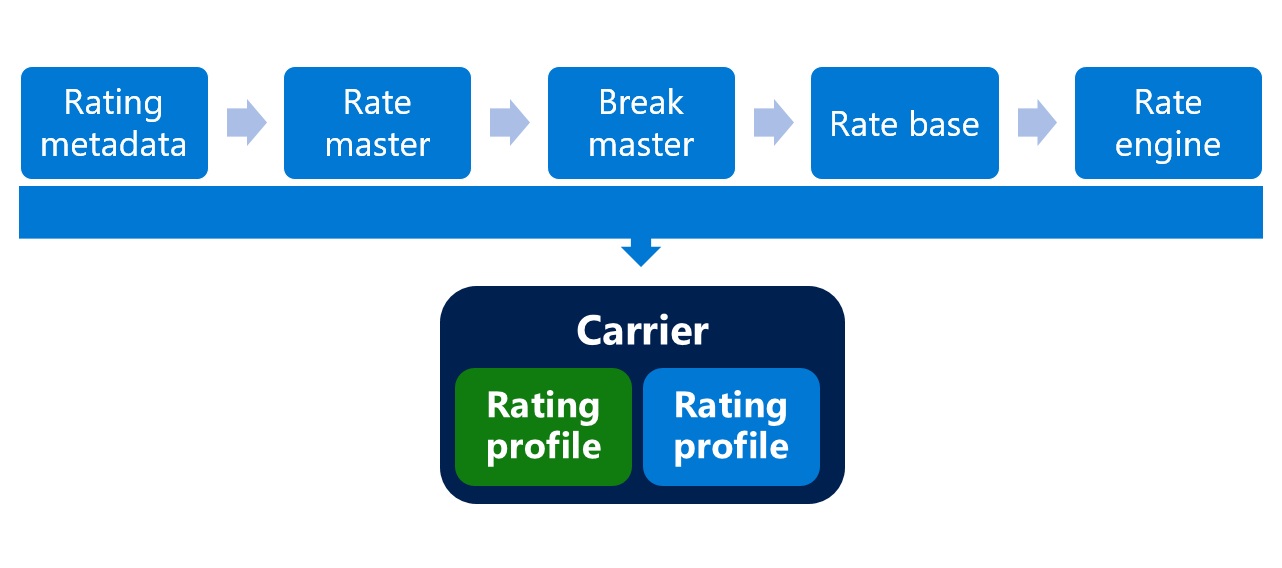
Rate masters are a key part of the rating setup for a shipping carrier. You can use rate masters to determine the available rates for the shipping carrier and to determine whether the rates justify considering the shipping carrier for an assignment. The rate master is associated with a shipping carrier in the carrier's rating profile. For each rate master, you must define rating metadata and a rate base.
Before setting up a rate master, you must set up at least one set of rating metadata. The rating metadata can be applied to any rate master, and it defines lookup criteria that are used to determine rates of a shipping carrier.
Setting up rating metadata requires the following tasks:
- Set up rating metadata with lookup criteria, such as a postal code and carrier service.
- Associate a rate master with the rating metadata and, on the rate master, provide values for criteria, such as a postal code and carrier service. One or more rate masters are associated with a shipping carrier on the Rating profile FastTab. You can use rate masters to determine the available rates for the shipping carrier and to determine whether the rates justify considering the shipping carrier for an assignment.
The break master defines the break values that you must associate with the rate base.
For example, distances are structured into breakpoints of 50, 100, and 150 miles. Up to 50 miles is charged with USD 10.00 for each assignment, between 50 and 100 miles is charged with USD 18.00, and from 100 to 150 miles is charged with USD 20.00.
If you want to set up a tariff structure for the rate master, you can create a rate base. The rate base will structure rates in breakpoints.
To calculate rates, you must create one or more engines or automatically initialize the base engine data. You can search for available shipment rates based on information such as travel distance or zones in a region. The search criteria are interpreted by transportation management engines that calculate the available rates.
Finally, you will link all the rating information to a carrier by creating a rating profile and then selecting one or more rating profiles on the Rating profiles FastTab of the Shipping carriers page.
Rating metadata
Rating metadata refers to a unique set of determinants or fields that are used by the carriers and services to determine the transportation tariff. Each set of metadata includes rate assignments, which are a minimum set of attributes that are required to calculate the tariff for a given shipment.
For example, attributes might include the origin's country or region and zip code, along with the shipment's destination country or region and zip code. The data for the assignments are assigned to a lookup type, which is a corresponding master data field in the system such as a less than truckload (LTL) code, Standard transportation commodity code (STCC), postal code, and so on.
Follow the steps in this procedure to set up a rate master for an air carrier:
- Go to Transportation management > Setup > Rating > Rate master.
- Select New.
- In the Rate master field, enter a value.
- In the Name field, enter a value.
- In the Rating metadata ID field, select the drop-down button to open the lookup. The rating metadata ID will determine the data that is needed for the rate master because it defines the metadata that is expected by the TMS engine that is using this rate master.
- Select the P2P option (for example).
- Select Save.
- To set up the rate base, select Rate base on the menu at the top of the page.
- Select New.
- In the Rate base field, enter a value.
- In the Name field, enter a value.
- In the Break master field, select the drop-down button to open the lookup.
- For this example, select Weight.
- Expand the Details section.
- Select New.
- In the Drop-off postal code from field, enter 30301.
- In the Drop-off postal code to field, enter 30318.
- In the Drop-off country region field, enter USA.
- In the <1.00 Lbs field, enter 100. Insert the rate per lbs. if the total weight of the load is less than 1 pound.
- In the <5.00 Lbs field, enter 300. Insert the rate per lbs. if the total weight of the load is less than 5 pounds.
- In the <20.00 Lbs field, enter 500. Insert the rate per lbs. if the total weight of the load is less than 20 pounds.
- In the <100.00 Lbs field, enter 1000. Insert the rate per lbs. if the total weight of the load is less than 100 pounds.
- In the <1,000.00 Lbs field, enter 3000. Insert the rate per lbs. if the total weight of the load is less than 1000 pounds.
- Select Save.
- Close the page.
- To assign the rate base, expand the Rate base assignments section.
- Select New. You can have several rate base assignments for each rate master. Having several assignments allows you to create several different price points for each carrier depending on destinations, services, or different rate bases. In this procedure, you will only create one rate base assignment.
- In the Name field, enter a value.
- In the Rate base field, select the drop-down button to open the lookup.
- In the list, find and select the desired record.
- In the Service field, select the drop-down button to open the lookup.
- In the list, find and select the desired record.
- In the Pick-up Postal Code field, enter 98052. Specify which postal code this rate base assignment should be valid from.
- In the Pick-up Country Region field, enter USA.
- Select Save.
Rating metadata is engine-specific. You must set up rating metadata before setting up a rate engine.
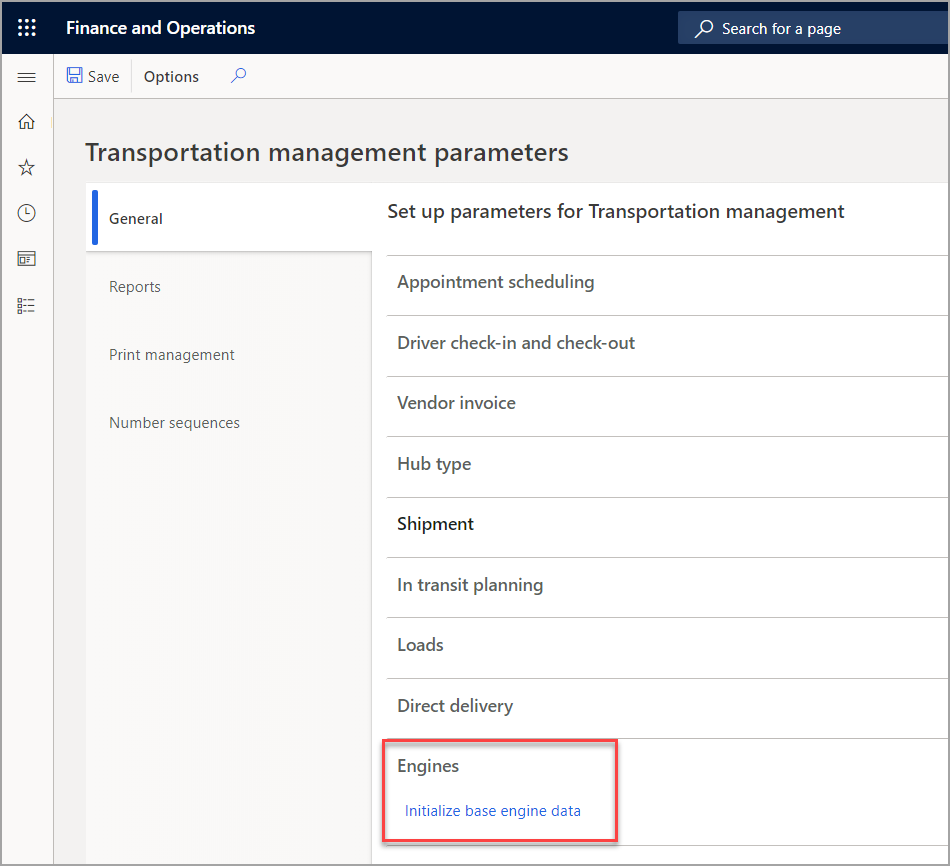
The rating metadata that is required for the engines that are shipped with Supply Chain Management is generated with the engines when you select the Initialize base engine data button on the Transportation management > Setup > Transportation management parameters page.
We don't recommend that you create your own rating metadata for existing engines; this approach is error-prone because it can cause the engine to fail unless the rating metadata strictly conforms to the rules of the engine.
- Open Transportation management > Setup > Rating > Rating metadata.
- Select New to create new rating metadata.
- Enter a unique ID and name for the rate base type.
In this example, you will set up two rate bases, set up an assignment, and then make them all mandatory.
- In the Described data type field, select Rate base to set up criteria fields.
- In the Rate base type metadata FastTab, select New.
- In the Data type field, select Integer for the input type of the data.
- In the Lookup type field, select ZIP/Postal code.
- Select the Mandatory check box.
- In the Described data type field, select Rate base to set up criteria fields.
- In the Rate base type metadata FastTab, select New.
- In the Data type field, select String for the input type of the data.
- In the Lookup type field, select Region.
- Select the Mandatory check box.
- In the Described data type field, select Assignment to set up criteria fields.
- In the Rate base type metadata FastTab, select New.
- In the Data type field, select Real for the input type of the data.
- In the Lookup type field, select a type.
- Optionally, select the Mandatory check box.
- Close the page.
If you are creating a rate base type with three rate bases and four assignments, you could select one of the following options:
- STCC class - string
- Mileage - integer or real
- Weight - real
The options for the rate bases are:
- Origin country/region - string
- Origin zip code - integer
- Destination country/region - string
- Destination zip code - integer
The Standard transportation commodity code (STCC) is a publication that contains specific product information that is used on waybills and other shipping documents. An STCC is a seven-digit numeric code that represents a commodity.
Assignment of an STCC is associated by a commodity description that was developed to conform to exact descriptions in freight transportation classifications of rail and motor carriers. Accompanying an STCC are two corresponding codes: the Harmonized commodity description coding system, or Harmonized code, and a Standard classification of transported goods (SCTG) category.
The less-than-truckload (LTL) class refers to the National motor freight classification (NMFC) code and is a category of your LTL freight. The freight class determines the carrier shipping charges by identifying the size, value, and difficulty of transporting your LTL freight.
Set up a new LTL class
To set up a new LTL class, follow these steps:
- Open Transportation Management > Setup > Transportation standards > LTL classes.
- Select New and create (or edit existing) LTL class codes.
- Enter a value in the LTL class field.
- Enter a value in the Name field.
- Enter a value in the Class field.
- Close the page.
Create an STCC code
To create an STCC code, follow these steps:
- Open Transportation management > Setup > Transportation standards > STCC codes.
- Select New to create a new STCC code.
- Enter a unique ID and descriptive name for the STCC code.
- Close the page.
The National motor freight classification (NMFC) code determines how the item is rated for certain carriers. It is also important to specify the code for the bill of lading.
After you have created the LTL codes, you can create the NMFC codes in Supply Chain Management. In most cases, the class will be the same for the NMFC and the LTL class. However, in some cases, an LTL shipment might cause the same product to be in a different class. After you create the NMFC code, you can link them to the products.
Create an NMFC code
To create an NMFC code, follow these steps:
- Open Transportation management > Setup > Transportation standards > NMFC Codes.
- Select New to create a new NMFC code.
- Enter a unique ID and descriptive name for the NMFC code.
- Optional: Enter the LTL class that the NMFC corresponds to.
- Optional: Enter the bill of lading type for the NMFC code.
- Close the page.
The Harmonized code is an internationally standardized system of names and numbers for classifying traded products that were developed by the World Customs Organization, and it accompanies the STCC code.
Set up a Harmonized tariff schedule code
To set up a Harmonized tariff schedule code, follow these steps:
- Open Transportation Management > Setup > Transportation Standards > Harmonized Tariff Schedules.
- Select New.
- Enter a value in the Harmonized tariff schedule field.
- Enter a name in the Name field.
- Close the page.
Link an NMFC, STCC, and Harmonized code to a product
To link an NMFC, STCC, and Harmonized code to a product, follow these steps:
- Open Product information management > Products > Products.
- Select a product from the list.
- Select Edit in the Action Pane.
- Open the Warehouse FastTab.
- Enter a code in the NMFC code field.
- Enter a code in the STCC code field.
- Enter a code in the Harmonized system field.
- Close the pages.
Shipping carrier
The shipping carrier is one of the required basic setups for transportation management. The carrier is a key input for the orders and loads that are created.
Use the Shipping carrier page to set up a carrier service, mode of shipment, transportation tender, and rating profile for the shipping carrier.
Create a shipping carrier
To create a shipping carrier, follow these steps:
- Open Transportation management > Setup > Carriers > Shipping carriers.
- Select New to create a new shipping carrier.
- In the Shipping Carrier field, enter the type of the shipping carrier.
- In the Name field, enter a name for the shipping carrier.
- In the Mode field, select the shipment mode type.
- On the Overview FastTab, specify the shipping carrier details by using the following fields:
- Activate shipping carrier - Set this slider bar to Yes to use the specified shipping carrier for the shipment.
- Vendor - Select the vendor account to which you want to assign the shipping carrier.
- SCAC - Enter an ID for the Standard Carrier Alpha Code (SCAC).
- Activate carrier rating - Set this slider to Yes to enable automatic rating for the shipping carrier.
- Optional: In the Transportation tender type field, select one of the following methods for updating the details of transportation tender:
- Manual - Manually update the transportation tender details by using the Transportation tenders page.
- EDI - Automatically update the transportation tender details by using an Electronic Data Interchange (EDI) on the Transportation tenders page.
- Optional: In the Pro number sequence field, you can select a number sequence that is associated with a generic engine, if any are available.
- On the Addresses FastTab, select New, and then enter the address and purpose of the shipping carrier.
- Select OK to save the address.
- Close the page.
Transportation mode
The transportation mode represents the type of transport that the carrier uses for freight deliveries, such as Less than load (LTL), Truckload (TL), or Parcel. The transportation method represents the form of transport that the carrier uses for freight deliveries, such as air, ground, ocean, or rail.
Create a transportation mode
To create a transportation mode, follow these steps:
- Open Transportation management > Setup > Carriers > Mode.
- Select New to create a new mode.
- Enter a unique ID and a descriptive name for the mode.
- Close the page.
Associate a shipping carrier with a transportation mode
To associate a shipping carrier with a transportation mode, follow these steps:
- Open Transportation management > Setup > Carriers > Shipping carriers.
- Select Edit.
- Select a shipping carrier.
- In the Mode field, select a transportation mode.
- Close the page.
Create a transportation method
To create a transportation method, follow these steps:
- Open Transportation management > Setup > Carriers > Transportation methods.
- Select New to create a new transportation method.
- Enter a unique ID and descriptive name for the transportation method.
- Close the page.
Carrier services
One or more carrier services must be configured for a carrier. The carrier service defines the services that are offered by the carrier. Examples of carrier services would be next day air, second day air, and ground.
Create a carrier service
To create a carrier service, follow these steps:
- Open Transportation management > Setup > Carriers > Shipping carriers.
- Select LTL on the left-hand pane.
- Expand the Services FastTab.
- Select New.
- Enter a unique ID in the Carrier service field.
- Enter a Name for the carrier service.
- Optional: Select a Load template ID.
- Select a Transportation method.
- Enter a Mode of delivery.
- Optional: Enter an External code.
- Select a Billing group ID.
- Close the page.
Carrier groups
Carrier groups are used to group shipping carriers with their corresponding shipping services.
Create a carrier group
To create a carrier group, follow these steps:
- Open Transportation management > Setup > Carriers > Carrier group.
- Select New.
- Enter a Carrier group ID and a name.
- On the Details FastTab, select New.
- Select a Shipping carrier.
- Select a Carrier service.
- Close the page.
Transportation status
You can set up master codes for transportation statuses to interpret codes that are provided by your shipping carriers. This method is used for EDI integration with shipping carriers to provide a status. The transportation status that you provide for a transportation master status code can help you track the status of a load, shipment, or container.
Create a transportation status
To create a transportation status, follow these steps:
- Open Transportation management > Setup > Transportation status masters.
- Select New to create a transportation status master.
- In the Transportation status master field, enter a unique code for the transportation status.
- In the Transportation type field, select either Shipping carrier or Hub as the type of transportation.
- Enter a name and transportation status.
- Close the page.
Map a transportation status to a carrier status
To map a transportation status to a carrier status, follow these steps:
- Open Transportation management > Setup > Carriers > Carrier transportation status.
- Select New to map a code from a shipping carrier to a transportation status master code.
- Select the unique ID for the shipping carrier and the carrier service.
- Select the transportation status code that you want to map to the selected shipping carrier's code.
- Enter the external code that is used by the shipping carrier.
- Close the page.
Number sequence
The Number sequences page in the Transportation management module lets you set up various pro-numbers to be used by the LTL and TL carriers.
Create a number sequence for a pro number
To create a number sequence for a pro number, follow these steps:
- Open Transportation management > Setup > Carriers > Number sequences.
- Select New to create a new number sequence.
- Enter a unique ID and descriptive name for the number sequence.
- In the Number sequence type field, Pro number is the only option.
- In the Check digit field, Check digit is the only option and is set up as a generic engine.
- On the Sequence FastTab, provide information on the sequence.
- Close the page.
Link a number sequence to a carrier
To link a number sequence to a carrier, follow these steps:
- Open Transportation management > Setup > Carriers > Shipping carriers.
- Select a shipping carrier.
- Select Edit.
- On the Overview FastTab, select an option in the Pro number sequence field.
- Close the page.
Load templates
Load templates are used in the load planning workbench to allow for the defaults for weight restrictions and/or equipment restrictions for the load. For example, if the load is frozen goods, then a load template would be set up that identifies a refrigerated truck and the weight that the selected equipment is restricted to.
Create a load template
To create a load template, follow these steps:
- Open Transportation management > Setup > Load building > Load templates.
- Select New to create a new load template.
- Enter a unique ID and descriptive name for the load template.
- Enter the Load height, Load width, and Load depth.
- Enter the Max. allowed load volume.
- Enter the Max. allowed load weight.
- Enter the Maximum allowed load gross weight.
- Enter the Maximum number of freight pieces allowed. This selection can relate to the number of pallets, loosed boxes, and so on.
- Close the page.
Transportation tender
A transportation tender is a shipping document that has an assignment for a load, a route, or part of a route. You can use this transportation tender to keep track of the dates and rates that are approved between the customer and a shipping carrier.
You can create a transportation tender from a route, a route segment, or from a load on a route segment. You can also create and update these documents on the Transportation tenders page.
After you have finished creating the transportation tender, you can submit it, which will update the workflow status from Pending to Submitted. When you have received confirmation from the carrier, you can confirm it and enter confirmed details such as the rate and pickup date.
You can also create and update these documents on the Transportation tenders page.
To create a transportation tender, follow these steps:
- Open Transportation management > Planning > Dock appointment scheduling > Transportation tenders.
- In the Filter by field, select one of the following options to indicate the type of assignment that is requested.
- Load - Refers to a pickup of a specific load.
- Route - Refers to a load that will be transported by using a route.
- Route segment - Refers to a load that will be transported by using part of a route.
- Route segment for a load - Refers to a specific load that will be transported by using part of a route.
- Select New to create a new transportation tender. The tender document automatically displays an ID in the Transportation tender field.
- On the References FastTab, in the Reference ID field, select a unique ID for the load. The loads are filtered according to your selection in the Filter by field.
- On the General FastTab, in the Shipping carrier field, select the shipping carrier that should pick up the load.
- In the Carrier service field, select a service that is offered by the carrier.
- Enter the remaining information in the Shipping field group.
- In the Rates field group, enter the date and rate request for the carrier. The Requested pickup date and time and the Requested rates fields are for the customer request. If the carrier wants to update the information before confirmation, this information must be entered in the Confirmed pickup date and time and the Confirmed rates fields. You can view the exchange of information between the customer and the carrier on the History FastTab.
- Close the page.
Watch the following video to see the creation of a transportation tender.
To submit, confirm, and accept a transportation tender, follow these steps:
- Open Transportation management > Planning > Dock appointment scheduling > Transportation tenders.
- Select Update status.
- Select Submit.
- Select Confirm.
- Enter the Rate and Date.
- Press OK.
- Select Update status.
- Select Accept.
- Close the page.
Transportation management parameters
To review the transportation management parameters, follow these steps:
- Open Transportation management > Setup > Transportation management parameters.
- On the General tab, review the following FastTabs:
- Appointment scheduling - Set the default duration of an appointment that is scheduled for delivery or pickup of shipment.
- Driver check-in and check-out - Enter an alert interval for driver check-in or check-out.
- Vendor invoice - Select options for vendor invoices.
- Hub type - Select a Port hub type.
- Shipment - Indicate whether shipments are planned by shipments.
- In transit planning - Indicate whether in transit planning is used.
- Loads - Determine whether to:
- Automatically create at sales order entry
- Automatically create at purchase order entry
- Automatically create at transfer order entry
- Override outbound shipped confirmation date
- Enable split of transfer order ship confirmation and posting transfer ship
- Direct delivery - Create customer charges for direct delivery.
- Engines - Initialize base engine data.
- Freight reconciliation - Indicate whether to enable freight reconciliation. If this option is disabled, no freight bills will be generated.
- Bill of lading - Indicate whether to create a master bill of lading when there is more than one shipment on a load.
- On the Reports tab, review the following FastTabs:
- Load report - Select a load report note type.
- Bill of lading - Select a carrier purpose.
On the Print management tab, the various documents in transportation management that are managed by print management are listed.
On the Number sequences tab, standard number sequences in transportation management are listed.