Lab - Configure warehouse management
Read this first - before you start the lab!
Important
For this lab, you CANNOT sign in with your own credentials. Use the following steps to sign in to your lab environment with the correct credentials.
Ensure that you are signed in to Microsoft Learn.
Select Launch VM mode or Sign in to launch VM mode in this unit.
In the Resources tab on the lab side bar, select the T icon next to Password in the MININT box, to have the administrator password for the Virtual Machine entered for you.
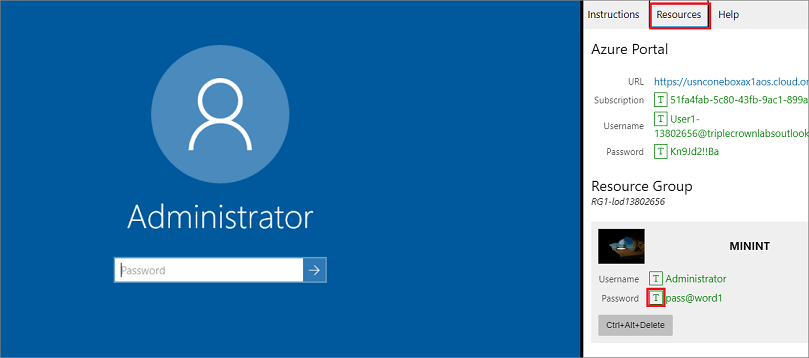
Select Enter.
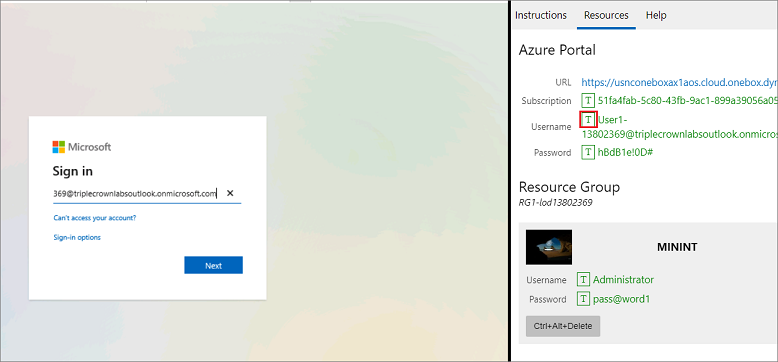
Microsoft Edge will open. Wait for it to navigate to the Sign in page for finance and operations.
On the Microsoft Sign in page in finance and operations, place your mouse cursor into the Username field.
On the Resources tab of the lab side bar, below the Azure portal heading, select the T icon next to Username, then press Enter.
Your mouse cursor will now be in the Password page.
On the Resources tab of the lab side bar, below the Azure portal heading, select the T icon next to select Password, then press Enter.
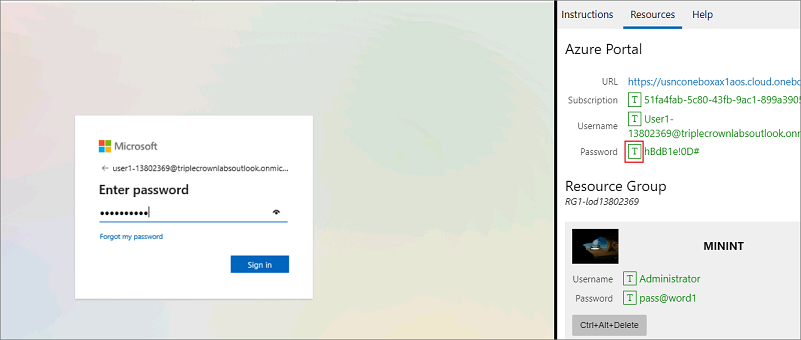
Don't stay signed in or store the password on the virtual machine.
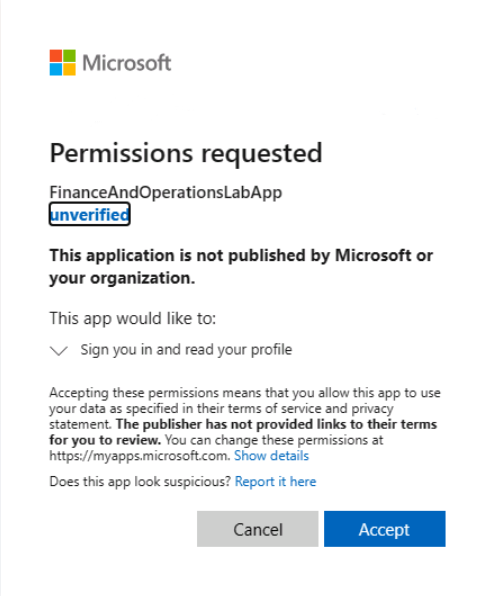
Select Accept in the Permissions requested page.
To see the lab instructions, select the Instructions tab on the lab side bar.
You can now begin your work on this lab.
Scenario - Configure warehouse management elements
As the warehouse manager in USMF, you need to configure the warehouse management elements.
Create a storage dimension group
As a warehouse manager in USMF, you need to create a new storage dimension group to use with warehouse management.
- In company USMF, go to Product information management > Setup > Dimension and variant groups > Storage dimension groups.
- Select New in the Action Pane to create a new storage dimension group.
- Type LASD in the Name field.
- Type Los Angeles storage dimension in the Description field.
- Enable the Use warehouse management processes option to enable warehouse management in the Warehouse specific setup FastTab.
- Select Save in the Action Pane and verify that the Site, Warehouse, Location, Inventory status, and License plate dimensions are active.
- Close the page.
Create a tracking dimension group
As a warehouse manager in USMF, you need to create a new tracking dimension group that will not track serial numbers or batch numbers.
- Open Product information management > Setup > Dimension and variant groups > Tracking dimension groups.
- Select New in the Action Pane to create a new Tracking dimension group.
- Type LABT in the Name field.
- Type Los Angeles batch tracking in the Description field.
- Ensure that None is selected in the Capture serial number field in the Serial numbers FastTab.
- Select Save in the Action Pane and the Tracking dimensions will appear in the Tracking dimensions FastTab.
- Ensure that the Active check box is not selected for Batch number, Serial number and Owner dimensions.
- Close the page.
Create a warehouse and assign a name and site
As a warehouse manager in USMF, you need to configure a new warehouse named "MainDC" in Site 1 for use within company USP2.
- Open Warehouse management > Setup > Warehouse > Warehouses.
- Select New to create a new warehouse.
- Type MainDC for the warehouse.
- Select Site 1 to relate the warehouse to.
Assign warehouse management attributes
- Expand the Master planning FastTab and select the Calendar "Production" for the warehouse.
- Expand the Warehouse FastTab.
- Set the Use warehouse management processes slider to yes.
- Set the Allow license plate moves during cycle counting slider to yes.
- Set the Decrement load line slider to yes.
- Select Save and close the page.
Create location types
As a warehouse manager in USMF, you need to create new location types for the warehouse, which you will name "RCV," "PICKING," and "FRESH."
- Open Warehouse management > Setup > Warehouse > Location types.
- Select New to create a new location type.
- Type PICKING as the identifier in the Location type field.
- Type Picking in the Description field.
- Select New to create another new location type.
- Type RCV as the identifier in the Location type field.
- Type Receiving in the Description field.
- Select New to create another new location type.
- Type FRESH as the identifier in the Location type field.
- Type Fresh in the Description field.
- Select Save and close the page.
Create location formats and add segments
As a warehouse manager in USMF, you need to create a new location format for Aisle-Rack-Shelf, and Rack-Shelf.
- Open Warehouse management > Setup > Warehouse > Location formats.
- Select New to create a new location format.
- Type ARS in the Location format field.
- Type Aisle - Rack - Shelf in the Name field.
- On the Details FastTab, we will specify the first line.
- In the Segment description field, type Aisle Prefix.
- Type 1 in the Length field.
- On the Details FastTab, select New to create a second line.
- In the Segment description field, type Aisle Number.
- Type 2 in the Length field.
- On the Details FastTab, select New to create a third line.
- In the Segment description field, type Rack Number.
- Type 2 in the Length field.
- On the Details FastTab, select New to create a fourth line.
- In the Segment description field, type Shelf Prefix.
- Type 1 in the Length field.
- On the Details FastTab, select New to create a fifth line.
- In the Segment description field, type Shelf Number.
- Type 2 in the Length field.
- Select Save in the Action Pane.
- Select New in the Action Pane to create a second location format.
- Type RS in the Location format field.
- Type Rack - Shelf in the Name field.
- On the Details FastTab, specify the first line.
- In the Segment description field, type Rack Prefix.
- Type 1 in the Length field.
- Select Save in the Action Pane.
- Close the page.
Create a dock management profile
As a warehouse manager in USMF, you need to set up a new dock management profile.
- Open Warehouse management > Setup > Warehouse > Dock management profiles.
- Select New in the Action Pane to create a dock management profile.
- Type SHIPSTAGE in the Dock management profile ID field.
- Type Staging locations unique per shipment in the Description field.
- Select Shipment ID in the Inventory types that should not be mixed field.
- Tab to the Assume empty location for new wave column and use the space bar to select the check box. This ensures that the location is empty before adding new items to the location.
- Select Save and close the page.
Create new location profiles
As a warehouse manager in USMF, you need to create new location profiles for picking, staging, receiving, bulk, and fresh.
- Open Warehouse management > Setup > Warehouse > Location profiles.
- Select New in the Action Pane to create a new Location profile.
- In the Location profile ID field, enter PICKING.
- In the Name field, enter Picking Locations.
- On the General FastTab, select ARS in the Location format field.
- On the General FastTab, select Picking from the Location type field.
- Set the Use license plate tracking slider to yes.
- Set the Allow mixed items slider to yes.
- Set the Allow cycle counting slider to yes.
- Select New to create a new Location profile.
- In the Location profile ID, enter STAGING.
- In the Name field, enter Staging locations.
- On the General FastTab, select Baydoor in the Location format field.
- On the General FastTab, select Stage in the Location type field.
- Set the Use license plate tracking slider to yes.
- Set the Allow mixed items slider to yes.
- Select New to create a new Location profile.
- In the Location profile ID field, enter RECEIVING.
- In the Name field, enter Receiving locations.
- On the General FastTab, select Baydoor in the Location format field.
- On the General FastTab, select Recv in the Location type field.
- Set the Use license plate tracking slider to yes.
- Set the Allow mixed items slider to yes.
- Select New to create a new Location profile.
- In the Location profile ID field, enter BULK-OS.
- In the Name field, enter Bulk Overstock.
- On the General FastTab, select RS in the Location format field.
- Set the Use license plate tracking slider to yes.
- Set the Allow mixed items slider to yes.
- Select New to create a new Location profile.
- In the Location profile ID field, enter FRESH.
- In the Name field, enter Fresh locations.
- On the General FastTab, select ARS in the Location format field.
- On the General FastTab, select Fresh in the Location type field.
- Set the Use license plate tracking slider to yes.
- Set the Allow mixed items slider to yes.
- Close the pages.
Scenario - Configure reservation hierarchies
You need to create a new reservation hierarchy to help you manage oranges. The oranges will be tracked by using site, warehouse, location, and batch numbers. Use the information provided to create a new reservation hierarchy.
Create a reservation hierarchy
- In company USMF, go to Warehouse management > Setup > Inventory > Reservation hierarchy.
- Select New on the Action Pane to create a new reservation hierarchy.
- Enter USMF in the Name field.
- Enter USMF Default in the Description field.
Select dimensions for the reservation hierarchy
- In the Selected pane, select the Serial number check box.
- Select the left directional button to move the dimensions to the Available pane.
- Repeat steps 1-2 for Owner.
- Select OK.
- A new reservation hierarchy has been created.
Apply the reservation hierarchy to a new product
You need to create a new product in company USMF called Low sugar orange juice, item number B1234. The new item will track site, warehouse, location, and batch numbers. The costing for the product will use the FIFO methodology and the posting will use the standard postings. Use the information provided to create a new item.
Create a product
- In USMF, open Product information management > Products > Released products.
- Select New in the Action Pane to create a new product.
- Enter the following information in the entry fields:
- Product number - B1234
- Product name - USB Hub
- Item model group - FIFO
- Item group - Consume
- Storage dimension group - Ware
- Tracking dimension group - Batch-Phy
- Reservation hierarchy - Batch - batch reservation hierarchy
- Select OK.
- A new product is created and the Released Product details master page will display.
Scenario - Configure disposition codes and location directives
You are asked to set up two new disposition codes. The first will be named "Ready," which will be available, and the second will be named "Not ready," which will be blocked for use with warehouse management.
- In company USP2, go to Warehouse management > Setup > Mobile device > Disposition codes.
- Select New to create a disposition code.
- In the Disposition code field, enter Ready.
- In the Inventory status field, select Available.
- Select New to create a disposition code.
- In the Disposition code field, enter Not ready.
- In the Inventory status field, select Blocked.
- Close the page.
Create inbound location directives
You need to configure a new inbound location directive that will receive goods to the warehouse and then one that will put away goods in bulk locations.
- Open Warehouse management > Setup > Location directives.
- Select Purchase orders in the Work order type field.
- Select New in the Action Pane to create a new location directive.
- Type MAIN DC in the Name field.
- Select Put in the Work type field because you want to put away the received items on purchase orders.
- Select Warehouse in the Warehouse selection field.
- Select 3 in the Site field.
- Select 30 in the Warehouse field.
- Select Stage in the Directive code field.
- Select Save.
Add lines to the location directive
- Select New in the Lines FastTab.
- Verify that the Sequence number is 1.
- Type 200 in the To quantity field.
- Select ea in the Unit field.
- Select None in the Locate quantity field.
- Select Save in the Action Pane.
- Select New in the Location directive actions FastTab.
- Type Fresh in the Name field.
- Select Save in the Action Pane.
Add location directive actions to the location directive
- Select Edit query in the Action Pane.
- Select Add on the Select query page.
- Select locations in the Table column.
- Select Location in the Field column.
- Select 30 in the Criteria column.
- Select OK.
- Close the Location directives page.
Scenario - Create a catch weight item
As the product manager for the company USMF, you are asked to set up five-pound (lbs.) bags of potatoes as a catch weight item. You will buy the potatoes in pounds and then create individual bags for consumer sales. Each bag could be between 4.25 and 5.75 lbs.
Create a catch weight handling policy
To create a catch weight handling policy, follow these steps:
- Change the company to USMF.
- Go to Warehouse management > Setup > Warehouse > Catch weight item handling policies.
- Select New.
- In the Catch weight item handling policy field, enter Potatoes.
- In the Description field, enter Potatoes.
- Save and Close the page.
Create a new released product
To create a new released product, follow these steps:
- Go to Product information management > Products > Released products.
- Select New.
- For Product number, enter 1825.
- For Product name, enter Potatoes.
- For CATCH WEIGHT, set the slider to Yes.
- For Item model group, select STD.
- For Item group, select Consume.
- For Storage dimension group, select Ware.
- For Tracking dimension group, select Batch-Phy.
- For Reservation hierarchy, select Batch.
- For all Units of Measure, select lb.
- Select OK.
- In the Product tab in the SET UP group, select Unit conversions.
- Select the tab for Inter-class conversions.
- Select New.
- In the From unit drop-down list, select ea.
- In the Quantity field, enter 5.
- In the To unit drop-down list, select lb.
- Select OK.
- Close the page.
- Go to the Manage inventory FastTab.
- Verify that the Catch weight item slider is set to Yes.
- For CW unit, select ea.
- Verify that Nominal quantity populates with 5 based on the Unit conversion.
- For Minimum quantity, enter 4.25.
- For Maximum quantity, enter 5.75.
- Go to the Warehouse FastTab.
- For Unit sequence group ID, select ea.
- For Catch weight item handling policy, select Potatoes.
- Save and Close the page.
Close the lab environment
- Select Done in the Instructions pane in the lab side bar.
- In the Lab is complete window, select Continue, and then select Leave to return to the next unit in the module.