Exercise - Set up the exercise environment
Important
This module creates Azure resources. If you don't plan to use this module again or if you don't complete the module, be sure to remove the created resources. We've included instructions for removing all resources at the end of the module.
This module assumes that you have Azure CLI installed. You can run commands from a Command Prompt window or Windows PowerShell. We recommend PowerShell.
The module also assumes that you have an Azure account. You need the Contributor and User Access Administrator roles or the Owner role on the Azure subscription.
Important
If you belong to an organization, you might need to coordinate with your IT Team to create your Azure Active Directory (Azure AD) user account and grant the appropriate privileges. Also, guest accounts associated with your Azure subscription don't meet the minimum requirements. You must have a member account.
The ARM template logic has been integrated into a connection prefab that drives a data simulator.
Download the solution and ARM template
In the previous unit, you cloned or downloaded the repository from GitHub.
Sign in to Azure using Azure CLI
Locate the azuredeploy.bicep script that we created for you. Typically, this file is in the root of the repository folder.
From the Start menu, open PowerShell. All Azure CLI commands run in your PowerShell console.
Change the current path to the location of the azuredeploy.bicep script you found in step 1.
Consolecd <path for azuredeploy.bicep>Sign in to Azure by using the az login command. This command opens a browser window and prompts for authentication.
Note
If the command fails to open the appropriate browser window, use this command:
az login --use-device-code. This device code flow returns a unique code. Open the device sign-in page in your browser and enter the code displayed in your terminal.
Set variables in PowerShell
Set the
$projectnamevariable. This value is the base unique name for the Azure resources that you create in this exercise. Extra random characters are appended to the project name. Make sure that your values are enclosed in double quotes.Note
Variables in PowerShell start with the
$symbol.Console$projectname="myproj"Important
Your project name is a maximum of 14 characters. It can contain only lowercase letters, numbers, and the hyphen character.
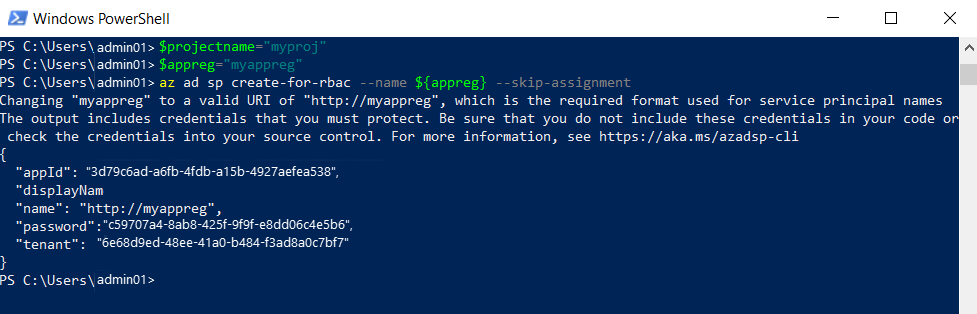
Set the App Registration name, which can be a maximum of 14 characters. This value is the name of the application registration for your mixed reality app.
Console$appreg="myappreg"
Create the App Registration
Run the following command to create a service principal and configure its access to Azure resources.
az ad sp create-for-rbac --name ${appreg} --role Contributor --scopes /subscriptions/<SUBSCRIPTION-ID> > AppCredentials.txt
This command's output is redirected from standard output to an AppCredentials.txt text file. The command creates the file in the same directory where you run the command. Any errors that might occur are displayed in your PowerShell console. Open the file to retrieve the credentials to configure the telemetry simulator application later.
Note
Be careful where you keep this file, because it contains credentials. Consider deleting the file after completing this learning path.
Obtain the object ID of the App Registration and the user ID
Create and set a variable for the
ObjectIDin PowerShell by using the following command.Console$objectid=$(az ad sp list --display-name ${appreg} --query [0].objectId --output tsv)Validate that the variable contains a GUID by using the
echocommand. If not, examine your previous steps.Consoleecho $objectidCreate and set a variable for the user ID.
Console$userid=$(az ad signed-in-user show --query objectId -o tsv)Validate that the variable contains a GUID by using the
echocommand. If not, examine your previous steps.Consoleecho $userid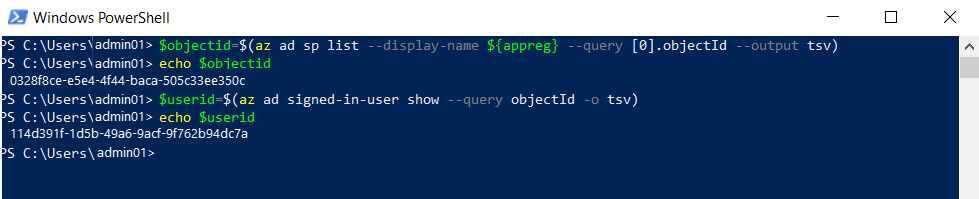
Create the Azure resource group
Create the resource group by using the az group create command in PowerShell:
az group create --name ${projectname}-rg --location eastus
Pay particular attention to the location. It must be eastus. This region is one of the valid regions for Microsoft.SignalRService/SignalR and Microsoft.DigitalTwins/digitalTwinsInstances.
Deploy the ARM template to the newly created resource group
Deploy the supplied bicep file to your resource group and redirect the output to a text file called ARM_deployment_out.txt. This process can take 10 to 15 minutes to complete.
az deployment group create --template-file azuredeploy.bicep --resource-group ${projectname}-rg `
   --parameters projectName=${projectname} userId=${userid} appRegObjectId=${objectid} `
   > ARM_deployment_out.txt
The file is for reference only. It isn't required for the rest of this module.
Note
You might receive several WARNING messages regarding valid URI renaming that the output contains credentials and type availability. Review these warnings, but no immediate action is required. The warnings don't affect this module.
Tip
If you need to re-create the Azure resources for any reason, be sure that you delete all previous instances of resources and resource groups.
Install the Azure CLI extension
Install the azure-iot extension for the Azure CLI in PowerShell by using the az extension command in PowerShell.
az extension add --name azure-iot
This command downloads and installs the extension. If it's already installed, the command alerts you.
Query Azure deployment for key configuration parameters
Query the Azure deployment by using the az deployment group show command in PowerShell. This command redirects the output to a file named Azure_config_settings.txt in the same directory in which you run the command.
az deployment group show --name azuredeploy --resource-group ${projectname}-rg `
   --query properties.outputs.importantInfo.value > Azure_config_settings.txt
Query Azure deployment for resource group connection parameter
Use the az iot hub connection-string show command to query the IoT hub for the resource group connection string parameter. You use this value later in the module.
Consoleaz iot hub connection-string show --resource-group ${projectname}-rg >> Azure_config_settings.txtThe command redirects the output and appends it to the file named Azure_config_settings.txt in the same directory in which you run the command. You created this file in the previous section. The two
>symbols indicate that the command appends rather than overwrites.Confirm the contents of the output text file in PowerShell. This command displays several key configuration parameters for later use in this module.
Consoleget-content Azure_config_settings.txt

Next unit: Exercise - Connect and stream Azure Digital Twin data to wind turbine assets
Having an issue? We can help!
- For issues related to this module, explore existing questions using the #azure training tag or Ask a question on Microsoft Q&A.
- For issues related to Certifications and Exams, post on Certifications Support Forums or visit our Credentials Help.