Plan your environments
Your Azure estate consists of many components, including basic configuration, organization-wide resources and settings, and application workloads. You've likely also spread your estate across multiple environments, each with a different purpose.
In this unit, you learn about the benefit of consistently using code for all of your deployment and configuration. Then, you consider the levels of control and automation that you might apply to each of your environments. You also consider how your changes progress through each stage of the deployment process, and the controls and types of governance that you need to support your chosen deployment strategy.
Define your infrastructure as code
Azure deployment and configuration cover far more than applications, virtual machines, storage services, and networking. For example, each of the following items is a form of configuration, with corresponding Azure resources:
- Organizing your resources by creating resource groups, subscriptions, and management groups.
- Controlling how your other resources should be configured, by defining and applying Azure Policy definitions, initiatives, and assignments.
- Assigning roles to allow users, groups, and workload identities to access Azure resources.
- Configuring monitoring, including alerts, to observe your Azure resources and ensure that they behave the way you expect.
When you first start defining your infrastructure as code, you might not be aware of all of the items that can be defined in your templates or definitions. But as your use of automation matures, it's a good practice to define everything about your environment as code. By doing so, you can use a consistent, tested, and approved process for all of your Azure configuration. And because the code is versioned and tracked in a Git repository, you can review how your Azure environment has changed over time. You can use the Git repository to trace the history of each change.
For example, suppose you need to configure your Azure Monitor alerts. At first, you might think that using automation to deploy alerts wouldn't make sense. But alerts are an important part of your Azure configuration. If an alert isn't created correctly, you might miss notifications of critical production issues. By defining your alerts in code:
- Your team members can review the alerts and their configuration.
- You can deploy the alerts to nonproduction environments first so you can test them.
- You have full traceability of the changes to your Azure configuration.
Environments
When you plan to deploy your infrastructure automatically, it's helpful to list out the environments that you plan to use. Many organizations have various environment types, each with different characteristics. For example:
- Some environments run production code, whereas others run nonproduction versions of the same code, perhaps with different configurations.
- Some environments are long lived and never meant to be deleted. Others are ephemeral: created automatically and destroyed when they're no longer used.
- Some environments are used by your infrastructure or software development team. Others are used by your security team, or even by your sales team when it needs to demonstrate a product to potential customers.
Consider the environments that your toy company might use for your website:
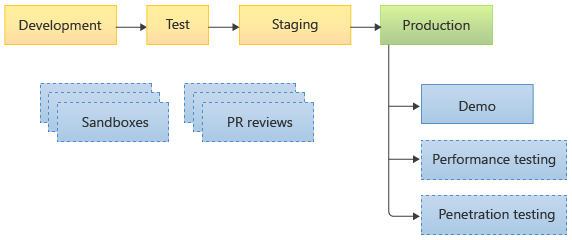
When you make and commit changes to your application or to your infrastructure, your pipeline deploys your changes through a sequence of nonproduction environments: development, test, and staging. You might also have manual approval steps at certain points so that defined team members can verify the configuration or look at the pipeline log before the deployment continues. Then, your pipeline eventually deploys your changes to your production environment.
In addition to those environments, your sales team has its own demo environment that it uses for talking to customers. The sales team takes a copy of the production environment to create its demo environment. Your security and test teams occasionally create temporary copies of the production environment for penetration testing and performance testing, respectively.
Your development team has its own sets of environments, too. It has sandboxes for development team members to use when they're exploring new features or experimenting with Azure services. The development team also creates PR review environments for each GitHub pull request that it reviews and merges.
Controlled environments
In some of these environments, it makes sense to require a formal process to review and apply changes. Environments of this type are called controlled environments. The production environment should always be controlled. It's a good practice to apply controls to some of the nonproduction environments, too. In this way, you can ensure that any restrictions that the controls impose are well understood and tested before the production deployment.
In contrast, uncontrolled environments don't have many, or any, formal controls. They might have the same code and similar configuration to your other environments, but they allow for more experimentation and ad-hoc configuration changes. In an uncontrolled environment, users might be allowed to modify the configuration by using the Azure portal or by directly running Azure CLI/Azure PowerShell commands. They might also be able to create resources without using the organization's approved process. Changes made in uncontrolled environments must be captured in code before they can start to be applied to controlled environments like the production environment.
Note
Sometimes, an environment might actually represent multiple physical environments or deployments. For example, when you create ephemeral environments for pull-request reviews, multiple separate environments might be active at the same time because your team has multiple pull requests open. But for the purpose of planning your environments, you can consider them to be equivalent because they have the same characteristics and controls.
After some discussions with your team, you designate which environments are controlled and uncontrolled. You also decide who owns each environment.
| Environment name | Description | Owner | Lifetime | Control level |
|---|---|---|---|---|
| Development | Integrates changes from multiple developers into a single environment. | Operations team | Long lived | Controlled |
| Test | An environment for running manual and automated tests against changes. | Operations team | Long lived | Controlled |
| Staging | The final nonproduction environment where changes are deployed before production, with production-like configuration. | Operations team | Long lived | Controlled |
| Production | Runs your production workloads. | Operations team | Long lived | Controlled |
| Demo | Used by the sales team to demonstrate the product to new customers. | Sales team | Long lived | Uncontrolled |
| Performance testing | Dynamically created as a duplicate of the production environment for running performance and stress tests, then deleted when the tests are completed. | Test team | Short lived | Uncontrolled |
| Penetration testing | Dynamically created as a duplicate of the production environment for running penetration and security tests, then deleted when the tests are completed. | Security team | Short lived | Uncontrolled |
| PR reviews | Dynamically created for each pull request that a team member creates to change the application or infrastructure. The environment is deleted when the pull request is closed. | Development team | Short lived | Uncontrolled |
| Development sandboxes | Created by development team members to experiment or explore, then deleted when no longer needed. | Development team | Short lived | Uncontrolled |
The preceding list of environments is just an example. In your own organization, you need to decide which environments you use, what their lifetime should be, and what level of control each environment needs.
Tip
It's much easier to lint, test, and review your infrastructure code when you apply those processes early in your deployments instead of adding them later and having to fix lots of broken code.
Similarly, it's much easier to work with security controls when they're present from the start, and when they're also applied to some of your non-production environments. That way, your team gets used to working within a controlled environment.
Throughout the learning paths, we've introduced some of these concepts gradually. It's often a good idea to add these elements into your deployment process as early as you can.
Isolation of each environment
It's important to separate each of your environments and to make them self-contained wherever possible. Using dedicated Azure subscriptions for each environment can help, but you still need to be careful to keep your environments separated.
Avoid connecting from one environment to another. For example, don't peer a production environment's virtual network to a nonproduction environment's virtual network. If you do, it's easy for somebody to accidentally change production data from within a nonproduction environment, or to leak sensitive production data to a nonproduction environment.
Checks and gates
As your deployment process proceeds, it should run a series of checks to increase your confidence in the deployment. You need to determine the checks that make sense for each of your environments that your deployments progress through.
Checks for infrastructure often include:
- Code reviews.
- Deployment of your in-review code to ephemeral environments and running automated or manual tests against the environments.
- Linting.
- Preflight validation.
- Manual testing.
- Manual approval.
- Automated functional testing.
- Automated smoke testing.
- Waiting for health signals from a previous environment before progressing to the next environment.
You might run some of these checks multiple times within your deployment process, such as for each controlled environment.
Tip
When you design your deployment process, list all of the steps that you need to perform, no matter how small or obvious. Be as detailed as you can. You might not choose to automate everything at first, but following this practice will help you create a blueprint for your automated deployment processes in the future.
A gate is an automated or a manual check that must succeed for the deployment to continue.
Manual intervention
It's a good idea to automate as many checks as possible during your code review and deployment processes. However, your organization might require manual approval for deployment to production or other controlled environments.
If you use manual approval gates for deployments, follow these recommended practices:
- Clearly define who's allowed to approve a deployment. Use Microsoft Entra groups to define approvers, instead of specifying individual users. You can easily change the list of approvers in the future.
- Have a process for emergency deployments. Plan who can approve a deployment if the normal approvers aren't available. An emergency deployment might need to happen in the middle of the night or during a vacation period.
- Limit human intervention to just approving or rejecting a deployment. Avoid requiring humans to run any of the deployment operations unless there's a step that you can't automate.
Governance
Azure provides tools and capabilities to help you govern your environment, including:
- Azure Policy to detect resources that have been configured in ways that don't fit with your organization's requirements. It can also help prevent resources from being created or reconfigured in a way that causes them to be out of compliance.
- Locks to prevent changes to or deletion of important resources.
- Management groups to help you organize your Azure subscriptions and configure role-based access control and policies consistently across your environments.
- Azure Monitor to record metrics and logs from your resources, present them in dashboards, and automatically alert you when they deviate from your expected values.
When you build your Azure estate, consider using Azure landing zones. By using a landing zone, you can build governance into your environment from the start. Many landing zones include prebuilt Bicep and Terraform files to help you configure your environment. We link to more information in the summary.