Exercise - Create your first XAML page
Note
.NET MAUI is the next evolution of Xamarin and what we recommend you develop mobile and desktop apps with, and you can learn more about .NET MAUI in several training modules. This Xamarin training module will not be maintained going forward.
This exercise converts the UI definition of an existing Xamarin.Forms app from C# to XAML.
In this exercise, you start with an app that displays an alpha numeric telephone number. The app does a simple translation and dials the number. In the starter solution, the UI is defined entirely in C#, as you've done up to this point. Our goal is to convert this UI to XAML. You'll create a standard Xamarin.Forms app that has a .NET Standard library for the shared UI and logic. The app has platform-specific projects for iOS and Android.
Replace the existing MainPage with a XAML version
Open the Phoneword solution in the exercise1 > start folder in your copy of the cloned or downloaded exercise repo. Verify that the app builds and runs in your environment (any platform is fine).
Note
If you are planning to run and debug your Xamarin apps on Android from Windows, it is best to clone or download the exercise content to a short folder path, such as C:\dev\, to avoid build-generated files exceeding the maximum path length.
Open the
MainPage.csfile. The file is the existing UI definition, which is in C# code.First, rename this class. Later, you'll create a duplicate of this file that's defined in XAML. Right-click the
MainPageclass name, and then select Rename. Or, you can use the Ctrl+R,R keyboard shortcut while the cursor is on the class name. Name the file whatever you like; the exercise assumes you name itOldMainPage.Compile the app and make sure it builds. You don't need to run the app, just make sure nothing is broken before you continue.
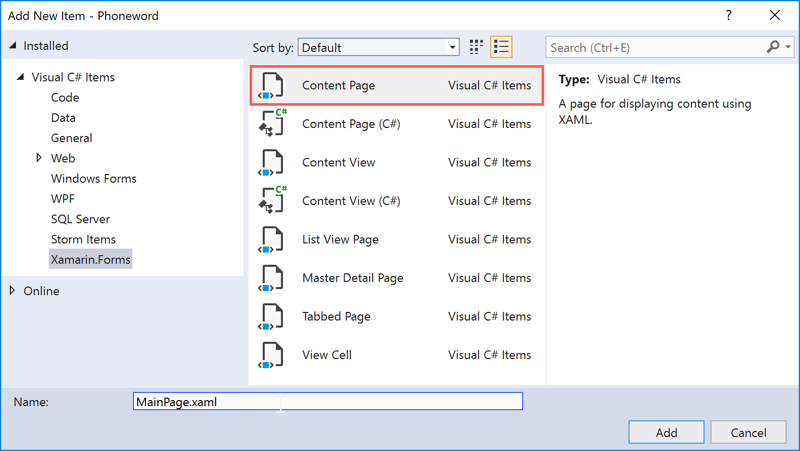
Add a new XAML page where you'll put the new UI definition:
- Add a new file to the shared project.
- Select the Visual C# > Xamarin.Forms > Content Page XAML template.
- Name the new file MainPage as shown in the following screenshot.
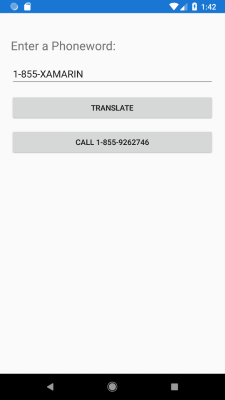
Re-create the UI
Use the following images as guidance for the layout we'll create. We'll use a StackLayout to lay out the required controls.
Open MainPage.xaml. The file is the markup file we'll use to describe our UI.
Add a
StackLayoutas the first child tag in theContentPage. If there's an existingStackLayoutwith aLabel, you can delete theLabeland start with the existingStackLayout.Note
Depending on the version of the IDE you're using, it might have a tag named
ContentPage.Contentas the first child tag, or it might be aLabel. The default child property for theContentPageisContent, which means you can place the child right into theContentPageand omit theContentPage.Contentvalue. The following code block has removed the tag, but it's okay to leave it in place. Just make sure yourStackLayoutis in between the open and close tags of theContentPage.<?xml version="1.0" encoding="UTF-8"?> <ContentPage xmlns="http://xamarin.com/schemas/2014/forms" xmlns:x="http://schemas.microsoft.com/winfx/2009/xaml" x:Class="Phoneword.MainPage"> <StackLayout> </StackLayout> </ContentPage>Add a
Labelto theStackLayoutand set theTextproperty of the label equal toEnter a Phoneword:.Set the
FontSizeproperty toLarge. Note how you use theNamedSizeenumeration, which has four built-in options. The string value is converted into the correct enumeration type using a built-in value converter. Xamarin.Forms chooses the best size for each platform based on this value.... <StackLayout> <Label Text="Enter a Phoneword:" FontSize="Large" /> </StackLayout> ...Add an
Entryto theStackLayoutand set theTextproperty of the entry equal to1-855-XAMARIN.Because you'll want to access the value captured in the
Textproperty in code-behind, set the element'sx:NameasphoneNumberText. Remember, a private field is created in the code-behind when you set the element's name.... <StackLayout> <Label Text="Enter a Phoneword:" FontSize="Large" /> <Entry x:Name="phoneNumberText" Text="1-855-XAMARIN" /> </StackLayout> ...Add a
Buttonto theStackLayoutand set theTextproperty of the button equal toTranslate.Set the button's name to
translateButton:... <StackLayout> <Label Text="Enter a Phoneword:" FontSize="Large" /> <Entry x:Name="phoneNumberText" Text="1-855-XAMARIN" /> <Button x:Name="translateButton" Text="Translate" /> </StackLayout> ...Add a second
Buttonto theStackLayoutand set theTextproperty of the button equal toCall.Set the button's name to
callButtonand make sure to set theIsEnabledproperty tofalse:... <StackLayout> <Label Text="Enter a Phoneword:" FontSize="Large" /> <Entry x:Name="phoneNumberText" Text="1-855-XAMARIN" /> <Button x:Name="translateButton" Text="Translate" /> <Button x:Name="callButton" Text="Call" IsEnabled="false"/> </StackLayout> ...
Update App.xaml.cs
Open App.xaml.cs in the .NET Standard project.
Instantiate a new instance of
MainPagein the constructor and assign it to theMainPageproperty. The instance should replace the existingOldMainPageinstantiation.public class App : Application { public App() { MainPage = new MainPage(); } ... }Run the app and make sure it displays the Phoneword UI. The app won't be functional yet, since you've not wired up any behavior. However, it should look identical to how you started.
Note
If you're getting compile errors, open your MainPage.xaml.cs file and make sure that the only code in the constructor of the class is a call to
InitializeComponent.... public MainPage() { InitializeComponent(); }
Rename the old MainPage.cs file
In the Solution Explorer pad, rename the original MainPage.cs file to OldMainPage.cs to make it obvious which file is no longer being used. You'll continue using this file for reference in a later exercise.