Create a Power Automate flow
With Business Central, you're provided with a license to Microsoft Power Automate. This license lets you use your Business Central data as part of a workflow in Microsoft Power Automate. You create flows and connect to your data from internal and external sources through the Business Central connector.
Power Automate flows are triggered by events, such as a record was created, modified, or deleted. They can also be run on a user-defined schedule or on demand.
With Business Central, you can sign up for Power Automate to build powerful automated workflows. You run those workflows from inside Business Central. The flows can connect internal and external data sources and tools, without significant coding knowledge.
Power Automate empowers customers to create their own workflows using a low-code/no-code approach with a vast number of connectors that make it easy to integrate systems. Dynamics 365 Business Central is no exception and provides multiple integration features that are already released. One new and valuable scenario added recently is the ability to trigger a flow manually from inside Business Central. This opens possibilities for every customer and citizen developer to automate tasks and workflows precisely when and how they need them.
You can boost your business management system by customizing using Power Automate instant actions launched from any card page. Run workflows of your choice and command Business Central to trigger actions based on Power Automate, such as send an update using Teams or email, update the order status, notify your warehouse about changed delivery, and so on.
Users can create and then manually trigger an instant Power Automate flow for a given record, such as a customer, item, or sales order. Any organization can create flows that integrate Business Central with other products using a seamless and no-code approach.
Every list, card, and document page that runs in the context of a data table features a new Automate group in the action bar. From that group, users can run manual flows defined for Business Central.
The first action in the Automate group adds a new flow based on a new Business Central trigger for Power Automate. While they create the flow in Power Automate, the citizen developer is presented with a choice of values that are passed from Business Central, including the record ID, environment, company, and more. Once added and defined in Power Automate, the new flow shows up on the card or document page. From this moment, users can run the flow from Business Central through a special Power Automate flyout pane where they can specify extra values.
Power Automate is a service that helps you create automated workflows (or flows) between apps and services, like Business Central. Flows can be associated with a wide range of events and responses, such as:
Record changes
External files updates
Posted documents
Different Microsoft and third-party services, like Microsoft Outlook, Excel, Dataverse, Teams, SharePoint, Power Apps, and more.
There are three different cloud flow types that you can work with:
Automated - This flow type is run automatically by an event. In Business Central, an event could be when a record or document is created, modified of deleted. So, for example, a new sales invoice can trigger a flow for an approval request, which can have different events set depending on the approver's reply. A negative response sends a notification and email to the approval requester. A positive reply simultaneously updates an Excel spreadsheet located in a SharePoint folder and sends an update to a Teams chat. Automated flows can be started by both internal and external events in Business Central.
Scheduled - This type of flow is also automatically run but it runs periodically at a scheduled date and time.
Instant - This flow type is run on-demand, requiring the user to run it manually from a button or action in another app or device, in this case, the Business Central client. Instant flows work similarly to batch shortcuts, performing multiple lengthy steps with a few button presses and are launched from specific pages or tables. For example, a flow can add a button to the action menu on the Vendors page to block payments to a vendor and, at the same time, send customizable emails to the vendor's contact and your company's purchasers as well as update the contact in Outlook.
You can explore all Power Automate flows currently available to you by signing in to Power Automate and selecting My flows from the navigation bar on the left. Here you'll find any flows you have already created yourself and flows shared with you by an admin or coworker.
These flows are also made available from inside Business Central from various pages. With automated flows in Business Central, there's nothing for you to do, unless you want to change them or turn them off. Otherwise, they'll just work when triggered.
As for instant flows on Business Central data, you can run them from most list, card, and document pages by selecting them from the Automate item in the action. Instant flows open inside Business Central so you can remain within the context of the business process you were in the middle of.
To run an instant flow from most lists, cards, or documents, be aware of the following items and steps.
In the action bar, select Automate, then select a flow from the list of available flows under the Power Automate action.
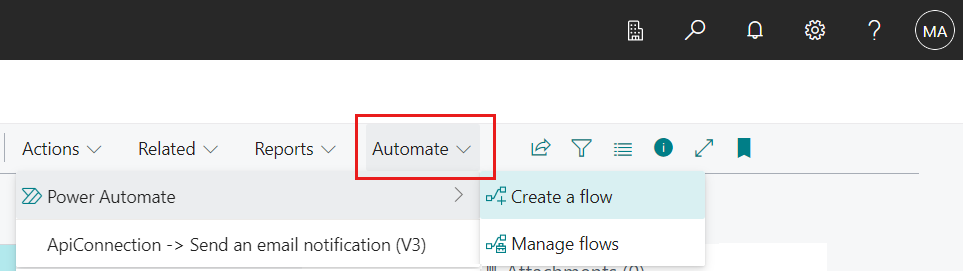
View the Automate actions in the action bar with expanded actions.
On some pages, Automate is nested under the More options (...) menu.
In the Run Flow pane, fill in any required fields, then select Continue to run the flow.

The first time you use the Automate item, you may only see the Get started with Power Automate action. You see this action if you haven't agreed to the privacy notice for Microsoft Power Automate. To continue, select Get started with Power Automate and follow instructions to agree or disagree.

Creating new flows, modifying and managing existing ones (like turning them on or off) can be done directly in Power Automate. But you can initiate some of these tasks from inside Business Central.
To create an instant flow from a list, card, or document page, select Automate > Create a Flow.
To open Power Automate from a list, card, or document page, select Automate > Manage Flows.
To create new flows or manage existing flows from inside Business Central, go to the Manage Power Automate Flows page.
These tasks are typically done by an administrator or super user. The tasks require a broader knowledge of the business processes in Business Central.
Personalize and design the Automate actions in the web client
Actions added in the new Automate action group in the action bar depend on personalization or designer, so that they can be moved, promoted, or hidden. This applies to personalizing for a single user, customizing user profiles for user groups, or designing a global customization (page extension) for the whole company. Also, Power Automate-bound actions can be added to AL extensions.

This way, actions created by citizen developers using Power Automate flows are prioritized on the action bar, allowing for easy no-code integration, and the new AL customAction is handled by the platform.
Set Up Power Automate integration
As an administrator, you can hide the Automation item and its actions from all users or individual users.
By default, all users have access to the Power Automate features. The features are available from the Automation item on most list, card, and document pages. In some cases pointed out earlier, you'll find the Power Automate features by selecting More options ... in the action base menu.

But before users can use the features, they'll have to agree to the privacy notice. They agree to the terms by selecting Automate and then select the Get Started with Power Automate action and run the Set Up Power Automate assisted setup. Agreeing to the terms turns on the Power Automate features for the user, activating the Create Flows and Manage Flows actions.
As an administrator, you can change this behavior and control which users have access to the Power Automate features. There are two levels of controlling access. The first level is done by a system permission that you assign to users. The next level is turning the Power Automate features on or off using the Privacy Notices Status page.
To grant individual users or groups access to the Power Automate features, assign them the system permission Allow Action Automate (ID 9630) in a permission set used on their account. You can also use the pre-defined permission set AUTOMATE - EXEC, which also includes the Allow Action Automate. Users who have the permission will see the Automate action on various pages in the client.
To prohibit individual users or groups from accessing the Power Automate features, remove the system permission Allow Action Automate from their assigned permissions sets. In this case, the Automate action won't appear on pages in the client.
To turn on Power Automate features as an administrator, you agree to the privacy terms on behalf all users, so they don't have to do it themselves. When you turn on Power Automate for users, the Automate item will no longer include the Get Started with Power Automate action for users. Instead, the Automate item will include the Create Flows and Manage Flows actions and links that run existing flows.