Create customer assets
A service organization maintains several air-conditioning units at the same customer site. Each unit needs its own record so technicians can identify it and keep its service history separate. Creating one asset for the product model doesn't distinguish the individual units.
Choose the creation method that matches how equipment enters your service process: create a record manually, import an existing equipment register, or generate an asset from a product installed during a work order.
Prepare categories and asset information
Use descriptive names and consistent identifiers that help people distinguish similar equipment. For example, Rooftop Unit 01 and Rooftop Unit 02 are more useful than two records named Air Conditioner. Don't assume that an asset's name is automatically unique.
An asset category groups similar equipment. A product connects an asset to its catalog item. Neither replaces the asset record for the specific item being serviced.
To create a category, change to Settings in Field Service, select Asset Categories, select New, enter a Name, and save. You can then select the category when creating an asset. Categories are optional; you don't need to create one before every asset.
Properties capture information such as a unit's cooling capacity or commissioning date. Define the properties under Settings > Asset Properties > Property Definitions. Property types include number, string, Boolean, and date/time. Group properties in a property template and associate that template with an asset category or an individual asset when you need a consistent set of information.
For more information, see Create properties and property templates.
Create or import customer assets
You can create customer assets one at a time in Field Service or import multiple assets from an Excel workbook. Use manual creation for individual items and an import when you already have an equipment register.
Create an asset manually
In Field Service, change to the Service area. Under Assets, select Assets, and then select New. Enter the information that identifies and locates the equipment:
- Name: Enter a descriptive name, such as Rooftop Unit 01.
- Account: Select the service account for the customer site. Normally, this account also serves as the service account on work orders for the asset.
- Category: Optionally group the asset with similar equipment.
- Product: Select the corresponding catalog product, if applicable.
- Functional Location: Select where the equipment is located, such as the roof of Building A.
- Parent Asset: Select the direct parent if this item is a component of another asset. Leave it empty for a standalone unit.
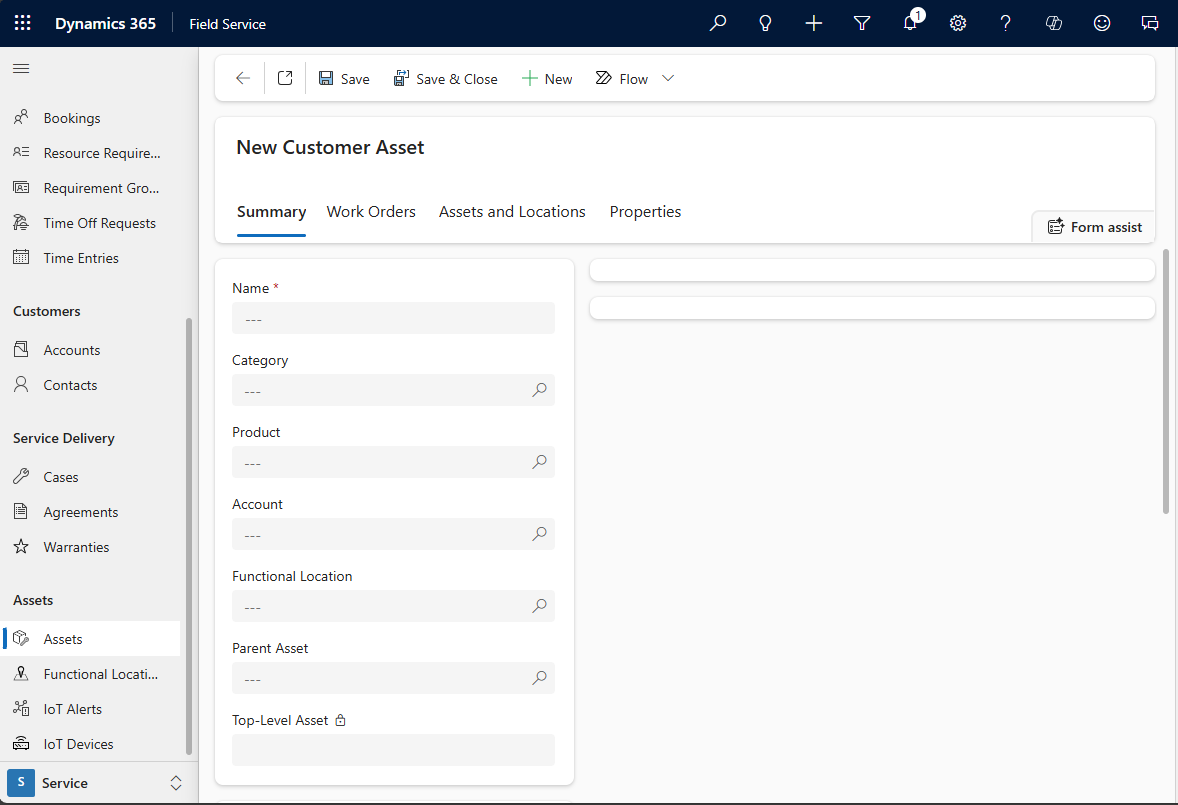
Select Save, reopen the record, and check its account and relationships. If you maintain two identical units, confirm that their records have distinguishable names and the appropriate equipment identifiers.
The Parent Asset and Functional Location fields serve different purposes. A roof belongs in the location hierarchy, not as the parent equipment record. Later units explain the two hierarchies in more detail.
Import an existing equipment register
For a larger inventory of installed equipment, use Import from Excel from the asset list. The workbook needs at least Name and Account columns. If it includes lookup values such as Product or Functional Location, those referenced records need to exist in Field Service.
- In Service > Assets > Assets, open More commands and select Import from Excel.
- Choose the workbook, select the appropriate owner, and select Next.
- Select an alternate key if your import uses one. Use a defined unique identifier for matching rather than assuming that a display name uniquely identifies each asset.
- Review duplicate handling. Don't enable Allow Duplicates simply to bypass a matching problem.
- Select Review Mapping and confirm that the workbook columns map to the intended asset fields.
- Select Finish Import. Use Track Progress or the My Imports view to check the outcome.
Review errors and a sample of imported records before relying on the register. Check the customer account, equipment identifiers, and any parent or location relationships. Starting an import doesn't establish that every row succeeds.
Create assets from work order products
Automatic creation is useful when your organization installs equipment that it subsequently services. Enable conversion for serviceable equipment, not automatically for every consumable used on a job.
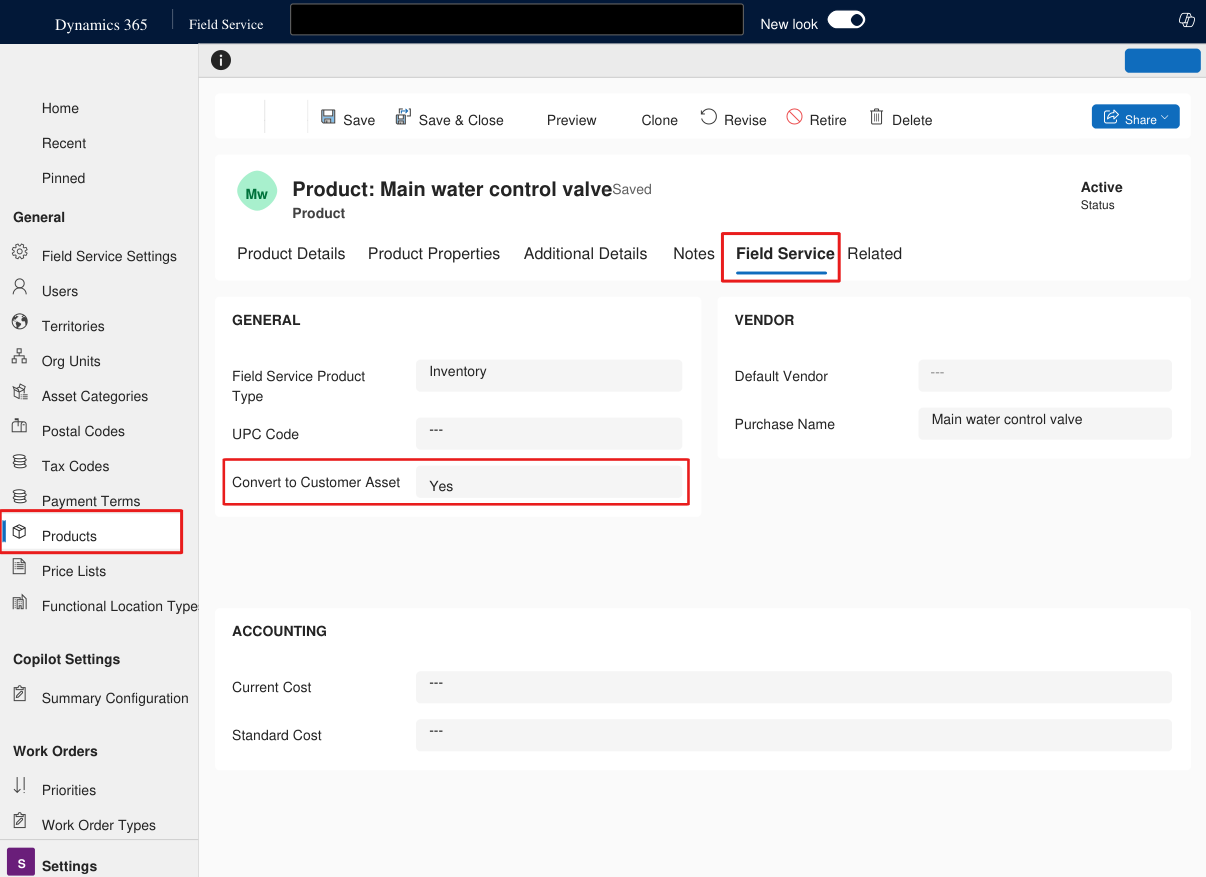
- Open the equipment's product record in Field Service.
- On the Field Service tab, set Convert to Customer Asset to Yes and save. Inventory and non-inventory products can be converted; services can't.
- Add that product to a work order, enter the quantity, and set the work order product's Line Status to Used when it is consumed.
- Complete or post the work order through the normal work order process.
When the work order reaches its completed or posted system status, Field Service creates a customer asset and associates it with the work order's service account. The generated asset links back to the work order product. Marking a booking complete isn't the same as checking the work order's system status.
Important
Field Service creates one customer asset for the work order product, regardless of the quantity on that product record. A quantity of two doesn't automatically produce two separately identifiable equipment records.
After processing a test work order, verify the generated asset, its account, and its link to the originating work order product. If the job installs multiple items that need individual histories, plan their separate asset records, check what the system generates, and create any additional records needed. Avoid creating a duplicate record for equipment already registered.
For more information, see Work with customer assets.
Connect assets with other systems
A customer asset and an IoT device aren't the same record. With Connected Field Service configured for an IoT provider, one asset can have multiple related devices, such as temperature and humidity sensors.
For an existing registered device, open the asset and select Connect Device to find and associate it. Check the Connected Devices section afterward. Use Related > Connections when connecting additional devices.
If you need to create a device in Field Service, use Assets > IoT Devices, create and save the device, and select Register. Resolve any registration error before expecting device readings. When using an existing Azure IoT Hub, Import Devices on the IoT Devices list imports device records; it isn't the Excel customer-asset import described earlier. Associate the resulting device with the correct asset.
For more information, see Register IoT devices.
Organizations that also use Dynamics 365 Supply Chain Management can integrate customer assets and asset categories through dual-write. Coordinate identifiers and ownership across systems rather than creating a second, unmatched asset register. Integration setup is separate from the core asset-creation workflow. See Integrate Dynamics 365 Field Service and Supply Chain Management.