Exercise - Add a custom node array to an HPC cluster
Caution
This content references CentOS, a Linux distribution that is End Of Life (EOL) status. Please consider your use and plan accordingly. For more information, see the CentOS End Of Life guidance.
A nodearray is a collection of identically configured nodes of an Azure CycleCloud cluster. Their purpose is to accommodate the horizontal scaling of the cluster compute resources as the number of queued jobs changes. Each nodearray has a name, a set of attributes which apply to each of its nodes, and optional attributes that describe how the nodearray should scale.
The Slurm job scheduler partitions group nodes into logical and potentially overlapping sets. Their purpose is to optimize processing of jobs by accounting for their specific constraints such as resource or time limits. The scheduler allocates jobs to nodes within a partition until their resources are exhausted or all jobs are processed.
You want to modify your newly deployed Azure CycleCloud-managed cluster to account for job-specific resource needs. To accomplish this goal, you decide to apply more changes to the underlying template and validate your approach.
In this exercise, you'll perform the following tasks:
- Task 1: Add a nodearray definition to the Azure CycleCloud template
- Task 2: Add graphical interface parameters to the Azure CycleCloud template
- Task 3: Export Azure CycleCloud cluster properties
- Task 4: Edit the properties file to include the new parameters
- Task 5: Import the modified template and parameters file into the existing cluster
Note
Ensure that you successfully completed the previous exercise before you start this exercise.
Task 1: Add a nodearray definition to the Azure CycleCloud template
You'll start by adding a definition of a nodearray within the Slurm template you customized in the previous exercise. The sample template includes two partitions labeled hpc and htc. You'll create another partition and the corresponding nodearray intended for jobs that benefit from the Compute Unified Device Architecture (CUDA) capabilities.
Navigate to the Azure portal. When prompted, authenticate with a Microsoft account or a Microsoft Entra account that has the Contributor or Owner role in the Azure subscription that you're using in this module.
From the Azure portal, open the Cloud Shell by selecting its icon in the toolbar next to the search text box and ensure that you're running a Bash session.
Run the following command in Cloud Shell to set the working directory to the one hosting the GitHub repository you fetched in the previous exercise:
cd ~/cyclecloud-slurm/templatesRun the following command to open the downloaded template in the nano editor:
nano slurm.txtIn the nano editor interface, scroll to the
[parameters About]section and add the following content directly before it:[[nodearray cuda]] MachineType = $CUDAMachineType ImageName = $CUDAImageName MaxCoreCount = $MaxCUDAExecuteCoreCount AdditionalClusterInitSpecs = $CUDAClusterInitSpecs [[[configuration]]] slurm.autoscale = true slurm.hpc = true [[[cluster-init cyclecloud/slurm:execute]]] [[[network-interface eth0]]] AssociatePublicIpAddress = $ExecuteNodesPublicNote
If you're using a Windows computer, you can paste the content of the clipboard by using the Shift + Insert key combination.
Note
Your changes define an extra nodearray.
Task 2: Add graphical interface parameters to the Azure CycleCloud template
To be able to modify the values of template parameters with the Azure CycleCloud graphical interface, you'll apply more changes to the template.
In the nano editor interface, scroll to the
[[parameters Auto-Scaling]]section and add the following content directly before it:[[[parameter CUDAMachineType]]] Label = CUDA VM Type Description = The VM type for CUDA execute nodes ParameterType = Cloud.MachineType DefaultValue = Standard_NC24Scroll to the
[[[parameter HPCMaxScalesetSize]]]section and add the following content directly before it:[[[parameter MaxCUDAExecuteCoreCount]]] Label = Max CUDA Cores Description = The total number of CUDA execute cores to start DefaultValue = 100 Config.Plugin = pico.form.NumberTextBox Config.MinValue = 0 Config.IntegerOnly = trueScroll to the
[[[parameter SchedulerClusterInitSpecs]]]section and add the following content directly before it:[[[parameter CUDAImageName]]] Label = CUDA OS ParameterType = Cloud.Image Config.OS = linux DefaultValue = cycle.image.centos7 Config.Filter := Package in {"cycle.image.centos7", "cycle.image.ubuntu18"}Scroll to the
[[parameters Advanced Networking]]section and add the following content directly before it:[[[parameter CUDAClusterInitSpecs]]] Label = CUDA Cluster-Init DefaultValue = =undefined Description = Cluster init specs to apply to CUDA execute nodes ParameterType = Cloud.ClusterInitSpecsSelect the Ctrl + O key combination, select the Enter key, then select the Ctrl + X key combination to save the changes you made and close the file.
Task 3: Export Azure CycleCloud cluster properties
Before applying the configuration changes you made in the Azure CycleCloud template to the target cluster, you'll first need to export the cluster properties.
Run the following command in Cloud Shell to list the existing clusters:
cyclecloud show_clusterNote
Verify that the output includes the contoso-custom-slurm-lab-cluster entry.
Run the following command to export into the file params.json the list of parameters of the contoso-custom-slurm-lab-cluster cluster and their values:
cyclecloud export_parameters contoso-custom-slurm-lab-cluster > ~/params.jsonRun the following command to review the exported list of parameters and their values:
cat ~/params.json
Task 4: Edit the properties file to include the new parameters
While the edits you applied to the Azure CycleCloud template included default values for all newly introduced parameters, you might need to modify them to account for your specific requirements. In this task, you'll set the values of the CUDAMachineType and MaxCUDAExecuteCoreCount parameters.
Run the following command in Cloud Shell to open the downloaded parameters file in the nano editor:
nano ~/params.jsonIn the nano editor, scroll to end of the file and add the following content starting with a new line before the closing braces (}):
   "CUDAMachineType" : "Standard_NC6",
   "MaxCUDAExecuteCoreCount" : 60
Add a comma to the end of the line preceding the line you added in the previous step:
"CUDAMachineType" : "Standard_NC6"Select the Ctrl + O key combination, select the Enter key, then select the Ctrl + X key combination to save the changes you made and close the file.
Task 5: Import the modified template and parameters file into the existing cluster
To conclude this exercise, you'll import the modified template and its parameters file into the existing cluster, overriding its current configuration.
Run the following command in Cloud Shell to import the modified template and its parameters file into the existing cluster:
cyclecloud import_cluster contoso-custom-slurm-lab-cluster --file ~/cyclecloud-slurm/templates/slurm.txt -p ~/params.json -c Slurm --forceNote
You must specify the name of the target cluster and the
--forceflag to overwrite the existing cluster's configuration.On your computer, open another browser window and navigate to the https://<IP_address> URL. If you're prompted, confirm that you want to proceed.
If you're prompted to authenticate, sign in by providing credentials of the same Azure CycleCloud application user account you used to configure Azure CycleCloud CLI.
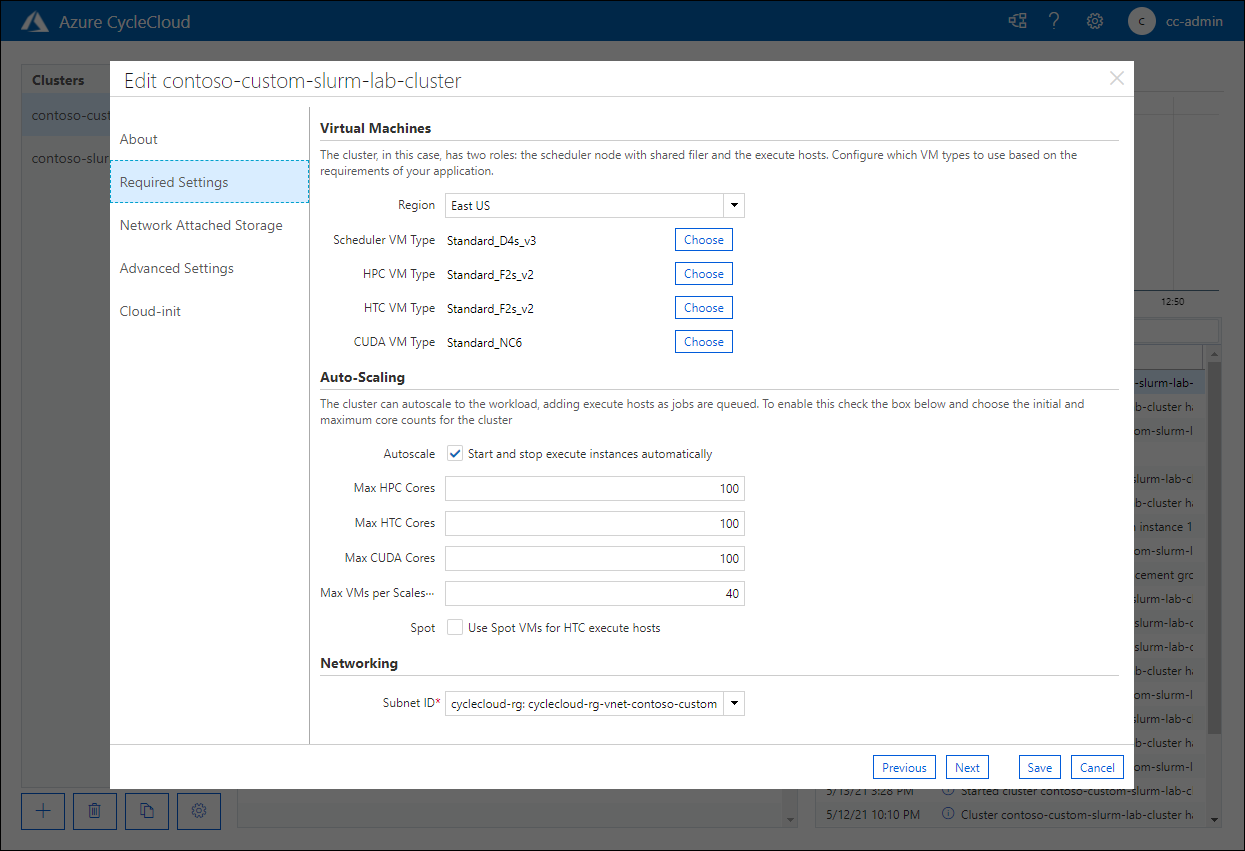
In the Azure CycleCloud graphical interface, navigate to the Clusters page. In the list of clusters, select the contoso-custom-slurm-lab-cluster entry, then select Edit.
In the Edit contoso-custom-slurm-lab-cluster pop-up window, on the About page, select Next.
On the Required settings page, verify the presence of the CUDA VM Type entry set to Standard_NC6 value and the corresponding autoscaling options:
Congratulations! You successfully completed the second exercise of this module. In this exercise, you further customized your Azure CycleCloud cluster by using a modified template including the definition of a new nodearray with the corresponding partition. To accomplish this goal, after editing the template, you exported and edited the cluster parameters file and imported it, along with the modified template, into the cluster.
Note
Don't delete the resources you deployed and configured in this exercise if you plan to run the next exercise. These resources are required in order to complete the next exercise.