Exercise - Upload the data
Now, it's time to upload the images that we'll use to train the machine learning model. There are two ways to upload images:
- In the Custom Vision portal, select, upload, and then tag images.
- In a tool like Jupyter Notebook, use the images that are included in the Custom Vision SDK.
When you have a large amount of data, image classes, and tags to upload, it's faster to use the Custom Vision SDK. However, you can choose one of the options that are described in the next sections. Complete the steps to upload the images in the dataset the way that works best for you.
Option 1: Use the Custom Vision portal to upload and tag images
The images must be uploaded and tagged individually by each subfolder. For this exercise, you might want to upload images in only four or five of the subfolders depending on your upload speed. Keep in mind that when training a machine learning module, more and varied examples will yield better results.
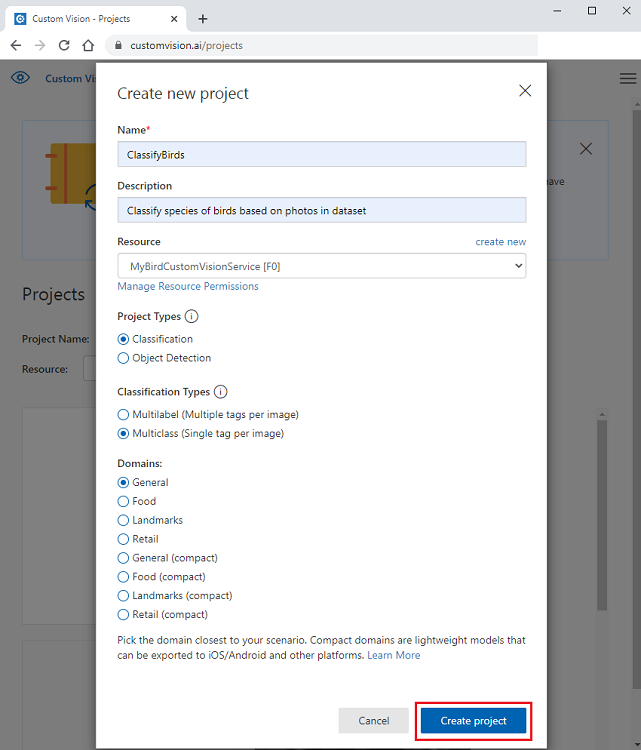
Create a project in the Custom Vision portal:
Go to https://www.customvision.ai/projects and sign in. Select New project.
In Create new project:
For Name, enter a project name of your choice.
For Description, enter a short description of the model.
For Resource group, Select the resource group you created in the Azure portal.
For Project Types, select Classification.
For Classification Types, select Multiclass (Single tag per image).
For Domains, select General.
Select Create project.
Note
If you want to export the model to deploy on a mobile device or in TensorFlow.js or IoT, under Domains, select a compact model option. You can change this option in settings after the project is created.
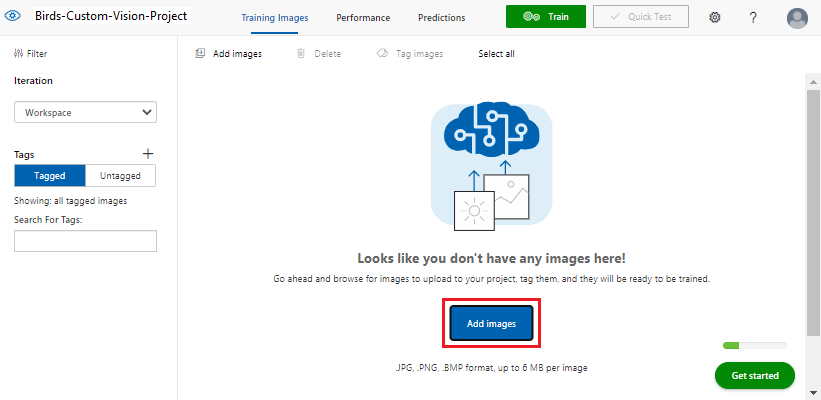
Add images and tags for a bird species:
In your Custom Vision project, select Add images.
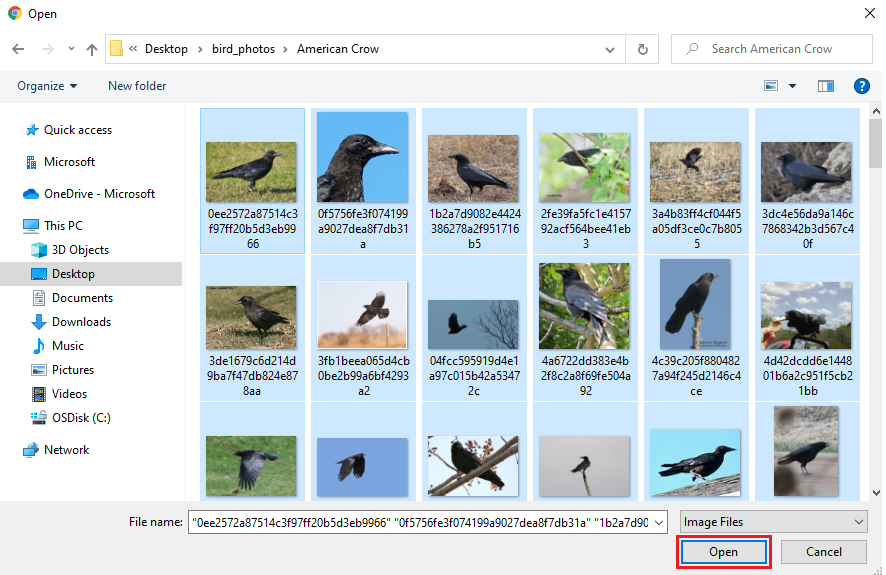
In Open, go to the birds-photo folder where you extracted the images files from the dataset zip file.
Open a bird species folder.
Select Ctrl + A to select all the images in the species folder, and then select Open.
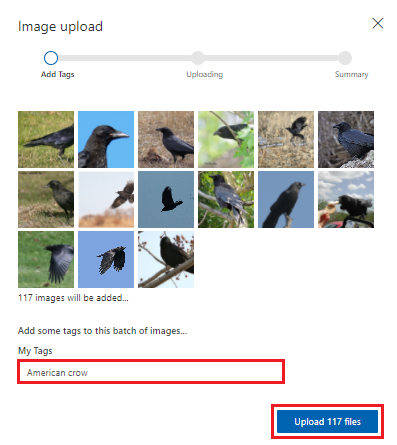
In Image upload, add a description in My Tags to indicate the species for the birds shown in the photos.
Select Upload <number> files.
Repeat the preceding step to upload the photos in each bird species folder in the downloaded dataset.
Option 2: Use Python and the Custom Vision SDK to upload and tag images
The Custom Vision SDK is available in the following programming languages: Python, .NET, Node.js, Go, and Java. We'll use Python. If you don't already have Python installed, we recommend that you get it with an Anaconda installation. You get Python when you download Anaconda.
If you prefer to instead download the code from GitHub, you can clone the repo by using the following command:
git clone https://github.com/MicrosoftDocs/mslearn-cv-classify-bird-species.git
Follow these steps to create the virtual environment and paste code into the environment:
Open the IDE of your choice. Then, run the following command to import the package:
!pip install azure-cognitiveservices-vision-customvisionImport the packages that you need to run the script:
from azure.cognitiveservices.vision.customvision.training import CustomVisionTrainingClient
from azure.cognitiveservices.vision.customvision.training.models import ImageFileCreateEntry
from azure.cognitiveservices.vision.customvision.training.models import ImageFileCreateBatch
from msrest.authentication import ApiKeyCredentials
import numpy as np
Now use the following code to create the Custom Vision project. Before your run the code, replace the
<endpoint>and<key>placeholders with the values for your Custom Vision resource.To get the Custom Vision resource values:
In the Azure portal, go to your Custom Vision resource.
In the resource menu, under Resource Management, select Keys and Endpoint.
Copy the value from the Endpoint box. In the code, replace the
<endpoint>placeholder with this value.For KEY 1, select the copy icon to copy the key. In the code, replace the
<key>placeholder with this value.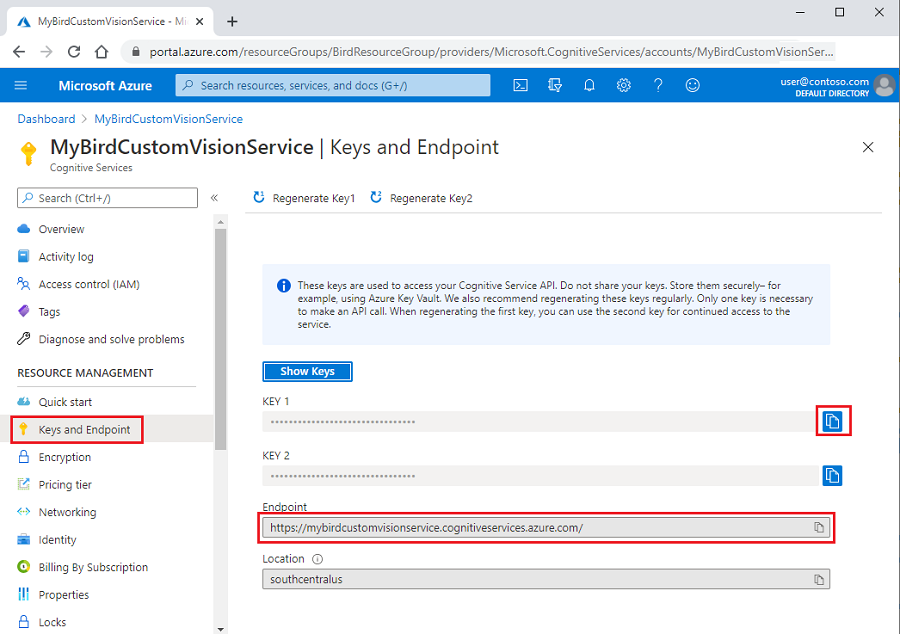
Your code will look like this example:
ENDPOINT = "<endpoint>"

# Replace with a valid key
training_key = "<key>"
credentials = ApiKeyCredentials(in_headers={"Training-key": training_key})
publish_iteration_name = "classifyBirdModel"

trainer = CustomVisionTrainingClient(ENDPOINT, credentials)

# Create a new project
print ("Creating project...")
project = trainer.create_project("Bird Classification")

print("Project created!")
Unzip your downloaded bird-photos.zip file to the same directory where you saved your Jupyter Notebook file. Add the following code to change to the directory for the bird photos in your project.
# Change to the directory for the bird photos
import os
os.chdir('./bird-photos/custom-photos')
Warning
Run the code in this cell only once. If you attempt to run the cell more than once without also restarting your Python kernel, the cell run fails.
Add the following code to get the list of bird type tags. The tags are created based on the folder names in the bird-photos/custom-photos directory:
# Create a tag list from folders in bird directory
tags = [name for name in os.listdir('.') if os.path.isdir(name)]
print(tags)
Next, we create three functions that we’ll call in a
forloop:- The
createTagfunction creates a class tag in the Custom Vision project. - The
createImageListfunction uses the tag name and tag ID to make an image list. - The
image_listfunction uploads images in batches from the list.
To create the three functions:
In your Jupyter Notebook file, add the
createTagfunction code. The function creates an image name tag in the Custom Vision project.tag_id = createTag(tag) print(f"tag creation done with tag id {tag_id}") image_list = createImageList(tag, tag_id) print("image_list created with length " + str(len(image_list))) # Break list into lists of 25 and upload in batches for i in range(0, len(image_list), 25): batch = ImageFileCreateBatch(images=image_list[i:i + 25]) print(f'Upload started for batch {i} total items {len(image_list)} for tag {tag}...') uploadImageList(batch) print(f"Batch {i} Image upload completed. Total uploaded {len(image_list)} for tag {tag}")Next, add the code for the
createImageListfunction. The function takes two parameters: atagname from the list of folder names and thetag_idfrom the tag we created in the Custom Vision project. The function uses thebase_image_urlvalue to set the directory to the folder that contains the images for thetagwe created from the folder names. Then, we append each image to the list, which we’ll use to upload in batches to the createdtag:def createImageList(tag, tag_id): # Set directory to current tag. base_image_url = f"./{tag}/" photo_name_list = os.listdir(base_image_url) image_list = [] for file_name in photo_name_list: with open(base_image_url+file_name, "rb") as image_contents: image_list.append(ImageFileCreateEntry(name=base_image_url+file_name, contents=image_contents.read(), tag_ids=[tag_id])) return image_listThe last code to add is to create the
uploadImageListfunction. We pass in theimage_listthat we created from the folder and then upload the list to thetag:def uploadImageList(image_list): upload_result = trainer.create_images_from_files(project_id=project.id, batch=image_list) if not upload_result.is_batch_successful: print("Image batch upload failed.") for image in upload_result.images: print("Image status: ", image.status) exit(-1)
- The
Now, we’ll add the code for our main method. For each tag, the method calls the three functions we created. We loop through each tag (folder name) in the
tagscollection that we created from the folders in the bird-photos/custom-photos directory. Here are the steps in theforloop:Call the
createTagfunction, which you created earlier, to create the classtagin the Custom Vision project.Call the
createImageListfunction, which you created earlier, and with thetagname andtag_idvalues returned from Custom Vision. The function returns the list of images to upload.Call the
imageListfunction, which you created earlier, to upload the images from theimage_listin batches of 25. We upload in batches of 25 because Custom Vision times out if we try to upload the entire dataset all at once.for tag in tags: tag_id = createTag(tag) print(f"tag creation done with tag id {tag_id}") image_list = createImageList(tag, tag_id) print("image_list created with length " + str(len(image_list))) # Break list into lists of 25 and upload in batches. for i in range(0, len(image_list), 25): batch = ImageFileCreateBatch(images=image_list[i:i + 25]) print(f'Upload started for batch {i} total items {len (image_list)} for tag {tag}...') uploadImageList(batch) print(f"Batch {i} Image upload completed. Total uploaded {len(image_list)} for tag {tag}")Warning
Run the code in this cell only once. If you attempt to run the cell more than once without also deleting your Custom Vision project, the cell run fails.